
3 Ways to Erase iPhone 14 Plus When Its Locked Within Seconds
3 Ways to Erase Apple iPhone 14 Plus When It’s Locked Within Seconds
Over the last few years, Apple has made remarkable progress with its flagship iPhone series. There are plenty of ways for users to back up, erase, and restore their data. It doesn’t matter if you are moving from one device to another or would like to reset your phone. You should know how to erase iPhone when locked. Too many times, after getting locked out of their device, users find it hard to wipe locked iPhone. If you are also going through the same dilemma, then don’t worry. Read on and learn how to wipe a locked iPhone in this extensive guide.
Part 1: Erase locked iPhone with Dr.Fone - Screen Unlock (iOS)
One of the best ways to wipe locked iPhone is by using Dr.Fone - Screen Unlock (iOS) tool. It is an extremely secure and reliable application. It is already compatible with every leading version of iOS and runs on almost all major iOS devices. Available for both Windows and Mac, the tool can be used to remove activation lock and Apple ID. The tool also provides an easy-to-use interface that can help you reset the activation lock on your device.
Dr.Fone - Screen Unlock (iOS)
Erase the data of an iPhone even if it is locked
- Erase iPhone data together with the lock screen.
- Remove the 4-digit/6-digit passcode, Touch ID, and Face ID , and activation lock.
- A few clicks and the iOS lock screen are gone.
- Fully compatible with all iDevice models and iOS versions.
4,395,216 people have downloaded it
To learn how to erase iPhone when locked, follow these steps:
Step 1. Download and install Dr.Fone.
Start by downloading Dr.Fone - Screen Unlock (iOS) from its official website. Install it on your Windows or Mac and connect your Apple iPhone 14 Plus to the system whenever you wish to resolve an issue with it. After launching the application, click on the “Screen Unlock” option from the welcome screen.

Step 2. Click Start button.
Wait for a while as the application will automatically recognize your phone. Click on the “Start” button to commence the process.

Step 3. Put the phone into DFU mode.
Follow the on-screen instructions to put your phone into the DFU (Device Firmware Update) mode. It can be done by pressing the Home and Power button simultaneously for 10 seconds. Afterward, it would help if you released the Power button while pressing the Home button for another 5 seconds.

Step 4. Download firmware package.
After putting your device into the DFU mode, the application will automatically move to the next window. Here, you would be required to provide essential information related to your phone like device model, firmware update, and more. After filling in the correct information, click on the “Download” button.


Sit back and relax as the application will download the essential firmware update for your phone.

Step 5. Start to unlock.
Once it is done, the application will automatically start resolving the issue on your phone. Make sure that you don’t disconnect your phone while Dr.Fone - Screen Unlock (iOS) will resolve the issue on your device.

Step 7. Unlock completed.
After completing the operation successfully, the interface will provide the following message.

You can check if you can unlock your phone or not. If you still have an issue, then click on the “Try Again” button. Else, you can safely remove your phone and use it without any constraint. By following this method, you would learn how to wipe a locked iPhone with Dr.Fone - Screen Unlock (iOS).
One of the best things about this technique is that you would wipe locked iPhone without causing any damage. Since it is a secure and reliable method with a high success rate, it is sure to provide a hassle-free experience.
Part 2: Erase locked iPhone by restoring it with iTunes
If you are looking for an alternative way to learn how to erase iPhone when locked, you can also take the assistance of iTunes. It provides a free and simple method to restore your device. Since it would wipe your data, you might end up losing your essential files in the process. We recommend following this technique only when you have taken a backup of your data via iTunes beforehand. To learn how to wipe a locked iPhone with iTunes, follow these steps:
1. Firstly, put your Apple iPhone 14 Plus into recovery mode. To do this, launch an updated version of iTunes on your system and connect it to a lightning cable. Now, long-press the Home button on your device and connect it to the other end of the lightning cable. Release the Home button once the iTunes logo would appear.

2. As soon as your phone would be connected, iTunes will recognize an issue with it. From here, you can choose to restore it.

3. If you don’t get the above pop-up on your screen, launch iTunes and visit its “Summary” section. From here, choose “Restore backup” under the Backup section.

4. agree to the pop-up message by clicking on the “Restore” button.

Part 3: Erase locked iPhone by Find My iPhone
If you haven’t already taken a backup of your phone, then you might find it hard to recover it with iTunes. Another popular way to wipe locked iPhone is by using the Find My iPhone tool. This is mostly implemented in case of a stolen or lost device. One of the best features of Find My iPhone is that it can be used to reset your device remotely. With this, you can protect your personal data without much trouble. Implement these steps to learn how to erase iPhone when locked using Find My iPhone.
1. To start with, log in to your iCloud account and visit the “Find My iPhone” section.
2. Under the “All Devices” section, you can choose the Apple iPhone 14 Plus you wish to reset.

3. After selecting your device, you will be presented with various options. Select the “Erase iPhone” feature to reset your device.

Confirm your choice and wipe locked iPhone remotely using the Find My iPhone feature on iCloud.
After following this informative guide, you would learn how to wipe a locked iPhone without any trouble. Go ahead and pick your preferred option to wipe locked iPhone. We recommend using Dr.Fone - Screen Unlock (iOS) to resolve this issue securely. Though, if you wish to do it remotely, then you can also give Find My iPhone a try as well. If you are familiar with any other reliable method, please let us know how to erase iPhone when locked in the comments below.
Complete Guide For Apple iPhone 14 Plus Lock Screen
Like most iPhone users, you rely on your lock screen to keep your data safe and protected. But with the release of iOS 17, there are a few new features and changes that you need to know about. This complete guide will clarify everything you need to know about the iOS 17 lock screen.
We’ll explain to you how to use the new features, protect your data, and more. So don’t waste any time - read on for all the details!
How to Have a Customized iOS 17 Lock Screen?
Before we get started, you should know that there are three ways to have a customized lock screen in iOS 17. Let’s get to know more about them.
1. How to select your favorite wallpaper
The first way is to use a pre-made wallpaper from the Apple Wallpaper Gallery.
To do this, go to Settings > Wallpapers & Brightness > Choose a New Wallpaper. Then, select the Apple Wallpaper Gallery and choose the image you want to use.
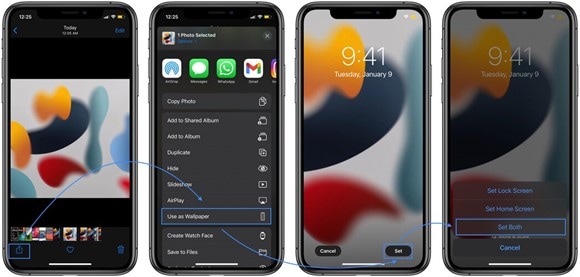
The second way to have a customized lock screen is to use a Live Photo. To do this, go to Settings > Wallpapers & Brightness > Choose a New Wallpaper. Then, select the Live Photo option and choose the image you want to use.
Note: You can only use Live Photos for your lock screen if your Apple iPhone 14 Plus is unlocked.
2. How to manage notifications
If you want to manage notifications on the iOS 17 lock screen, there are two ways to do it.
At first, you can go to Settings > Notifications. Here, you can choose how many notifications you want to see on your lock screen and which apps can send you notifications.
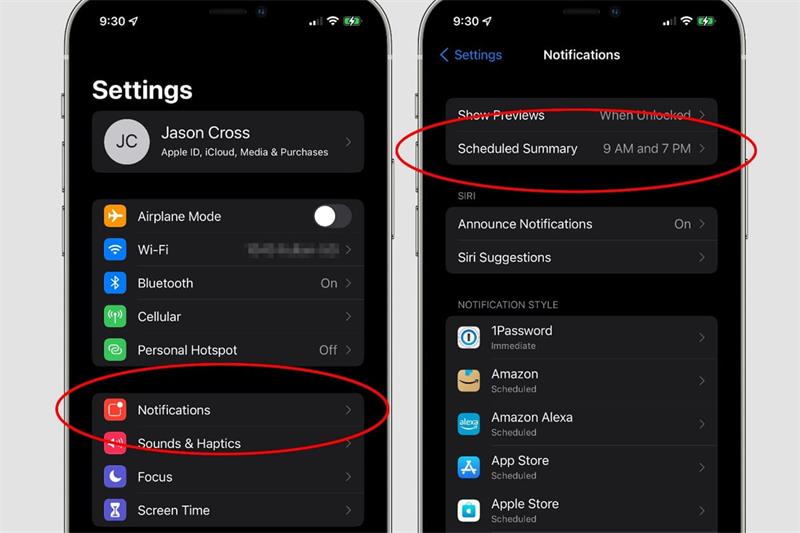
The Do Not Disturb feature is the second way to manage notifications. To do this, go to Settings > Do Not Disturb and enable the feature. You can also schedule when Do Not should turn on and off. This feature work like a charm if you want to silence all notifications at night.
3. How to set Auto-Lock time
If you want to set the Auto-Lock time, go to Settings > Display & Brightness > Auto-Lock. Here, you can choose how long it should take for your Apple iPhone 14 Plus to lock automatically.
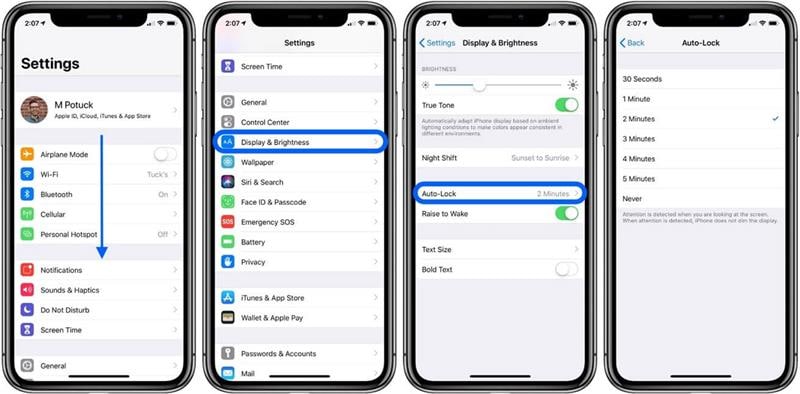
By default, the Auto-Lock time is set to 30 seconds. But you can choose to lock it immediately, after 1 minute, 5 minutes, or never.
How to Turn Off/On Lock Screen in iOS 17?
If you want to turn off the lock screen, go to Settings > Touch ID & Passcode (or Face ID & Passcode). Then, scroll down and disable the Unlock with Passcode (or Unlock with Face ID) option.
Enable the Unlock with Passcode (or Unlock with Face ID) to turn ON the lock screen.

But if you have forgotten your passcode, don’t worry. The next section will show you how to bypass the lock screen.
How to Bypass the iOS 17 Lock Screen Passcode?
Different methods can help you bypass the iOS 17 lock screen passcode. Let’s discuss them in detail.
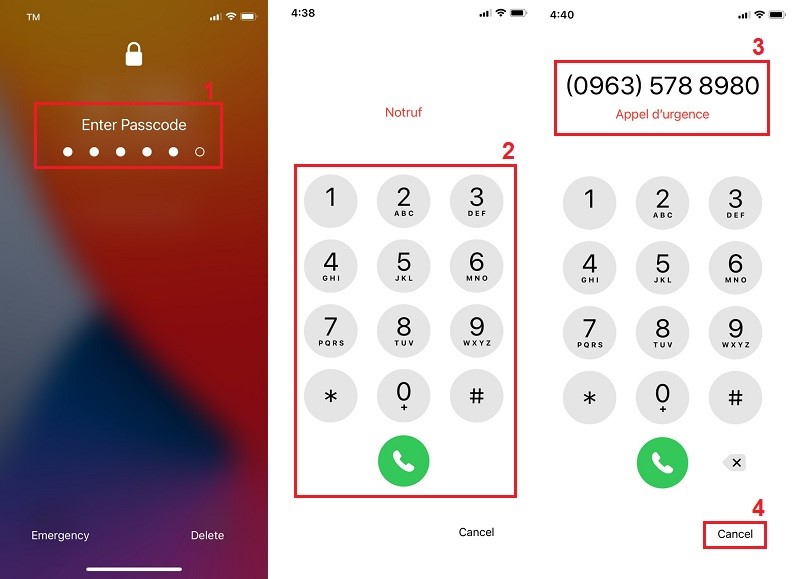
1. Use Emergency call
The first method to bypass the passcode is to use the emergency call feature.
To do this, access your device with five wrong passcodes attempts. This will trigger the emergency call feature. All you need to do is, dial an emergency number and then tap on the cancel button, and you’ll be taken to the home screen.
That’s how you bypass the lock screen without losing any data.
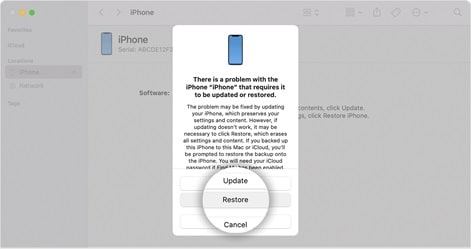
2. Bypass passcode with iTunes restore
If your Apple iPhone 14 Plus needs to be backed up with iTunes sync feature, you can use this method to bypass the passcode.
To do this, connect your Apple iPhone 14 Plus to a computer and open iTunes. Then, click the Restore button and follow the on-screen instructions to restore your Apple iPhone 14 Plus.
It will take some time, but you can use your Apple iPhone 14 Plus without a passcode once it’s done.
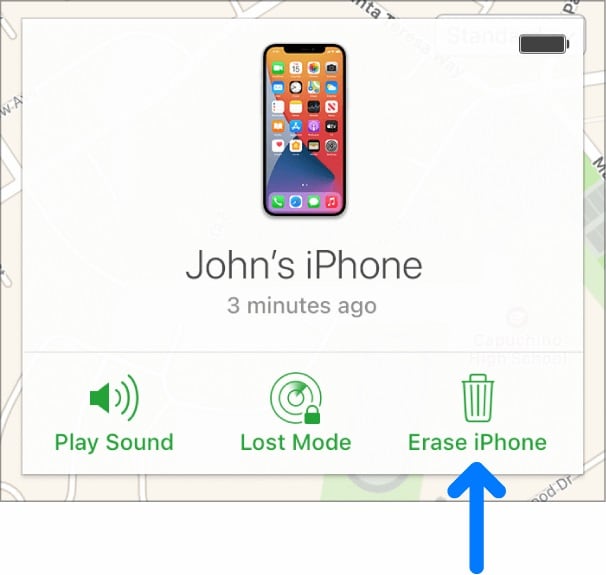
3. Use Find My in iCloud
If you have synced your Apple iPhone 14 Plus with iCloud, you can try the Find My feature to bypass the lock screen.
To do this, go to icloud.com/#find and sign in with your Apple ID. Then, select your device from the list of devices and click on the Erase button.
To do this, go to icloud.com/#find and sign in with your Apple ID. Then, select your device from the list of devices and click on the Erase button.
All the data will disappear on your Apple iPhone 14 Plus, and you’ll be able to access it without a passcode.
This process can also take some time, so be patient.
4. Dr.Fone-Screen Unlock
If all mentioned methods don’t work for you, the ultimate solution is to use Wondershare Dr.Fone-Screen Unlock and bypass the passcode. To finish it, you can follow the steps given below carefully.
Step #1: Download/Install Dr.Fone on your Computer or MacBook
A third-party tool named Dr.Fone-Screen Unlock can help you in this regard. The wonderful part is that you don’t have to learn any technical knowledge.
First, download/install Dr.Fone-Screen Unlock on your computer or MacBook. You can get it from here:
After downloading the tool, install launch it on your PC.
Step #2: Launch the Application and Go for Screen Unlock
Once you have installed the tool, launch it and go to its main window. Here, you will see different features. Select the Screen Unlock feature from the list.
Step #3: Connect your Apple iPhone 14 Plus and Activate DFU Mode
Now, you need to connect your Apple iPhone 14 Plus to the computer using an Apple original cable. Once done, you need to put your Apple iPhone 14 Plus into DFU mode.
To do this, you need to press and hold the Home button and Sleep/Wake button simultaneously for 10 seconds.
After that, release the Sleep/Wake button but keep holding the Home button until Dr.Fone detects your device in DFU mode.

Step #4: Download the Appropriate Firmware
Once Dr.Fone detects your Apple iPhone 14 Plus, it will ask you to continue. So, proceed to the next, and here you will be asked to download the correct firmware package for your device.
So, choose the firmware carefully and hit the download button.
Depending on your internet connection, you may have to wait for a longer time. But once the firmware is downloaded successfully, you can proceed to the next step.
Step #5: Unlock your Apple iPhone 14 Plus
After the firmware is downloaded, you need to press the Unlock Now button, and Dr.Fone will start to unlock your Apple iPhone 14 Plus without a passcode. Once it is done, you can get into your device without any restriction.

FAQs
Why iOS 17 Lock Screen is not working?
There could be many reasons for the malfunction of the Lock Screen in iOS 17. The most common reason is the installation of incompatible jailbreak tweaks. Therefore, it is recommended to remove all the jailbreak tweaks and check whether the problem persists.
You can try resetting your device to factory settings if the problem still exists. But make sure to back up your data before doing so, as it will erase all your data.
How do I fix my iOS 17 lock screen bugs?
There are various ways to fix the lock screen bugs in iOS 17. You can try resetting your device to factory settings, or you can also try restoring your device from a previous backup.
If none of these methods work, you can try using a third-party tool like Dr.Fone-Screen Unlock to bypass the lock screen.
How do you unlock a locked iPhone iOS 17?
There are various ways to unlock a locked iPhone running on iOS 17. You can try the feature of Find My iPhone, or you can also use a third-party tool like Dr.Fone-Screen Unlock.
How do you fix an unresponsive lock screen on iPhone running on iOS 17?
If your lock screen is unresponsive on iPhone running on iOS 17, you can try force restarting your device. To do this, you need to press and hold the Home button and Sleep/Wake button simultaneously for 10 seconds.
After that, release the Sleep/Wake button but keep holding the Home button until you see the Apple logo. Once your device is restarted, check if the problem persists or not.
If the problem still bothers you, you can try using a third-party tool like Dr.Fone-Screen Unlock to reset the phone, eventually fixing the issue.
The Bottom Line
So this is what we want to talk about the iOS 17 Lock Screen with you. We have tried to cover everything in this article, including the new features, lock screen bugs, and how to fix them.
All the fixes mentioned above are tested and proven to be working. So you can try them without any hesitation.
But if you are still facing problems with your lock screen, then the greatest thing you can do is to use a third-party tool like Dr.Fone-Screen Unlock. This tool is very easy to use and will unlock your device within minutes.
So, if you are looking for a hassle-free solution to fix your lock screen issues, then this is the best one you should never miss.
How To Fix Apple iPhone 14 Plus Unavailable Issue With Ease
The Apple iPhone 14 Plus stands out as an impressive device that integrates technology and practicality. Nonetheless, even the most cutting-edge devices experience occasional setbacks. Among these, one major problem for iPhone users is the “iPhone Unavailable” message. This problem typically arises when many incorrect passcode attempts have locked the Apple iPhone 14 Plus device. It renders the Apple iPhone 14 Plus device inaccessible, displaying the “iPhone Unavailable” prompt.
Yet, worry not, for reliable methods exist to address this problem efficiently. In this guide, we’ll explore the best and proven techniques for how to fix iPhone unavailable. We will also walk you through step-by-step solutions and provide clear instructions to resolve your unavailable iPhone.

Part 1. iPhone is Unavailable: Explaining the Basics
The “iPhone Unavailable” issue is a distressing fix encountered by users. It occurs when their iPhone becomes unavailable with a black screen and inaccessible due to many incorrect passcode attempts. This problem arises as a security measure implemented by Apple. Its primary aim is to protect the data on the Apple iPhone 14 Plus device and deter unauthorized access.
The iPhone’s security mechanism typically activates after six wrong attempts. It starts with making the Apple iPhone 14 Plus unavailable for a specific period. The device becomes permanently locked when the incorrect code is entered consecutively for the 10th time. This lock manifests as the “iPhone Unavailable” message on the screen.
This acts as a shield against potential intruders trying to gain access by guessing or brute-forcing the passcode. However, this protective measure can affect users who forget their passcodes or insert incorrect entries mistakenly. For example, there are cases of children playing with the Apple iPhone 14 Plus device, leading to accidental key presses. All of this makes learning how to unlock the Apple iPhone 14 Plus unavailable an essential thing to learn.
Part 2. [Top Fix] Unlock iPhone Unavailable Without Lossing Data By Wondershare Dr.Fone
When faced with the “iPhone Unavailable” issue, the most common cause is forgetfulness. The other major cause is the accidental incorrect entries of the Apple iPhone 14 Plus device’s passcode. This predicament leaves users locked out of their iPhones and functionalities. Wondershare Dr.Fone emerges as a leading solution to tackle this frustrating problem.
It is designed to address various iOS-related issues, including unlocking disabled iPhones. Dr.Fone offers a user-friendly approach to regaining access to your device. The tool offers a smooth process that bypasses the locked screen, allowing users to regain entry into their iPhones. It can remove all screen locks like passcode, password, Touch ID, and Face ID.
Key Highlights of Wondershare Dr.Fone
- You can remove the iCloud activation lock swiftly and effortlessly with Dr.Fone’s iPhone unlocking function.
- It effectively bypasses the Apple ID lock permanently, irrespective of the activation of Find My/Find My iPhone on the Apple iPhone 14 Plus device.
- Fone empowers you to bypass MDM restrictions from your device without data loss or the necessity to jailbreak your device.
Steps To Unlock Your Apple iPhone 14 Plus Unavailable With Wondershare Dr.Fone
With Dr.Fone, even users with no tech prowess can easily unlock their devices. Below is the guide to iPhone unavailable how to fix using Wondershare Dr.Fone - Screen Unlock (iOS):
Here is a video for you to learn how to unlock your Apple iPhone 14 Plus screen:
- Step 1. Dr.Fone Installation and iOS Screen Unlock Setup
After installing Wondershare Dr.Fone onto your computer, launch it. Proceed by accessing “Toolbox,” followed by “Screen Unlock.” Now choose “iOS” as the Apple iPhone 14 Plus device type and choose the “Unlock iOS Screen” option. Click “Start” on the next screen to start the unlocking process for your iOS device.

- Step 2. iDevice Recovery Mode and Firmware Download
Afterward, place your iDevice into Recovery Mode by following the on-screen instructions. Then, the platform will detect the “Device Model” and showcase it. If necessary, change the model and choose the “System Version.” Once these adjustments are made, click on “Start “to continue. The next screen will display the download progress of the iOS firmware.

- Step 3. iOS Firmware Verification and Unlocking Confirmation
After ensuring the iOS firmware is downloaded and validated, you’re ready to proceed. To begin unlocking, click the “Unlock Now” button. This action will trigger a confirmation prompt asking you to enter the necessary code. Once entered, tap “Unlock” to advance to the last stage. Click the “Done” button to complete the process when your device is unlocked.

Tips: Are you searching for a powerful iPhone Unlock tool? No worries as Dr.Fone is here to help you. Download it and start a seamless unlock experience!
Part 3. How To Unlock iPhone Unavailable Using Find My
When encountering the Apple iPhone 14 Plus Unavailable issue, a method to regain access is Apple’s Find My feature. This method allows users to erase their device remotely and set it up again. Nevertheless, it’s important to emphasize that this procedure will delete all information on the Apple iPhone 14 Plus device while unlocking it. Below is a detailed, step-by-step guide on unlocking your Apple iPhone 14 Plus Unavailable using Find My:
- Step 1. Using a web browser, access the iCloud website and “Sign In” using your Apple ID and password. Once logged in, scroll down and click the “Find My” option on the website.

- Step 2. On the following screen, select the unavailable iPhone from the “All Devices” section on the left side. Once you access the Apple iPhone 14 Plus device options, tap the “Erase this Device” option. Afterward, follow the on-screen prompts to erase the Apple iPhone 14 Plus device completely.

Part 4. How To Unlock iPhone Unavailable Using Erase iPhone Feature
One potential solution to resolve the Apple iPhone 14 Plus Unavailable issue is the “Erase iPhone” feature. It is available for users running iOS 15.2 or higher via the Apple iPhone 14 Plus device itself. This method is straightforward but requires you to have your device’s Apple ID password. Using this method will result in all data deletion on your Apple iPhone 14 Plus. The following is how to unlock unavailable iPhone using Erase iPhone:
- Step 1. To begin, look for the “Erase iPhone” option in the bottom right corner of your Apple iPhone 14 Plus.

- Step 2. A prompt will appear on the screen, warning you about the data loss or trying again in 15 minutes. Here, tap “ Erase iPhone” again, and on the following screen, enter the Apple ID “Password.” This will kickstart the process of erasing your Apple iPhone 14 Plus, and it will become available.

Part 5. How To Unlock iPhone Unavailable Using Other Device
If another device uses the same Apple ID as your locked device, you can use it to unlock it. You can remotely erase the locked device using the Find My app on this trusted device. It’s important to note that this action necessitates your Apple ID credentials.
Moreover, it will result in deleting all data on the locked device. These are the steps to remove the “Unavailable” iPhone from another device:
- Step 1. Access the Find My app on your reliable iOS device and log in with your Apple ID details. Within the Find My interface, expand the “Devices” tab from the bottom side of the screen.

- Step 2. Within “Devices,” locate and select the “Unavailable” iPhone from the list of devices. Once you have selected the Apple iPhone 14 Plus device, choose “Erase This Device” from the available options after scrolling down.

- Step 3. Afterward, press the “Continue” button to confirm your choice. On the following screen, “Enter Phone Number” if needed and tap the “Erase” option at the top right corner. Next, write your “Apple ID password for verification purposes and again hit the “Erase” option to erase the Apple iPhone 14 Plus device quickly.

Part 6. How To Unlock iPhone Unavailable Using iTunes
Consider utilizing iTunes as a solution for the “iPhone Unavailable” issue. It involves the restoration of your device to its factory settings. While effective, note that it leads to complete data loss. Unlocking your Apple iPhone 14 Plus Unavailable via iTunes is detailed in the following step-by-step guide:
- Step 1. Make certain your computer has the most recent version of iTunes installed. Afterward, connect your Apple iPhone 14 Plus to it via a USB cable. To place your device into Recovery Mode, refer to the appropriate guide based on your Apple iPhone 14 Plus model.
- **For iPhone 8 or Later:**Press the Volume Up button momentarily, followed by the Volume Down button similarly. Press the Side button until the recovery mode screen is displayed.
- For iPhone 7 and 7 Plus: Simultaneously press the Volume Down and Sleep/Wake buttons and hold them until the recovery mode screen comes up.
- **For iPhone 6s and Earlier:**Simultaneously press the Home and Sleep/Wake buttons until the recovery mode screen emerges.

- Step 2. In iTunes, a notification will appear, signaling a problem with the Apple iPhone 14 Plus that needs to be updated or restored. Select the “Restore” option to commence the restoration procedure. This action will delete all data and configurations on the Apple iPhone 14 Plus and install the most recent iOS version.

Conclusion
In conclusion, several helpful methods exist for how to unlock unavailable iPhone. Various techniques offer solutions, including iTunes, Find My, and other device removal methods. Dr.Fone distinguishes itself as the most effective choice. This is due to its user-friendly interface and capability to bypass the lock, making it the optimal solution.
Also read:
- [Updated] In 2024, Behind the Photo Instagram Selfie Credibility Explored
- Best Top 5 Replacements for SoundCloud: Discover New Music Platforms
- Easy Steps on How To Create a New Apple ID Account On Apple iPhone 13 mini
- Fixes for Non-Functional Samsung Blu-Ray Players: A Comprehensive Guide
- In 2024, 5 Easy Ways to Change Location on YouTube TV On Honor Magic 5 Pro | Dr.fone
- In 2024, Full Guide to Unlock iPhone 8 with iTunes
- In 2024, How Can I Unlock My iPhone 13 Pro Max After Forgetting my PIN Code?
- In 2024, Is Your iPhone SE (2022) in Security Lockout? Proper Ways To Unlock
- In 2024, Unlock iPhone 15 Pro Max Without Passcode Easily
- Introduce Efficient Execution of Commands via New Run Feature
- Unlock Apple ID without Phone Number On iPhone 6s Plus
- Unlocking Apple iPhone 8 Passcode without a Computer
- Updated In 2024, Master Your Tunes The Best iPhone & Android Applications for Music Arrangement
- Title: 3 Ways to Erase iPhone 14 Plus When Its Locked Within Seconds
- Author: Sophia
- Created at : 2024-10-04 00:18:38
- Updated at : 2024-10-08 21:49:03
- Link: https://ios-unlock.techidaily.com/3-ways-to-erase-iphone-14-plus-when-its-locked-within-seconds-by-drfone-ios/
- License: This work is licensed under CC BY-NC-SA 4.0.