
:max_bytes(150000):strip_icc():format(webp)/coverjointwitter-6f13b51d1be04d8bb3f5221ef5a057c7.jpg)
4 Ways to Unlock Apple iPhone SE (2022) to Use USB Accessories Without Passcode
4 Ways to Unlock Apple iPhone SE (2022) to Use USB Accessories Without Passcode
How do I unlock my Apple iPhone SE (2022)? I know you’re supposed to connect it to the computer and put it in recovery mode but when I do, it says “unlock Apple iPhone SE (2022) to use accessories.”

You may have had the experience of connecting your Apple iPhone SE (2022) to a computer with USB accessories. Usually, “Unlock Apple iPhone SE (2022) to use accessories“ will appear on the screen. In most cases, enter the passcode to unlock the phone, and you can then proceed with data transfer and management. What to do if you forget your screen lock passcode? Here come the most effective methods for you!
Part 1: Why You Need to “Unlock Apple iPhone SE (2022) to Use Accessories”?
The command comes from Apple’s significant privacy safeguard “USB Restricted Mode”. It means after an hour of your iOS device is unlocked, the system cuts off the lightning port and limits it to charging only. Simply put, when your Apple iPhone SE (2022) is locked for more than an hour, it needs to be unlocked to allow the connection of USB accessories. Sometimes, when you unlock your Apple iPhone SE (2022) screen to use USB accessories, it can’t charge anymore.
In 2017, a password cracking tool called GrayKey was launched, which can bypass any iPhone screen lock passcode. The FBI, the police, and some government agencies have all become GrayKey customers. To combat hackers including GrayKey and protect iOS users’ data security, the USB Restricted Mode feature arrived with iOS 11.4.1 in July 2018 and be improved in iOS12.
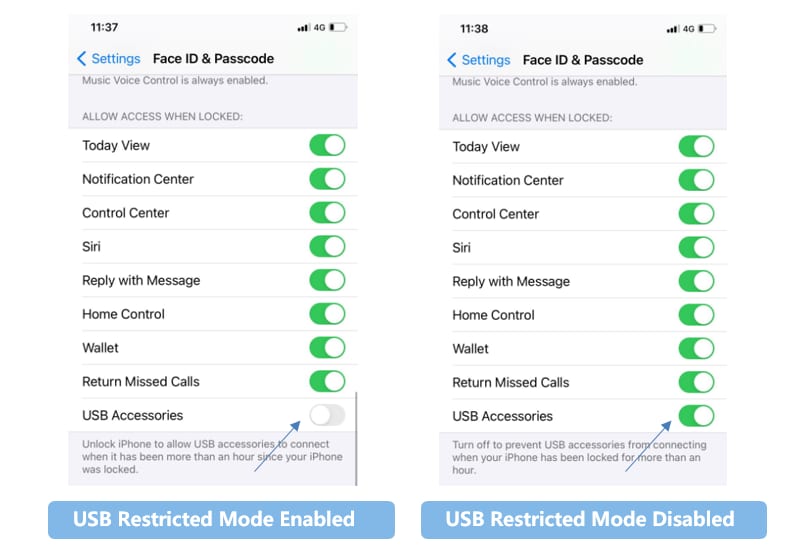
Part 2: How to Disable USB Restricted Mode?
If you find this warning annoying or your Apple iPhone SE (2022) not charging when using USB accessories, disabling USB Restricted Mode is an optional solution. However, you have to remember the unlock passcode. All the steps will be presented to you next.
- Step 1: Open Settings on your Apple iPhone SE (2022).
- Step 2: Click on Face ID & Passcode (or Touch ID & Passcode), and then input your screen passcode.
- Step 3: Scroll to the bottom of the page and find “USB accessories“ in the “Allow access when locked“ column.
- Step 4: Click the toggle button on the right to disable this feature.
After completing all the steps, your Apple iPhone SE (2022) can connect USB accessories anytime, anywhere. However, it is very common to forget to unlock the passcode. Next, we will recommend four solutions to help you use USB accessories without a passcode.
Part 3: How to Unlock Apple iPhone SE (2022) to Use USB Accessories without Passcode via Dr.Fone?
Now, here comes an amazing App with many benefits to solving the problem for you. This is Dr.Fone-Screen Unlock, which is very convenient and fast to use. You must be curious about it. More of its advantages will be introduced to you.
- The application is available on both Mac and Windows.
- No technical skills are required.
- It fully supports iPhone X, iPhone 11, and the latest iPhone models.
- Dr.Fone - Screen Unlock can easily unlock 4-digit or even 6-digit screen passcode, Face ID, or Touch ID.
- No Apple ID and password are needed.
Step 1: The first step, of course, is to download Dr.Fone to your computer and click on “Screen Unlock”.

 safe & secure
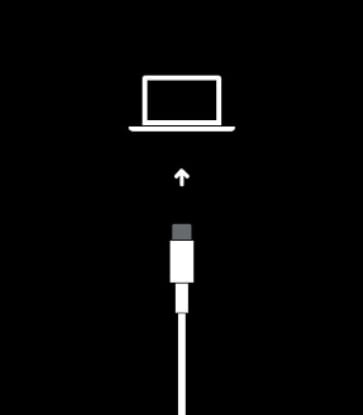
Step 2: Connect your Apple iPhone SE (2022) to the computer with a lightning cable, and choose “Unlock iOS Screen”.

Step 3: Follow the guides to boot your device in Recovery or DFU mode. The Recovery mode is recommended for iOS lock screen removal by default. If you fail to turn on recovery mode, you can turn to activate DFU mode. DFU means Device Firmware Upgrade, and the operation is more mandatory.

Step 4: Click “Start” to download the firmware. After the download is successful, select “Unlock now” and wait a few minutes, the passcode will be removed from your device.

After that, you could set up your Apple iPhone SE (2022) as a new one and unlock your screen to use USB accessories without a passcode.

There is no doubt that you may worry about losing all your data while bypassing the Apple iPhone SE (2022) lock screen. But honestly, there is no tool on the market today that can preserve data to unlock an iPhone. Therefore, it is necessary to back up data in your daily life. Dr.Fone-Phone Backup provides you with a full range of data backup solutions, you can click the link below to learn more.
This guide will teach you about how to unlock iphone using 5 feasible ways.
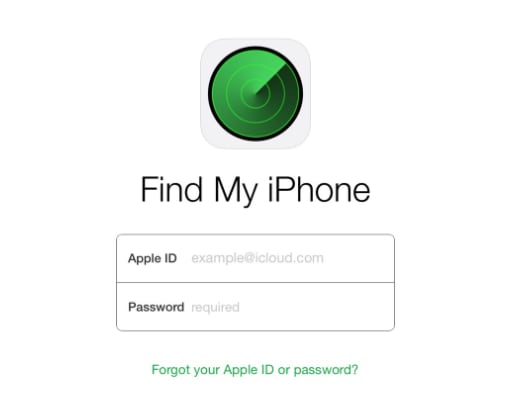
Part 4: How to Unlock Apple iPhone SE (2022) to Use USB Accessories without Passcode via iCloud?
With iCloud, you can quickly clean up your Apple iPhone SE (2022), remove screen locks, and help unlock your device. But, you have to know that all your data will be erased. Make sure your Apple iPhone SE (2022) has the “Find My iPhone” function enabled, otherwise your device will be offline.
Step 1: Open your computer or another iOS device, and sign in with your Apple account.
Step 2: Click on “All Devices”, choose your Apple iPhone SE (2022), and then “Erase iPhone”.
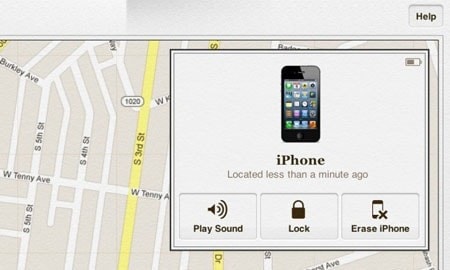
Now, your Apple iPhone SE (2022) will reboot without a passcode. Then, you can unlock Apple iPhone SE (2022) to use accessories and bypass the passcode.
Part 5: How to Unlock Apple iPhone SE (2022) to Use USB Accessories without Passcode via iTunes?
There is currently no way to unlock an iPhone without erasing all data. Luckily, iTunes can help back up your data before removing it. Please note that this way is only possible if the Apple iPhone SE (2022) device has synced data in iTunes before.
- Step 1: Connect Apple iPhone SE (2022) to a computer with a USB accessory and turn on iTunes. Then iTunes will make a backup for your phone.
- Step 2: Choose “Restore iPhone”.

Wait for a while and you could unlock the screen to use USB accessories. However, in step one, you may need to enter your passcode to get stuck during the process. Therefore, this method is not the most efficient.
Part 6: How to Unlock Apple iPhone SE (2022) to Use USB Accessories without Passcode via Recovery Mode?
If you have forgotten your Apple ID or password and have not synced iCloud and iTunes, you can choose recovery mode. It will remove all your passcode and data as well.
- Step 1: You need to prepare a Mac or PC (Windows 8 or later).
- Step 2: Turn off your Apple iPhone SE (2022).
- Step 3: Put your device in recovery mode. This step might be a little complicated, but don’t worry, we’ll walk you through it step by step.
1. Find the button on your device, it will be useful then.
- iPhone SE (1st generation), iPhone 6s, and earlier: The Home button.
- iPhone 7 and iPhone 7 Plus: The Volume down button.
- iPhone SE (2nd and 3rd generation), iPhone 8, iPhone 8 Plus, iPhone X, and later devices: The side button.
2. Quickly press and hold the button while connecting your phone and computer until the recovery mode appears.
Step 4: Find your tool in iTunes on the computer. Choose Restore and this process will take a few minutes.
Step 5: Unplug your tool and use your Apple iPhone SE (2022) without a passcode.
Now, you’ll get an iPhone which is like being factory reset. And you could unlock the screen to use USB accessories when you forget the passcode.
Part 7: Hot FAQ about USB Accessories on iPhone
Q1: What is the feature of USB Accessories on iPhone?
From USB-A to the latest, USB-C. Also, most iPhones use a proprietary Lightning port.
Q2: Why does My iPhone Think My Charger is a USB Accessory?
It is related to the capacity of the charger. If a low-capacity charger is used, your device must regard it as a USB port because the USB port charges at a lower rate than a good wall charger. Another possibility is that the cable being used is flaky.
Q3: What to Do If My iPhone Not Charging after Unlock to Use Accessories?
- Step 1: Disconnect your tool from the accessory.
- Step 2: Unlock your device.
- Step 3: Connect the USB accessory again.
If it doesn’t work, please contact customer service of Apple.
Conclusion
It is very common to use USB accessories to connect iPhone and computer. Sometimes, we may forget the password, or cannot unlock the screen due to system failure. There are many ways to unlock Apple iPhone SE (2022) to use the accessories in the article. Finally, we recommend everyone to use Dr.Fone - Screen Unlock, a helpful and convenient tool.
 safe & secure
Easy Steps on How To Create a New Apple ID Account On Apple iPhone SE (2022)
Your Apple ID is your gateway to a world of apps and services, making it an essential part of your Apple experience. Whether you’re a new Apple user or simply looking to start fresh, creating a new Apple ID can open the doors to endless possibilities.
This guide will walk you through creating a new account for Apple devices in an easy-to-understand manner. From setting up your email address to securing your account, this article covered you every step of the way. Embark on this journey and learn how to create a new Apple ID account effortlessly.
Part 1: Why Create a New Apple ID?
You might need to create a new Apple ID to enhance your Apple experience. Let’s dive into why it’s a good idea:
A. Reasons for Creating a New Apple ID Account
Here’s a breakdown of the reasons why you should create a new Apple ID for your Apple iPhone SE (2022):
- Your Apple ID is like your digital identity. Creating a new one lets you choose a unique email address that suits you, adding a personal touch to your Apple journey.
- Maybe you’ve been using an email for your Apple ID that you don’t want to use anymore. Creating a new one helps keep your personal and Apple-related emails separate.
- **Switching Devices.**When you switch to a new Apple device, like getting a new iPhone or iPad, creating a unique Apple ID ensures a fresh start tailored to your new gadget.
- **Separation of Accounts.**Sometimes, you may want to keep your work-related apps and data separate from your ones. Creating a new Apple ID helps you achieve this separation.
- If you’re using Apple services for different purposes, such as work and personal use, having separate Apple IDs can help keep everything organized and distinct.
B. Scenarios Where a New ID Is Needed
Below are the common scenarios where a new Apple ID might be needed:
- **New Apple Device.**When you purchase a new Apple device, like an iPhone or iPad, you’ll need a new Apple ID to set it up and make it truly yours.
- **Shared Device.**If multiple people use the same device, creating a new Apple ID for each user ensures that everyone has their own personalized experience.
- **Change of Email.**If your current email address associated with your Apple ID is changed or you prefer a new one, creating a unique Apple ID with the updated email is the solution.
- **Work and Personal.**To keep your work-related apps and data separate from your personal ones, having separate Apple IDs for each purpose is practical and organized.
- **Starting Fresh.**Sometimes, you might want a fresh start with your Apple experience, and creating a new Apple ID provides a clean slate.
Creating a new Apple ID isn’t just about getting a new email; it’s about tailoring your Apple experience to your needs, whether for personalization, privacy, or organization. Now that you know why it’s essential, let’s explore how to create it in the next section.
Part 2: Step-by-Step Guide: How To Create a New Apple ID Account
Creating a new Apple ID for free is a straightforward process. Let’s break it down into simple steps:
A. Registering a New Apple ID
These are the steps for registering a new Apple ID:
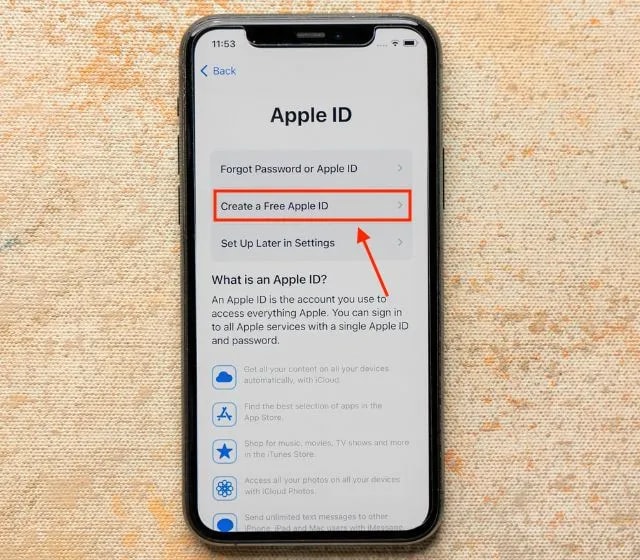
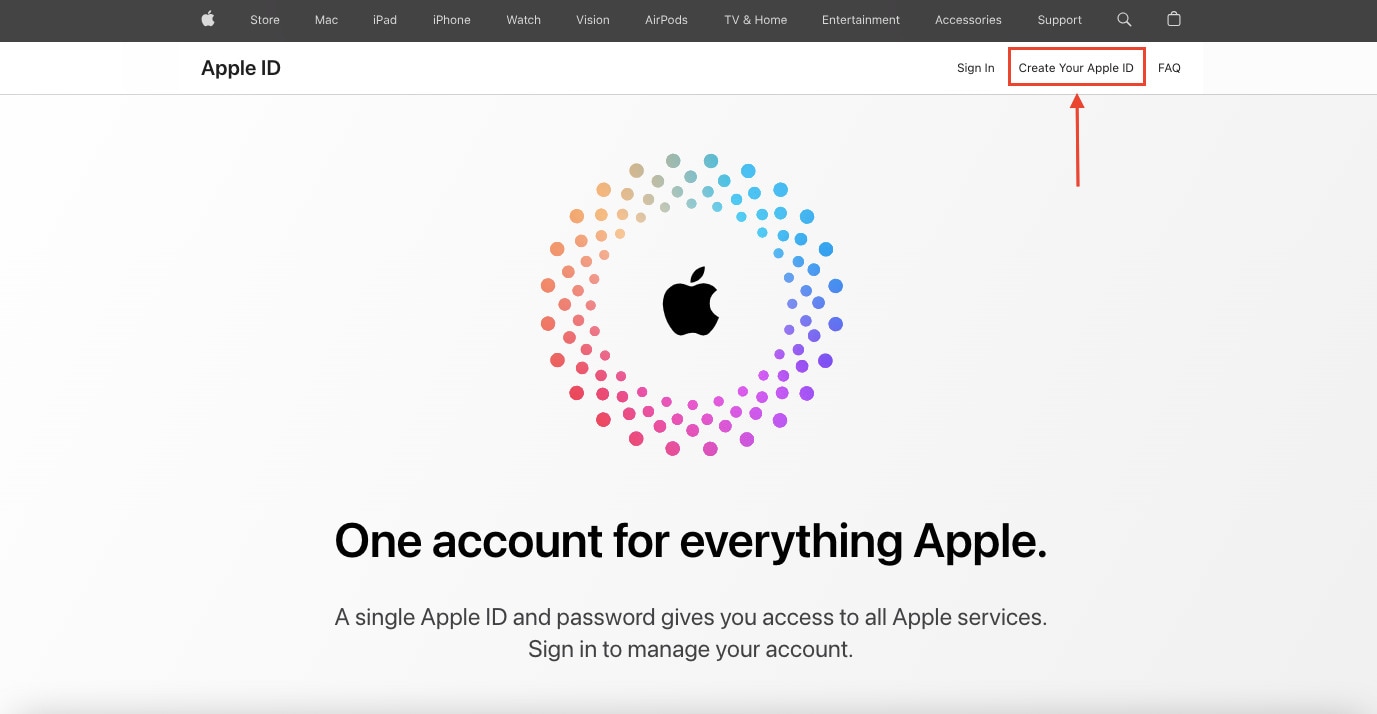
- Step 1: Open your web browser and visit the Apple ID account management page. Click the Create Your Apple ID button to begin.
- Step 2: On the registration page, you’ll be asked to provide your First name and Last name. Make sure to use the name associated with your new Apple ID. Next, you’ll need to enter your preferred email address. This one will be your new Apple ID.
Tip: Choose an email that’s easy to remember and access.
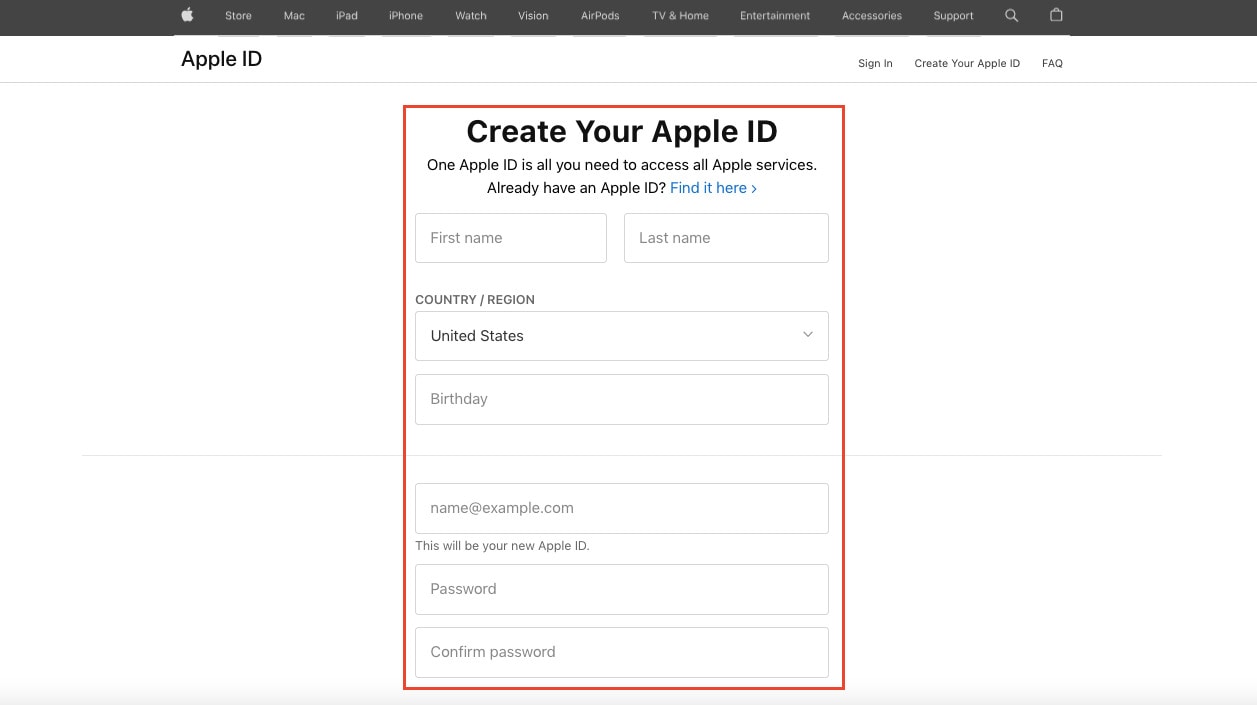
- Step 3: Create a strong password that combines letters, numbers, and symbols. This password is essential for the security of your account, so make it unique and hard to guess. Confirm your password by entering it again in the designated field.
B. Verifying Your Identity
The next step is verifying your identity. Check out the steps below:
- Step 4: Apple takes your security seriously. You may be asked to provide a phone number to verify your identity. This number can be used for account recovery or two-factor authentication. The phone number you provided will receive a verification code. Enter this code in the space provided to confirm your identity.
Note: It’s crucial to ensure that your phone number is accurate and accessible. This number will help you recover your account in case you forget your password or encounter any issues. Apple may use this phone number for two-factor authentication, adding an extra layer of security to your account.
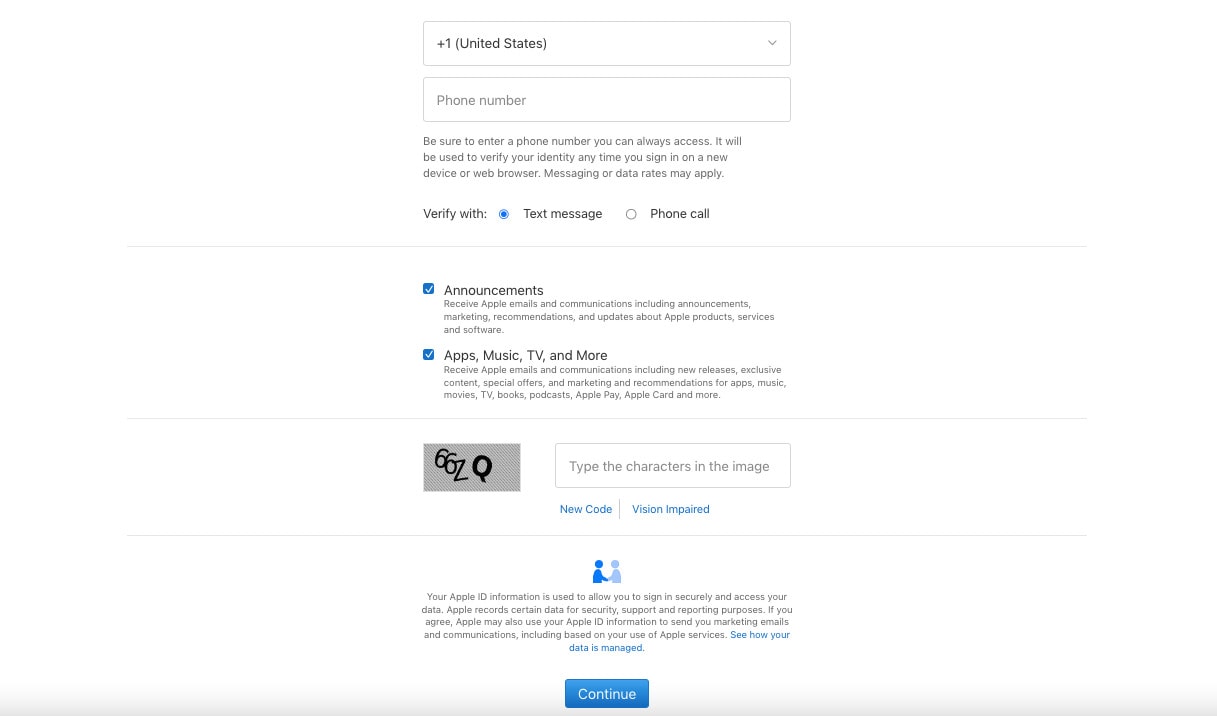
- Step 5: Apple may sometimes ask you to complete a CAPTCHA or verify your identity to prevent automated account creation.
C. Setting Up Security Questions
The next process will be setting up security questions for your account:
- Step 6: Apple asks you to choose and answer security questions. These questions provide an additional layer of protection for your account. Select questions that you can easily remember and that others can’t guess.
D. Finalizing the Process
To finalize the creation process, refer to the steps given below:
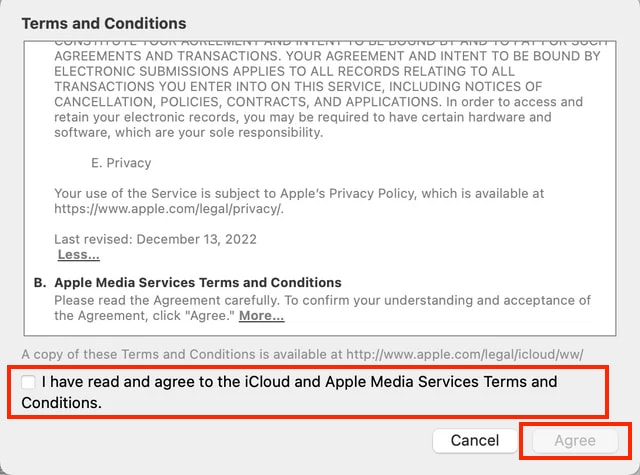
- Step 7: Read through Apple’s Terms and Conditions and Privacy Policy. Once you’ve understood them, tick the box to confirm that you’ve read and agree to the iCloud and Apple Media Services Terms and Conditions. Then click Agree to proceed. Remember that it’s essential to be familiar with Apple’s policies to ensure a secure and smooth experience.
- Step 8: After completing these steps, Apple will send a confirmation email to the address you provided. Go to your email and open the verification link to confirm your new Apple ID.
Congratulations! You’ve successfully created a new Apple ID. With this account, you can now access Apple’s services, including the App Store, iCloud, and more. Remember to keep your login credentials secure and use them to personalize your Apple experience fully.
Part 3: Effortlessly Remove Your Apple ID Using Wondershare Dr.Fone - Screen Unlock (iOS)
You can embark on an enhanced Apple experience after successfully creating your new Apple ID. Removing the previous one is essential when you create it, especially if you’ve acquired a second-hand device or no longer want the previous user’s associated credentials.
This step ensures that your new Apple ID takes center stage, granting you full control over your device and its associated services. But if you encounter difficulties when removing the previous Apple ID from your device, Dr.Fone - Screen Unlock (iOS) is a reliable and user-friendly solution.

Key Features of Dr.Fone - Screen Unlock (iOS)
This versatile tool offers the following key features in the context of Apple ID issues:
- **User-Friendly Interface.**Fone - Screen Unlock (iOS) is designed to be straightforward, making it accessible to users of all levels of technical expertise.
- It is usable with a wide range of iOS devices, ensuring you can remove the previous Apple ID from your device, regardless of the model.
- **Multiple Unlock Modes.**Fone offers various unlock modes to cater to different scenarios, including removing the previous Apple ID. This flexibility ensures that you have the right solution for your specific situation.
- **Data Security.**Fone - Screen Unlock (iOS) prioritizes data security, ensuring that your personal information and content remain intact during the Apple ID removal process.
Step-by-Step Guide on Using Dr.Fone Screen Unlock (iOS)
Check out the steps on how to remove an Apple ID account using Dr.Fone below:
- Step 1: Launch Wondershare Dr.Fone on your PC to use the Screen Unlock function and then navigate to Toolbox. Click the Screen Unlock section, then choose iOS.
- Step 2: If you want to proceed with deleting your Apple ID, you’ll need to go to the next window and select the Remove AppleID option from the menu.
- Step 3: When you hook up your iOS device to a computer, the next screen will report on its connectivity. Select the Unlock Now button to proceed.

- Step 4: Before the Apple ID can be unlocked, the next step is for the platform to ask a series of questions. Verify that a screen lock is active on your iOS device. However, please lock your iOS device before proceeding with the Yes option.

- Step 5: Check if Two-Factor Authentication is set up on all your iOS devices. If not, switch it on before confirming your decision to unlock your Apple ID.

- Step 6: After you have confirmed these settings, you will be taken to a screen with on-screen instructions for entering Recovery Mode on your iDevice. If the steps for your specific iOS device don’t work, try tapping Try DFU Mode in the app’s bottom left corner. To continue with the unlocking process, this will launch the DFU Mode instructions.

- Step 7: Once Recovery Mode has been activated, the Apple iPhone SE (2022) device’s information will be shown on the subsequent screen. Once the Device Model has been identified, all that remains is to choose the appropriate System Version and click Start. However, if there are disagreements in recognition, pick the details by hand and move forward.
- Step 8: The appropriate iOS firmware begins downloading, showing its status on the following screen. Click the Copy button to copy the direct URL to download iOS firmware for systems with sluggish firmware download speeds.
- Step 9: The platform checks the downloaded firmware and displays its details on the following screen. To proceed with unlocking your Apple ID, click the Unlock Now button. To proceed, you will be prompted to input a code into a confirmation window. Enter the code and then click the Unlock button.

- Step 10: The following screen shows the unlocking status of your Apple ID. Don’t let the Apple iPhone SE (2022) device lose its connection under any circumstances. The screen prompts the process of completing the Apple ID once the ID has been unlocked. If the Apple ID has been unlocked, click Done to proceed. If that fails, click the Try Again button and give it another shot.

Conclusion
This guide has simplified the process of creating a new Apple ID, ensuring you can effortlessly personalize, secure, and organize your digital experience. Creating a new Apple ID is easy, and it allows you to tailor your Apple journey to your preferences. Remember, it’s all about you, your privacy, and your convenience.
Should you encounter any challenges while managing your Apple ID, such as removing a previous one, consider Dr.Fone - iOS Screen Unlock tool. This user-friendly resource stands ready to assist, ensuring a seamless and secure Apple experience. Explore the possibilities and make the most of your Apple adventure!
3 Ways to Erase Apple iPhone SE (2022) When It’s Locked Within Seconds
Over the last few years, Apple has made remarkable progress with its flagship iPhone series. There are plenty of ways for users to back up, erase, and restore their data. It doesn’t matter if you are moving from one device to another or would like to reset your phone. You should know how to erase iPhone when locked. Too many times, after getting locked out of their device, users find it hard to wipe locked iPhone. If you are also going through the same dilemma, then don’t worry. Read on and learn how to wipe a locked iPhone in this extensive guide.
Part 1: Erase locked iPhone with Dr.Fone - Screen Unlock (iOS)
One of the best ways to wipe locked iPhone is by using Dr.Fone - Screen Unlock (iOS) tool. It is an extremely secure and reliable application. It is already compatible with every leading version of iOS and runs on almost all major iOS devices. Available for both Windows and Mac, the tool can be used to remove activation lock and Apple ID. The tool also provides an easy-to-use interface that can help you reset the activation lock on your device.
Dr.Fone - Screen Unlock (iOS)
Erase the data of an iPhone even if it is locked
- Erase iPhone data together with the lock screen.
- Remove the 4-digit/6-digit passcode, Touch ID, and Face ID , and activation lock.
- A few clicks and the iOS lock screen are gone.
- Fully compatible with all iDevice models and iOS versions.
4,395,216 people have downloaded it
To learn how to erase iPhone when locked, follow these steps:
Step 1. Download and install Dr.Fone.
Start by downloading Dr.Fone - Screen Unlock (iOS) from its official website. Install it on your Windows or Mac and connect your Apple iPhone SE (2022) to the system whenever you wish to resolve an issue with it. After launching the application, click on the “Screen Unlock” option from the welcome screen.
Step 2. Click Start button.
Wait for a while as the application will automatically recognize your phone. Click on the “Start” button to commence the process.

Step 3. Put the phone into DFU mode.
Follow the on-screen instructions to put your phone into the DFU (Device Firmware Update) mode. It can be done by pressing the Home and Power button simultaneously for 10 seconds. Afterward, it would help if you released the Power button while pressing the Home button for another 5 seconds.

Step 4. Download firmware package.
After putting your device into the DFU mode, the application will automatically move to the next window. Here, you would be required to provide essential information related to your phone like device model, firmware update, and more. After filling in the correct information, click on the “Download” button.
Sit back and relax as the application will download the essential firmware update for your phone.

Step 5. Start to unlock.
Once it is done, the application will automatically start resolving the issue on your phone. Make sure that you don’t disconnect your phone while Dr.Fone - Screen Unlock (iOS) will resolve the issue on your device.

Step 7. Unlock completed.
After completing the operation successfully, the interface will provide the following message.

You can check if you can unlock your phone or not. If you still have an issue, then click on the “Try Again” button. Else, you can safely remove your phone and use it without any constraint. By following this method, you would learn how to wipe a locked iPhone with Dr.Fone - Screen Unlock (iOS).
One of the best things about this technique is that you would wipe locked iPhone without causing any damage. Since it is a secure and reliable method with a high success rate, it is sure to provide a hassle-free experience.
Part 2: Erase locked iPhone by restoring it with iTunes
If you are looking for an alternative way to learn how to erase iPhone when locked, you can also take the assistance of iTunes. It provides a free and simple method to restore your device. Since it would wipe your data, you might end up losing your essential files in the process. We recommend following this technique only when you have taken a backup of your data via iTunes beforehand. To learn how to wipe a locked iPhone with iTunes, follow these steps:
1. Firstly, put your Apple iPhone SE (2022) into recovery mode. To do this, launch an updated version of iTunes on your system and connect it to a lightning cable. Now, long-press the Home button on your device and connect it to the other end of the lightning cable. Release the Home button once the iTunes logo would appear.

2. As soon as your phone would be connected, iTunes will recognize an issue with it. From here, you can choose to restore it.

3. If you don’t get the above pop-up on your screen, launch iTunes and visit its “Summary” section. From here, choose “Restore backup” under the Backup section.

4. agree to the pop-up message by clicking on the “Restore” button.

Part 3: Erase locked iPhone by Find My iPhone
If you haven’t already taken a backup of your phone, then you might find it hard to recover it with iTunes. Another popular way to wipe locked iPhone is by using the Find My iPhone tool. This is mostly implemented in case of a stolen or lost device. One of the best features of Find My iPhone is that it can be used to reset your device remotely. With this, you can protect your personal data without much trouble. Implement these steps to learn how to erase iPhone when locked using Find My iPhone.
1. To start with, log in to your iCloud account and visit the “Find My iPhone” section.
2. Under the “All Devices” section, you can choose the Apple iPhone SE (2022) you wish to reset.

3. After selecting your device, you will be presented with various options. Select the “Erase iPhone” feature to reset your device.

Confirm your choice and wipe locked iPhone remotely using the Find My iPhone feature on iCloud.
After following this informative guide, you would learn how to wipe a locked iPhone without any trouble. Go ahead and pick your preferred option to wipe locked iPhone. We recommend using Dr.Fone - Screen Unlock (iOS) to resolve this issue securely. Though, if you wish to do it remotely, then you can also give Find My iPhone a try as well. If you are familiar with any other reliable method, please let us know how to erase iPhone when locked in the comments below.
- Title: 4 Ways to Unlock Apple iPhone SE (2022) to Use USB Accessories Without Passcode
- Author: Sophia
- Created at : 2024-03-31 22:40:53
- Updated at : 2024-04-01 10:58:46
- Link: https://ios-unlock.techidaily.com/4-ways-to-unlock-apple-iphone-se-2022-to-use-usb-accessories-without-passcode-by-drfone-ios/
- License: This work is licensed under CC BY-NC-SA 4.0.
