
Apple iPhone 14 Plus Backup Password Never Set But Still Asking? Heres the Fix
Apple iPhone 14 Plus Backup Password Never Set But Still Asking? Here’s the Fix
Part 1: Why Do iTunes Ask Me for iPhone Backup Password?
When you use iTunes to create a backup, the backup will probably have a password that iTunes automatically create. This is for privacy reasons. Hence, it might ask for an iTunes backup password never set by you!
In most cases, this occurs when the Encrypt Backup option is activated. As an official iOS feature, its purpose is to provide iOS users with the iTunes backup encryption for further security.
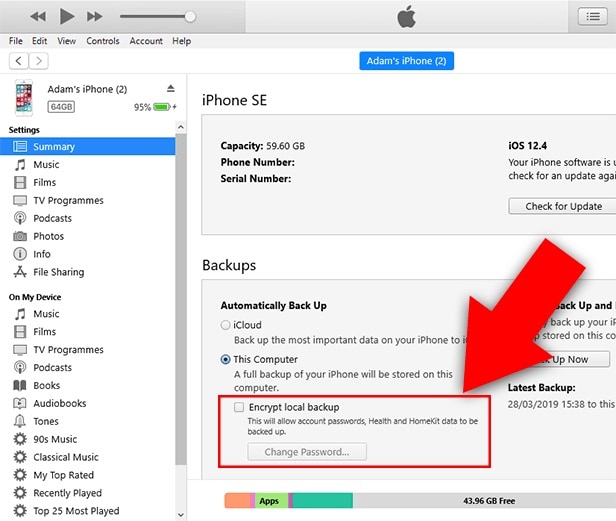
Unfortunately, this capability may also become problematic if you inadvertently take a backup without being able to provide the password. For example, you may have to enter the password for your Apple iPhone 14 Plus backup unlocking never set by you.
But the good news is you have some possible fixes. So, let’s talk about them.
Part 2: 4 Possible Ways to Fix Asking for iPhone Backup Password
Many iPhone users have problems with iTunes when they back up their devices.
One of the most common issues is that people are asked for their iPhone backup password never set, but they need to know what it is. This can be frustrating because you can only back up your device if you have the password.
There are a few possible ways to fix this problem. Try resetting your password or using a different computer to back up your device. You could also try using a third-party software tool like Dr.Fone - Screen Unlock.
1. Try all passwords you use on iPhone
When iTunes prompts you for an iPhone backup password never set, what should your initial course of action be?
To get out of this predicament in the simplest way possible, try entering every potential password you will likely have used. In most cases, individuals will use the same password for many accounts.
A significant possibility is that you encrypted the iTunes backup with the same password from the iCloud account.
Therefore, before doing anything further, try all passwords to configure your iTunes account. For example, try entering 0000, 123456, name123, or 1111.
2. Find the password from Keychain on macOS
You may also attempt to find the password for the iTunes backup using the keychain approach if you are working on a Mac.
The likelihood of success with this approach is relatively low. However, it is still worthwhile to try it, particularly if you have also synchronized your iTunes account with your Mac.
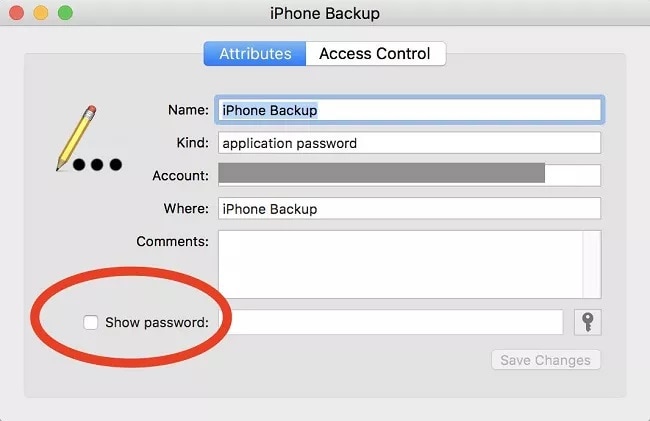
- On your macOS, go to Utilities by clicking the Applications menu item. At this point, launch the Keychain Access app and look for your Apple iPhone 14 Plus backup.
- To open a new dialogue box, double-click the most recent backup file, and you will see one appear before you.
- On this page, choose Show Password to get the password for the Apple iPhone 14 Plus backup. However, you will first be prompted to provide the administrator password associated with your iCloud account to recover the password.
3. “Reset All Settings”
Resetting the password is another option at your disposal if you encounter the Apple iPhone 14 Plus backup password never set problem. How you do this will be different depending on the version of iOS that you have installed.
Here are what you can do with your iOS smartphone if it has iOS 11 or a later version:
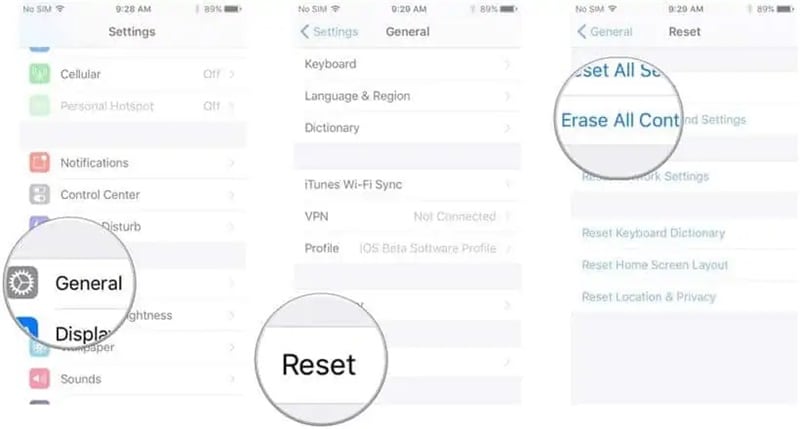
Step 1: Unlock your Apple iPhone 14 Plus, and then open the Settings app on your device.
Step 2: After locating the General menu, go to the Reset menu and then hit the Reset All Settings button. Please confirm your action by providing the password for your Apple iPhone 14 Plus.
Step 3: Once the reset has been completed, your previous password will be deleted.
Step 4: The next thing you should do is take a fresh backup of your Apple iPhone 14 Plus using iTunes, and then establish a new password for the backup that iTunes creates.
You will need to use an alternative strategy, which includes a factory reset if you use an older version of the iOS firmware than iOS 11.
Step 1: Before continuing, it is highly recommended that you create a backup of the data on your Apple iPhone 14 Plus using iCloud.
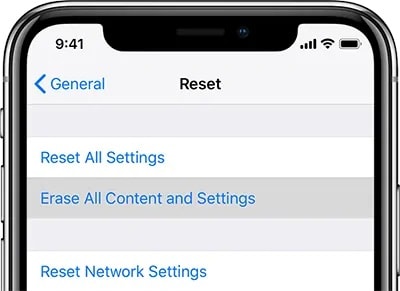
Step 2: After you have opened the Settings app, go to the General menu, then to the Reset menu, and finally to the Erase All Content and Settings option.
Step 3: Confirm that you want to reset your Apple iPhone 14 Plus to factory settings, and wait until it is done.
Step 4: Once the factory data reset is finished, you must restore your iCloud backup. To do this, follow the steps for setting up iOS until you reach the Apps & Data option.
Step 5: Create a new backup in iTunes and change the password for the existing backup in iTunes.
You should be aware that resetting the Apple iPhone 14 Plus device to factory settings will not make your encrypted backups accessible again.
On the other hand, it does make it possible for you to generate a fresh backup in iTunes that is not encrypted.
4. Dr.Fone-Screen Unlock
First step: After installing Dr.Fone on your device, please run the program and look for the red button labeled “Screen Unlock.”

Step 2: While in the interface for Screen Unlock, navigate to the bottom right of the screen and tap on the feature labeled “Remove iTunes BackUp Encryption.” This will allow you to proceed.

Step 3: When brought to this screen, please use a USB cord to connect your iOS device to your personal computer. If Dr.Fone can identify this relationship, the following picture will appear for you to see.
Please read the following three notes carefully before clicking the “Remove Now” button:
- Check to ensure that “Find My iPhone” is not turned on.
- During this procedure, you should not launch “iTunes.”
- During the process, your Apple iPhone 14 Plus will restart.

Step 4: If you have an iTunes backup, Dr.Fone may automatically verify it and delete it. This encryption will be removed once the percentage on the progress meter reaches the end. This procedure won’t take a lot of time at all.

Step 5: The encryption of the iTunes backup has been successfully erased! Your backed-up data may be quickly restored, transferred, wiped clean, and backed up again. Hence, you can enter the password to unlock your Apple iPhone 14 Plus backup never set in the first place!

The Bottom Line
There are four ways to fix the problem if iTunes keeps asking for your Apple iPhone 14 Plus backup password. The first method is to try all the passwords you use on your Apple iPhone 14 Plus. You can try finding the password from Keychain on macOS if this does not work. Another option is to “Reset All Settings” on your Apple iPhone 14 Plus.
Lastly, Dr.Fone-Screen Unlock is a program that can help you bypass the passcode and get into your backups. So, what are you waiting for? It’s time to avoid the problem of iTunes backup password never set.
7 Top Ways To Resolve Apple ID Not Active Issue For Apple iPhone 14 Plus
Your Apple ID is the cornerstone of your Apple device experience. It serves as the key to accessing a lot of functions. It plays an essential role, from App Store purchases to iCloud storage and device syncing. It ensures smooth functionality across Apple devices. Apart from its convenience, the Apple ID serves as an essential element for security.
Yet, despite its significance, issues can arise, disrupting the active status of your Apple ID. In this article, we’ll discuss one common yet frustrating issue: this Apple ID is not active. The guide will provide 7 effective methods to restore the functionality of your Apple ID. Additionally, we’ll highlight the most efficient approach to swiftly resolve this issue.

Part 1. Reasons Why Apple ID Is Not Active
Understanding the causes behind “ why my Apple ID is not active” is necessary for resolving it. Several factors contribute to this problem, requiring attention for a successful resolution. A few of these reasons are outlined below to help you understand the issues with Apple ID:
1. Incorrect Login Credentials
An inactive Apple ID results from incorrect login information. Mistyped passwords or forgotten Apple ID usernames can render the account inactive.
2. Account Security Measures
Apple employs strict security measures to protect user accounts. Sometimes, an Apple ID becomes inactive due to suspicious activities. This triggers security locks to safeguard sensitive information.
3. Payment or Billing Issues
Unsettled payments, expired credit cards, or billing-related problems can lead to an inactive Apple ID. Failure to update payment information or resolve outstanding dues may cause this issue.
4. Server or Network Problems
At times, issues with Apple’s servers or network connectivity problems on your end can contribute to an inactive Apple ID. This may prevent proper authentication and verification, resulting in the inactivity of the account.
5. Software Updates or Glitches
System updates or software glitches might also play a role in deactivating an Apple ID. Incompatibility issues can arise from software updates or glitches within the OS. These can interfere with the account’s active status.
Part 2. [Direct Solution] Fix Apple ID Not Active Issue With Wondershare Dr.Fone
When it comes to resolving my Apple ID, which is not active, Wondershare Dr.Fone stands out as an exceptional solution. It is universally recognized for its reliability and user-friendly interface. Dr.Fone provides an effortless process for unlocking Apple ID and restoring accessibility to your device. The tool makes it easy to fix issues related to Apple ID without needing to figure out complicated settings.
It can permanently bypass the Apple ID lock, even when the Find My feature is active. You can regain access to all your iCloud services and Apple ID features by signing in with a new account. Dr.Fone doesn’t just handle Apple ID concerns; it also bypasses iCloud Activation Lock . Additionally, it allows you to bypass Mobile Device Management (MDM) from your device.
Key Characteristics of Wondershare Dr.Fone
- Supports different unlock types and is compatible with the latest iOS versions and iPhone models, making it versatile.
- It alsooffers the ability to remove iTunes backup encryption without damaging its data.
- Allows removing the SIM lock, allowing you to use your device internationally.
Steps To Fix Apple ID Not Active Issue With Dr.Fone
The user-friendly interface of Dr.Fone ensures that all types of users can remove Apple ID from their devices. To fix the Apple ID not active on iPhone issue with Dr.Fone - Screen Unlock (iOS), follow these steps:
- Step 1. Initialize Dr.Fone and Initiate Apple ID Removal
Begin by opening Wondershare Dr.Fone on your computer. Then, navigate through “Toolbox,” access “Screen Unlock,” and select “iOS” as the Apple iPhone 14 Plus device type. In the next window, locate and click the “Remove AppleID” option from the available choices. Ensure your iOS device is connected to the computer; proceed by clicking the “Unlock Now” button.

- Step 2. Verification of Device Locks and Two-Factor Authentication
Afterward, the platform will prompt you with inquiries before advancing. Firstly, confirm if a screen lock is set up on your iDevice. Ensure that it is active, and proceed by selecting “Yes.” Subsequently, verify if Two-Factor Authentication is activated on your iDevice. If not, activate it and click “Yes” to unlock the Apple ID.

- Step 3. Accessing Recovery Mode and Downloading iOS Firmware
To initiate Recovery Mode for your iDevice, follow the on-screen instructions. Once in “Recovery Mode,” the Apple iPhone 14 Plus device’s information will display on the subsequent screen. Upon recognizing the “Device Model,” you’ll be prompted to select the “System Version.” The iOS firmware download commences on clicking “Start,” and its progress is visible on the next screen.

- Step 4. Verifying Firmware and Confirming Apple ID Unlock
Once the firmware download is complete, the platform verifies it. To begin unlocking your Apple ID, select “Unlock Now.” A prompt will pop up, requesting you to enter a code to proceed. Input the code and choose “Unlock” to start the unlocking process. After a successful unlocking, a confirmation message will appear on your screen. To conclude the process after the Apple ID is unlocked, click on “Done.”

Tips: Are you searching for a powerful iPhone Unlock tool? No worries as Dr.Fone is here to help you. Download it and start a seamless unlock experience!
Part 3. Some Other Basic Solutions to Apple ID Not Active
Wondershare Dr.Fone - Screen Unlock (iOS) provides a reliable and efficient Apple ID but is not the active solution. Yet, there are alternative solutions that are worth considering. These solutions offer different approaches that might suit various preferences or specific situations. Here are some basic solutions to resolve the ‘Apple ID not active’ issue:
Way 1. Try Restarting the iOS Device
An inactive Apple ID issue might sometimes stem from a temporary glitch within the Apple iPhone 14 Plus device’s OS. In such cases, a simple restart can effectively resolve the problem. This helps reinstate the active status of your Apple ID:
Instructions. Begin by pressing the “Side” button along with any volume button at the same time. It will lead to the appearance of the “Power” slider, which you need to slide right to turn off the Apple iPhone 14 Plus device. Once it is turned off, press and hold the “Side” buttons to turn on your Apple iPhone 14 Plus.

Way 2. Try Changing Wi-Fi or Mobile Data
An inactive Apple ID issue might occasionally arise due to connectivity problems. Switching between Wi-Fi and mobile data can help troubleshoot network-related issues. As a result, it can resolve the error affecting your Apple ID’s activity. As a result, the Apple iPhone 14 Plus device can be restored to its normal state.

Way 3. Try Resetting Your Apple ID Password
Resetting your Apple ID password is a common solution for addressing problems linked to an inactive ID. This proves particularly effective when issues stem from entering incorrect login details.
Solution 1: Reset Apple ID Password From Settings
Do you know your Apple ID and simply need to reset the password? You can easily do so by following these steps within your Apple iPhone 14 Plus’s Settings:
- Step 1. Initially, access the “Settings” on your device and select the “Apple ID” at the top. Press “Sign-In & Security” on the following screen to proceed further.

- Step 2. Next, tap “Change Password” and provide your device passcode. You will need to type in a new password, verify it, and press “Change” from the top-right corner.

Solution 2: Reset Apple ID Password From iForgot Website
Are you unable to reset your Apple ID password directly from your device? If you encounter issues using settings, another way to reset your Apple ID password exists. To initiate the password reset process, utilize the iForgot website. Follow these steps for Apple ID, not active solution using the iForgot website:
- Step 1. Access iforgot.apple.com using a web browser on either your computer or smartphone. Upon reaching the iForgot page, click the “Reset Password” button.

- Step 2: Upon reaching the subsequent screen, input the “Email or Phone Number” linked to your Apple ID. Then, verify the CAPTCHA verification and proceed by tapping “Continue.” Adhere to the instructions on the screen to finalize the password reset procedure.

Way 4. Check the iCloud Status Page
Verifying the status of Apple’s services, including iCloud, can help determine if there’s an ongoing outage. The Apple Status page provides real-time information about Apple’s service. It displays disruptions, maintenance, or outages that might impact a service’s availability. Follow these steps to check the iCloud Status page:
Instructions. Using a web browser on your computer or smartphone, go to the System Status page provided by Apple. Check the status for services such as “Apple ID,” “iCloud Accounts & Sign In,” and other services. The fault lies at Apple’s end if the indicators in front of these services are another color than green.

Way 5. Look Out for Apple Support
When all other troubleshooting methods fail to resolve the issue of an inactive Apple ID, contacting Apple Support is the last step. It can be an essential step if you seek personalized assistance and guidance. Apple’s support team comprises experts capable of providing tailored solutions for various iOS issues.
When connecting with Apple Support, be ready to provide details about your issue. Explain that your Apple ID appears inactive despite trying various troubleshooting methods. Apple Support will guide you through specific steps or may provide further assistance to resolve the issue. Follow their instructions carefully and provide any necessary information or verification as requested.

Conclusion
In conclusion, an Apple ID that is not active can disrupt access to essential device services. Various troubleshooting methods offer solutions, including resetting passwords, checking network connections, and consulting Apple Support. Yet, Dr.Fone is a hassle-free and efficient option among the solutions provided.
How to Unlock Apple iPhone 14 Plus with a Mask On
Are you tired of wearing a mask in this pandemic? Apple introduced a new feature through which people can unlock iPhone face ID while wearing a mask. Before this, people either had to use other types of passwords or put off the mask to use Face ID. However, this feature is only available on iOS 15.4, depicting that iPhones containing earlier iOS versions won’t be able to enjoy this feature.
Only iPhone 12 and the latest models can use Face ID with a mask on, which reflects that models like iPhone 11, iPhone X, and the older models cannot utilize this function. Moreover, an additional way to unlock iPhone is to use Apple Watch to unlock iPhone 11, X, or earlier models.
Once you meet these requirements, you can easily unlock your Apple iPhone 14 Plus while wearing a mask and get further details by reading this article.
Part 1: How to Unlock iPhone Face ID with a Mask on
Are you excited to unlock your Apple iPhone 14 Plus while wearing a face mask? This section will give you detailed steps to unlock your Apple iPhone 14 Plus with a mask on, but before proceeding, make sure that you have updated your phone’s model to iPhone 12 or iPhone 13. This iOS 15.4 version feature is only available on:
- iPhone 12
- iPhone 12 Mini
- iPhone 12 Pro
- iPhone 12 Pro Max
- iPhone 13
- iPhone 13 Pro Max
- iPhone 13 Pro
- iPhone 13 Mini
- iPhone 14
- iPhone 14 Pro
- iPhone 14 Pro Max
- iPhone 15
- iPhone 15 Pro
- iPhone 15 Pro Max
Once you have updated to iPhone 12 or iPhone 13 model, you will automatically receive the prompt to set your Face ID while wearing a mask. If you have missed the chance to scan your face during the setup of iOS 15.4, follow the below guidelines to activate this fantastic feature unlock iPhone with a mask:
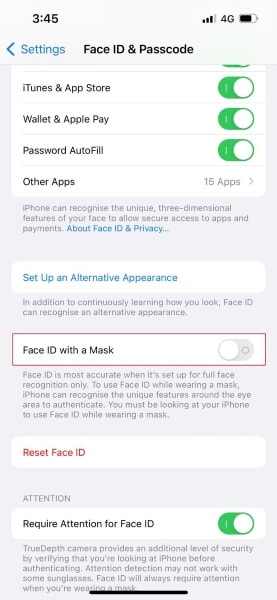
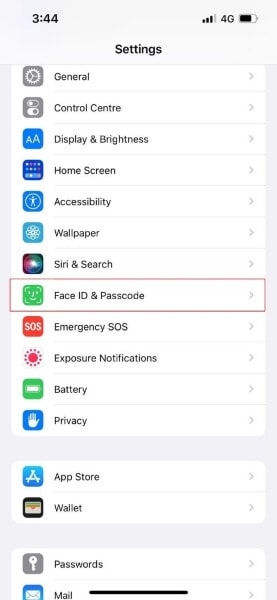
Step 1: Navigate to the app “Settings” from the home screen of your Apple iPhone 14 Plus. From the displayed menu, select “Face ID & Passcode.” Enter your passcode to give verification.

Step 2: Tap on the toggle switch of “Use Face ID with a Mask.” Afterward, select “Use Face ID with a Mask” to begin with settings.
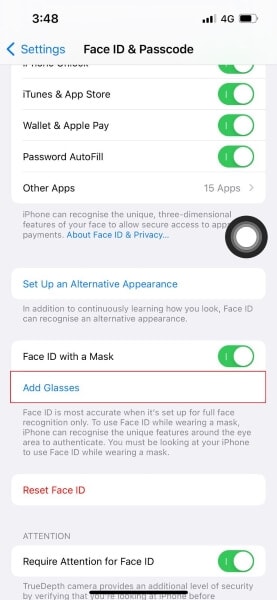
Step 3: Now, it’s time to scan your face with your Apple iPhone 14 Plus to initiate the setup. Again, you don’t have to wear a mask at this stage, as the Apple iPhone 14 Plus device’s main focus while scanning would be the eyes. Also, if you wear glasses, you can proceed without taking them off.

Step 4: After scanning your face twice, select “Add Glasses” by tapping on it. You can use your Face ID while wearing your regular glasses. Make sure that you scan your face with every pair of glasses daily.
After carefully following the steps mentioned above, you are ready to unlock your Face ID with a mask. Remember that Face ID will scan and focus mainly on your eyes and forehead. However, it cannot work in the scenarios if you have completely concealed your look by wearing hats or accessories that can hide your face.
Part 2: How to Unlock iPhone Face ID Using Apple Watch
Before unlocking iPhone through the Apple Watch, some requirements are necessary for security reasons. Read the following requirements to proceed further:
- First, you would need an Apple Watch that must be functioning on WatchOS 7.4 or later.
- The passcode on your Apple iPhone 14 Plus must be enabled from the settings. If you have not enabled the passcode on your Apple iPhone 14 Plus, you can do it by navigating to the “Settings” and tapping on “Passcode.” From there, enable the passcode by turning it on.
- You should be wearing the Apple Watch on your wrist, and it must be unlocked.
- Your Apple iPhone 14 Plus should be upgraded to iOS 14.5 or above.
- The wrist detection on your phone should be activated.
To enable the feature of unlocking the Apple iPhone 14 Plus with an Apple Watch, the steps are:
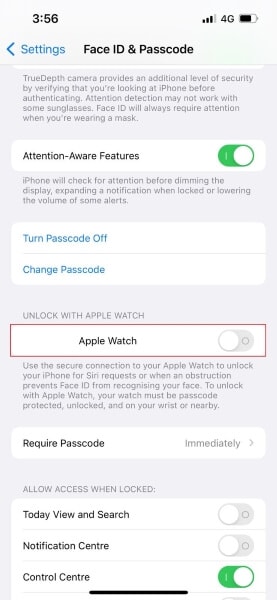
Step 1: Head to the “ Settings “ app and choose “Face ID & Passcode.” Give your passcode for authenticity and proceed further.
Step 2: Now, on the displayed menu, scroll down to the bottom, where you will see the toggle of “Unlock with Apple Watch.” Tap on that toggle to enable this feature.
After enabling this feature, you can unlock your Apple iPhone 14 Plus with a mask on through your Apple Watch. You need to grab your phone and hold it the same way you would in a normal Face ID scan. The phone will be unlocked, and you will feel a slight vibration on the wrist. Also, a notification will pop up on your watch, indicating that your Apple iPhone 14 Plus has been unlocked.
Bonus Tips: Unlock iPhone Without Any Experience
Are you stuck with your locked iPhone? Don’t worry, as Dr.Fone - Screen Unlock can unlock any screen passcode, Face ID, Touch ID, and PINs. You don’t need any technical experience to use this tool, as the user interface is pretty simple and understandable. Moreover, it works perfectly well on all iOS devices at the best possible speed.
Dr.Fone - Screen Unlock (iOS)
Unlock iPhone/iPad Lock Screen Without Hassle.
- Intuitive instructions to unlock iPhone without the passcode.
- Removes the iPhone’s lock screen whenever it is disabled.
- Works for all models of iPhone, iPad and iPod touch.
- Fully compatible with the latest iOS 11,12,13.


3981454 people have downloaded it
You can also unlock Apple ID and iCloud passwords without losing the data. Also, while unlocking iPhone Screen Time Passcode through this platform, all of your data and information will be kept intact, and you can function your phone normally again.
Conclusion
We all can relate that unlocking an iPhone on Face ID while wearing a face mask in a pandemic era is annoying. That’s why Apple introduced a new feature of unlocking the Apple iPhone 14 Plus Face ID with a mask on to help individuals who rely entirely on Face ID. Find out about enabling this feature to easily unlock your Apple iPhone 14 Plus Face ID while wearing a mask.
Also read:
- [New] In 2024, 10 Premier Free Windows Screencasting Apps
- [Updated] 2024 Approved Professionally Speaking The Top 5 Drone Recommendations
- [Updated] A-List Steadicams for High-Quality DSRL Footage
- [Updated] Transform Every Moment Top Ideas for Productive Podcast Sessions
- 5 Ways to Restart Motorola Moto G24 Without Power Button | Dr.fone
- Expert Tips on Maximizing Adobe's Cloud Storage Capabilities and Top Contenders for 2024
- Expertly Curated List of Where to Buy Quality Phones Online and Offline
- How to Bypass Apple iPhone 12 Pro Max Passcode Easily Video Inside
- How To Fix Unresponsive Touch Screen on Itel P55 | Dr.fone
- In 2024, 5 Most Effective Methods to Unlock iPhone 6s in Lost Mode
- In 2024, A Comprehensive Guide to Apple iPhone SE (2020) Blacklist Removal Tips and Tools
- In 2024, Can You Unlock Apple iPhone 7 After Forgetting the Passcode?
- In 2024, How To Change Country on App Store for Apple iPhone 12 Pro With 7 Methods
- In 2024, How To Change Your Apple ID Password On your iPhone 6 Plus
- In 2024, How To Remove Flashlight From Apple iPhone 11 Pro Lock Screen
- In 2024, Is Your Apple iPhone 14 in Security Lockout? Proper Ways To Unlock
- Movavi: Il Modo Più Semplice per La Conversione Gratuita Di Immagini in Formato JPG - Ottieni Risultati Migliori!
- Title: Apple iPhone 14 Plus Backup Password Never Set But Still Asking? Heres the Fix
- Author: Sophia
- Created at : 2024-09-30 17:23:42
- Updated at : 2024-10-03 16:18:25
- Link: https://ios-unlock.techidaily.com/apple-iphone-14-plus-backup-password-never-set-but-still-asking-heres-the-fix-by-drfone-ios/
- License: This work is licensed under CC BY-NC-SA 4.0.