
Complete Guide For iPhone 14 Lock Screen
Complete Guide For Apple iPhone 14 Lock Screen
Like most iPhone users, you rely on your lock screen to keep your data safe and protected. But with the release of iOS 17, there are a few new features and changes that you need to know about. This complete guide will clarify everything you need to know about the iOS 17 lock screen.
We’ll explain to you how to use the new features, protect your data, and more. So don’t waste any time - read on for all the details!
How to Have a Customized iOS 17 Lock Screen?
Before we get started, you should know that there are three ways to have a customized lock screen in iOS 17. Let’s get to know more about them.
1. How to select your favorite wallpaper
The first way is to use a pre-made wallpaper from the Apple Wallpaper Gallery.
To do this, go to Settings > Wallpapers & Brightness > Choose a New Wallpaper. Then, select the Apple Wallpaper Gallery and choose the image you want to use.
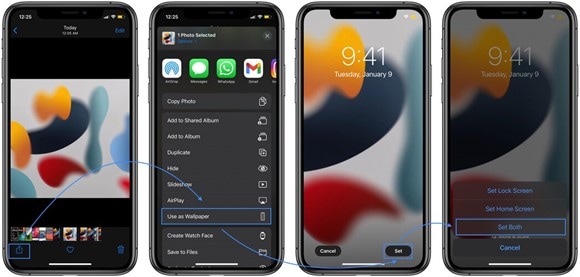
The second way to have a customized lock screen is to use a Live Photo. To do this, go to Settings > Wallpapers & Brightness > Choose a New Wallpaper. Then, select the Live Photo option and choose the image you want to use.
Note: You can only use Live Photos for your lock screen if your Apple iPhone 14 is unlocked.
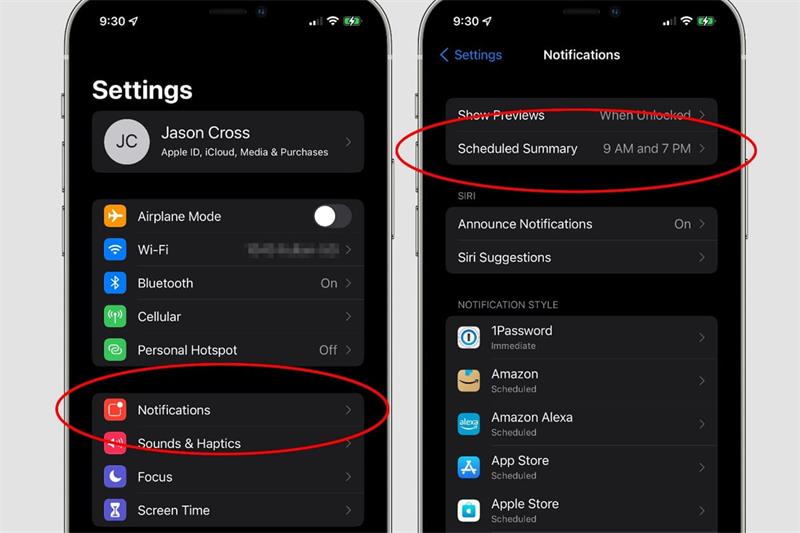
2. How to manage notifications
If you want to manage notifications on the iOS 17 lock screen, there are two ways to do it.
At first, you can go to Settings > Notifications. Here, you can choose how many notifications you want to see on your lock screen and which apps can send you notifications.
The Do Not Disturb feature is the second way to manage notifications. To do this, go to Settings > Do Not Disturb and enable the feature. You can also schedule when Do Not should turn on and off. This feature work like a charm if you want to silence all notifications at night.

3. How to set Auto-Lock time
If you want to set the Auto-Lock time, go to Settings > Display & Brightness > Auto-Lock. Here, you can choose how long it should take for your Apple iPhone 14 to lock automatically.
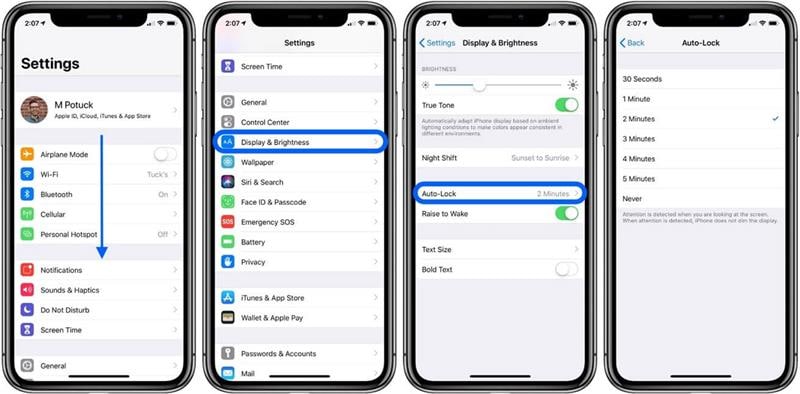
By default, the Auto-Lock time is set to 30 seconds. But you can choose to lock it immediately, after 1 minute, 5 minutes, or never.
How to Turn Off/On Lock Screen in iOS 17?
If you want to turn off the lock screen, go to Settings > Touch ID & Passcode (or Face ID & Passcode). Then, scroll down and disable the Unlock with Passcode (or Unlock with Face ID) option.
Enable the Unlock with Passcode (or Unlock with Face ID) to turn ON the lock screen.

But if you have forgotten your passcode, don’t worry. The next section will show you how to bypass the lock screen.
How to Bypass the iOS 17 Lock Screen Passcode?
Different methods can help you bypass the iOS 17 lock screen passcode. Let’s discuss them in detail.
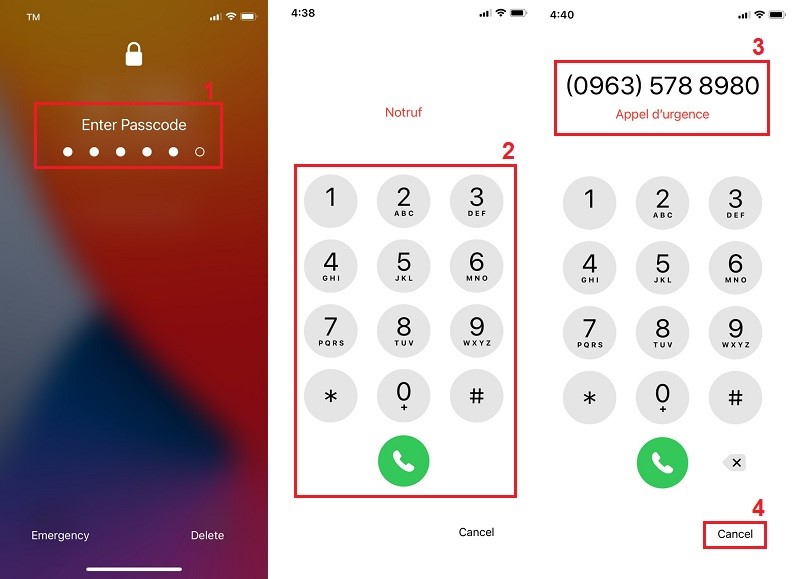
1. Use Emergency call
The first method to bypass the passcode is to use the emergency call feature.
To do this, access your device with five wrong passcodes attempts. This will trigger the emergency call feature. All you need to do is, dial an emergency number and then tap on the cancel button, and you’ll be taken to the home screen.
That’s how you bypass the lock screen without losing any data.
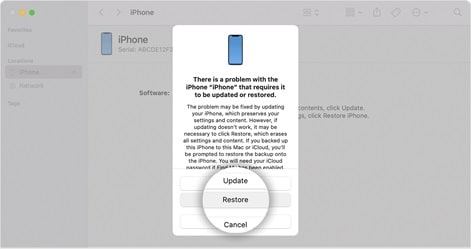
2. Bypass passcode with iTunes restore
If your Apple iPhone 14 needs to be backed up with iTunes sync feature, you can use this method to bypass the passcode.
To do this, connect your Apple iPhone 14 to a computer and open iTunes. Then, click the Restore button and follow the on-screen instructions to restore your Apple iPhone 14.
It will take some time, but you can use your Apple iPhone 14 without a passcode once it’s done.
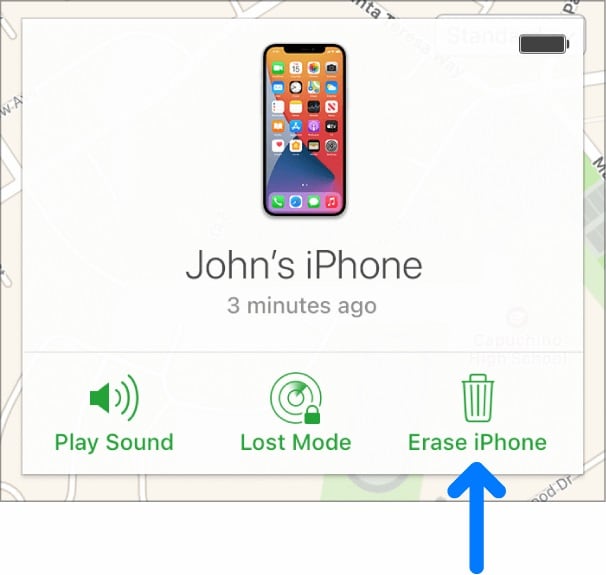
3. Use Find My in iCloud
If you have synced your Apple iPhone 14 with iCloud, you can try the Find My feature to bypass the lock screen.
To do this, go to icloud.com/#find and sign in with your Apple ID. Then, select your device from the list of devices and click on the Erase button.
To do this, go to icloud.com/#find and sign in with your Apple ID. Then, select your device from the list of devices and click on the Erase button.
All the data will disappear on your Apple iPhone 14, and you’ll be able to access it without a passcode.
This process can also take some time, so be patient.
4. Dr.Fone-Screen Unlock
If all mentioned methods don’t work for you, the ultimate solution is to use Wondershare Dr.Fone-Screen Unlock and bypass the passcode. To finish it, you can follow the steps given below carefully.
Step #1: Download/Install Dr.Fone on your Computer or MacBook
A third-party tool named Dr.Fone-Screen Unlock can help you in this regard. The wonderful part is that you don’t have to learn any technical knowledge.
First, download/install Dr.Fone-Screen Unlock on your computer or MacBook. You can get it from here:
After downloading the tool, install launch it on your PC.
Step #2: Launch the Application and Go for Screen Unlock
Once you have installed the tool, launch it and go to its main window. Here, you will see different features. Select the Screen Unlock feature from the list.

Step #3: Connect your Apple iPhone 14 and Activate DFU Mode
Now, you need to connect your Apple iPhone 14 to the computer using an Apple original cable. Once done, you need to put your Apple iPhone 14 into DFU mode.
To do this, you need to press and hold the Home button and Sleep/Wake button simultaneously for 10 seconds.
After that, release the Sleep/Wake button but keep holding the Home button until Dr.Fone detects your device in DFU mode.

Step #4: Download the Appropriate Firmware
Once Dr.Fone detects your Apple iPhone 14, it will ask you to continue. So, proceed to the next, and here you will be asked to download the correct firmware package for your device.
So, choose the firmware carefully and hit the download button.
Depending on your internet connection, you may have to wait for a longer time. But once the firmware is downloaded successfully, you can proceed to the next step.

Step #5: Unlock your Apple iPhone 14
After the firmware is downloaded, you need to press the Unlock Now button, and Dr.Fone will start to unlock your Apple iPhone 14 without a passcode. Once it is done, you can get into your device without any restriction.

FAQs
Why iOS 17 Lock Screen is not working?
There could be many reasons for the malfunction of the Lock Screen in iOS 17. The most common reason is the installation of incompatible jailbreak tweaks. Therefore, it is recommended to remove all the jailbreak tweaks and check whether the problem persists.
You can try resetting your device to factory settings if the problem still exists. But make sure to back up your data before doing so, as it will erase all your data.
How do I fix my iOS 17 lock screen bugs?
There are various ways to fix the lock screen bugs in iOS 17. You can try resetting your device to factory settings, or you can also try restoring your device from a previous backup.
If none of these methods work, you can try using a third-party tool like Dr.Fone-Screen Unlock to bypass the lock screen.
How do you unlock a locked iPhone iOS 17?
There are various ways to unlock a locked iPhone running on iOS 17. You can try the feature of Find My iPhone, or you can also use a third-party tool like Dr.Fone-Screen Unlock.
How do you fix an unresponsive lock screen on iPhone running on iOS 17?
If your lock screen is unresponsive on iPhone running on iOS 17, you can try force restarting your device. To do this, you need to press and hold the Home button and Sleep/Wake button simultaneously for 10 seconds.
After that, release the Sleep/Wake button but keep holding the Home button until you see the Apple logo. Once your device is restarted, check if the problem persists or not.
If the problem still bothers you, you can try using a third-party tool like Dr.Fone-Screen Unlock to reset the phone, eventually fixing the issue.
The Bottom Line
So this is what we want to talk about the iOS 17 Lock Screen with you. We have tried to cover everything in this article, including the new features, lock screen bugs, and how to fix them.
All the fixes mentioned above are tested and proven to be working. So you can try them without any hesitation.
But if you are still facing problems with your lock screen, then the greatest thing you can do is to use a third-party tool like Dr.Fone-Screen Unlock. This tool is very easy to use and will unlock your device within minutes.
So, if you are looking for a hassle-free solution to fix your lock screen issues, then this is the best one you should never miss.
Disabled Apple iPhone 14: How to Unlock a Disabled Apple iPhone 14?

Apple iPhone 14 Disabled?
Because of using face masks, Face ID on iPhone does not always work correctly, and we are entering our passcodes more than before. If we enter it incorrectly a few times in succession, the phone will disable itself to prevent unauthorized access. It can seem like the end of the world because in so many ways smartphones have become our world. Here are ways you can unlock your Apple iPhone 14 disabled due to too many incorrect passcode attempts.
Part 1: Unlock Disabled Apple iPhone 14 Without iTunes/ iCloud Using Dr.Fone - Screen Unlock (iOS)
We know and understand that the word troubleshooting can remind you of long telephone calls with support or making appointments and driving down to specialists and spending obscene amounts of money to get solutions. You do not want that. How about a way you could unlock your Apple iPhone 14 in a simple, 1-click way instead?
Dr.Fone - Screen Unlock is a unique tool designed to help you avoid all hassles and get back on track quickly. It comprises modules designed to help you with all the issues that you might encounter during smartphone use. Naturally, there is something to help you when your Apple iPhone 14 is disabled. You don’t need to use anything else, no other software or special cable or support. All you need is this one software you can download on your computer (both macOS and Windows supported) and you’re good to go.
Dr.Fone - Screen Unlock (iOS)
Unlock Disabled Apple iPhone 14 Without iTunes/ iCloud.
- Intuitive instructions to unlock iPhone without the passcode.
- Removes the iPhone’s lock screen whenever it is disabled.
- Easy to use with detailed guides.
- Compatible with the latest iOS/iPadOS version.
3981454 people have downloaded it
Do note that all methods that unlock your Apple iPhone 14 will necessarily wipe your Apple iPhone 14 and remove all data from the Apple iPhone 14 device, essentially booting it up as new.
Step 1: Launch Dr.Fone and click the module titled “Screen Unlock”.
Step 2: Choose the “iOS” option, then select “Unlock iOS Screen” on the subsequent screen to continue unlocking your Apple iPhone 14.

Step 3: Follow the provided instructions to start the disabled Apple iPhone 14 in Recovery Mode to unlock it. If for any reason the phone does not boot in Recovery Mode, there are instructions provided at the bottom to enter what is called DFU mode.
Step 4: Dr.Fone will read and display your phone model and the software installed on it. If the model displayed is incorrect, use the dropdown to pick the correct detail. Click “Start” to download the specific firmware file for your particular Apple iPhone 14 model.
Step 5: After the download completes, please click Unlock Now to start unlocking the disabled Apple iPhone 14.
Your Apple iPhone 14 will be unlocked in a short span of time. Please note that all data would have been wiped out from the Apple iPhone 14 device. When you set the Apple iPhone 14 device up again, if you set it to use iCloud, data such as Contacts, iCloud Photos, iCloud Drive data, etc. will be downloaded onto your device again. The apps you had on your Apple iPhone 14 prior to it getting disabled can be downloaded again from the App Store. If you did not use iCloud but backed up the data manually, you will have to manually restore that data onto the Apple iPhone 14 device again.
 safe & secure
Part 2: Unlock Disabled Apple iPhone 14 Using iTunes or macOS Finder
Of course, there is an official way that Apple provides for users to restore device firmware using iTunes or macOS Finder. For this, iPhone is put under Recovery Mode manually and Finder or iTunes is used to reinstall software on it directly from Apple. This process is fine for people who are conversant in tech, since this process can throw up a lot of errors that are just numbers, and people can get confused as to what they mean, resulting in frustration.
Step 1: Connect your Apple iPhone 14 to a Windows/ macOS device and launch iTunes. If you are on a Mac that runs macOS Catalina or higher, open Finder since you would not have access to iTunes anymore.
Step 2: Pick your Apple iPhone 14 and do the following:
(2.1) Press the volume up button and let it go.
(2.2) Press the volume down button and let it go.
(2.3) Press the Side Button (power button, on the right side of your Apple iPhone 14) and keep it pressed till Finder or iTunes detects the phone in Recovery Mode.
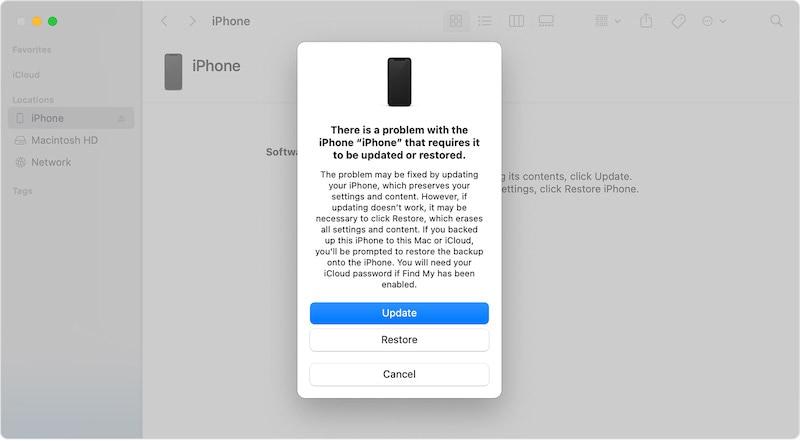
Step 3: Choose Restore to download and reinstall the latest iOS on your Apple iPhone 14 and unlock your Apple iPhone 14.
When the Apple iPhone 14 reboots, it will be reset to factory settings, and you can set it up again as you did when brand new.
Part 3: Unlock Disabled Apple iPhone 14 Using iCloud Website (Find iPhone method)
Another method you may go with to unlock your disabled Apple iPhone 14 is using the iCloud website to gain access back. This is a fairly easy way and doesn’t require going through complex hoops.
Find My is available both online via the iCloud website and on iOS devices and on Macs. In case the only Apple product you own is the currently disabled Apple iPhone 14, you can use Find My on the iCloud website from any other computer you may have to unlock your disabled Apple iPhone 14.
Step 1: Visit https://icloud.com and log in into the same iCloud account/ Apple ID as the disabled Apple iPhone 14.
Step 2: Go to Find My, select your Apple iPhone 14.
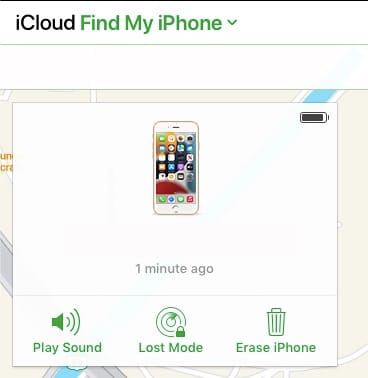
Step 3: Click Erase iPhone and confirm.
This will start the wipe process on your Apple iPhone 14 remotely and your Apple iPhone 14 will be reset to factory settings. You can now proceed to setup your Apple iPhone 14 once again.
Part 4: Unlock Disabled Apple iPhone 14 Using Find My iPhone App
There are times you have another iOS device in the family or just lying around, you can use that device to unlock your disabled Apple iPhone 14. This method is particularly useful if you’re traveling with family or alone, and only have family members with their own iOS devices or, say, your iPad with you. As always, note that all these methods will wipe your data from your Apple iPhone 14.
Step 1: Open the Find My app on your other iOS device or Mac
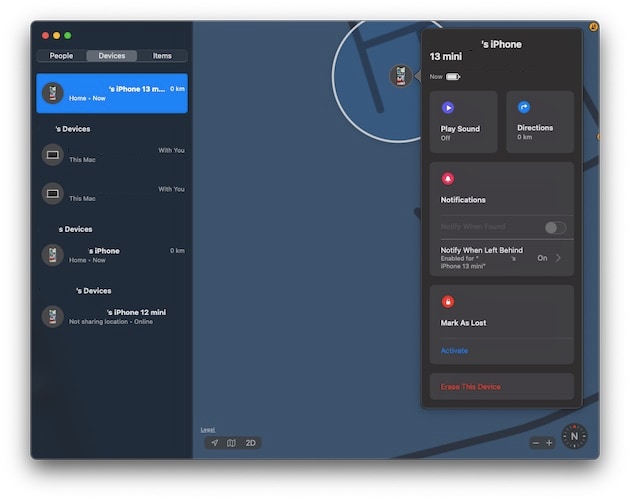
Step 2: Select your disabled Apple iPhone 14 from the Apple iPhone 14 devices from the left pane, click/ tap your disabled Apple iPhone 14 and click/ tap Erase This Device
The disabled iPhone will be wiped and reset to factory settings. You can then set it up again.
Part 5: Unlock Disabled Apple iPhone 14 Without A Computer
There are millions in the world who do not use the traditional computer so to speak. They have entered the post-PC era as they say, and their needs are met without a regular desktop or a laptop. They live wirelessly. They travel the world. Are you one of them? How would you unlock disabled Apple iPhone 14 with no desktop/ laptop computer around? You have a few options.
You can use your other iOS device with Find My iPhone app to unlock your disabled Apple iPhone 14 or you can use the iCloud website from your other device and Find iPhone app to unlock your disabled Apple iPhone 14.
The second option is to get a loaner device from someone you know. A loaner device is a device you borrow from someone to use for a purpose and return it when you are done with it. In this case, you can ask for a computer from someone you know and use it to unlock your disabled Apple iPhone 14 and return the Apple iPhone 14 device back. That way, you can use iTunes or macOS Finder if you’re more favorable to using that method.
When using a computer, the simplest, easiest, most flexible, and robust method to unlock disabled Apple iPhone 14 is using third-party tools such as Dr.Fone – Screen Unlock (iOS). However, Dr.Fone is not just for troubleshooting and unlocking your disabled devices. Dr.Fone is like that multi-utility knife that can do a variety of things.
Using Dr.Fone you can not only unlock your Apple iPhone 14 with ease, you can also use it periodically as a backup and restore tool that gives power in your hands. How does it do that? When you launched Dr.Fone, you had several modules to choose from and you chose Screen Unlock to unlock your disabled device. Instead of that, you can choose the Phone Backup module to backup and restore data from and to your device. Why would you use a third-party tool to backup and restore?
As you may be aware, using iTunes or macOS Finder allows you to backup and restore data onto your Apple iPhone 14 easily, but, the one glaring omission here is that it does not allow you to choose what you want to backup and what you want to restore. This is a much-coveted feature that is glaringly absent from the Apple world so far, and with Dr.Fone’s iOS Phone Backup feature you can have that choice in your hands, just like you do with Android. Dr.Fone allows you to choose what you want to backup, so, you can back up just your photos, just your text messages, just your files, or any combination thereof, for the matter. And, when it comes to restore, you can restore selectively as well. So, suppose you backed up your entire data using Dr.Fone, now you can restore just the text messages if you so want.
safe & secure
Part 6: Prevent iPhone From Getting Disabled Again
After all this to get access back, you might think let’s go passcode-less and prevent the hassle. Don’t do that - that’s worse and unsafe. Instead, here are tips you can use to make sure you don’t accidentally disable your Apple iPhone 14 again.
Tip 1: About Passcodes
- 1.1 Set a passcode that is easier to remember for you but difficult to think of for thieves and others.
- 1.2 Never use birthdates, years, vehicle numbers or any such numbers that may be easily tried by others.
- 1.3 Never use repeating numbers.
- 1.4 Do not use your ATM PIN as your phone passcode either. Think of some digits or combination that makes sense to you and only you. And then use it.
Tip 2: Use Face ID
Along with Passcode comes the option of Face ID on your Apple iPhone 14, so use that. That will minimize instances for you to enter your passcode, and may make you forget it again, though. So, make sure that the passcode you set does make sense to you and you can remember it always without effort.
Conclusion
Not all of us have the memory of elephants. With Touch ID and Face ID on our iPhones minimizing the use of passcodes, we may forget them. Another factor in forgetting passcodes is being too smart for our own good and trying to set up such a secure passcode that even we are not able to remember it. If we enter incorrect passcode too many times, the Apple iPhone 14 disables itself and we need to restore it to factory settings to unlock it again. There are several ways to do that, depending on the time you are willing to spend on the job and your proficiency level, along with the resources that you have with you right now. For example, if a method requires use of another iOS device and you do not have it, that method is not useful to you right now, pick another. Lastly, when the Apple iPhone 14 device is reset, instead of going passcode-less to make sure that you do not forget the passcode again, it is best to set up a passcode that you can somehow remember.
safe & secure
Detailed Review of doctorSIM Unlock Service For Apple iPhone 14
IMEI unlocking frees a mobile device from the limitations imposed by its original carrier. This allows the Apple iPhone 14 device to operate with different network providers worldwide. Numerous tools and techniques exist to unlock phones. These include software-based unlocking, hardware modifications, and IMEI-based solutions.
Among these methods, doctorSIM stands out as a reliable and reputable service. While alternative operational solutions are available, IMEI unlocking remains a popular choice. Some users may find it necessary when changing carriers or traveling abroad. In this doctorSIM review, we’ll review its functions, reliability, and pros and cons.

Part 1. Understanding The Basic Mechanism Behind doctorSIM: A Review
doctorSIM is a comprehensive solution for smartphones and offers a whole lot of features. These services range from recharging mobile devices to unlocking carrier locks. When it comes to unlocking carrier locks, doctorSIM legit claims to work for any carrier anywhere worldwide. Its primary function revolves around providing users with the ability to unlock their devices.
The tool provides users with the convenience of checking if their device is blacklisted. This service extends globally and comes at a reasonable price point. Moreover, doctorSIM unlock review and unlocking solutions cater to most iOS devices and Android phones. It includes even lesser-known niche brands, offering compatibility across a wide spectrum.
Key Features of doctorSIM
- It allows you to check the SIM lock status and warranty status of your iOS device.
- doctorSIM can also help you check the iCloud Activation Lock Status and MI Account Activation Status.
- Along with the old devices, this service is also compatible with the latest models, such as the Apple iPhone 14 15 series,
Pros
- There is no need to download and install any software on the Apple iPhone 14 device.
- Jailbreaking the Apple iPhone 14 device isn’t a requirement.
- Offers a 30-day money-back guarantee.
Con
- It can take up to a week to unlock a device
Part 2. Using doctorSIM for Easy IMEI Unlocking Operations
doctorSIM unlock reviews simplify the unlocking process by leveraging the IMEI number . Here, users can submit their device’s IMEI number and relevant details. It then provides an unlocking code or instructions tailored to their device model and carrier. Below are the instructions you should adhere to to unlock your device:
- Step 1. You can start by accessing the doctorSIM website using a web browser. Here, click the “Unlock” option, and from the drop-down menu, choose your device brand, for example, “Apple.”

- Step 2. On the following screen, scroll down to choose your smartphone model, followed by your country and network carrier. Next, choose the “Service” you want to use, provide an IMEI number, agree to the terms, and click “Next.”

- Step 3. This will take you to the next screen, where you can view the “Summary” of your order. If everything is all right, press “Next” to move to payments to pay the charges via Credit Card or Crypto. Afterward, wait for the process to complete, which can take days.

Part 3. Is the Entire doctorSIM System Legit?
doctorSIM is generally regarded as a legitimate platform for unlocking mobile devices. Its legitimacy is supported by various factors, ranging from reputation to customer reviews. It has established a credible reputation within the mobile device unlocking industry. The service has been operating for several years and has garnered users’ trust.
The platform operates within the legal frameworks governing IMEI unlocking services. It adheres to regulations and ensures that the unlocking methods used are lawful. While specific reviews may vary, many users have reported positive experiences.
Customer doctorSIM reviews highlight the platform’s reliability, effectiveness, and user-friendly interface. It provides clear information about the unlocking process, associated fees, and service terms. Such effective transparency contributes to its credibility.
Part 4. Other Top Alternatives of IMEI Unlocking
It is important to clarify that doctorSIM primarily focuses on IMEI unlocking. This liberates a device from carrier restrictions to enable use with various networks. Amongst all the discussion, it is crucial to differentiate that this service does not offer iCloud Activation Lock removal in any case. Here are some top alternatives specifically that you can consider when using doctorSIM for unlocking purposes:
1. IMEIDocto
Specializing in unlocking iPhones by IMEI, IMEIDoctor is a trusted service. It offers a dependable solution for users seeking freedom from carrier restrictions. IMEIDoctor stands out further due to its extensive support for various iPhone models and carriers. It solidifies its status as a reliable choice.

2. CellUnlocker
CellUnlocker stands out as a reputable IMEI unlocking service, catering to many types of smartphones. Known for its reliability, the service facilitates unlocking for numerous carriers globally. This provides flexibility for users requiring international use of their devices. The user-friendly interface further enhances the overall experience.

3. IMEIUnlockSIM
IMEIUnlockSIM is a specialized service focusing on unlocking iPhones through IMEI. Known for its straightforward process, it aims to provide users with a hassle-free experience. This service also offers iCloud unlock and IMEI checks. The service supports a variety of iPhone and Android models and provides timely customer support.

4. iUnlockBase
This IMEI unlocking service is a comprehensive service renowned for its expansive database. It supports a large number of devices and carriers. The platform provides various unlocking services, such as network unlocking and iCloud unlocking. Serving a worldwide audience, iUnlockBase guarantees a seamless unlocking process.

Part 5. What To Do When iCloud Activation Lock Active?
Although IMEI Unlocking turns out to be quite an exceptional service, it generally is not the only thing that becomes a barrier for iPhone users. The iCloud Activation binds an Apple device to a user’s Apple ID, making itself a great security measure. It presents a unique circumstance where services such as doctorSIM legit are inapplicable. Wondershare Dr.Fone specializes in bypassing the iCloud Activation Lock.
It allows users to circumvent it without needing the Apple ID. This unique capability sets Dr.Fone apart from other solutions. Once the activation lock is removed, it grants full access to users’ devices. Dr.Fone also extends its capabilities to remove an Apple ID in cases where the password is forgotten. Its remarkable performance includes the permanent bypass of the Apple ID lock.
Notable Characteristics of Wondershare Dr.Fone
- Remove MDM or Screen Time passcodes on your device effortlessly, preserving your data.
- Wondershare Dr.Fone specializes in bypassing various screen locks, including passcodes and Face IDs.
- Fone can remove the iTunes backup encryption lock without any impact on your data.
Steps To Bypass iCloud Activation Lock via Wondershare Dr.Fone
Dr.Fone is intended for users locked out of their devices. Given below are the steps you need to follow when using Dr.Fone to bypass iCloud Activation Lock:
1. For Devices Running iOS/iPadOS 12.0 to 14.8.1
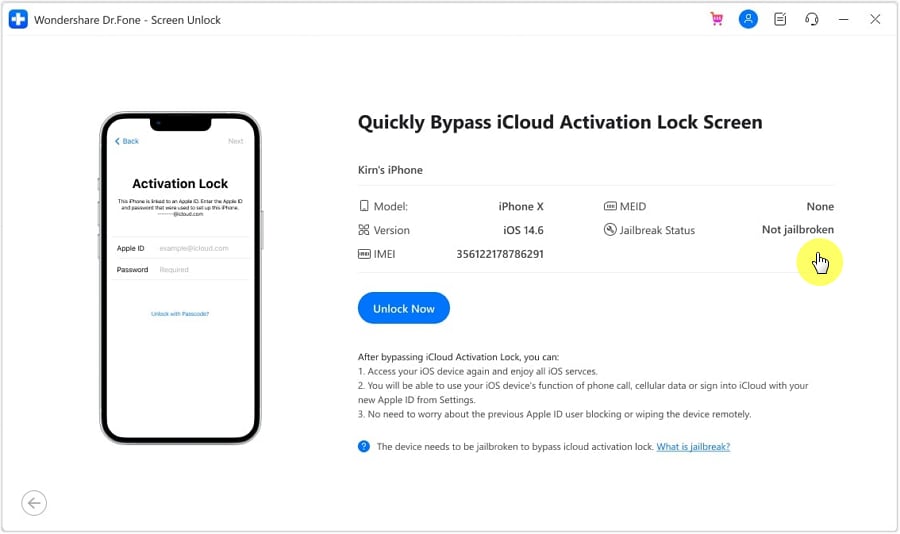
- Step 1. Installation and iCloud Activation Lock Removal
Install and launch the most recent version of Wondershare Dr.Fone onto your computer. Now, proceed to the “Toolbox” tab, navigate to “Screen Unlock” and select “iOS.” In the following window, choose “iCloud Activation Lock Removal” and click “Start” to begin the process and receive a prompt to connect your iOS device. Once connected, the window will display the progress status.

- Step 2. Device Identification and Unlock Initiation
Now, decide whether your device is GSM or CDMA, as it is an important aspect. Bypassing iCloud Activation Lock on a GSM device won’t affect the Apple iPhone 14 device. However, running this process on a CDMA device will result in a loss of cellular activities. Click “Unlock Now” to proceed further, and if your device is CDMA type, you’ll encounter a series of pointers. Go through them and click “Got It!” after agreeing with all the mentioned points.
- Step 3. Jailbreaking and Activation Lock Bypass
After this, if your iDevice isn’t jailbroken, you will be required to jailbreak your device. For that, you can follow the step-by-step textual instructions or watch a video. Once the Apple iPhone 14 device is jailbroken, the process will commence automatically to bypass the Activation Lock. A completion message will pop up on the window when the process finishes. Afterward, tap the “Done” button to finalize the process successfully.

2. For Devices Running iOS/iPadOS 15.0 to 16.3
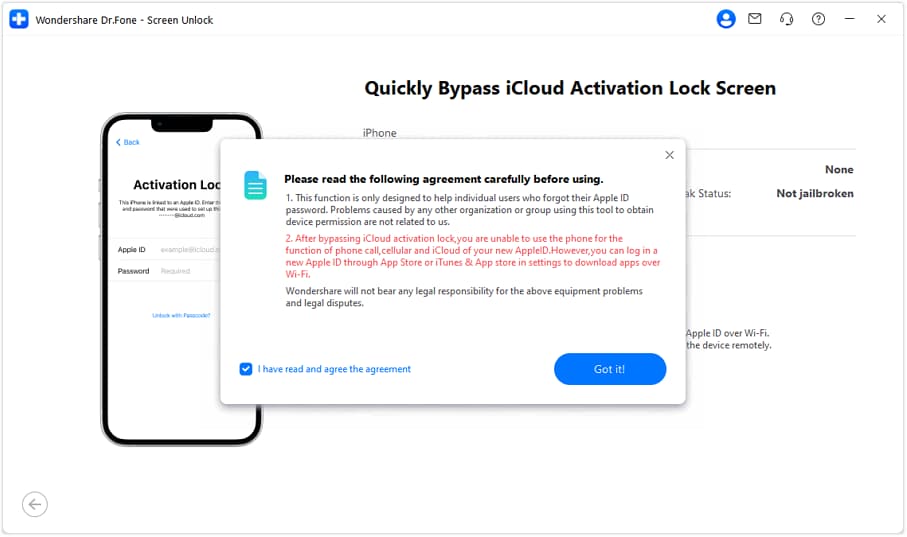
- Step 1. iCloud Activation Lock Removal Setup
On accessing the “iCloud Activation Lock Removal” page, a notification will display on the screen, alerting the user about the ongoing process. Carefully review all the information provided and select the “I have read and agree to the agreement” option. Proceed by tapping on the “Got It!” choice.
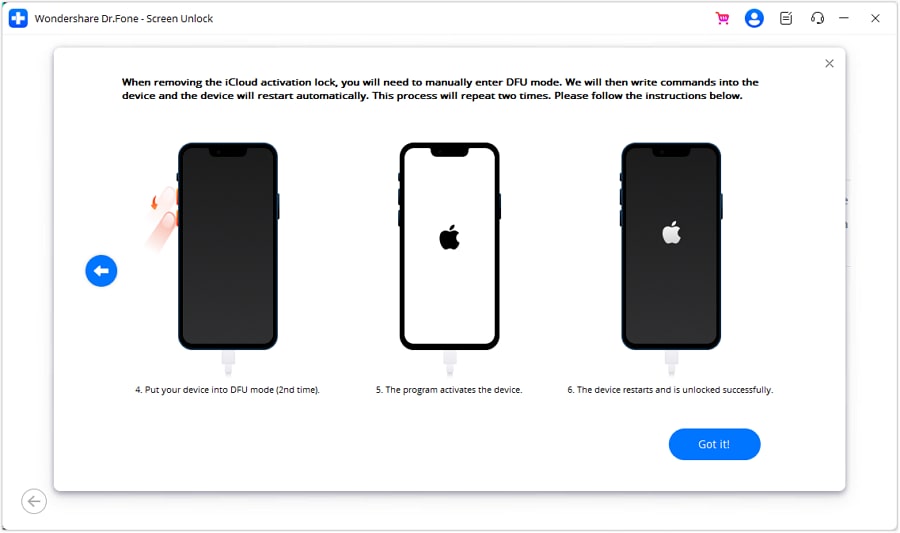
- Step 2. DFU Mode Initiation and Device Unlock
Follow the on-screen instructions to initiate the DFU Mode for your iOS device. Once in the particular mode, the program will send an initial command to the Apple iPhone 14 device, prompting it to restart. Click the right arrow to proceed and repeat putting the iOS device in DFU Mode. Likewise, upon completion, the program will activate and unlock the Apple iPhone 14 device promptly. Finally, click the “Got It!” button to conclude the process.
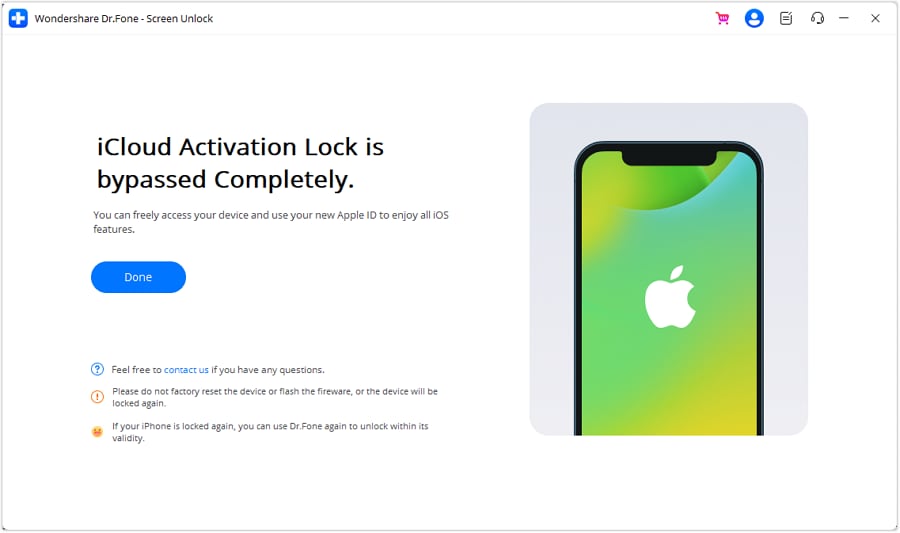
- Step 3. Completion of iCloud Activation Lock Removal
After processing the Apple iPhone 14 device in DFU Mode, Dr.Fone initiates the iCloud Activation Lock removal process. Monitor the progress bar to witness the process’s completion. Once finished, a completion message will appear on the screen. Click “Done” to finalize the removal of the iCloud Activation Lock.
3. For Devices Running iOS/iPadOS 16.4~16.6
For users with devices operating on iOS/iPadOS versions 16.4~16.6, Dr.Fone offers a streamlined approach to removing the iCloud Activation Lock. This solution is crafted to autonomously retrieve and jailbreak your device. This eliminates the necessity for manual interference or the use of third-party apps. Post-jailbreak, proceed with the steps detailed above in the “For Devices Running iOS/iPadOS 12.0 to 14.8.1” section.
Conclusion
Throughout this doctorSIM unlock service review, we explored the different IMEI unlocking services, focusing on doctorSIM as a reliable solution. We covered its legitimacy, user-friendly interface, and efficacy in unlocking devices from carrier restrictions. Additionally, we discussed alternatives for iCloud Activation Lock removal. It emphasizes the uniqueness of tools like Wondershare Dr.Fone bypassing this security feature.
Tips: Are you searching for a powerful iPhone Unlock tool? No worries as Dr.Fone is here to help you. Download it and start a seamless unlock experience!
Also read:
- [New] In 2024, Timeless Media Capturing Device
- [New] In 2024, Vimeo Simplified Platform for Content Creators
- [New] Tailored Content Creation How to Cropped & Export Videos for Instagram
- AV1 Versus VP9 The Ultimate Codec Showdown for 2024
- Hacks to do pokemon go trainer battles For Honor Play 8T | Dr.fone
- How to Unlock iPhone 13 Passcode without Computer?
- In 2024, How to Track Vivo S17e Location by Number | Dr.fone
- In 2024, How To Unlock Stolen iPhone 13 In Different Conditionsin
- In 2024, How to Unlock Your iPhone 14 Pro Passcode 4 Easy Methods (With or Without iTunes)
- In 2024, iPhone Is Disabled? Here Is The Way To Unlock Disabled iPhone 11 Pro
- In 2024, PassFab iPhone 15 Backup Unlocker Top 4 Alternatives
- iPhone Is Disabled? Here Is The Way To Unlock Disabled iPhone 12 mini
- Simple Yet Powerful Software for Seamless Screen Capture
- Title: Complete Guide For iPhone 14 Lock Screen
- Author: Sophia
- Created at : 2024-10-26 03:59:46
- Updated at : 2024-11-01 10:47:53
- Link: https://ios-unlock.techidaily.com/complete-guide-for-iphone-14-lock-screen-by-drfone-ios/
- License: This work is licensed under CC BY-NC-SA 4.0.