
Forgot Apple iPhone 14 Pro Backup Password? Heres What to Do
Forgot Apple iPhone 14 Pro Backup Password? Here’s What to Do
Forgetting your Apple iPhone 14 Pro backup password can be a real pain. Not only does it mean you can’t access your data, but it also means you can’t restore your phone if something goes wrong.
There are still chances that you could forget your Apple iPhone 14 Pro backup password. Fortunately, you have a chance to recover your password. So, if you’re having trouble remembering your Apple iPhone 14 Pro backup password, don’t despair. There are still ways to get it back!
Part 1: Overview of iPhone Backup Password
The Apple iPhone 14 Pro is secured using a combination that is the backup password. Passwords, Wi-Fi settings, browser history, and health records are sensitive information that an encrypted device may back up.
Remember that this is not the same as your Apple ID or passcode (the sequence you input to unlock the iPhone).
Note:
The encryption of backups is not turned on by default. You will only need to activate the Encrypt Backup option the first time you use either iTunes or Finder. After that, each of your backups will encrypt on its own automatically.
So, if you choose to store your backups in iCloud, it will automatically encrypt all of your data each and every time.
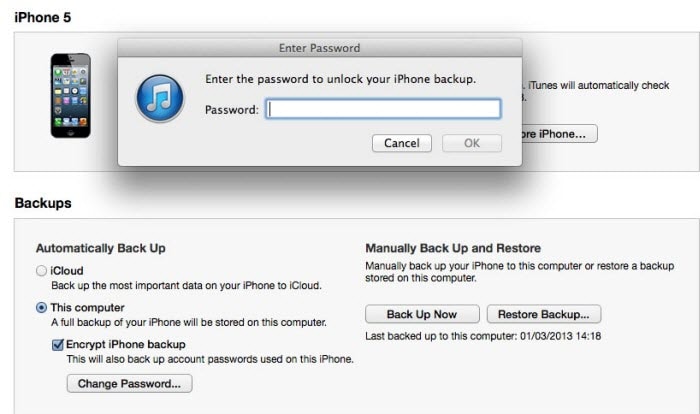
To get the password for the encrypted backup of iTunes:
Step 1: Open iTunes
Launching iTunes is the first thing to do if you have a Mac computer running Mojave 10.14 or an older operating system version. On the other hand, if you use the Mac operating system known as Catalina 10.15, you need to run the Finder application.
Step 2: Link your Apple iPhone 14 Pro to your PC
At this point, a USB cable should be used to connect the Apple iPhone 14 Pro device to a computer. The next step is to find the widget on your desktop computer or portable device.
Step 3: Begin the Encryption Process
Select the Encrypt Local Backup option in the Backups section directly from either the Summary or General tab of the Backups section.
Step 4: Create a Password
When prompted in the window, create a password for the account. Make it powerful yet that is simple for you to remember. You might also save it somewhere secure to help you recall it later.
After establishing the password, all your previous backups will immediately undergo an automated overwrite and encryption. Make it a priority to ensure that the encryption procedure is finished effectively.
Part 2: 5 Fixes When We Forgot iPhone Backup Password
1. Try all passwords you used on your Apple iPhone 14 Pro
The typical method that each individual attempts for the first time is to input all of the available passcodes. Even if it is the most straightforward technique, there is still a possibility that you miss one of them. Therefore, think about all of the passwords you may input, which are listed below.
- The password to log in to the computer
- The password to access Apple ID
- The password to access the encrypted data on the hard disk
- The password to access various websites
- The password to log in to the computer
- Password for the wireless network
- Password for the email account
- Passcode for the administrator
- Passcode for the iPhone
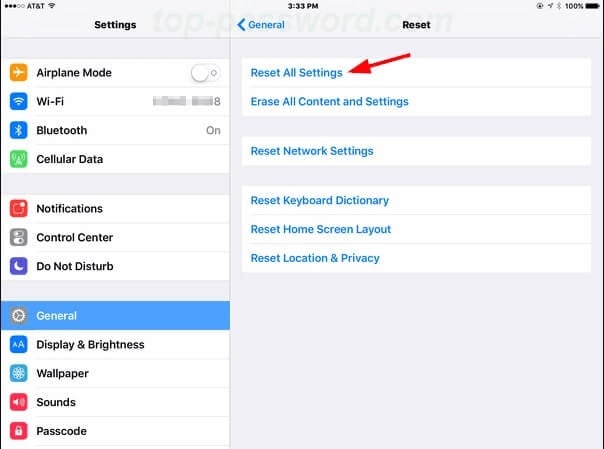
2. “Reset All Settings” via “Settings”
To begin, go to the Settings app on your iOS device, then choose General, followed by Reset.
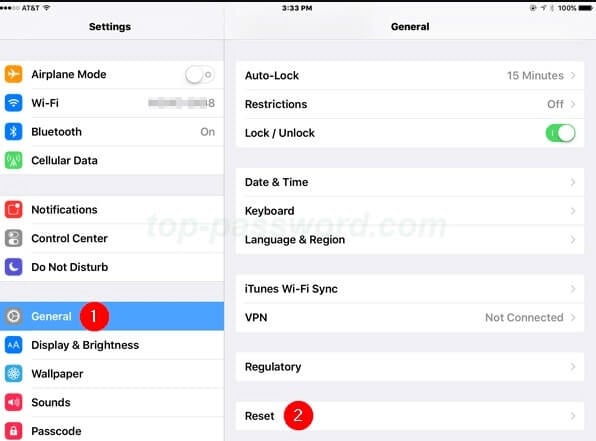
You may now go to Reset All Settings and confirm by entering the security passcode when prompted. Then, your phone will automatically go through the process of resetting and returning to its default settings.
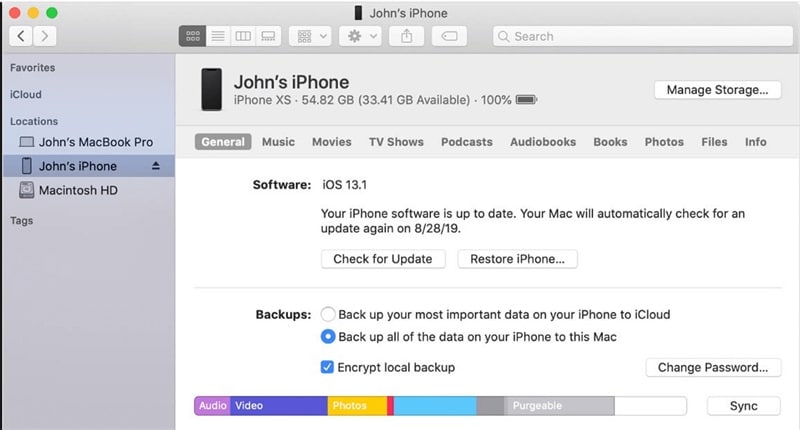
You can also get rid of the password for the last backup without deleting any other apps or data.
Use a USB cable to link your Apple iPhone 14 Pro to your PC. Look at the small iOS icon in the figure below. Just click on it.
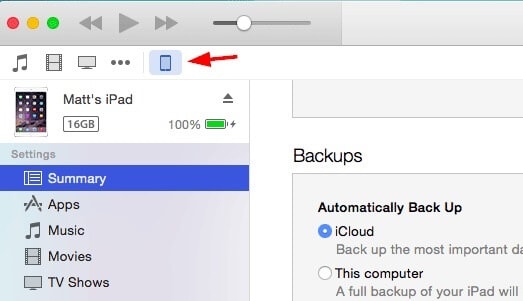
Proceed to the Summary Page and make your selection there for The Computer. After selecting Encrypt Local Backup, you must create a new password. After you have pressed the Backup Now option, wait for iTunes to create a new password for you.
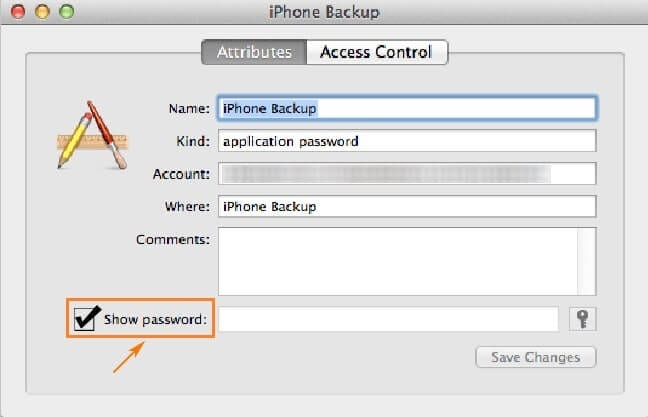
3. Find your password in the macOS keychain
Step 1: Launch Keychain Access by going to Application > Utilities > Keychain Access once your Mac has booted up.
Step 2: Check for a backup of your Apple iPhone 14 Pro by entering it into the search box and looking for it there.
Step 3: Double-click the Show Password option, and then choose it from the drop-down menu. After that, type in the password for the keychain. At long last, the password for your Apple iPhone 14 Pro backup will be shown.
4. Select “Back Up Now” via iCloud to remove password
If you already have a backup stored in iCloud, you may use iCloud for recovery.
First, power up the gadget and look for the “Hello” screen. If you have previously set up your Apple iPhone 14 Pro, you must delete or remove all of the material before continuing.
Navigate to the Apps & Data menu and choose the Restore from iCloud Backup option.
After successfully signing in with your Apple ID, choose Backup.

During the time that the system is being restored, it is essential that the Wi-Fi connection remains active.
5. Dr.Fone-Screen Unlock
With Dr.Fone - Screen Unlock, it’s easy to follow all the steps to get rid of the iTunes backup password.
Step 1: After installing Dr.Fone, open it and look for the red Screen Unlock button.

Step 2: In the Screen Unlock interface, tap Remove iTunes BackUp Encryption in the bottom right corner to move forward.

Step 3: When you get to this page, use a USB cable to connect your iOS device to the PC. If Dr.Fone can find this connection, you will see the picture below.
Before you click Remove Now, please carefully read the following three notes:
- Make sure to turn off Find My iPhone.
- Don’t open iTunes while doing this.
- Your device will reboot

Step 4: Dr.Fone can check your iTunes backup and delete it by itself. This encryption will be erased when the progress bar reaches 100%. This will take a short time to do.

Step 5: The encryption on the iTunes backup has been removed successfully! Now you can easily back up, restore, move, or wipe your device.

Part 3: 3 Tricks to Help You Remember the Passwords
If you have an iPhone, you know it can be tricky to keep track of all your passwords. From your email password to your banking login, there are a lot of different codes to remember.
Here are three tricks to help you keep track of your passwords so you don’t have to stress the next time you can’t log in to your account.
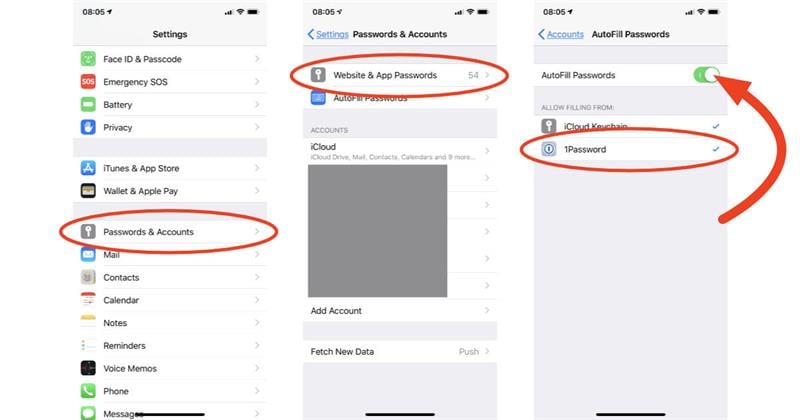
- Turn on “AutoFill” in “Settings”
You can turn on AutoFill in the Settings app. This will allow your Apple iPhone 14 Pro to fill in passwords when you visit websites and apps automatically. All you need to do is ensure you’ve entered the correct username and password once, and your Apple iPhone 14 Pro will save the information, so you don’t have to enter it again.
- Try iCloud Keychain to keep your passwords
iCloud Keychain is a great way to keep all your passwords in one place. Once you’ve turned on the iCloud Keychain, all your passwords will be synced across your devices. That means if you create a new password on your laptop, it will automatically appear on your Apple iPhone 14 Pro.
- Use Notes for passwords
If you’re finding a simple way to keep all your passwords, try using the Notes app. Create a new note and title it “Passwords.” Then, add it to the note whenever you create a new password.
You can even add a description of the password, so you remember which account it’s for.
The Bottom Line
As a last piece of advice, please safely save your newly created passwords. Rather than writing them down in the iPhone’s notepad, you should save the passwords in a secure location.
However, no matter how secure your gadget is, password leakage may happen, sending you to unpleasant situations that you can’t even conceive. It’s best to use Dr.Fone - Screen Unlock as soon as you encounter any problem!
How To Bypass the Required Apple Store Verification For Apple iPhone 14 Pro
The Apple App Store is a familiar place for anyone with an iPhone or iPad. It’s where you find all sorts of useful and fun apps. However, one thing that can be a hassle is the store’s strict verification process. Every time you make a purchase, you need to go through this step.
It’s there for a good reason – to stop fraud – but it can get annoying, especially if you forget your Apple ID or have other issues. This article will explore the ways to stop the Apple Store “Verification Required” prompt, making your app downloading experience smoother.

Part 1: Why Does Apple Require Verification in the Apple Store?
When browsing the App Store on your Apple iPhone 14 Pro or iPad and looking to download the latest game or productivity tool, you might have noticed that Apple often asks for some form of verification before you can proceed with your purchase. This is not just a random step; there’s a solid reason behind it.
The primary reason Apple requires verification for App Store purchases is to ensure that you are the person authorizing the purchase. This security measure prevents unauthorized transactions and protects your account from fraud.
What does this verification usually involve? It could be entering your Apple ID password or using Face ID or Touch ID if your device supports these features. These methods are designed to confirm your identity quickly and securely.

Reasons Why the Verification Required Message Might Appear
There are several reasons why you might see an Apple Store’ Verification Required’ message when trying to download an app or make a purchase:
- New Apple ID. If you’ve just created a new Apple ID and need to download or pay for apps, Apple must verify your payment information. Thus, you’ll have to prove everything, especially on a new phone.
- **Payment method needs to be corrected.**Suppose there’s an issue with your Apple ID’s payment method, such as outdated or incorrect details. In that case, verification is required to ensure the account is secure and ready for transactions.
- Invalid credit card. Unsupported or invalid credit cards can trigger the verification notice, as Apple can’t process payments with these cards.
- Unpaid balance. If there’s an outstanding balance on your Apple ID, you can download or pay for new apps once this balance is cleared.
- Family Sharing restrictions. For those using Family Sharing, if the family organizer has placed restrictions on your account, this could result in a verification prompt.
Understanding these reasons is the first step in addressing the ‘Verification Required’ message. It’s not just a random or annoying hurdle; it’s there for your security and to ensure a smooth, safe experience when using the App Store.
Part 2: How To Fix Verification Required Prompt Using Apple ID
Having to deal with the ‘Verification Required’ prompt in the App Store can be a bit of a hassle, especially when you’re eager to get your hands on a new app or game. Fortunately, there are several methods you can use to resolve this issue, most of which are pretty straightforward and can be done right from your device. Here’s how to tackle it:

Update Payment Method
One of the most common reasons for the verification prompt is a problem with your payment method. To fix this, go to your Apple ID settings on your Apple iPhone 14 Pro or iPad. Tap your name at the top of the Settings app, then go to Payment & Shipping. You can update your payment information or add a new payment method here. Make sure the details are correct and up to date.
Check Unpaid Subscriptions
Sometimes, unpaid subscriptions can trigger the verification prompt. Tap the App Store > your profile icon, and select Subscriptions. Here, you can view all your subscriptions, active or expired. Check if there are any unpaid ones and clear any outstanding payments.

Don’t Require Password for Purchases
For less frequent purchases, you should change the settings so you don’t always have to enter your password. Go to Settings, then to Screen Time. Under Content & Privacy Restrictions, select iTunes & App Store Purchases. Here, you can change the settings to Don’t Require for purchases. However, be cautious with this method as it reduces security.

Sign Out of Apple ID and Re-Sign In
Sometimes, simply signing out of your Apple ID and then signing back in can resolve the issue. Go to the Settings app, tap your name at the top, and scroll down to Sign Out. After signing out, restart your device and then sign back in. This can help refresh your account settings and clear up any minor glitches.
Remember, these methods are about bypassing the verification process and ensuring your account is up-to-date and secure. Regularly checking your Apple ID settings and payment information can prevent many common issues with the App Store, including the frustrating ‘Verification Required’ prompt.
Part 3: How To Bypass Verification Required Prompt Without Apple ID
If you need to learn how to bypass the ‘Verification Required’ prompt in the App Store but don’t have access to the Apple ID or password, there’s an alternative approach using third-party software. One such tool that can assist in this situation is Wondershare Dr.Fone - Screen Unlock (iOS), which offers a feature specifically designed for this purpose.
Introducing Dr. Fone’s Screen Unlock (iOS) Feature
Dr.Fone - Screen Unlock (iOS) function includes an Apple ID remover tool. This feature is handy when you cannot remember your Apple ID or password but need to download apps from the App Store. Here’s a step-by-step guide on how to use this feature.
Step-by-Step Guide To Bypass Verification Without Apple ID With Dr.Fone
Here’s a complete guide on bypassing the verification required on the App Store.
Step 1: Install and open Wondershare Dr.Fone on your computer.
Step 2: Navigate to Toolbox and select Screen Unlock followed by iOS.
- Step 3: In the next window, choose Remove Apple ID to proceed.

- Step 4: A connectivity status will appear on the screen with your iOS device connected to the computer. Click Unlock Now to start the process.

- Step 5: Confirm if your iOS device has a screen lock and two-factor authentication enabled. This is crucial for the process to continue smoothly.

- Step 6: Follow the on-screen instructions to put your iOS device in Recovery Mode. If necessary, you can also opt for DFU Mode by following the provided instructions. Once in Recovery Mode, the tool will recognize your device model. You’ll need to select the correct system version to proceed.

- Step 7: The tool will download the appropriate iOS firmware for your device. After the download, it will verify the firmware.

- Step 8: After firmware verification, click Unlock Now. You’ll be prompted to enter a code for confirmation. Once entered, the unlocking process will begin.

- Step 9: You’ll receive a notification once the process is complete. You may try again if the process fails to succeed the first time.

Note: After Apple ID removal, you must re-enter a new Apple ID to access the App Store. Take note of the password now if you forgot your previous one.
Conclusion
In this article, you’ve learned how to remove ‘Verification Required’ in the App Store. The primary takeaway is to try solving the issue using your Apple ID, as this approach typically prevents data loss. However, if you’re in a tight spot without access to your Apple ID, Dr.Fone - Screen Unlock (iOS) offers a reliable alternative to bypass this hurdle.
While it’s an effective solution, always consider it a secondary option to safeguard your data. Additionally, Dr.Fone can be a handy tool for various other phone-related challenges, making it a useful resource for tackling different tech problems.
Tips: Are you searching for a powerful Screen Unlock tool? No worries as Dr.Fone is here to help you. Download it and start a seamless unlock experience!
Things You Should Know When Unlocking Total Wireless Of Apple iPhone 14 Pro
Total Wireless is a prominent name when it comes to affordable network carriers. It offers users a wide range of call and data packages. The company also offers smartphones; however, they are carrier-locked. This can become a problem for users who want to switch networks. Users need to learn unlocking methods that seek greater flexibility and control over their phones.
In this article, we go through the essence of unlocking a Total Wireless phone. Our focus is to present a comprehensive overview of the methods and essential details required to unlock your device. It will enable users to make informed decisions and achieve the best possible results.

Part 1. Defining The Total Wireless Phone Terminology
A Total Wireless phone refers to a mobile device that operates on the Total Wireless network. It is a prepaid mobile virtual network operator (MVNO) that uses Verizon’s network infrastructure. These phones are often sold with Total Wireless plans. Moreover, they are optimized to function within its network coverage area. Unlocking a Total Wireless phone can pose challenges due to the Apple iPhone 14 Pro device’s association with a specific carrier.
The difficulty level largely depends on factors such as the phone model, contract status, and carrier policies. Unlock Total Wireless iPhone is indeed feasible under specific conditions. Even so, the procedure might not follow a direct path and is subject to variation on various factors. Like its counterparts, Total Wireless presents distinct guidelines and eligibility criteria for phone unlocking.

Part 2. Looking out the Reasons for Unlocking a Total Wireless Phone
Understanding the details of unlocking a Total Wireless phone opens up many compelling reasons to pursue this task. It enables users to bypass limitations and enjoy the benefits of a more liberated mobile experience. Given below are some of the many reasons why you should go for unlocking a Total Wireless phone:
- Switching Carriers: Total Wireless phones are often locked to their network, which limits users to their services. Unlocking allows users to switch to other carriers for better plans, coverage, or services that suit their needs.
- International Travel: On Total Wireless, international roaming options might be limited or expensive. Unlocking the phone enables the use of local SIM cards abroad. This offers more cost-effective communication options during travel.
- Network Compatibility: Total Wireless phones don’t work with other carriers due to specific network configurations. Unlocking enables these devices to work with a broader range of networks, enhancing usability.
Advantages of Unlocking a Total Wireless Device
Unlocking a Total Wireless phone opens up a lot of advantages. Here are a few of the benefits associated with unlocking Total Wireless iPhone:
- Flexibility: The freedom to select among different carriers, plans, and services is offered by unlocked phones. It grants users increased flexibility in handling their communication requirements.
- Cost Savings: Switching to more affordable or better-suited plans from different carriers can result in cost savings. This is especially true for users with specific usage patterns or travel requirements.
- Improved Resale Value: Unlocked phones generally have higher demand in the resale market. It appeals to a wider range of buyers and potentially fetching better prices.

Part 3. How To Check if Your Apple iPhone 14 Pro Is Already Unlocked?
No need to worry if you’re unsure whether your Total Wireless device is unlocked. You can easily verify its status through a simple SIM test. Here’s a straightforward set of steps to check if your iPhone Total Wireless unlock is already unlocked:
- Step 1. Turn off your device and remove the SIM tray to start. Swap the current SIM card for one from a different carrier and position it in the tray. Reinsert the tray into your device and power it on again.

- Step 2. First, check to see if the SIM card is getting network service. Attempting a call or sending an SMS are alternative methods to test whether your phone is unlocked. If it fails, it suggests that your phone might still be locked to Total Wireless.
Part 4. A Small Checklist to Ensure Before Unlocking Your Total Wireless Phone
Prior to Total Wireless unlock, it’s essential to verify that it meets the specified criteria. Ensure your phone aligns with the requirements by following the provided checklist:
- Check Contract Status: Ensure your device is not bound by an ongoing contract with Total Wireless. If under contract, complete the contractual obligations, which include payment of fees or early termination charges.
- Verify Eligibility: Confirm your device’s eligibility for unlocking. Total Wireless requires your device to be at least completed 12 months of service period. Moreover, you need to ensure the Apple iPhone 14 Pro device isn’t reported lost or stolen.
- Clear Outstanding Payments: Make sure no outstanding payments or dues are associated with your Total Wireless account. These cover any installment plans or unpaid bills involving the Apple iPhone 14 Pro device.
- IMEI Compatibility: Check if your device’s IMEI is compatible with unlocking services. Moreover, you need to ensure that it is not blacklisted.
- Backup Your Data: Before initiating the unlocking process, back up all your important data . This includes contacts, photos, and files to prevent any potential loss during the process.
- Understand Terms and Conditions: Familiarize yourself with the unlocking policies and terms Total Wireless provides. Ensure compliance with their guidelines to avoid complications during the unlocking process.
Part 5. How To Unlock Total Wireless Phone: The Best Methods
You are now armed with an inherent understanding of Total Wireless phones. We discussed the reasons for unlocking a Total Wireless phone free and its prerequisites. Below, the most common methods to unlock a Total Wireless phone are summarized. These will equip you completely to explore the most effective ways to unlock your device.
Way 1. Accessing All Important Carriers
Unlocking a phone to access various carriers involves understanding the unique policies of each carrier. Below are the differing policies of prominent carriers:
AT&T
Instructions. Using a browser, open the att.com/deviceunlock website. Here, choose the “Start an unlock request” option and follow the on-screen prompts to complete the process. AT&T will let you know about the unlock status via the provided email.

T-Mobile
Instructions. Access the T-Mobile website and navigate to the “Contact US” page. Here, choose a way to contact customer service and request device unlocking. If you meet the basic criteria set by T-Mobile, your device will be unlocked.

Verizon
Instructions. Verizon has established a minimum period of 60 days, after which your device will be unlocked. However, it is necessary that you don’t have any outstanding payments. Moreover, your device is not blacklisted is also an essential requirement.

Way 2. Contact the Total Wireless Customer Service
As explained before, Total Wireless requires you to use your device for at least 365 days before you can request device unlocking. Moreover, the Apple iPhone 14 Pro device should be white-listed and should not be reported missing or stolen. These are the simple instructions to unlock Total Wireless phone free:
- Step 1. After ensuring you meet all the criteria, you can contact them by dialing 1-888-442-5102. This number is available throughout the week between 8 A.M and 11:45 P.M EST. Once you reach out, the department will request your IMEI number.
- Step 2. Following that, they will advise you to wait a few days as they need this time to verify your request. They will contact you to unlock your device if you meet their requirements. It is an unlock code for Android devices, while iPhones can be unlocked remotely.

Way 3. Make the Urgency Fee Payment
While the official Total Wireless device unlocking policy requires you to use the Apple iPhone 14 Pro device for at least a year, there are times when it might not be feasible. In such scenarios, you can pay an urgent fee to unlock the Apple iPhone 14 Pro device. Remember that even when paying an urgency fee, you need to have used the Apple iPhone 14 Pro device for at least 60 days.
Way 4. Unlock Your Total Wireless Phone Using SafeUnlocks
SafeUnlocks stands as the premier choice for unlocking your phone. It is committed to delivering unparalleled services, including speed, safety, and affordability. The aim of the superior quality is a guaranteed phone unlocking experience. It boasts a 99.9% success rate and can unlock any phone’s brand without a hassle. Additionally, we specialize in unlocking devices from numerous carriers worldwide. Here’s how to unlock Total Wireless phone using SafeUnlocks:
- Step 1. Begin by accessing the official SafeUnlocks website. Click “Services” from the top toolbar and choose the “Carrier Unlock” option. Provide your name, email, device model, and IMEI number on the following screen.

- Step 2. After ensuring you’ve marked the “I accept the $1 fee for signing up and unlocking my device” box, proceed by tapping “Proceed.” Next, on the following screen, select a payment method and then follow the prompts displayed on the screen.

Bonus Tip. What To Do if Your Apple iPhone 14 Pro Is Locked? Use Wondershare Dr.Fone
Should your Apple iPhone 14 Pro become locked because of forgotten passcodes or any other issues, there’s no need to panic. Wondershare Dr.Fone , a dependable software tool, seeks to rescue the situation. It is a reputable software known for its utility. You can find options to resolve various iOS device-related problems, including unlocking iPhone screens.
Dr.Fone effectively unlocks your iOS devices across various iOS versions, from iOS 7 to iOS 17. It covers various lock types, including touch lock screens, 4-digit/6-digit passcodes, numeric codes, and alphanumeric passcodes. Moreover, it can bypass Face ID, Touch ID, and Screen Time Passcode, among others. With Dr.Fone, you can unlock your iDevices within minutes.
Key Characteristics of Wondershare Dr.Fone
- This tool can effortlessly bypass the iCloud activation lock without needing the Apple ID.
- You can find a dedicated option for Data Recovery in Dr.Fone’s service, allowing you to easily recover all types of lost data.
- It can remove encryption locks from iTunes backups without causing any data loss.
Steps To Unlock Your Locked iPhone Using Wondershare Dr.Fone
This tool ensures a straightforward process without any learning curve. Experience the simplicity of unlocking your Apple iPhone 14 Pro in just a few easy steps:
- Step 1. Initialization and Setup of Screen Unlocking
After installing Wondershare Dr.Fone on your computer, begin by launching the program. Access the “Toolbox” section and find “Screen Unlock”. Choose “iOS” as your device type and proceed by selecting “Unlock iOS Screen .” Initiate the unlocking process by clicking “Start.”

Tips: Are you searching for a powerful iPhone Unlock tool? No worries as Dr.Fone is here to help you. Download it and start a seamless unlock experience!
- Step 2. Preparing Devices and Firmware
Follow the prompts on the screen to put your iDevice into Recovery Mode. The platform will automatically detect and showcase the “Device Model.” If necessary, modify the model or System Version accordingly and click “Start.” Monitor the progress of the iOS firmware download on the following screen.

- Step 3. Validation and Completion
Ensure that the downloaded iOS firmware is validated before proceeding. To start the unlocking process, click “Unlock Now”. Enter the required code and tap “Unlock” to continue. Upon successfully unlocking the Apple iPhone 14 Pro device, finalize the process by clicking the “Done” button.

Conclusion
In this comprehensive guide, we navigated through how to unlock Total Wireless phone. It covered its definition, reasons for unlocking, and a checklist before initiating the process. We explored multiple unlocking methods, including carrier-specific policies and third-party services. Additionally, we discussed Wondershare Dr.Fone as the ultimate choice when users encounter device unlocking.
Also read:
- [Updated] In 2024, Becoming a Savvy VR Tour Connoisseur
- [Updated] In 2024, Enhancing Your Chat Experience with Customized WhatsApp Tones
- [Updated] In 2024, Pure Sound Capture on Your Mac
- How To Change Your Apple ID Password On your iPhone XS
- How to Track WhatsApp Messages on Infinix Smart 7 HD Without Them Knowing? | Dr.fone
- How To Unlock Stolen Apple iPhone 13 Pro In Different Conditionsin
- Ideal Devices and Programs Photos to Movies
- In 2024, A Detailed Guide YouTube's Most Engaging Storytellers in '23
- In 2024, How To Unlock A Found Apple iPhone 8?
- In 2024, Trouble with Apple iPhone 8 Swipe-Up? Try These 11 Solutions
- In 2024, Trouble with iPhone SE Swipe-Up? Try These 11 Solutions
- Leading 8 Tools for Subtitle-SRT Format Switching
- Recupere Sus Archivos Borrados De La Memoria USB Gratuitamente en Un Paso Fácil
- Title: Forgot Apple iPhone 14 Pro Backup Password? Heres What to Do
- Author: Sophia
- Created at : 2024-11-02 01:54:32
- Updated at : 2024-11-06 20:28:28
- Link: https://ios-unlock.techidaily.com/forgot-apple-iphone-14-pro-backup-password-heres-what-to-do-by-drfone-ios/
- License: This work is licensed under CC BY-NC-SA 4.0.