
Guide on How To Change Your Apple ID Email Address On iPhone 15 Plus
Guide on How To Change Your Apple ID Email Address On Apple iPhone 15 Plus
Your Apple ID email is the key to your digital world with Apple devices. It’s the address Apple recognizes you by, allowing you to access your apps, music, and more. But sometimes, life brings changes, and your Apple ID email may need an update.
This guide will take you through the simple process of changing your Apple ID email address, ensuring it’s easy to understand every step. Explore why you might want to make this change, shedding light on common scenarios where this adjustment can enhance your Apple experience. So dive in and explore!

Part I: Why Change Your Apple ID Email?
Your Apple ID email helps you access your apps, music, and more. But sometimes, you might need to change it for simple reasons. Let’s look at why you might want to change your Apple ID email in easy-to-understand terms.
- Your email address is part of your identity. Changing it to something that better suits you can make your Apple experience more personal.
- If you think someone else knows your old email password, changing it can keep your Apple account safer. A fresh email means a new layer of security.
- Maybe you used an old email you don’t want to use anymore. Changing it lets you keep your personal life separate from your Apple stuff.
- **Email Problems.**If your old email is full of spam or not working well, switching to a new one is a good idea. You’ll get a cleaner and more reliable inbox.
- **Sharing Devices.**If you share Apple devices with someone and want to keep your stuff separate, changing your Apple ID email can help you do that easily.
- Using a more professional email address for your Apple ID can make a better impression when using Apple services for work or business.
These are the simple reasons why you might want to change your Apple ID email. It’s all about making your Apple experience better, safer, and more suited to your needs.
Part II: Step-by-Step Guide: How to Change Apple ID Email
Before you jump into changing your Apple ID email address, there’s an essential step to take. Just like you’d secure your valuables before embarking on a journey, backing up your device before going through the email change process is vital. This step ensures that none of your precious data is lost during the transition.

A. How To Change Your Apple Email Address on Various Devices
Now, let’s explore three different methods of how to change your Apple ID email address, tailored to various user preferences.
Method 1: For Mac Users
If you’re a Mac enthusiast, changing your Apple ID email is straightforward:
- Step 1: Click the Apple logo at the top left corner of your screen.
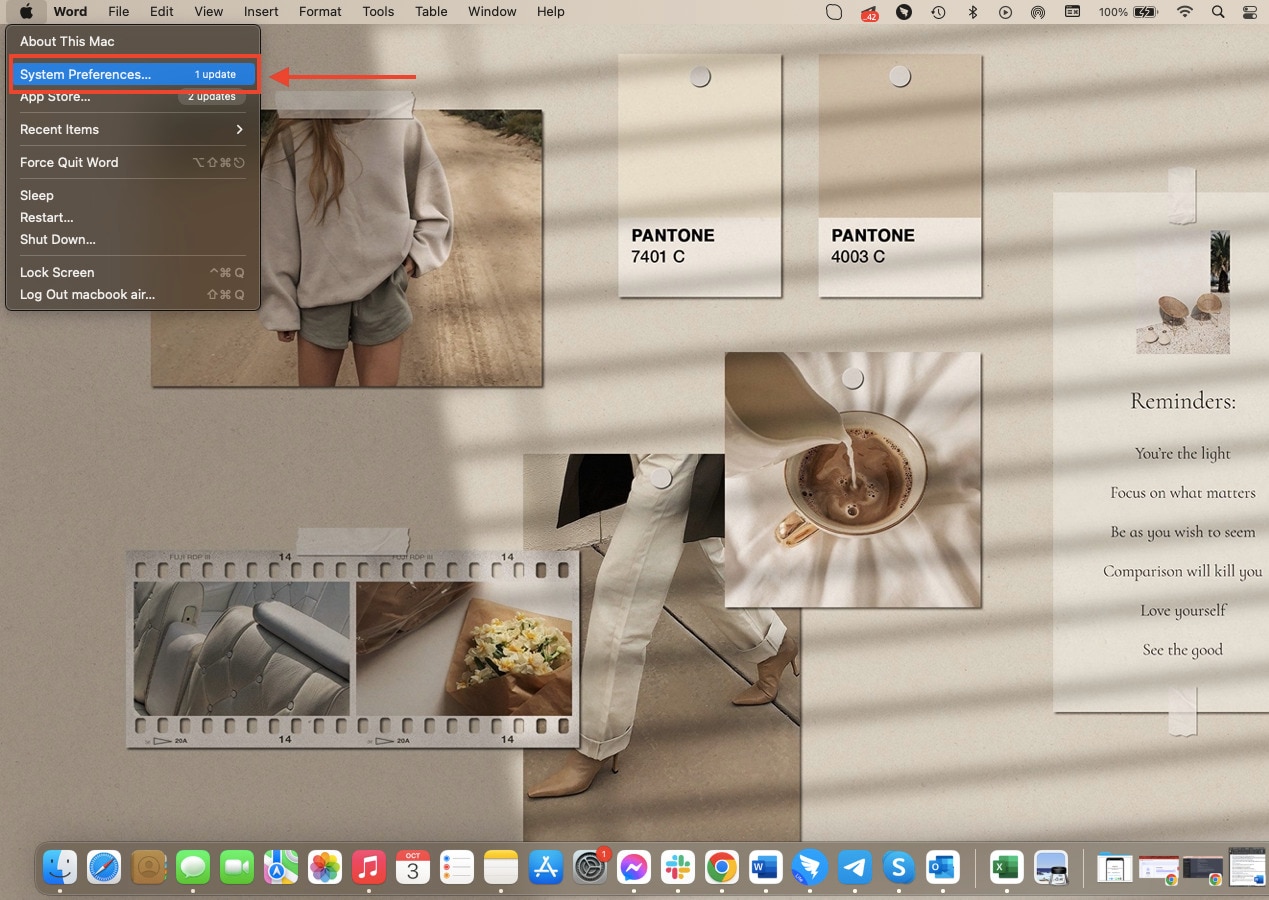
- Step 2: Click System Preferences, and then select Apple ID.
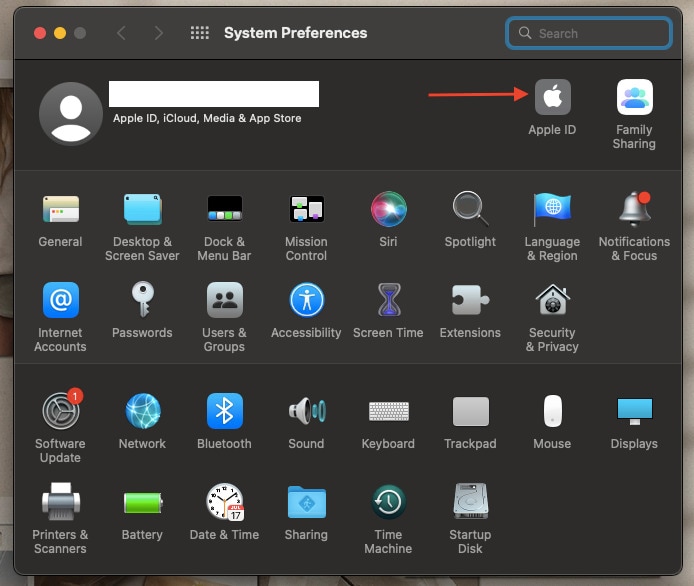
- Step 3: Navigate to the Name, Phone, Email section, then click Edit next to your email address.
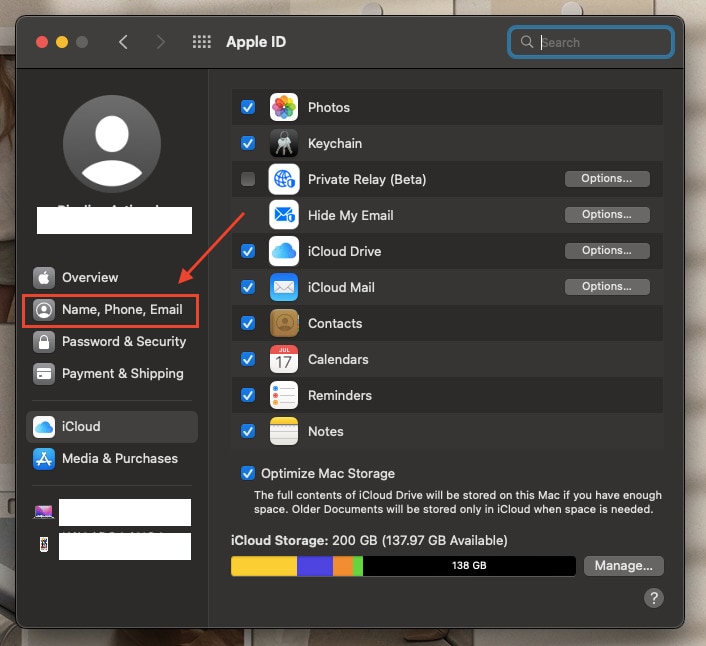
- Step 4: Input your new email address, and Apple will send a verification code to it.
- Step 5: Check your new email for the verification code, enter it, and voilà! Your Apple ID email is updated on your Mac.
Method 2: For Mobile Device Users
For those who prefer the convenience of mobile devices:
- Step 1: Open the Settings app on your Apple iPhone 15 Plus or iPad, then tap your Apple ID at the top of the screen.
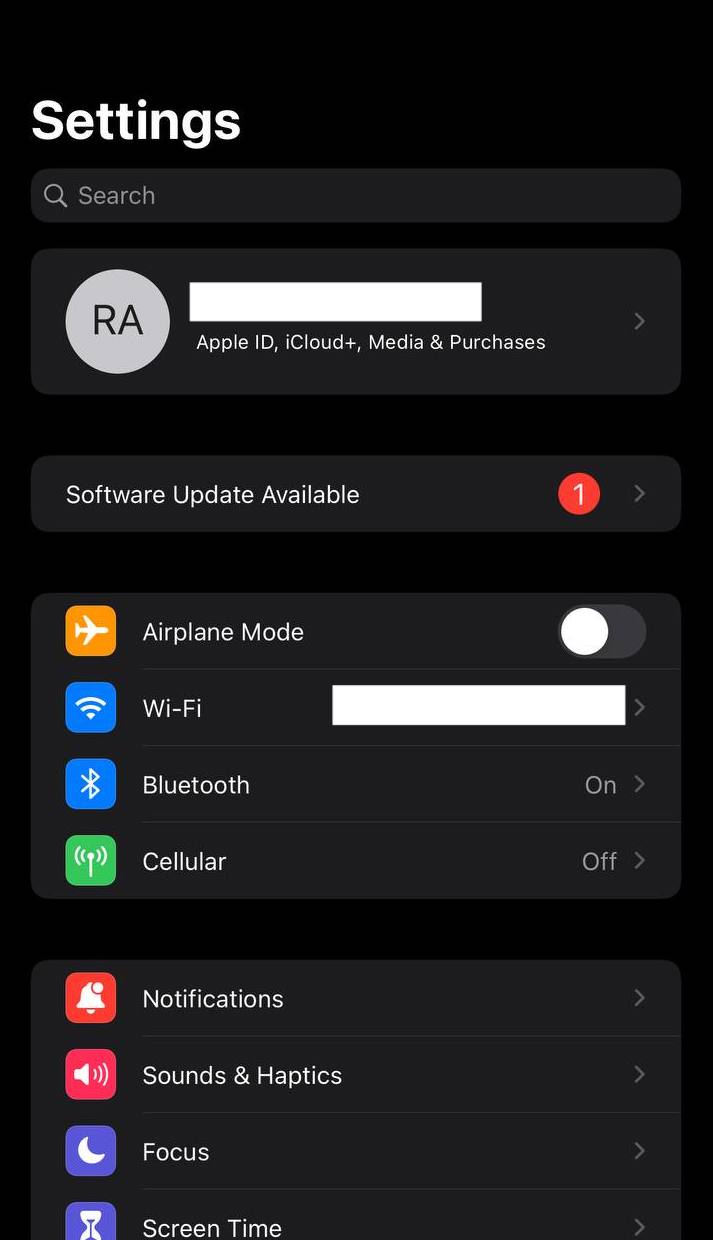
- Step 2: Tap Name, Phone Numbers, Email.
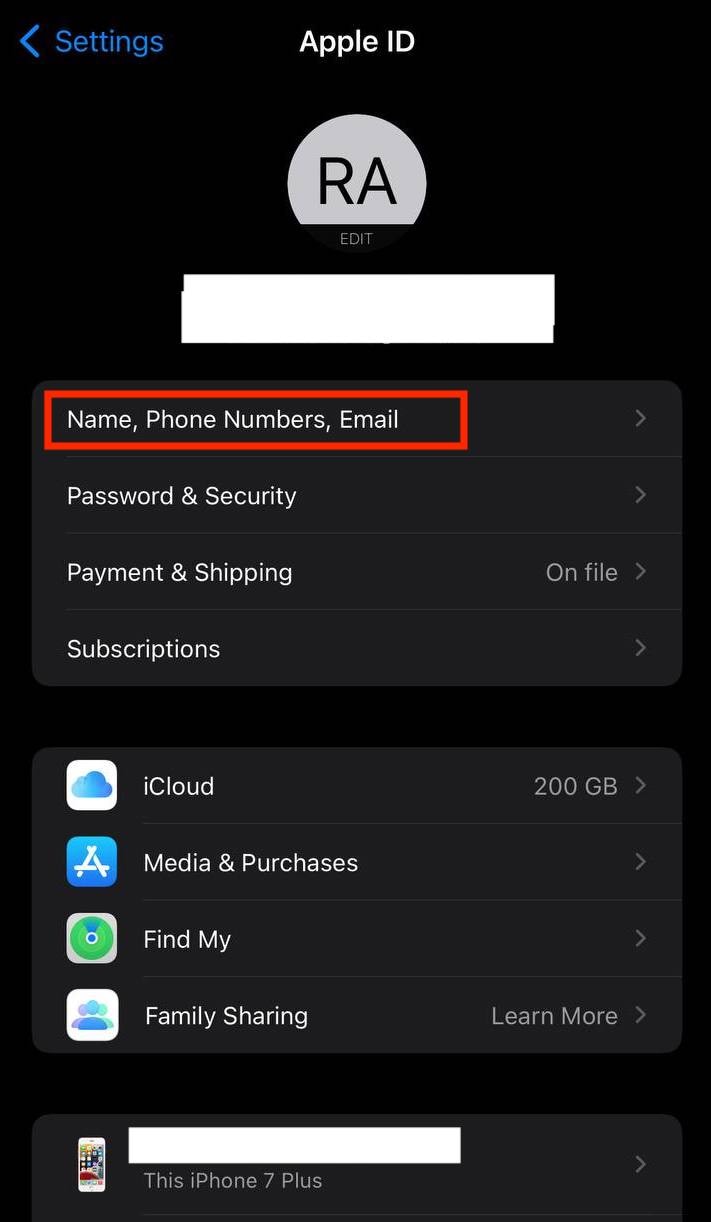
- Step 3: Tap Edit next to your email address, enter your new one, then tap Next.
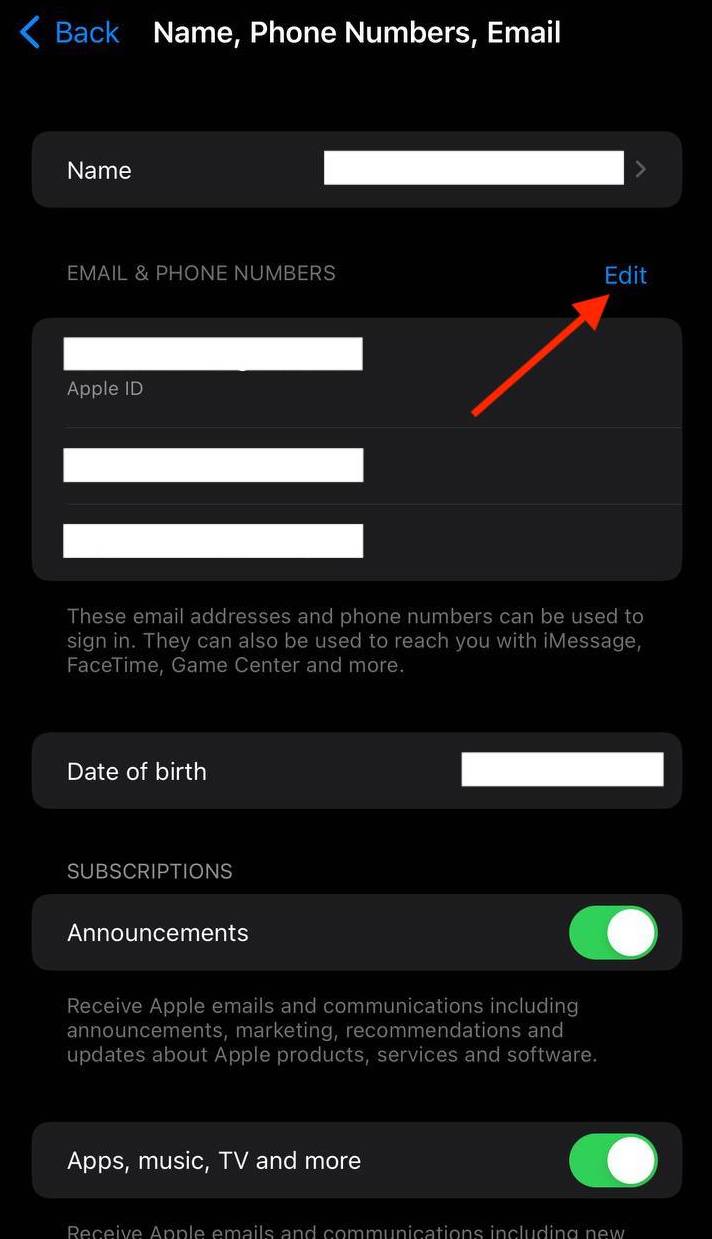
- Step 4: Apple will send a verification code to the new email. Enter it, and your Apple ID email on your mobile device is updated.
Method 3: For Browser Users
If you prefer the simplicity of a web browser:
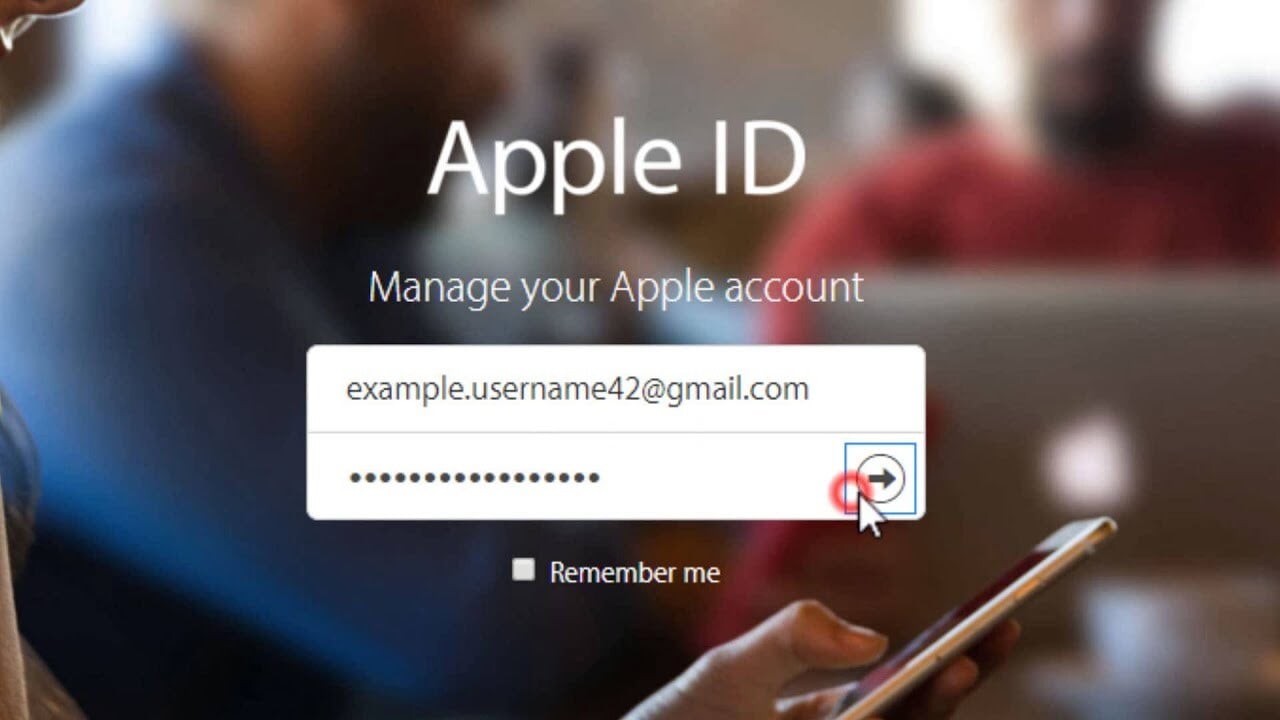
- Step 1: Open the web browser your prefer and go to the Apple ID account management page.
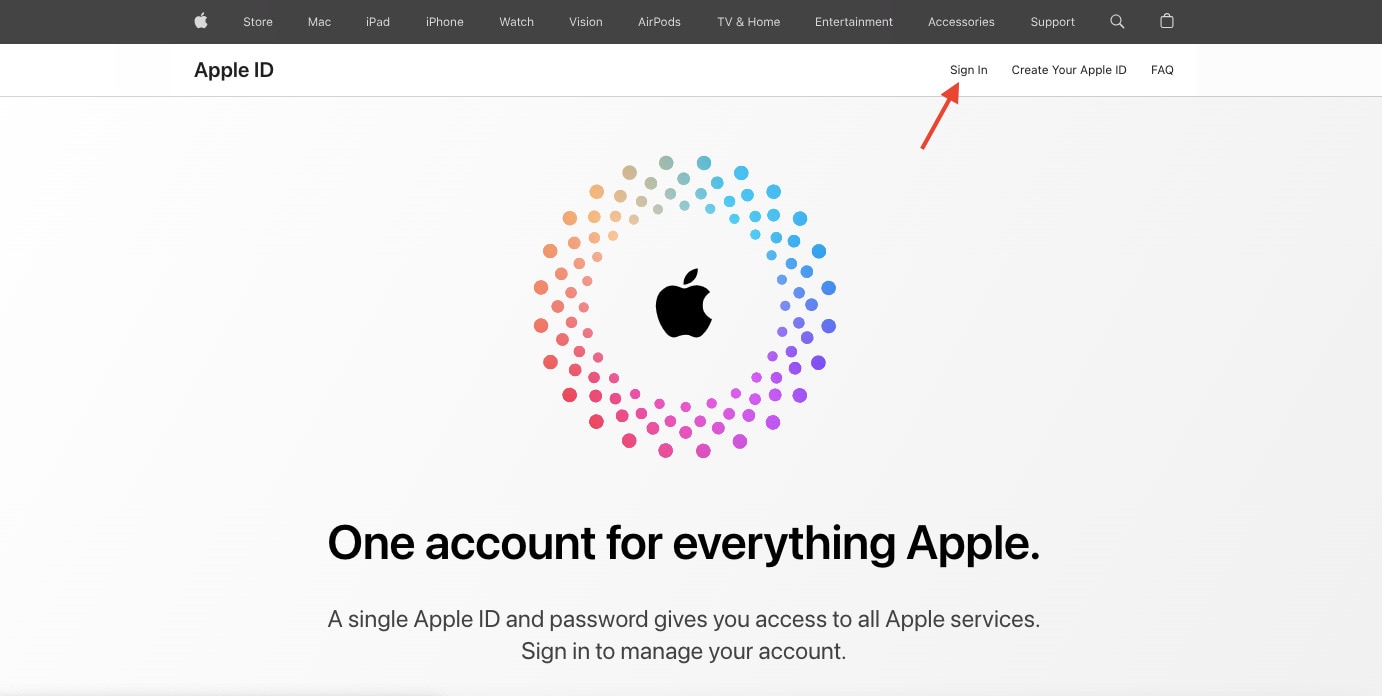
- Step 2: Click Sign In and tap your Email or Phone Number and Password.
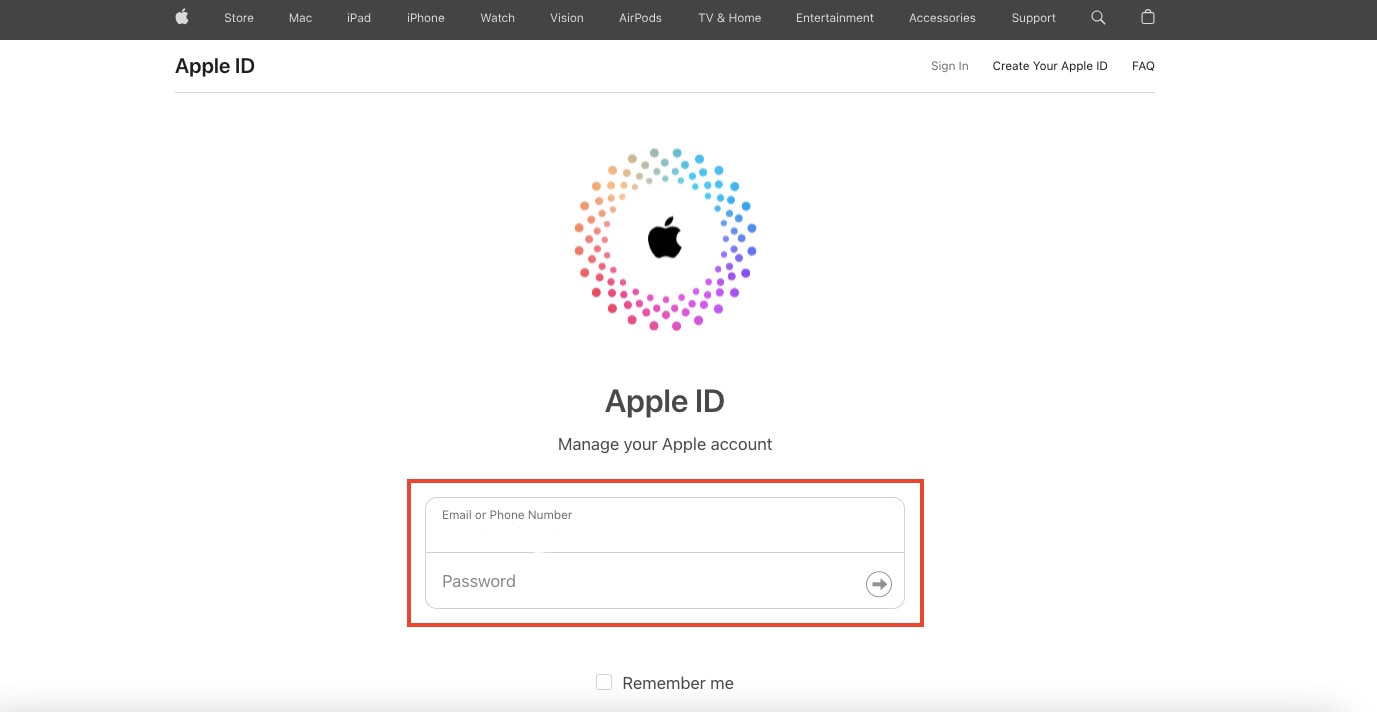
- Step 3: Click Edit next to your email address in the Account section.
- Step 4: Input your new email address and click Continue.
- Step 5: A verification code will be sent to your new email. Enter it to confirm your email change.
B. Updating Your Apple ID
Now that you’ve successfully changed your Apple ID email, it’s crucial to ensure that all your Apple devices are on the same page:
- Step 1: Tap the Settings application on your Apple iPhone 15 Plus or iPad.
- Step 2: Go to Update Apple ID Settings below your Apple ID settings.
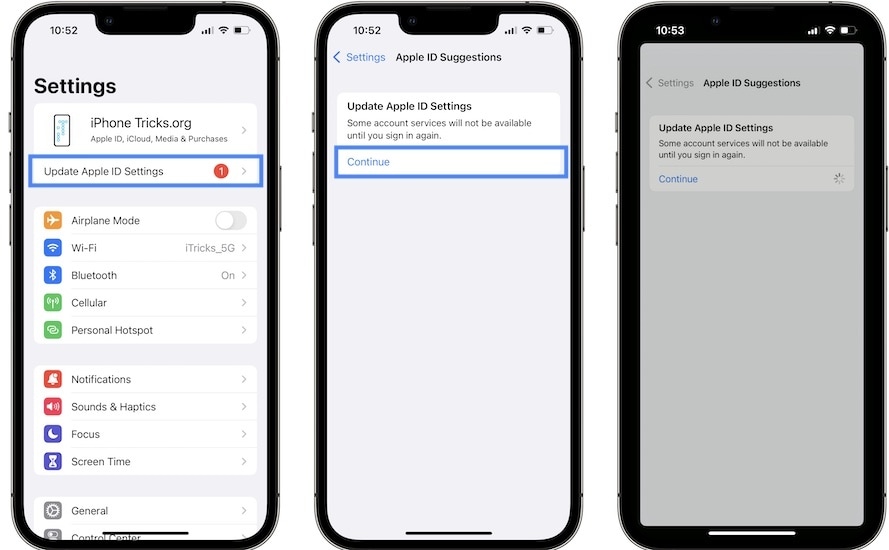
- Step 3: Tap Continue, then wait for a few moments. Your Apple ID will then get updated.
By following these steps, you’ll ensure that all your Apple devices are synced with your updated email address, providing a seamless and consistent Apple experience across all your gadgets. Now, with your new Apple ID email, you’re ready to explore the Apple ecosystem with renewed convenience and security.
Part III: Unlock iOS Screen With Wondershare Dr.Fone - Screen Unlock (iOS)
What if you find yourself in a situation where you want to change your Apple ID email address on your iOS device, but you’re locked out? Don’t worry; Dr.Fone - Screen Unlock (iOS) can rescue you. This handy tool is designed to help you unlock your iOS device, allowing you to change your Apple ID email address smoothly.

Key Features of Dr.Fone - Screen Unlock (iOS)
Check out the key features that Dr.Fone has to offer:
- **User-Friendly Interface.**Fone - Screen Unlock (iOS) is designed to be easy to use, making it accessible for users of all levels of technical expertise.
- It fits a wide range of iOS devices, including iPhones and iPads, ensuring that you can unlock your device no matter which one you have.
- **Multiple Unlock Modes.**Fone offers different unlock modes to cater to various scenarios. Whether you’ve forgotten your passcode, have a disabled device, or are dealing with a locked Apple ID, Dr.Fone has a solution.
- **No Data Loss.**One of the most significant advantages of Dr.Fone is that it unlocks your device without causing any data loss. Your photos, apps, and important information remain intact.
Step-by-Step Guide on Using Dr.Fone - Screen Unlock (iOS)
Outlined below is the step-by-step guide on how to use Dr.Fone – Screen Unlock for iOS devices:
- Step 1: When you’ve finished downloading and installing Wondershare Dr.Fone on your computer, go to Toolbox, then Screen Unlock, and choose iOS to open the tool in a new window.
- Step 2: Begin to pick the Unlock iOS Screen button in the new window to begin unlocking the screen of your iOS device. On the following screen, click the Start button to begin unlocking the iOS device.
Note: Ensure your device’s battery levels are enough before proceeding.

- Step 3: Following that, place your iDevice in Recovery Mode. Follow the on-screen instructions to set your iDevice into mode based on your phone model.
Note: If Recovery Mode does not work, try hitting the Try DFU Mode button at the bottom to access the instructions for putting the iDevice in DFU mode.

- Step 4: After successfully entering your device into Recovery Mode, the platform automatically recognizes the Device Model and shows it in the appropriate section. Modify the model and select the System Version to meet your needs if necessary. After that, select Start to begin unlocking your device’s screen.

- Step 5: The next screen shows the progress of your iOS firmware download. If at any point you decide you’d rather call it quits, hit the Stop button. If the iOS firmware takes a long time to download on your platform, you can copy the download link by clicking the Copy option.

- Step 6: After a successful download, the iOS firmware is checked and shown on the next screen. Select the Unlock Now option again to proceed with the unlocking procedure. A confirmation popup displays, requesting you to confirm the action. Enter the unlock code and press the Unlock button to continue.

- Step 7: You’ll see the unlocking status of your iOS device on the following screen. Don’t forget that keeping the gadget plugged in is necessary to avoid bricking it.
- Step 8: Click the Done button once the iDevice has been unlocked. If you’re still stuck with a locked iPhone, iPad, or iPod, select Try Again to retry the process.

By using Dr.Fone - Screen Unlock (iOS), you can regain access to your iOS device and continue with the process of changing your Apple ID email address hassle-free. It’s a reliable and user-friendly solution that ensures you can enjoy the benefits of the new email address without losing any of your precious data.
You May Also Like:
How to Show Email Password on iPhone and Find It Back
A Detailed Guide to Fix All iPad Email Problems [2023]
How to Fix Email Disappeared from iPhone?
Conclusion
This guide easily explored the process of changing your Apple ID email address. It started by understanding why this change might be necessary and provided straightforward methods for Mac, mobile, and browser users to accomplish it seamlessly.
But what if you’re locked out of your iOS device? Don’t fret; Dr.Fone - Screen Unlock (iOS) is a user-friendly tool that can help you regain access to your device. It ensures a smooth transition to your new email. Unlock new possibilities with Dr.Fone, a reliable companion in managing your iOS device. Explore its features and simplify your Apple journey today!
Disabled Apple iPhone 15 Plus: How to Unlock a Disabled Apple iPhone 15 Plus?

Apple iPhone 15 Plus Disabled?
Because of using face masks, Face ID on iPhone does not always work correctly, and we are entering our passcodes more than before. If we enter it incorrectly a few times in succession, the phone will disable itself to prevent unauthorized access. It can seem like the end of the world because in so many ways smartphones have become our world. Here are ways you can unlock your Apple iPhone 15 Plus disabled due to too many incorrect passcode attempts.
Part 1: Unlock Disabled Apple iPhone 15 Plus Without iTunes/ iCloud Using Dr.Fone - Screen Unlock (iOS)
We know and understand that the word troubleshooting can remind you of long telephone calls with support or making appointments and driving down to specialists and spending obscene amounts of money to get solutions. You do not want that. How about a way you could unlock your Apple iPhone 15 Plus in a simple, 1-click way instead?
Dr.Fone - Screen Unlock is a unique tool designed to help you avoid all hassles and get back on track quickly. It comprises modules designed to help you with all the issues that you might encounter during smartphone use. Naturally, there is something to help you when your Apple iPhone 15 Plus is disabled. You don’t need to use anything else, no other software or special cable or support. All you need is this one software you can download on your computer (both macOS and Windows supported) and you’re good to go.
Dr.Fone - Screen Unlock (iOS)
Unlock Disabled Apple iPhone 15 Plus Without iTunes/ iCloud.
- Intuitive instructions to unlock iPhone without the passcode.
- Removes the iPhone’s lock screen whenever it is disabled.
- Easy to use with detailed guides.
- Compatible with the latest iOS/iPadOS version.
3981454 people have downloaded it
Do note that all methods that unlock your Apple iPhone 15 Plus will necessarily wipe your Apple iPhone 15 Plus and remove all data from the Apple iPhone 15 Plus device, essentially booting it up as new.
Step 1: Launch Dr.Fone and click the module titled “Screen Unlock”.
Step 2: Choose the “iOS” option, then select “Unlock iOS Screen” on the subsequent screen to continue unlocking your Apple iPhone 15 Plus.
Step 3: Follow the provided instructions to start the disabled Apple iPhone 15 Plus in Recovery Mode to unlock it. If for any reason the phone does not boot in Recovery Mode, there are instructions provided at the bottom to enter what is called DFU mode.
Step 4: Dr.Fone will read and display your phone model and the software installed on it. If the model displayed is incorrect, use the dropdown to pick the correct detail. Click “Start” to download the specific firmware file for your particular Apple iPhone 15 Plus model.
Step 5: After the download completes, please click Unlock Now to start unlocking the disabled Apple iPhone 15 Plus.

Your Apple iPhone 15 Plus will be unlocked in a short span of time. Please note that all data would have been wiped out from the Apple iPhone 15 Plus device. When you set the Apple iPhone 15 Plus device up again, if you set it to use iCloud, data such as Contacts, iCloud Photos, iCloud Drive data, etc. will be downloaded onto your device again. The apps you had on your Apple iPhone 15 Plus prior to it getting disabled can be downloaded again from the App Store. If you did not use iCloud but backed up the data manually, you will have to manually restore that data onto the Apple iPhone 15 Plus device again.
 safe & secure
Part 2: Unlock Disabled Apple iPhone 15 Plus Using iTunes or macOS Finder
Of course, there is an official way that Apple provides for users to restore device firmware using iTunes or macOS Finder. For this, iPhone is put under Recovery Mode manually and Finder or iTunes is used to reinstall software on it directly from Apple. This process is fine for people who are conversant in tech, since this process can throw up a lot of errors that are just numbers, and people can get confused as to what they mean, resulting in frustration.
Step 1: Connect your Apple iPhone 15 Plus to a Windows/ macOS device and launch iTunes. If you are on a Mac that runs macOS Catalina or higher, open Finder since you would not have access to iTunes anymore.
Step 2: Pick your Apple iPhone 15 Plus and do the following:
(2.1) Press the volume up button and let it go.
(2.2) Press the volume down button and let it go.
(2.3) Press the Side Button (power button, on the right side of your Apple iPhone 15 Plus) and keep it pressed till Finder or iTunes detects the phone in Recovery Mode.
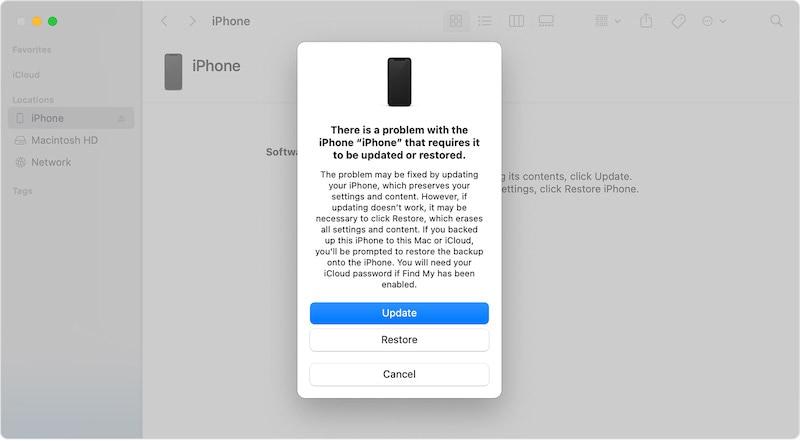
Step 3: Choose Restore to download and reinstall the latest iOS on your Apple iPhone 15 Plus and unlock your Apple iPhone 15 Plus.
When the Apple iPhone 15 Plus reboots, it will be reset to factory settings, and you can set it up again as you did when brand new.
Part 3: Unlock Disabled Apple iPhone 15 Plus Using iCloud Website (Find iPhone method)
Another method you may go with to unlock your disabled Apple iPhone 15 Plus is using the iCloud website to gain access back. This is a fairly easy way and doesn’t require going through complex hoops.
Find My is available both online via the iCloud website and on iOS devices and on Macs. In case the only Apple product you own is the currently disabled Apple iPhone 15 Plus, you can use Find My on the iCloud website from any other computer you may have to unlock your disabled Apple iPhone 15 Plus.
Step 1: Visit https://icloud.com and log in into the same iCloud account/ Apple ID as the disabled Apple iPhone 15 Plus.
Step 2: Go to Find My, select your Apple iPhone 15 Plus.
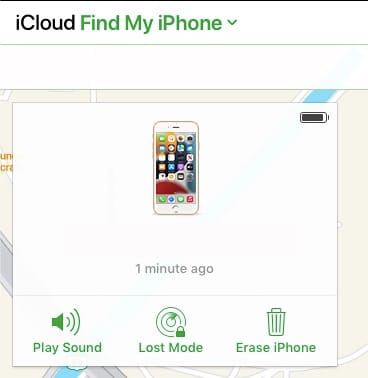
Step 3: Click Erase iPhone and confirm.
This will start the wipe process on your Apple iPhone 15 Plus remotely and your Apple iPhone 15 Plus will be reset to factory settings. You can now proceed to setup your Apple iPhone 15 Plus once again.
Part 4: Unlock Disabled Apple iPhone 15 Plus Using Find My iPhone App
There are times you have another iOS device in the family or just lying around, you can use that device to unlock your disabled Apple iPhone 15 Plus. This method is particularly useful if you’re traveling with family or alone, and only have family members with their own iOS devices or, say, your iPad with you. As always, note that all these methods will wipe your data from your Apple iPhone 15 Plus.
Step 1: Open the Find My app on your other iOS device or Mac
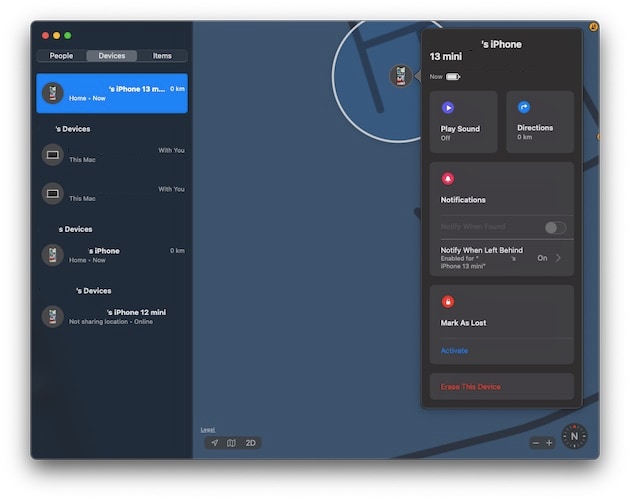
Step 2: Select your disabled Apple iPhone 15 Plus from the Apple iPhone 15 Plus devices from the left pane, click/ tap your disabled Apple iPhone 15 Plus and click/ tap Erase This Device
The disabled iPhone will be wiped and reset to factory settings. You can then set it up again.
Part 5: Unlock Disabled Apple iPhone 15 Plus Without A Computer
There are millions in the world who do not use the traditional computer so to speak. They have entered the post-PC era as they say, and their needs are met without a regular desktop or a laptop. They live wirelessly. They travel the world. Are you one of them? How would you unlock disabled Apple iPhone 15 Plus with no desktop/ laptop computer around? You have a few options.
You can use your other iOS device with Find My iPhone app to unlock your disabled Apple iPhone 15 Plus or you can use the iCloud website from your other device and Find iPhone app to unlock your disabled Apple iPhone 15 Plus.
The second option is to get a loaner device from someone you know. A loaner device is a device you borrow from someone to use for a purpose and return it when you are done with it. In this case, you can ask for a computer from someone you know and use it to unlock your disabled Apple iPhone 15 Plus and return the Apple iPhone 15 Plus device back. That way, you can use iTunes or macOS Finder if you’re more favorable to using that method.
When using a computer, the simplest, easiest, most flexible, and robust method to unlock disabled Apple iPhone 15 Plus is using third-party tools such as Dr.Fone – Screen Unlock (iOS). However, Dr.Fone is not just for troubleshooting and unlocking your disabled devices. Dr.Fone is like that multi-utility knife that can do a variety of things.
Using Dr.Fone you can not only unlock your Apple iPhone 15 Plus with ease, you can also use it periodically as a backup and restore tool that gives power in your hands. How does it do that? When you launched Dr.Fone, you had several modules to choose from and you chose Screen Unlock to unlock your disabled device. Instead of that, you can choose the Phone Backup module to backup and restore data from and to your device. Why would you use a third-party tool to backup and restore?
As you may be aware, using iTunes or macOS Finder allows you to backup and restore data onto your Apple iPhone 15 Plus easily, but, the one glaring omission here is that it does not allow you to choose what you want to backup and what you want to restore. This is a much-coveted feature that is glaringly absent from the Apple world so far, and with Dr.Fone’s iOS Phone Backup feature you can have that choice in your hands, just like you do with Android. Dr.Fone allows you to choose what you want to backup, so, you can back up just your photos, just your text messages, just your files, or any combination thereof, for the matter. And, when it comes to restore, you can restore selectively as well. So, suppose you backed up your entire data using Dr.Fone, now you can restore just the text messages if you so want.
safe & secure
Part 6: Prevent iPhone From Getting Disabled Again
After all this to get access back, you might think let’s go passcode-less and prevent the hassle. Don’t do that - that’s worse and unsafe. Instead, here are tips you can use to make sure you don’t accidentally disable your Apple iPhone 15 Plus again.
Tip 1: About Passcodes
- 1.1 Set a passcode that is easier to remember for you but difficult to think of for thieves and others.
- 1.2 Never use birthdates, years, vehicle numbers or any such numbers that may be easily tried by others.
- 1.3 Never use repeating numbers.
- 1.4 Do not use your ATM PIN as your phone passcode either. Think of some digits or combination that makes sense to you and only you. And then use it.
Tip 2: Use Face ID
Along with Passcode comes the option of Face ID on your Apple iPhone 15 Plus, so use that. That will minimize instances for you to enter your passcode, and may make you forget it again, though. So, make sure that the passcode you set does make sense to you and you can remember it always without effort.
Conclusion
Not all of us have the memory of elephants. With Touch ID and Face ID on our iPhones minimizing the use of passcodes, we may forget them. Another factor in forgetting passcodes is being too smart for our own good and trying to set up such a secure passcode that even we are not able to remember it. If we enter incorrect passcode too many times, the Apple iPhone 15 Plus disables itself and we need to restore it to factory settings to unlock it again. There are several ways to do that, depending on the time you are willing to spend on the job and your proficiency level, along with the resources that you have with you right now. For example, if a method requires use of another iOS device and you do not have it, that method is not useful to you right now, pick another. Lastly, when the Apple iPhone 15 Plus device is reset, instead of going passcode-less to make sure that you do not forget the passcode again, it is best to set up a passcode that you can somehow remember.
safe & secure
What Does Jailbreaking Apple iPhone 15 Plus i Do? Get Answers here
Jailbreaking grants you root access to your smartphone, opening a range of features and functionalities. But what does jailbreaking an iPhone do? Jailbreaking your Apple iPhone 15 Plus removes the restrictions imposed by Apple on its operating system, iOS. It offers more customization options and access to extra apps.
However, is jailbreaking an iPhone safe and legal? It’s a complex answer and not a decision to take lightly. While the process is legal in most countries, its applications can cross legal lines, like installing pirated apps.
To learn more, read on and explore the capabilities of a jailbroken iPhone in the following sections. This article will also touch on its impact on iCloud Activation Lock. Let’s start with the benefits and risks of jailbreaking your Apple iPhone 15 Plus.

Part 1: What Does Jailbreaking an iPhone Do?
Before trying to jailbreak your Apple iPhone 15 Plus, it’s crucial to understand, “What can you do with a jailbroken iPhone?” While it opens up exciting possibilities, it also introduces potential drawbacks. In this section, you’ll learn both aspects.
Benefits of Jailbreaking
Apple’s App Store and iOS offer a curated selection of features and functionalities. But for some users, this can feel restrictive. Here are some advantages of jailbreaking your Apple iPhone 15 Plus:
- Install Unapproved Apps
Apple’s App Store has strict guidelines limiting the type of apps available. Jailbreaking offers various third-party apps and tweaks not available on the App Store. These could include emulators, screen recorders, or apps that bypass certain limitations.
- Increased Customization Options
Users can customize their iPhones beyond the limitations imposed by Apple after Jailbreaking. It includes changing themes, icons, and even the look and feel of the user interface. This level of personalization can enhance your experience while using your iOS device.

- Unlocking System-wide Features
Jailbreaking unlocks extra iPhone features. It lets you access advanced settings and functions. These aren’t in the regular, non-jailbroken mode. More control means more customization. You can optimize your Apple iPhone 15 Plus based on your preferences.
- Unlocking Network Restrictions
Jailbreaking frees the Apple iPhone 15 Plus from carrier restrictions. You can then use it with different network providers. This is handy for travelers or those wanting better service options.
However, these benefits come with caveats you should consider.
Risks of Jailbreaking
While jailbreaking itself isn’t illegal, it does involve bypassing Apple’s security measures. This increased freedom comes with its own set of potential pitfalls. Here are some potential downsides of jailbreaking your Apple iPhone 15 Plus:
- Security Vulnerabilities
Bypassing Apple’s security measures can expose your device to vulnerabilities. Malicious apps or tweaks can exploit these vulnerabilities, risking your data and privacy. It could lead to the theft of your data, including passwords, financial information, and photos.
- Voided Warranty
Jailbreaking is seen by Apple as a device modification. Doing so can void your device warranty. So, if jailbreaking causes any issues, Apple won’t cover them under their support services—both hardware and software.
- Instability and Performance Issues
Jailbreaking may make your system unstable and cause performance problems. When you add unauthorized tweaks or apps, they can clash with iOS. This clash might result in crashes, freezes, or a general drop in your Apple iPhone 15 Plus’s performance.

- Difficulty in Updating
Jailbreaking may cause problems with new iOS updates. When Apple releases updates, jailbreak developers might take time to catch up. This delay can leave you without access to the latest features and security patches.
- Bricking Risk
Incorrect jailbreaking can “brick“ your Apple iPhone 15 Plus, making it unusable. This risk goes up if you try it without enough knowledge or with unreliable tools.
Part 2: What Can Jailbreak iPhone Do to iCloud Activation Lock?
Jailbreaking an iPhone won’t remove the iCloud Activation Lock, contrary to a common misconception. While jailbreaking provides extensive control over your device’s system, it is not synonymous with bypassing iCloud Activation Lock. These are distinct concepts. Here’s how they differ:
- Jailbreak
If you jailbreak your Apple iPhone 15 Plus, what happens is you have root access to the iOS system. It opens customization and functionality beyond what is available.
- iCloud Activation Lock
iCloud Activation Lock is a security feature that ties an Apple iPhone 15 Plus to the Apple ID used to set it up. If lost or stolen, it prevents unauthorized use even after a factory reset.

While jailbreaking grants you deeper access to the system, it can’t override or bypass the iCloud Activation Lock directly. However, third-party tools that can bypass iCloud activation lock use this access. These software, such as Wondershare Dr.Fone, leverage the jailbreak to access crucial system files and implement their bypass methods.
Part 3: Easily Bypass iCloud Activation Lock Without Password
Security risks? Warranty void? These are valid concerns when considering “What does it mean to jailbreak an iPhone?”
Not only that, but if you jailbreak your Apple iPhone 15 Plus and face issues, you may need the Apple ID and password for access. Retrieving them is easy with known iCloud credentials. But reactivation becomes challenging if you’ve forgotten or bought a used iOS device without the previous owner’s details.
To solve this, you can use software to bypass the Activation Lock on your Apple iPhone 15 Plus. Several tools in the market can do it, and Wondershare Dr.Fone is a standout option. It’s user-friendly, compatible with the latest iOS devices, and boasts an intuitive interface.
Here are some things Dr.Fone - Screen Unlock tool can offer:
- Can remove all types of locked screen
- Remove SIM lock/ unlock iPhone carrier without losing data
- Unlock Apple ID without a password
- Bypass MDM without data loss
- Remove iTunes backup encryption
Dr.Fone uses the responsible path of jailbreaking your iOS device, giving you back control. Now, let’s walk through a step-by-step guide on how to bypass the iCloud Activation Lock using Dr.Fone - Screen Unlock (iOS):
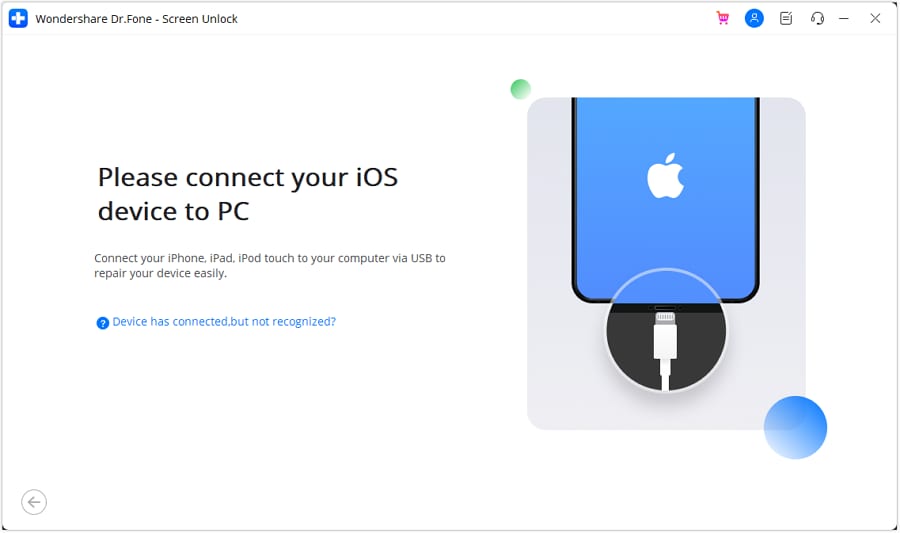
Step 1: Download Dr.Fone and set up the software on your computer.
Step 2: Open the program and select Screen Unlock from the available options on the Toolbox page.
- Step 3: Choose iOS as your device type, then select iCloud Activation Lock Removal on the next window.

- Step 4: Click Start to initiate the bypass process.

- Step 5: Use a USB cable to connect your Apple iPhone 15 Plus to the computer. Ensure the software detects your device.
- Step 6: Check your Apple iPhone 15 Plus settings for a displayed MEID or ESN number to identify CDMA network support. If an IMEI number is present, the Apple iPhone 15 Plus device supports GSM networks. The findings indicate support for both GSM and CDMA networks. Click Unlock Now to proceed.
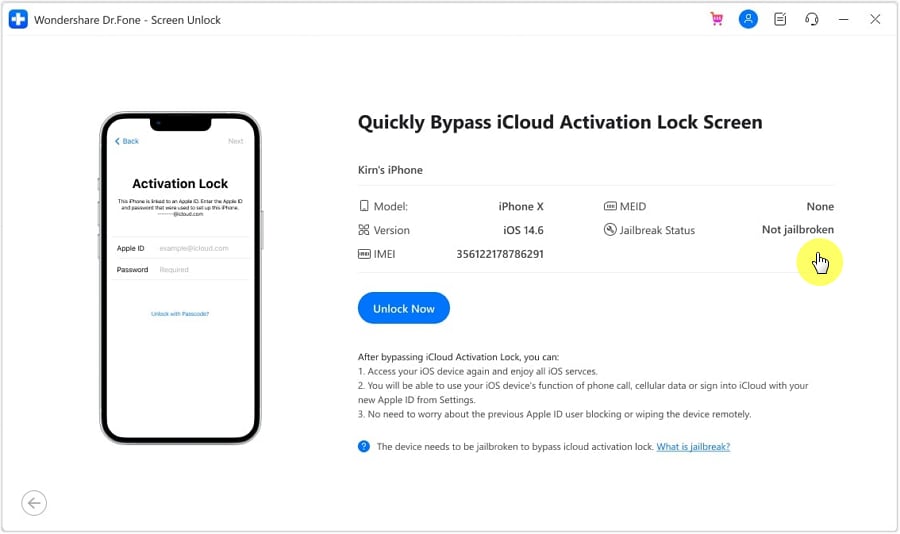
****Note:****For GSM devices, removing the iCloud Activation Lock doesn’t disrupt normal functioning. Conversely, for CDMA devices, calling features may be disabled. However, the Apple ID remains usable for essential functions like App Store access.
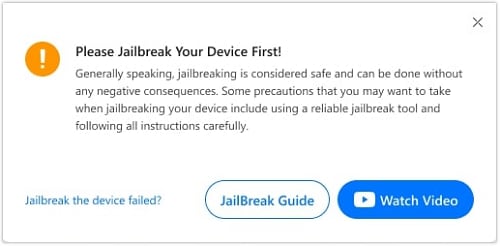
- Step 7: Dr.Fone will check if your device needs to be jailbroken. If it does, follow the on-screen instructions to jailbreak it.
- Step 8: Allow the software to complete the bypass process. Once done, your Apple iPhone 15 Plus will be successfully unlocked from the iCloud Activation Lock without a password.

Part 4: Other Way To Remove iCloud Activation Lock Without Jailbreak
If you’re the rightful owner of the iPhone, the safest and most legitimate way to bypass the Activation Lock is to remove the associated Apple ID from the Apple iPhone 15 Plus device. Here’s how to remove iCloud Activation lock on the web without jailbreaking your Apple iPhone 15 Plus:
- Step 1: Go to appleid.apple.com, then sign in with your Apple ID and password.
- Step 2: Select the Apple iPhone 15 Plus device you want to remove the Activation Lock from, then click Remove from account.

- Step 3: Confirm that you want to remove the Apple iPhone 15 Plus device.
****Note:****If you’re still having trouble removing Activation Lock, you can contact Apple Support for help.
Conclusion
With the question “What does jailbreaking an iPhone do?” answered, it’s time to weigh the pros and cons. Jailbreaking an iPhone means bypassing restrictions for more functions and unauthorized apps. Although it provides customization and extra features, it poses risks.
Jailbreaking your Apple iPhone 15 Plus weakens its iOS security, possibly exposing your device to malware. If you plan to remove iCloud Activation Lock, use trustworthy tools like Dr.Fone. Weighing the benefits of jailbreaking against the potential downsides is crucial. Remember, customizing your Apple iPhone 15 Plus comes at the cost of your device’s security and stability.
Tips: Are you searching for a powerful Screen Unlock tool? No worries as Dr.Fone is here to help you. Download it and start a seamless unlock experience!
Also read:
- [New] 2024 Approved Role-Playing Realms Vintage Versus Variant Forms
- [New] A Deep Dive Into Streamlining Your Google Podcast Process
- [Updated] In 2024, Essential Tips Enhancing Focus in Your YouTube Video
- Complete Guide For Apple iPhone 6 Plus Lock Screen
- Everything You Need To Know About Unlocked Apple iPhone 6s
- Expert Advice Perfected Media Import Techniques for Windows 10 for 2024
- Forgot Apple iPhone 13 Backup Password? Heres What to Do
- Hard Reset Honor X50 GT in 3 Efficient Ways | Dr.fone
- In 2024, How to Make the Most of Your Apple iPhone 15 Plus Lock Screen with Notifications?
- In 2024, iPhone Is Disabled? Here Is The Way To Unlock Disabled Apple iPhone XS
- In 2024, The Ultimate Guide to Syma X5C – Your First Drone's Best Friend
- Top 7 Phone Number Locators To Track Xiaomi Redmi K70 Pro Location | Dr.fone
- Versatile Online Creations Simple and Inclusive Ideas for Your First Videos for 2024
- Who Reigns Supreme? OBS vs Twitch Live for 2024
- Title: Guide on How To Change Your Apple ID Email Address On iPhone 15 Plus
- Author: Sophia
- Created at : 2024-10-15 19:45:37
- Updated at : 2024-10-20 17:48:51
- Link: https://ios-unlock.techidaily.com/guide-on-how-to-change-your-apple-id-email-address-on-iphone-15-plus-by-drfone-ios/
- License: This work is licensed under CC BY-NC-SA 4.0.