
How Do You Remove Restricted Mode on iPhone 12 Pro
How Do You Remove Restricted Mode on Apple iPhone 12 Pro
Restricted Mode on iPhone is useful for controlling access to certain content. If you need to remove these restrictions, learn how to disable Restricted Mode on your Apple iPhone 12 Pro by reading the article. The feature provides a layer of security and content filtering. However, it can limit functionality in some apps.
Follow the steps outlined in the page’s latter part to learn how to turn off Restricted Mode on your Apple iPhone 12 Pro. This will grant you unrestricted access to all apps and content, ensuring a smoother and more flexible user experience. To know more, let’s get started.

Part 1. What Is the iPhone’s Restricted Mode?
iPhone’s Restricted Mode is a comprehensive set of features to enhance user control in family-oriented contexts. It acts as a comprehensive filter, safeguarding users from unwanted content. Restricted Mode employs several key functionalities, such as:
- **Content filtering.**Content filtering filters out inappropriate content from various sources, including apps, websites, and search results.
- Functionality restrictions. Restricted Mode can also turn off specific functionalities like in-app purchases and the Apple iPhone 12 Pro device camera. It ensures a more controlled and secure user experience.
- **4-digit passcode.**The inclusion of a 4-digit passcode adds an extra layer of security. It prevents unauthorized changes to the Apple iPhone 12 Pro settings or Apple ID.
- **Parental controls.**Targeting family use, Restricted Mode incorporates robust parental controls. Parents can manage and monitor screen time for a balanced, age-appropriate digital experience for their children.

Part 2. Why Can’t I Remove Restricted Mode?
If you want to know how to remove Restricted Mode on your Apple iPhone 12 Pro, it’s not as simple as you may have desired. Here are several reasons:
- Forgotten Passcode
If you’ve forgotten the passcode set for Restricted Mode, unlocking it becomes challenging. Security measures are in place to prevent unauthorized changes, and bypassing it can be complex.
- Parental Controls
For users under parental guidance, restrictions are often set by parents or guardians. It’s to ensure a safe and controlled digital environment. Removing Restricted Mode might require parental consent or a passcode.
- Software Updates
Occasionally, issues arise during iOS updates, causing bugs or glitches that may affect the removal of Restricted Mode. These technical issues can hinder the smooth operation of device features.
- Factory Restrictions
In cases of secondhand or refurbished iPhones, the Apple iPhone 12 Pro device may have restrictions that limit the removal of Restricted Mode. These restrictions are set to maintain the Apple iPhone 12 Pro device’s integrity and compliance with certain standards.
These factors are crucial for users attempting to remove Restricted Mode. Each scenario may necessitate a different approach or solution.
Enabling Restricted Mode on your Apple iPhone 12 Pro is prudent, especially for parents. It ensures a secure and controlled digital environment for their children. Follow these simple steps to turn on Restricted Mode:
- Step 1: Go to Settings > Screen Time > Content & Privacy Restrictions on your Apple iPhone 12 Pro. Next, Toggle the switch next to Content & Privacy Restrictions to turn it on.

- Step 2: The device will prompt you to set a passcode. Choose a secure 4-digit code required to make changes or deactivate the Restricted Mode. You can customize various settings, such as app usage, web content, and privacy settings. Tailor these restrictions according to your preferences and the intended user.
Part 4. 3 Ways to Turning Off Restricted Mode on iPhone
If you want to know how to turn off Restricted Mode on your Apple iPhone 12 Pro, here are three efficient methods to do so. Whether on a specific iOS version or facing a forgotten passcode, these provide solutions for every scenario.
Method 1: Turn Off Restricted Mode on iOS 12 and Above
For users on iOS 12 and above, turning off Restricted Mode is straightforward:
- Step 1: Open the Settings app on your Apple iPhone 12 Pro and scroll down to find Screen Time > Content & Privacy Restrictions. Enter your passcode when prompted.

- Step 2: Toggle off the switch next to Content & Privacy Restrictions. This action turns off Restricted Mode on your Apple iPhone 12 Pro.
Method 2: Turn Off Restricted Mode on iOS 11 and Below
For those using iOS 11 and below, the steps are a bit different:
- Step 1: Go to Settings > General. Scroll down to find the Restrictions option.

- Step 2: Toggle off the switch next to Restrictions. The action turns off Restricted Mode on iOS 11 and below.
Method 3: Turn Off Restricted Mode Using Dr.Fone - Screen Unlock (iOS)
There may be situations where removing Restricted Mode on your Apple iPhone 12 Pro becomes challenging. If you can’t unlock your Apple iPhone 12 Pro screen time, then you need a specialized tool like Wondershare Dr.Fone. The platform’s Unlock Screen Time Passcode feature can assist in its removal in quick and easy steps.

Key features
Packed with essential features, Dr.Fone ensures a seamless experience in removing Restricted Mode your device:
- Removes all types of lock screens. Dr.Fone - Screen Unlock (iOS) is equipped to handle various lock screens. It provides a versatile solution for users dealing with Restricted Mode passcode issues.
- **No need for an Apple ID password.**Unlike many other tools, Dr.Fone allows you to unlock without Apple ID password. It streamlines the unlocking process, making it more accessible for users.
- **Unlocks Without Data Loss.**You regain access to your Apple iPhone 12 Pro without compromising your valuable information.
- High Success Rate: Dr.Fone - Screen Unlock (iOS) boasts a high success rate, assuring users of a reliable and effective solution.
How To Turn Off Restricted Mode Using Dr.Fone
Here’s how to disable Restricted Mode on iPhone without a password using Dr.Fone. Follow the steps:
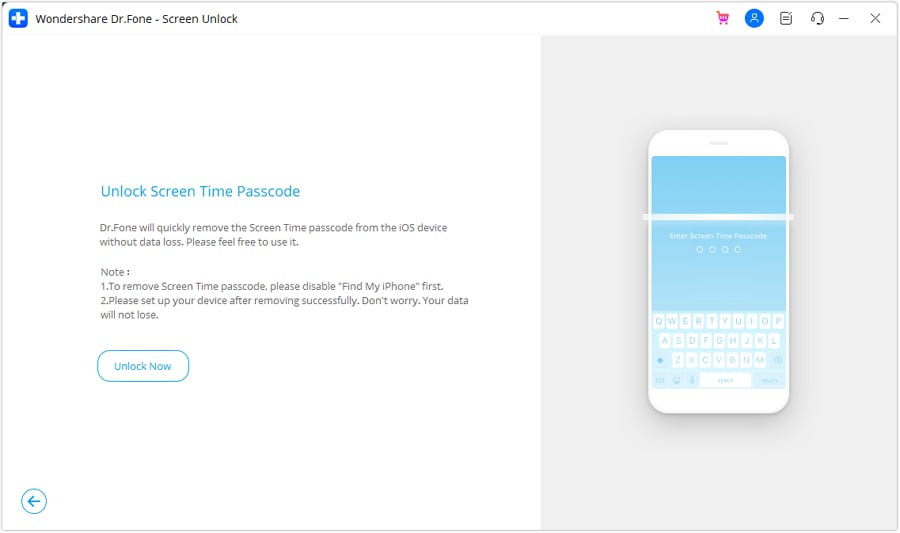
- Step 1: Begin by downloading and installing Dr.Fone on your computer. Next, click Toolbox > Screen Unlock > iOS. Choose Unlock Screen Time Passcode from the next window to start the process.

- Step 2: Ensure your Apple iPhone 12 Pro is connected to the computer using a USB cable. Wait for Dr.Fone to detect your Apple iPhone 12 Pro automatically. Next, click the Unlock Now button.
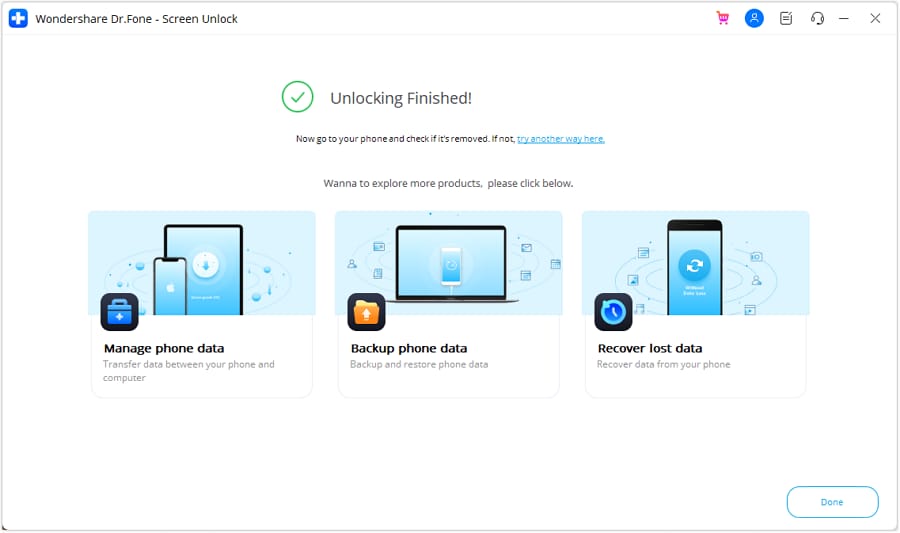
- Step 3: Follow the on-screen instructions. Afterward, Dr.Fone will initiate the unlocking process to remove the Restricted Mode passcode. Once removed, click the Done button to finish.
Tips: Are you searching for a powerful Screen Unlock tool? No worries as Dr.Fone is here to help you. Download it and start a seamless unlock experience!
Bonus. How To Turn Restricted Mode On or Off on YouTube
YouTube’s Restricted Mode on iPhone is valuable for users seeking a more controlled and family-friendly viewing experience. It serves to screen out mature content and ensures a safer environment, especially for younger audiences. Here’s a breakdown of what YouTube’s Restricted Mode does:
Screens Out Mature Content
Restricted Mode filters content that may not be suitable for all audiences, blocking videos with explicit or sensitive material.
Comment Viewing Restrictions
With Restricted Mode enabled, users cannot view comments on videos, offering an additional layer of protection and privacy.
Browser and Device Level Functionality
YouTube’s Restricted Mode operates on both the browser and device levels. Once activated, it applies across various platforms, ensuring consistent content filtering.
Different from Age-Restricting Videos
It’s important to note that Restricted Mode differs from age-restricting videos. While age restriction applies to specific videos, Restricted Mode filters content across the entire platform, providing a broader safety net.
How To Turn Restricted Mode On or Off on YouTube
Follow the steps to learn how to disable Restricted Mode on iPhone when using YouTube.
- Step 1: Go to your profile picture on the YouTube app and tap on Settings. Next, toggle the switch next to Restricted Mode on or off.

- Step 2: Go to the YouTube website if you’re on a browser. Next, scroll down to the bottom of the page and click on Restricted Mode. Toggle the switch on or off.
You May Also Like:
How to Turn Off Screen Time without Passcode
100% Working - Screen Time Passcode Not Working Solutions
Conclusion
Managing how to disable Restricted Mode on iPhone and YouTube ensures a safer digital environment. On iPhone, employ various methods like navigating settings or using Dr.Fone - Screen Unlock (iOS) for forgotten passcodes. On YouTube, easily toggle Restricted Mode in-app or on the browser for a more controlled viewing experience.
Remember, Dr.Fone becomes a valuable ally when facing a passcode challenge. These versatile solutions grant you control over content accessibility and privacy, enhancing your digital experience. You can easily navigate and customize your device’s restrictions by mastering these techniques.
Unlocking Apple iPhone 12 Pro Lock Screen: 3 Foolproof Methods that Actually Work

The competition in the market between Android and iOS has been increased ever since the features are increasing. People get attracted by anything that is new and unique. The competitive brands are taking things seriously and are coming up with the eye-catching mobile body and mesmerizing features.
Someone who is new in the Apple world must not be aware of the security activation lock and many other different features. No one can use your Apple device without the activation lock. The fact that user can remove all the data from iPhone whenever they want and can even restore it instantly gets user attention.
Looking more into the Apple iPhone 12 Pro world, people might be confused between the lock screen and activation lock. Also, they might be facing the problem of how to bypass the lock screen of iPhone Apple iPhone 12 Pro . Let us answer your questions and provide you some knowledge.
Part 1. Can Someone Bypass the Apple iPhone 12 Pro Activation Lock?
Protecting user’s information is among the core objectives of Apple. For this purpose, an activation lock has been developed for iPhone, iPad, iPod, and Apple Watch users. The lock prevents any other person from using your apple device in case it’s lost or stolen.
The phones that are iOS 7 or above versions do not need to manually enable the lock because it is auto-enabled once the phone is switched on. The strong security concerns behind this lock do not allow your device’s misuse from someone who is using it for the wrong purpose.
Apple’s activation server saves your Apple ID, and in case the phone is turned off, or any erasing activity is observed, then the Apple iPhone 12 Pro device will ask to unlock the iCloud activation. Suppose you have purchased a phone from someone, and it asks for an activation lock. That is because the Apple iPhone 12 Pro device is still linked with the old owner and hence, will not allow you to access the phone.
For this, if the Apple iPhone 12 Pro device is asking for an activation lock, the user cannot bypass the Apple iPhone 12 Pro activation lock. The only way to get rid of that is to break the link between the Apple device and the prior owner, but that requires Apple ID.
Part 2. Bypass iPhone Lock Screen Apple iPhone 12 Pro without Passcode [No iTunes]
The major difference between the lock screen and activation lock is that the lock screen can be bypassed without the password but, the user can never bypass the activation lock as it marks the security boundary of Apple.
You might be wondering how to escape the lock screen without a password because it is possible that you might forget the password, and now you can’t open your phone. Let’s look at how you can do this;
The commonly faced problem of many iOS users was that they forget the password but later, an amazing solution to this problem as Dr.Fone – Screen Unlock application was known and used by almost all iOS users. Some of its features are;
- The application is easy to use. It does not need any technical skill to use it, and everyone can handle the application.
- It can unlock a disabled iPhone even if the user doesn’t have the passcode.
- It fully supports iPhone 8, iPhone X, and all the latest models of iPhone.
- You don’t have to worry if you got a second-hand phone because Dr.Fone can unlock it.
Let us now show you how to use the application and enjoy life with iPhone;
Step 1: Download Dr.Fone
The user is requested to download Dr.Fone – Screen Unlock on Windows or Mac system from its official website. Once it’s downloaded, you should install it and then, it will be ready to use. Launch it whenever you want to bypass the Apple iPhone 12 Pro lock screen.
As you will launch the application, the home page will appear from that, and you have to select ‘Screen Unlock’ that is on the left.
Step 2: Make a Connection
The user is now supposed to make the connection between iPhone and the system and let the application automatically detect it. When you are ready to initiate the action, just click on the button ‘Unlock iOS Screen.’

Step 3: Activate DFU Mode
Once the system has detected the phone, the user is advised to activate the DFU mode by turning off the phone and connecting it to the computer.

Step 4: Information for Confirmation
The next window will ask for some basic information regarding the iOS device and version.

Step 5: Firmware Update
Click on the ‘Download’ button at the bottom to get the firmware update for your phone. This might take some time as the firmware update for your phone is being downloaded. As that’s done, click on the ‘Unlock Now’ button on the screen.
Step 3: Select the Path
Select the saving path where you want to save your screenshots. For this, click on the “Settings” and go to “Screenshots and recording settings.”
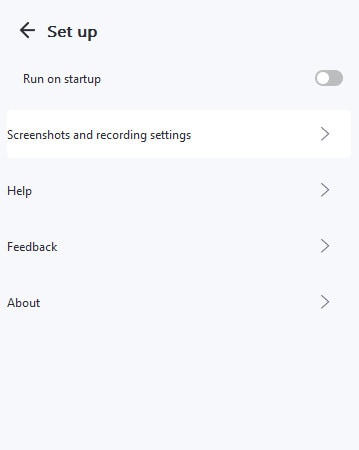
You will see the option “Save to.” Guide the path, and all taken screenshots will be stored at the selected location.

Provide the system with an on-screen confirmation code to continue the process. When that is done, the interface will notify you. By clicking on the ‘Try Again’ button, you can repeat the process.

Part 3. Erase iPhone from iCloud [Apple ID & Password]
People keep on switching between Android and iOS. Not everyone sticks to one thing, and so do passionate mobile users do. But suppose someone is changing their phone and they want to delete the Apple iPhone 12 Pro from iCloud, both the Apple ID and its password; what should be done in such a scenario?
The user can easily bypass the lock screen on their iPhone from iCloud only if their Find My iPhone feature is turned on. Let us take you through the steps that will help you to do the task;
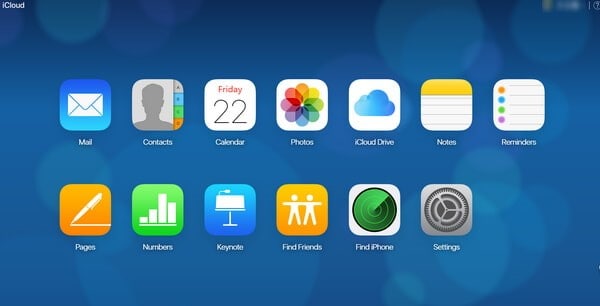
User is firstly supposed to log in to iCloud.com on their computer or any other device in use by using the Apple ID and password.

In case the user has enabled the two-factor authentication on iPhone, then they should hit ‘Trust’ and enter the six-digit verification code sent to their iPhones on the iCloud web.
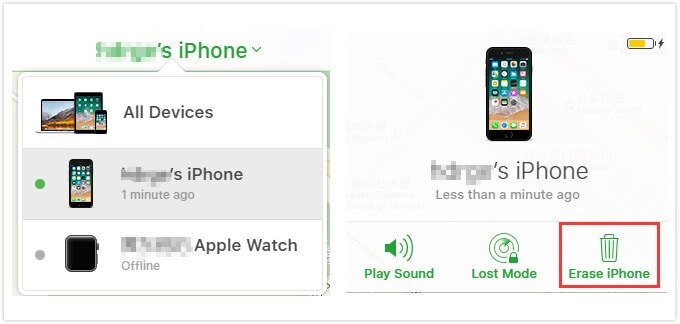
Once that is done, and you have logged in to iCloud, select the option of ‘Find iPhone.’
Now, the user should select and click on ‘All Devices, located at the top of the browser.
The system will now ask for your Apple ID and password; provide that.
After you have done that, a list of all the Apple iPhone 12 Pro devices will appear. You are now supposed to select your device and click on the option of ‘Erase iPhone.’
Doing this will wipe all the data, settings and, also the password.
Part 4. Restore Apple iPhone 12 Pro Apple iPhone 12 Pro to Factory Reset by iTunes
Most iPhone users have synced the Apple device to iTunes. This helps them to recover the data in case it is lost. If the user has created an appropriate backup across iTunes, they can easily carry out the process of bypassing the lock screen. In other words, iPhone users have everything saved without the fear of being lost.
iPhone users can even restore their phones to factory settings without losing anything and by just using iTunes. Let us show you how it is done;
Users should start the process by turning their phone off and connecting it to the computer.
Now, the user should press and hold the ‘Home’ button and ‘Power’ button together. Release them when you see ‘Connect to iTunes’ on the screen.
Once that is done, the user is now requested that from the menu on the left side of the screen, select ‘Summary.’
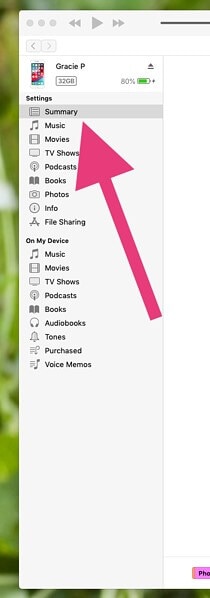
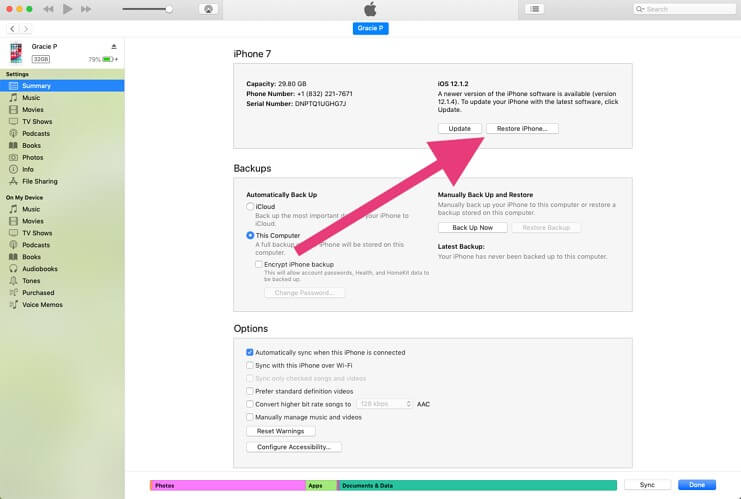
A new window will appear, the Summary window. From this, the user is supposed to select the option of ‘Restore iPhone.’
Selecting the restore option, a confirmation window will appear on the screen, asking the user to confirm the decision of the restore process.
As soon as iTunes has finished the restoring process, the phone is ready and reset.
Users can now retrieve all the data that has been backed up on iTunes.
Conclusion
The article has covered a sufficient portion of knowledge for the user regarding how they can bypass iPhone lock screen Apple iPhone 12 Pro . The difference between the common confusion of lock screen and activation screen and also a few tips and tricks have been discussed.
How to Make the Most of Your Apple iPhone 12 Pro Lock Screen with Notifications?
The Apple iPhone 12 Pro lock screen has certainly changed a lot over the last few updates of iOS. Not only it provides an added security to the Apple iPhone 12 Pro device, but with iPhone lock screen notifications, we can also save our time and efforts. With the introduction of iOS 18, we can also see a change in iPhone lock screen with notifications as well. To help you make the most out of lock screen notifications iPhone, we have come up with this ultimate guide. Read on and know all sorts of things you can do with iPhone notification lock screen.
Part 1: How to use iPhone lock screen notifications?
When it comes to iPhone lock screen with notifications, there are so many things that you can do. For instance, here are a handful of things you can do with iPhone lock screen notifications.
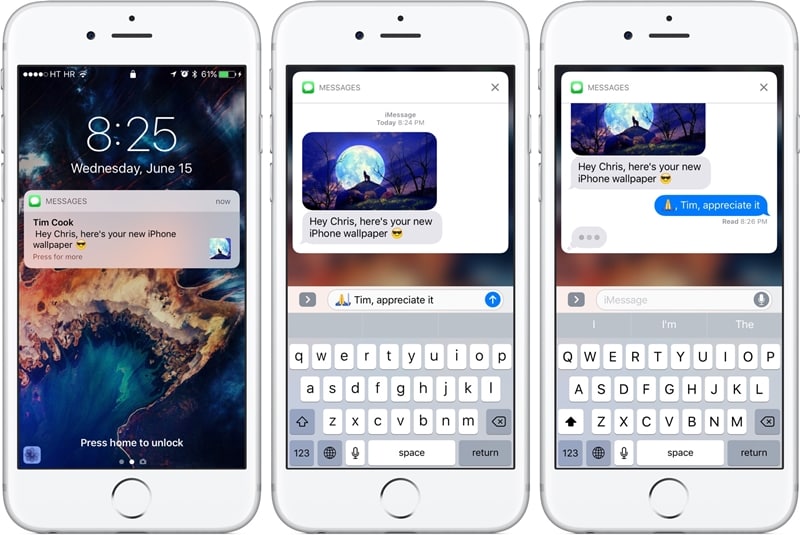
Reply to messages quickly
If you aren’t using this iPhone notification lock screen feature, then you are certainly missing out on something. You might already know that you can get a preview of messages on your home screen. Simply long press it (or 3D Touch) to interact with it. From here, you can reply to your messages without unlocking your device.
Interact with apps without unlocking your phone
Not just your messages, you can interact with other apps as well right from the lock screen notifications iPhone. After getting a list of notifications, you can simply tap on the “x” button to close them.
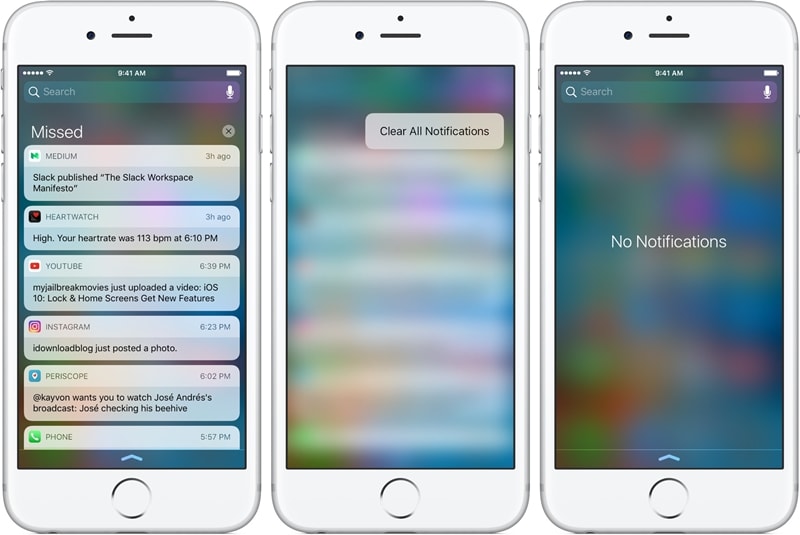
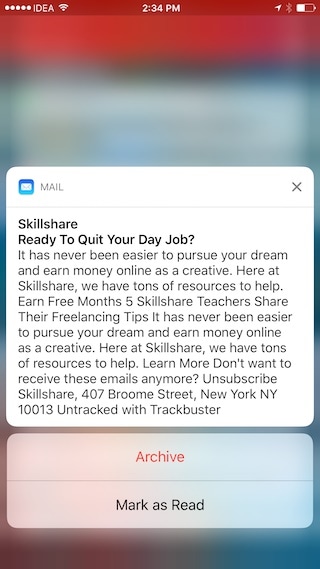
Though, if you want to know more, then just long press the notification. For instance, if you have got a notification for an email, then you can get various options just by long pressing it.
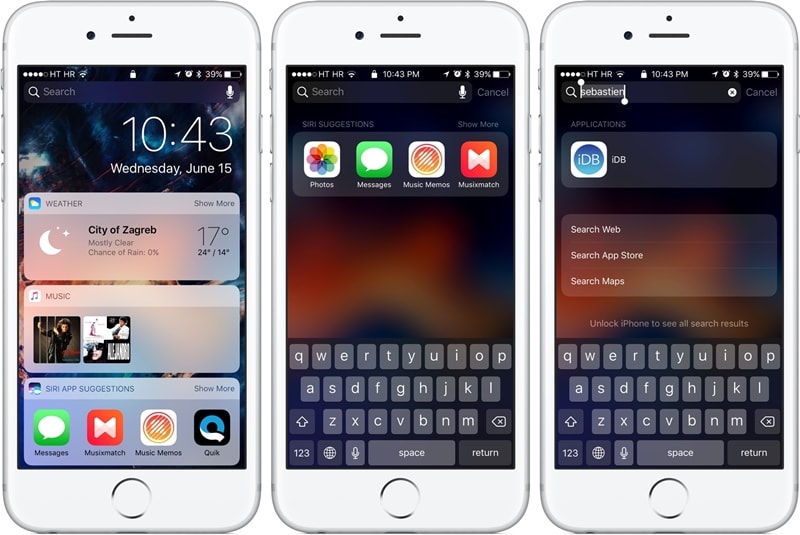
Search for anything
Besides interacting with widgets and apps, you can also search for something on your device and that too without unlocking it. Simply tap on the search bar to make it work.
Part 2: How to turn off notifications on iPhone lock screen?
Sometimes, people can access our private information just by looking at our notifications. In this way, they can get read your crucial information and that too without unlocking your device. By simply visiting your device’s settings, you can customize iPhone lock screen with notifications. In this way, you can turn on or off iPhone lock screen notifications for the apps of your choice.
1. Unlock your device and go to its Settings > Notifications to access all the features related to its notifications.
2. From here, you can view a list of all the apps that can access notifications.
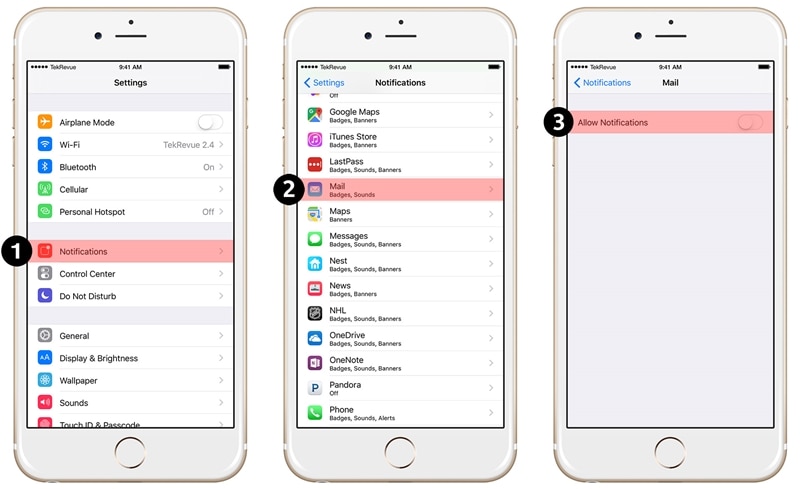
3. Simply tap on the app of your choice (Mail, Message, Photos, iTunes, etc).
4. From here, turn off the option of “Allow Notification” to completely turn off the notifications for the app.
5. If you simply want to turn off notifications on lock screen, then switch off the option of “Show on Lock Screen”.
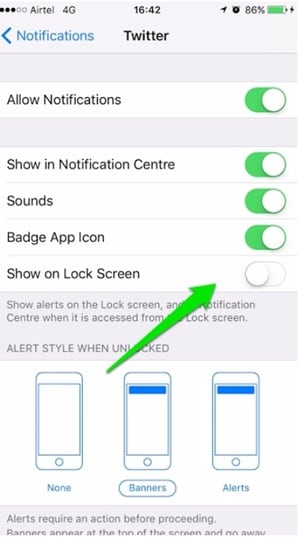
Besides that, there are a few other options as well that you can either enable or disable to customize your lock screen notifications iPhone.
Part 3: How to turn off notification view on iPhone lock screen?
The notification view can be used to see previous notifications on the Apple iPhone 12 Pro device without unlocking it. Needless to say, most of the users don’t like to include this iPhone notification lock screen feature. To turn off the notification view of iPhone lock screen notifications, follow these steps:
1. Firstly, unlock your device and got to its Settings > Touch ID & Passcode option.
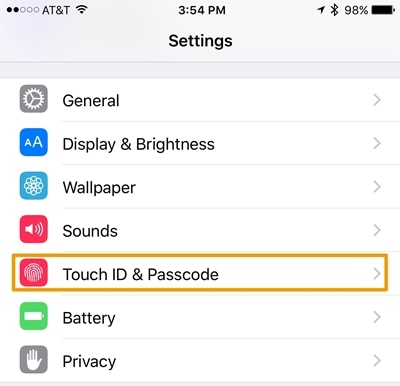
2. You would be needed to provide the passcode or your fingerprint in order to access these settings.
3. This will provide a list of features related to your passcode. Go to the section of “Allow Access When Locked”.
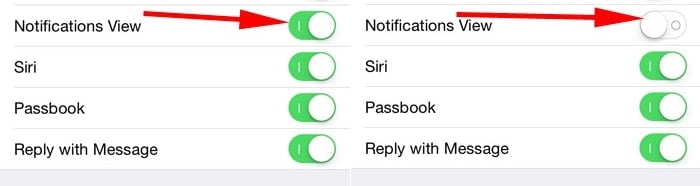
4. From here, make sure that the option of “Notification View” is turned off.
After turning the option off, you can exit from the Settings interface. In this way, your device won’t display the notification view.
Part 4: Changes on iPhone lock screen notifications on iOS 18
With the new update of iOS 18, we can see a drastic change in the Apple iPhone 12 Pro lock screen notifications as well. Since the Apple iPhone 12 Pro lock screen with notifications have been integrated into one, it becomes quite easier for users to access it.
Access iPhone notification lock screen on iOS 18
Some people find it a little tricky to access the lock screen notifications iPhone after the iOS 18 update. Instead of sliding the screen from the top, you need to swipe it from the middle. By swiping it from the bottom, you might get its control center.
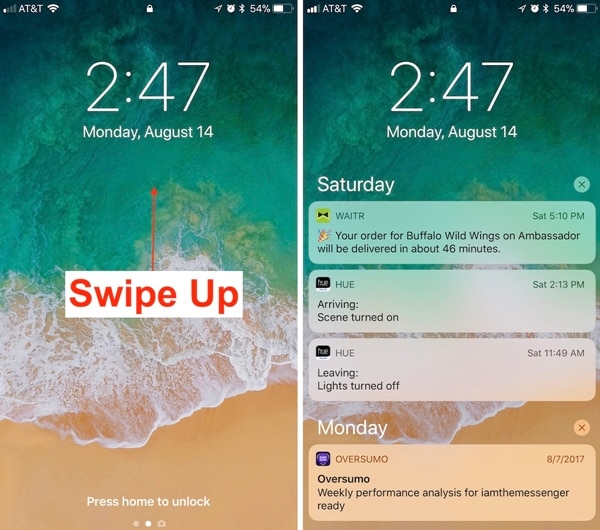
Simply swipe up from the middle of the screen to get a list of all the notifications. Now, you can slide them to access the old notifications.
Nevertheless, you can swipe from the top to access the cover sheet.
Swipe left or right
This is undoubtedly one of the most evident new features of the Apple iPhone 12 Pro notification lock screen of iOS 18. Now, you can swipe left or right to access various features. By swiping left, you can access the Camera on your device and by swiping right, you can access your Today View.
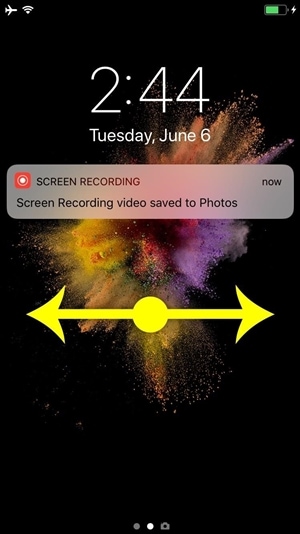
If you want to click pictures instantly, then simply swipe left the lock screen. This will launch the Camera on your device, letting you click pictures on the go. Similarly, by swiping right, you can access your Today View. This includes vital data from apps and widgets that your smartphone assumes is important for you regarding the day.
We hope that after following this guide, you would be able to gain in-depth information regarding iPhone lock screen with notifications. Apart from all the basic things you can do on the lock screen, we have also provided easy ways to customize it. Furthermore, there are so many things that you can do with the iOS 18 iPhone lock screen notifications. While most of the users loved the feature, some are quite hesitant about its application. What is your take on this? Let us know about it in the comments.
Also read:
- [New] In 2024, Reviewing VLC as a Multimedia Recorder
- [Updated] 2024 Approved A Beginner's Guide to Flawless iPad Screen Saving
- [Updated] Essential Tips for Attending TikTok Live Events for 2024
- 2024 Approved Break Into Everyone's Heart - Clever Tips & Examples for Tinder Bios
- How To Fix iPhone 12 Pro Max Unavailable Issue With Ease
- How To Simulate GPS Movement With Location Spoofer On Samsung Galaxy A14 4G? | Dr.fone
- In 2024, How to Unlock Apple iPhone 11 Pro, Apples New iPhone
- In 2024, The Best Methods to Unlock the iPhone Locked to Owner for Apple iPhone 15 Pro Max
- In 2024, What Does Jailbreaking iPhone 11 Pro i Do? Get Answers here
- Title: How Do You Remove Restricted Mode on iPhone 12 Pro
- Author: Sophia
- Created at : 2024-12-09 16:35:12
- Updated at : 2024-12-12 16:23:46
- Link: https://ios-unlock.techidaily.com/how-do-you-remove-restricted-mode-on-iphone-12-pro-by-drfone-ios/
- License: This work is licensed under CC BY-NC-SA 4.0.