
:max_bytes(150000):strip_icc():format(webp)/GettyImages-970157966-65f3dd434f3e4dc98e28a635b8cacc87.jpg)
How To Change Your Apple ID on iPhone 7 With or Without Password
How To Change Your Apple ID on Apple iPhone 7 With or Without Password
The Apple ID is a unique identifier used to log in to all Apple services, including iCloud, the App Store, Apple Music, and more. You can track purchases and manage your account settings through your Apple ID. But what if you need a new one for security or moving to a new location?
Whatever the reason, learning how to change your Apple ID on your iPad is straightforward. And this guide will show the steps and provide some tips at the end.

Part 1: Reasons Why You Might Need To Change Your Apple ID
Your iOS devices contain most of your digital data. That includes your contact list, email, financial information, and social media passwords. All this data is valuable - others can use it to do identity theft, fraud, and other crimes.
If you feel the existing Apple ID isn’t secure enough, it’s a good idea to change your Apple ID on your iPad or other devices. Aside from this, there are a few scenarios where you might find yourself needing to change your details:
You No Longer Use the Email Address or Phone Number Associated With Your Apple ID
Life moves fast, and sometimes contact info changes. If the email or phone number linked to your Apple ID becomes outdated, it’s a good idea to update it. That way, you won’t miss out on vital notifications or have trouble recovering your account if needed.
You Want To Simplify Your Online Life
If you have multiple email addresses, you may want to consolidate them into one email address. It can make it easier to manage and remember your online accounts, including your Apple ID.
You Are Relocating to a Different Region or Country
Moving abroad? Your Apple ID may need an update to match your new location. It ensures access to region-specific apps and services. You need to have a few things in place before you can do that: add a payment method for your new location, cancel your subscriptions, and spend your store credit. Aside from that, you will also need to change your Apple ID country or region.
Changing your Apple ID can be smart, ensuring your digital life stays up-to-date, secure, and tailored to your needs. It’s not complicated, and it’s all about making your Apple experience better suited to you. So, go ahead and learn how to change your Apple ID on your iPad in the following sections.
Part 2: How To Change Apple ID on iPad Without Losing Data?
If you receive a notification from Apple about suspicious account activity, it’s time to act. Before you learn how to change the Apple ID on an iPad – for yourself or others, here are some common signs of a compromised Apple ID:
- A login attempt from a device or location that you don’t recognize
- A password change that you didn’t know about
- Unauthorized messages or purchases
- A password that no longer works
- Unfamiliar account details
If you suspect unauthorized access to your Apple ID, below is what you can do.
Steps To Change Your Apple ID to a Different Email Address
If you are worried about losing data such as purchases and contacts, don’t worry. You can update your Apple ID account anytime without disrupting your data. Here’s a step-by-step guide on how to change your Apple ID email address. Just sign out of all Apple services and devices that use your account first.
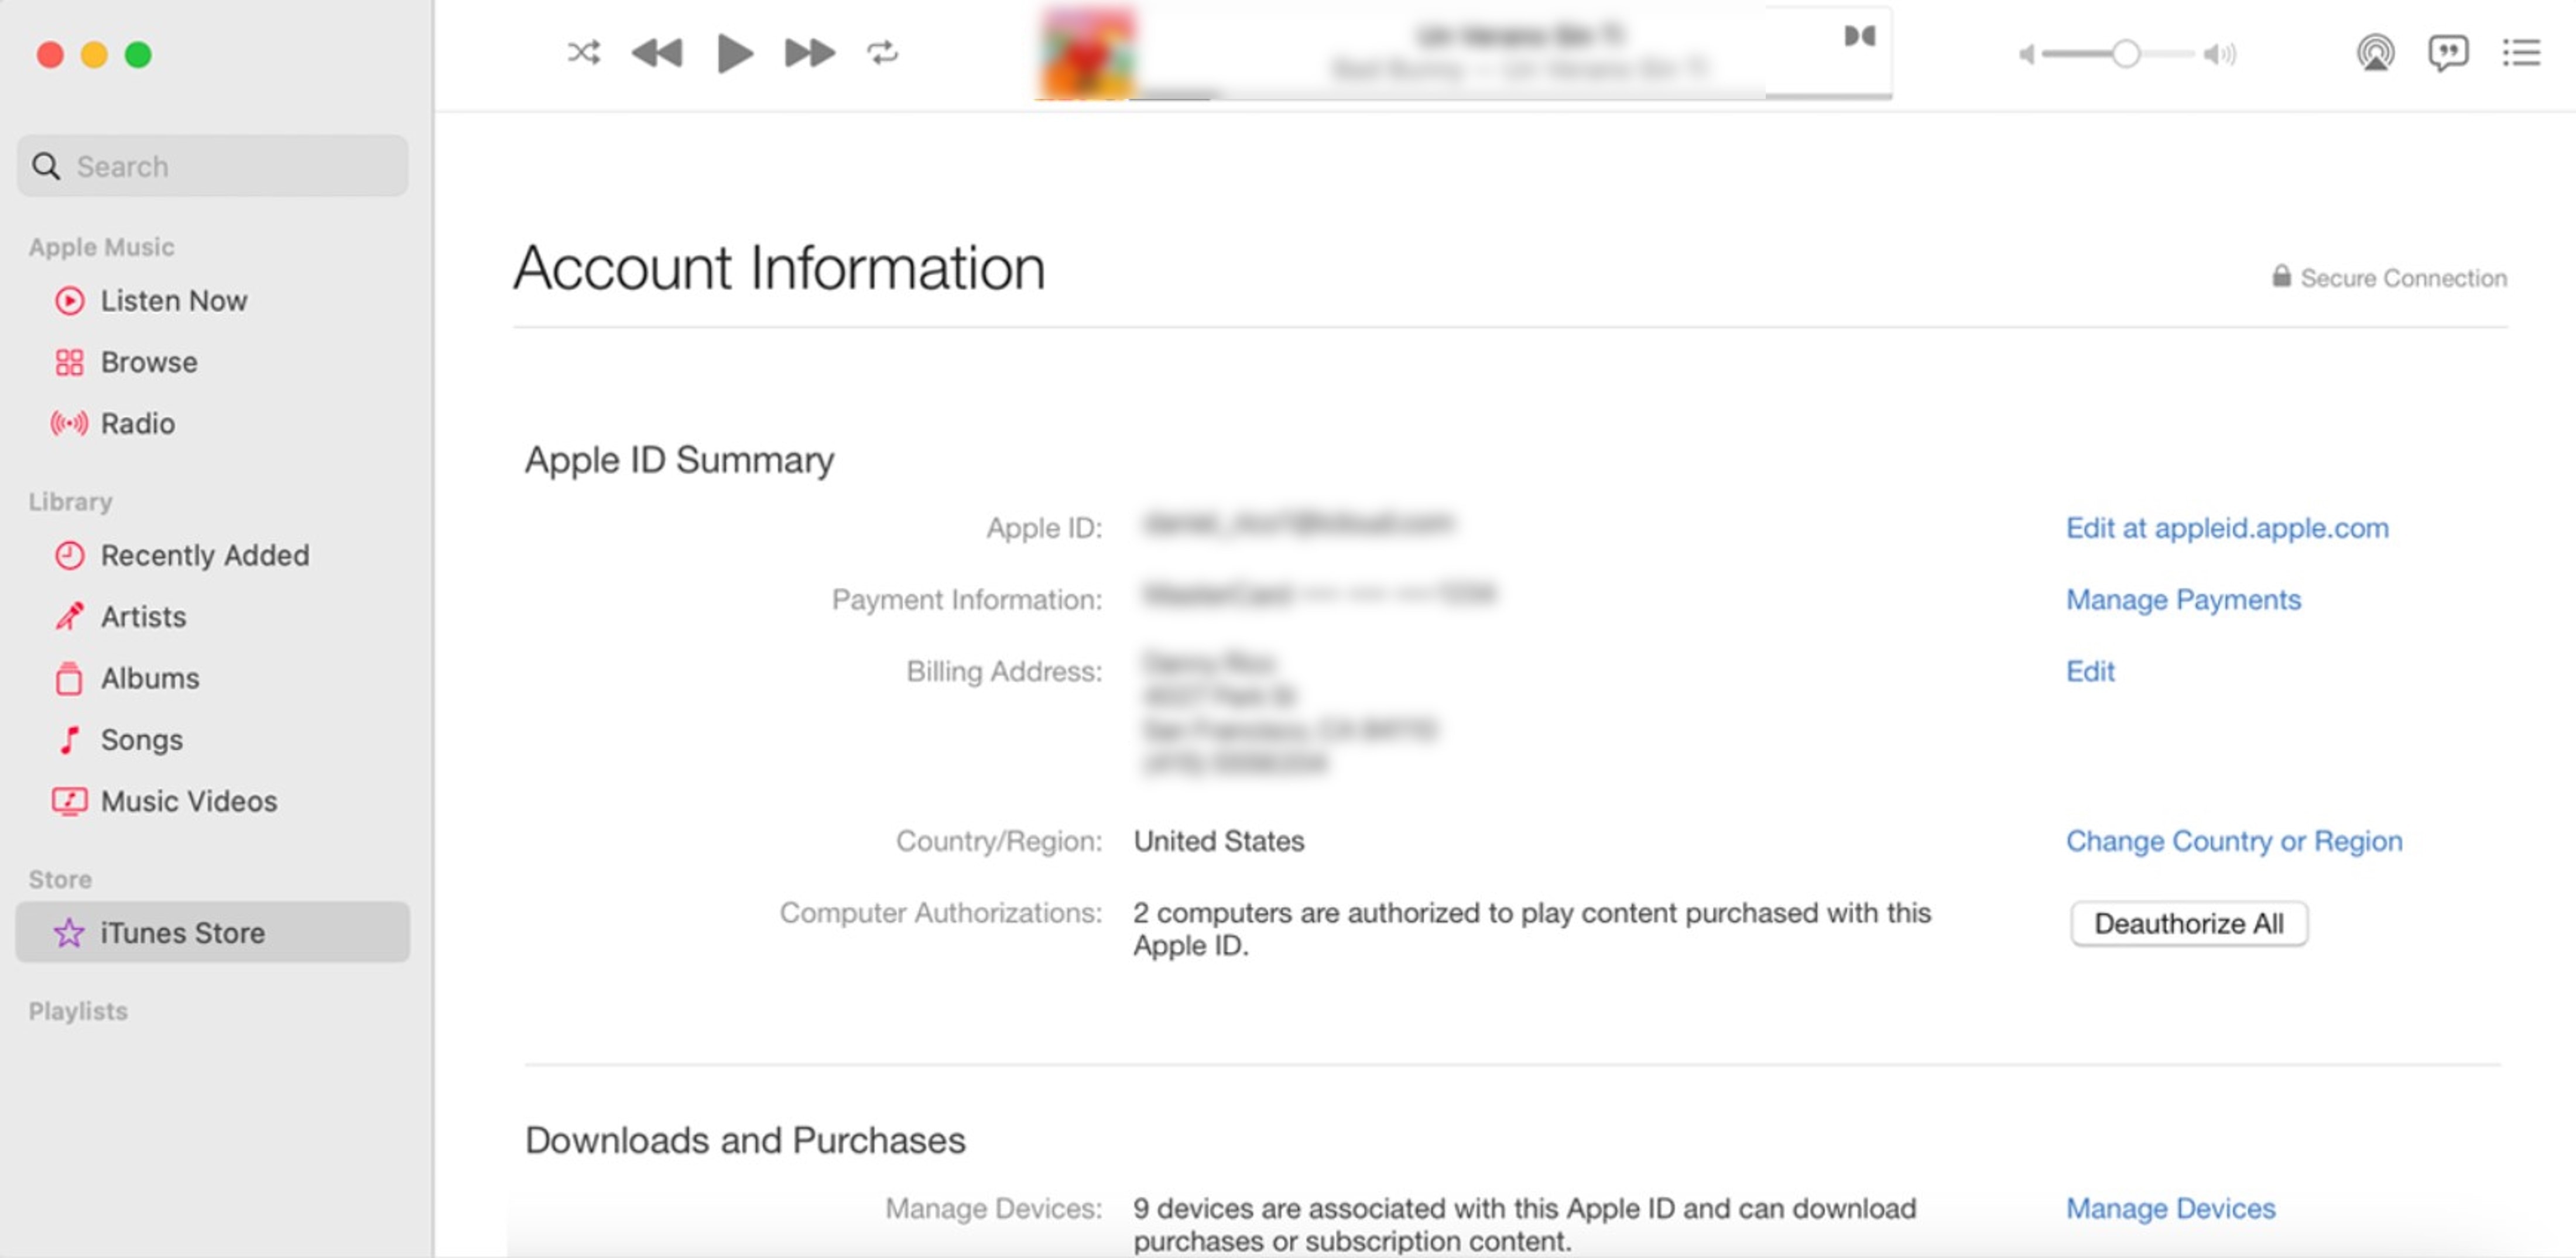
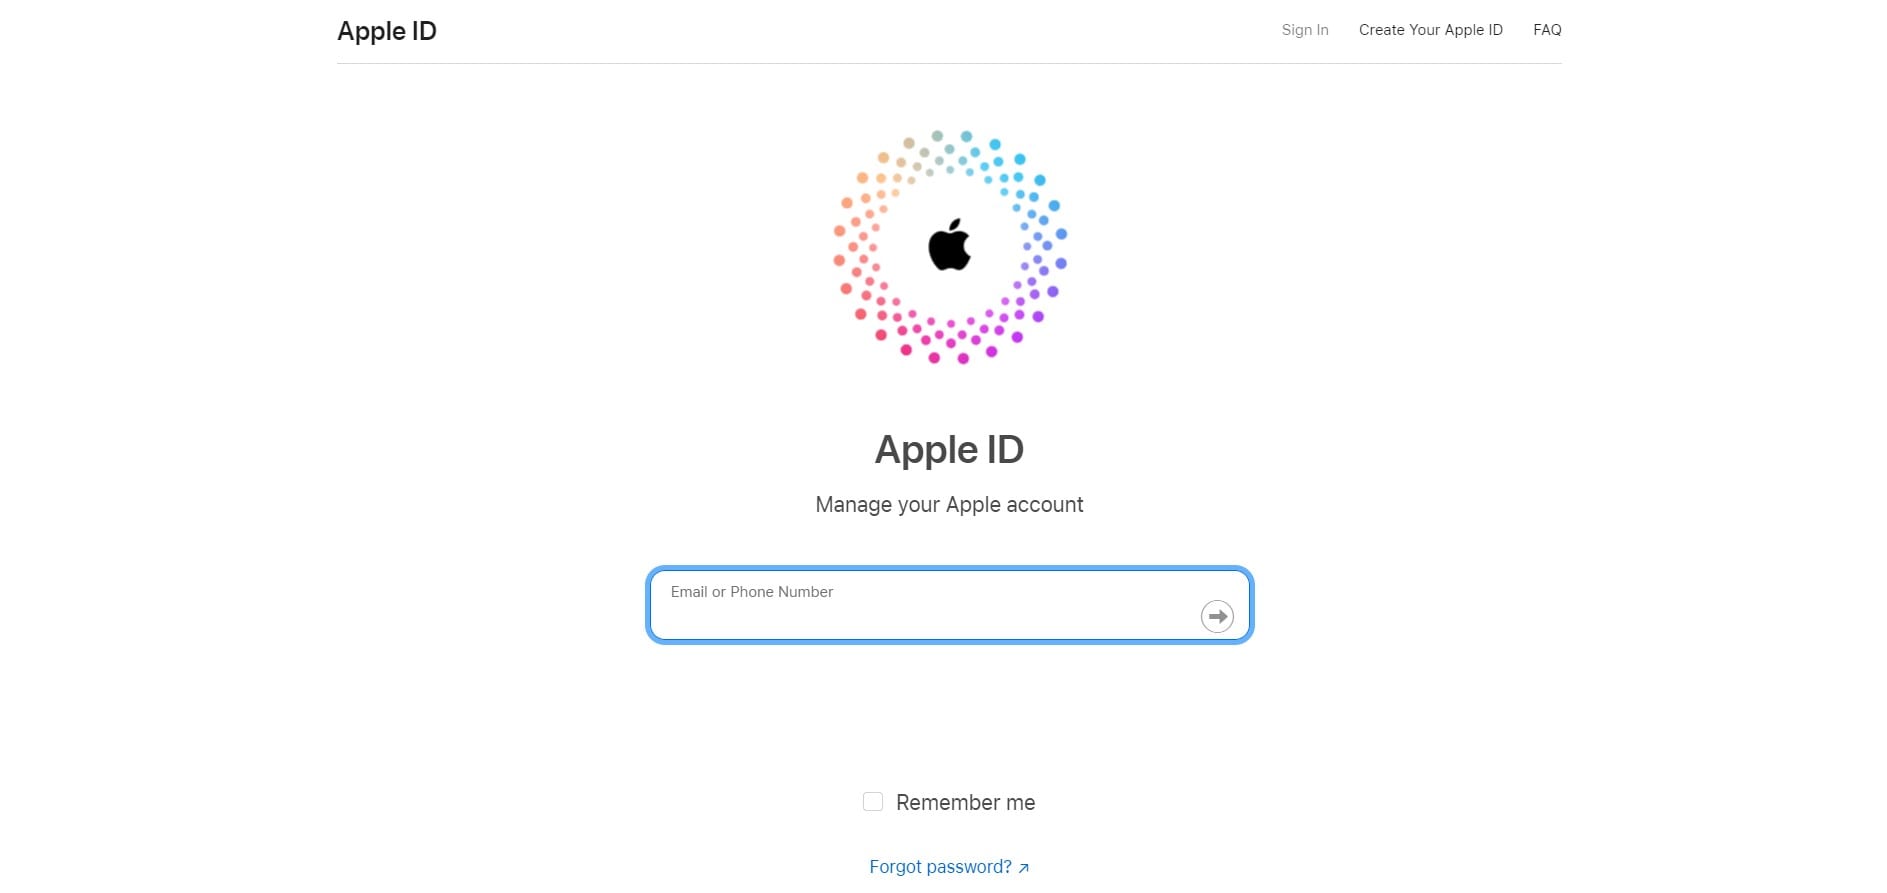
- Step 1: Visit the Apple ID official website and log in to your account credentials.
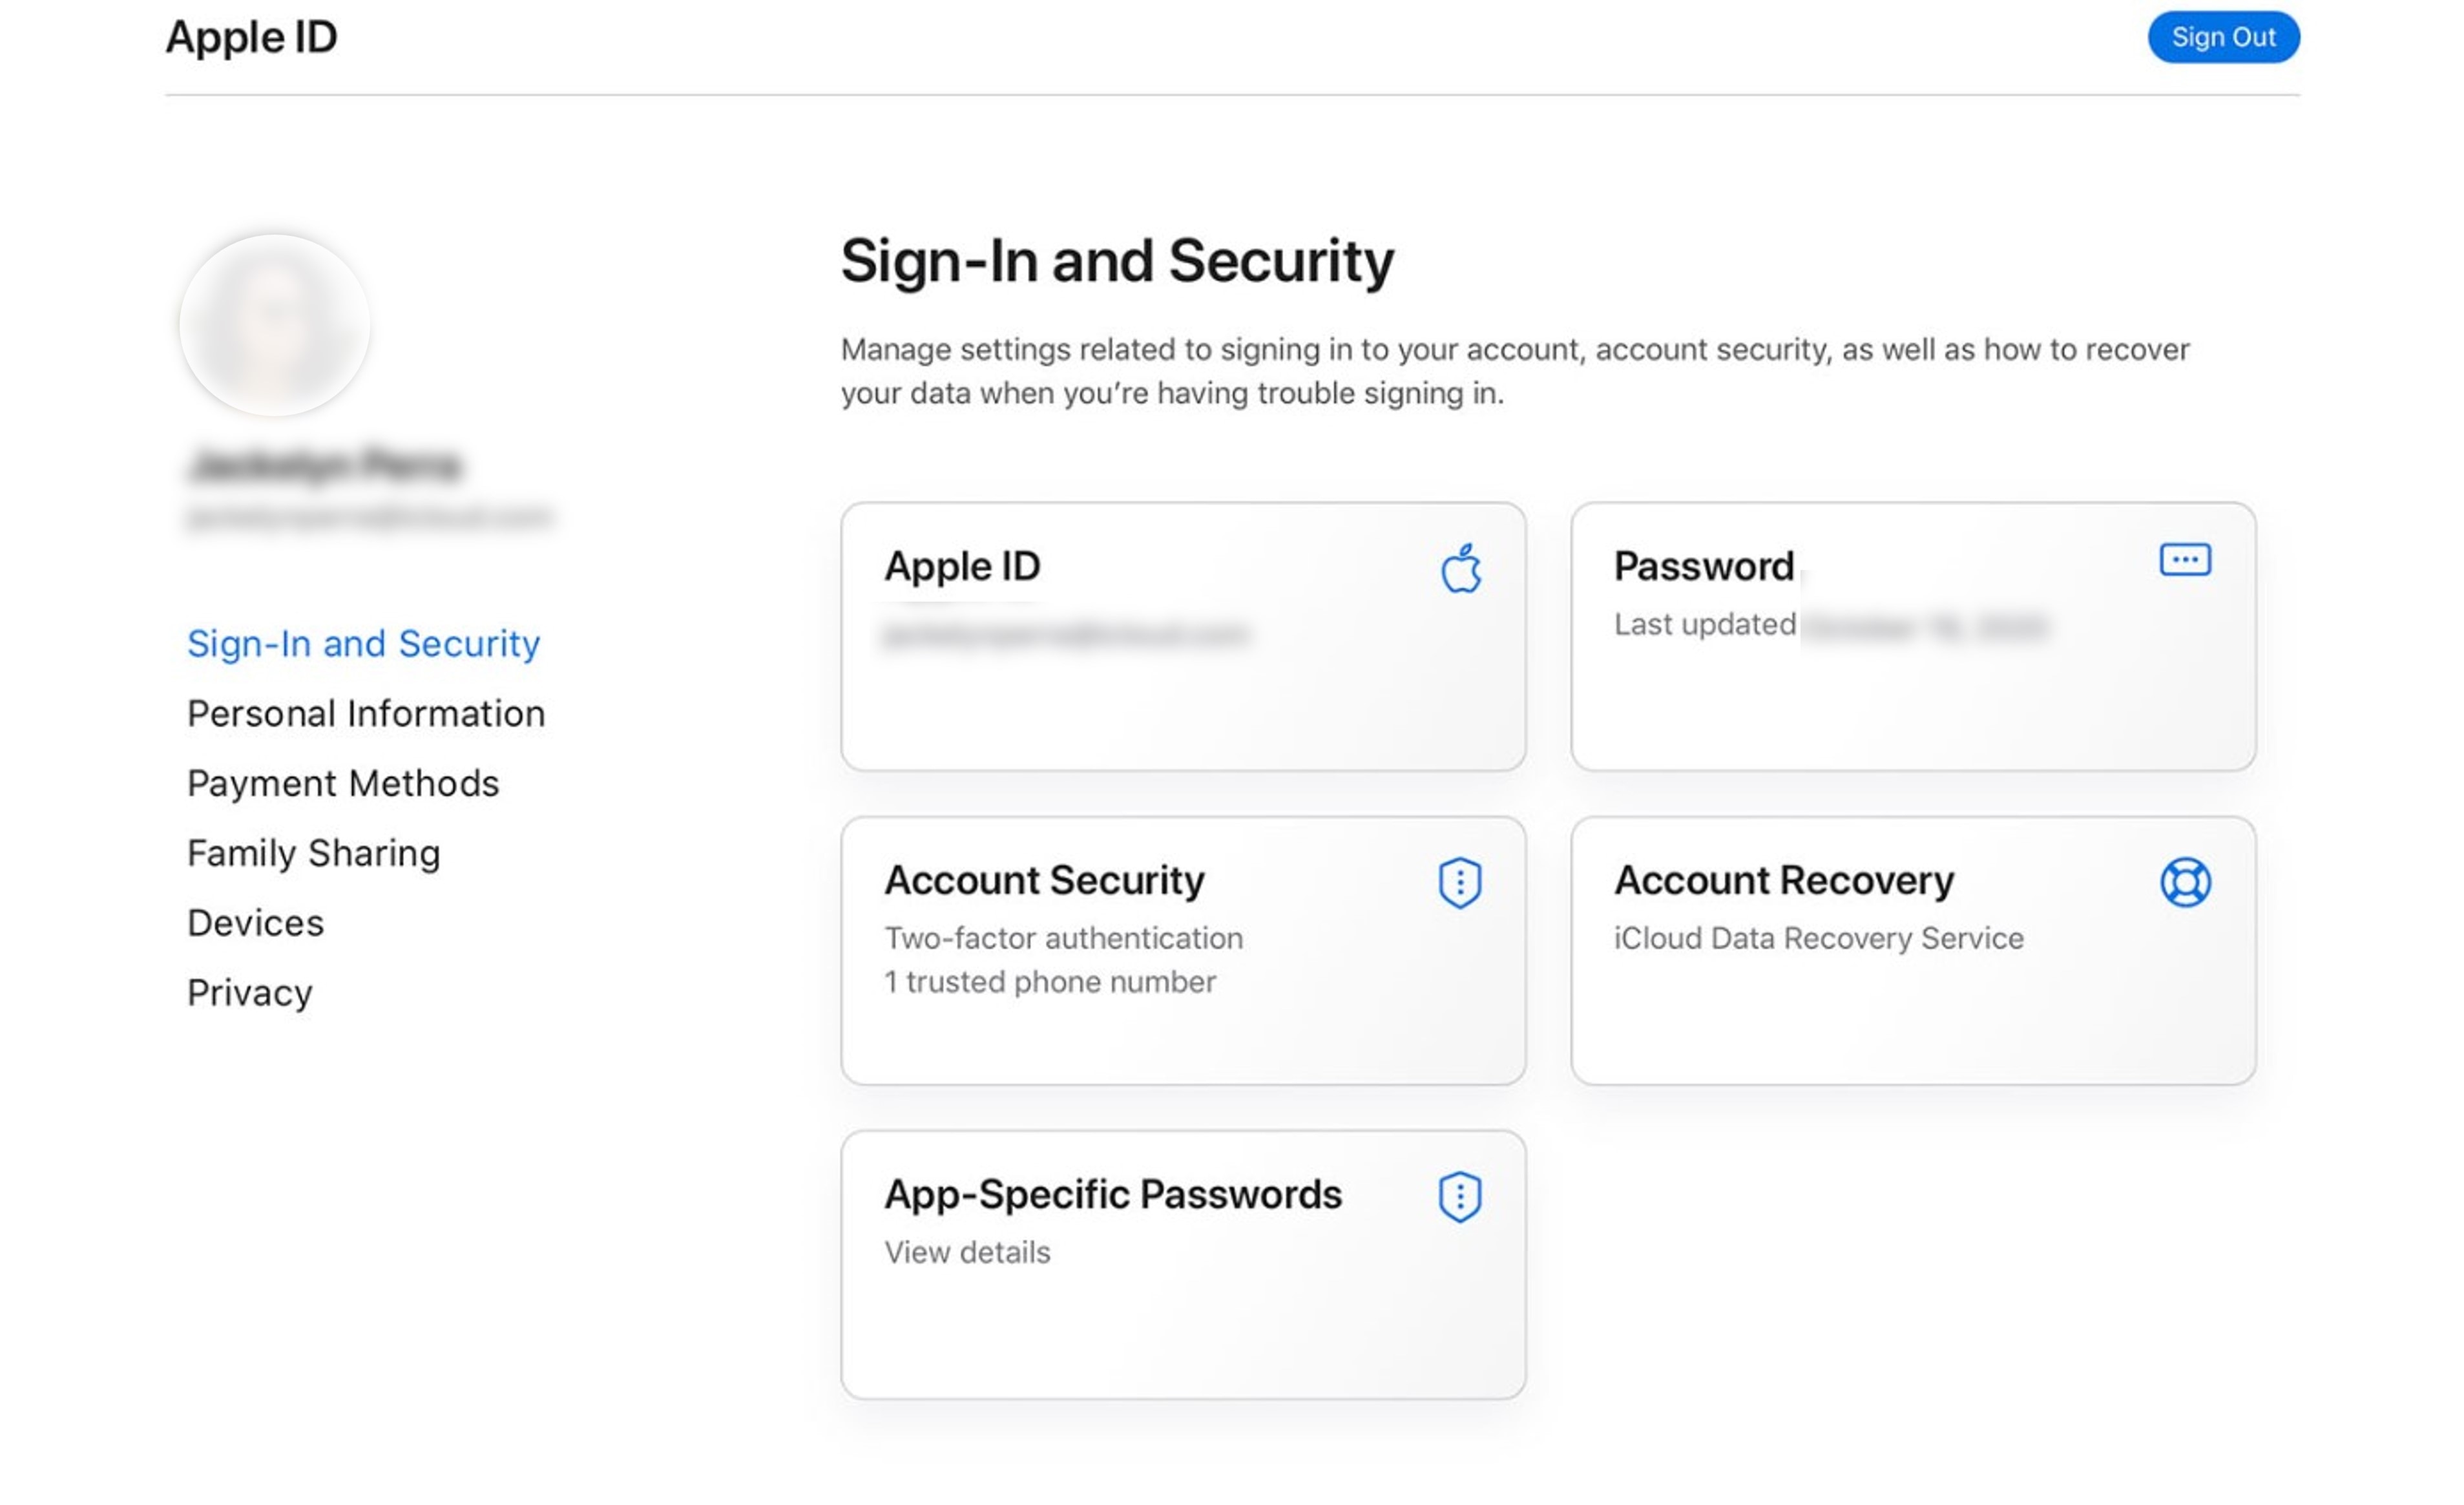
- Step 2: Once logged in, select Apple ID in the Sign-In and Security section.
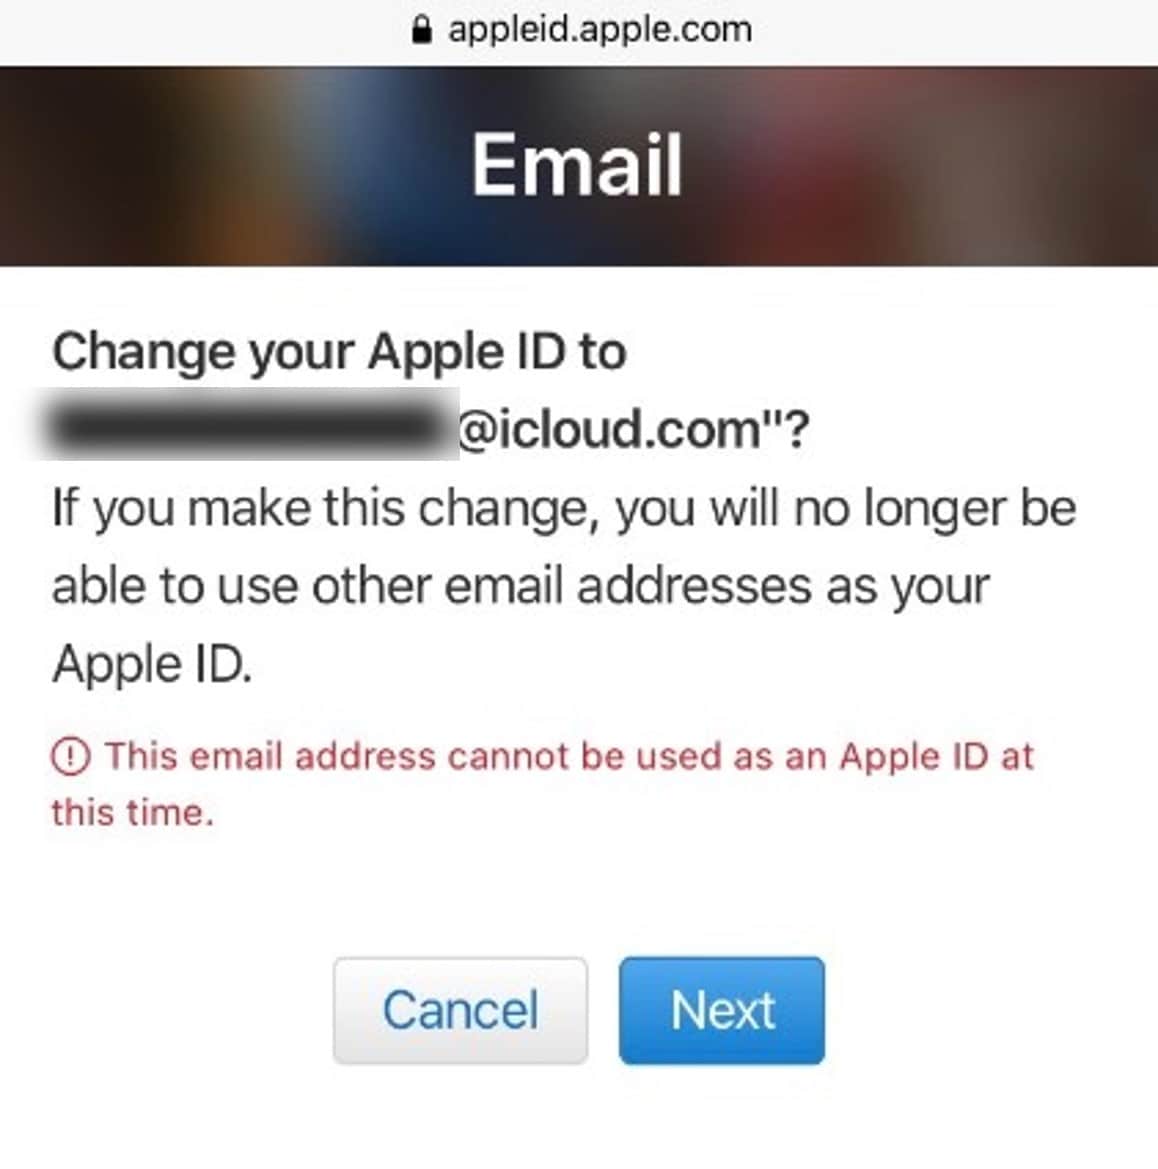
- Step 3: From the Apple ID pop-up window, enter your new Apple ID in the Change your Apple ID text field.
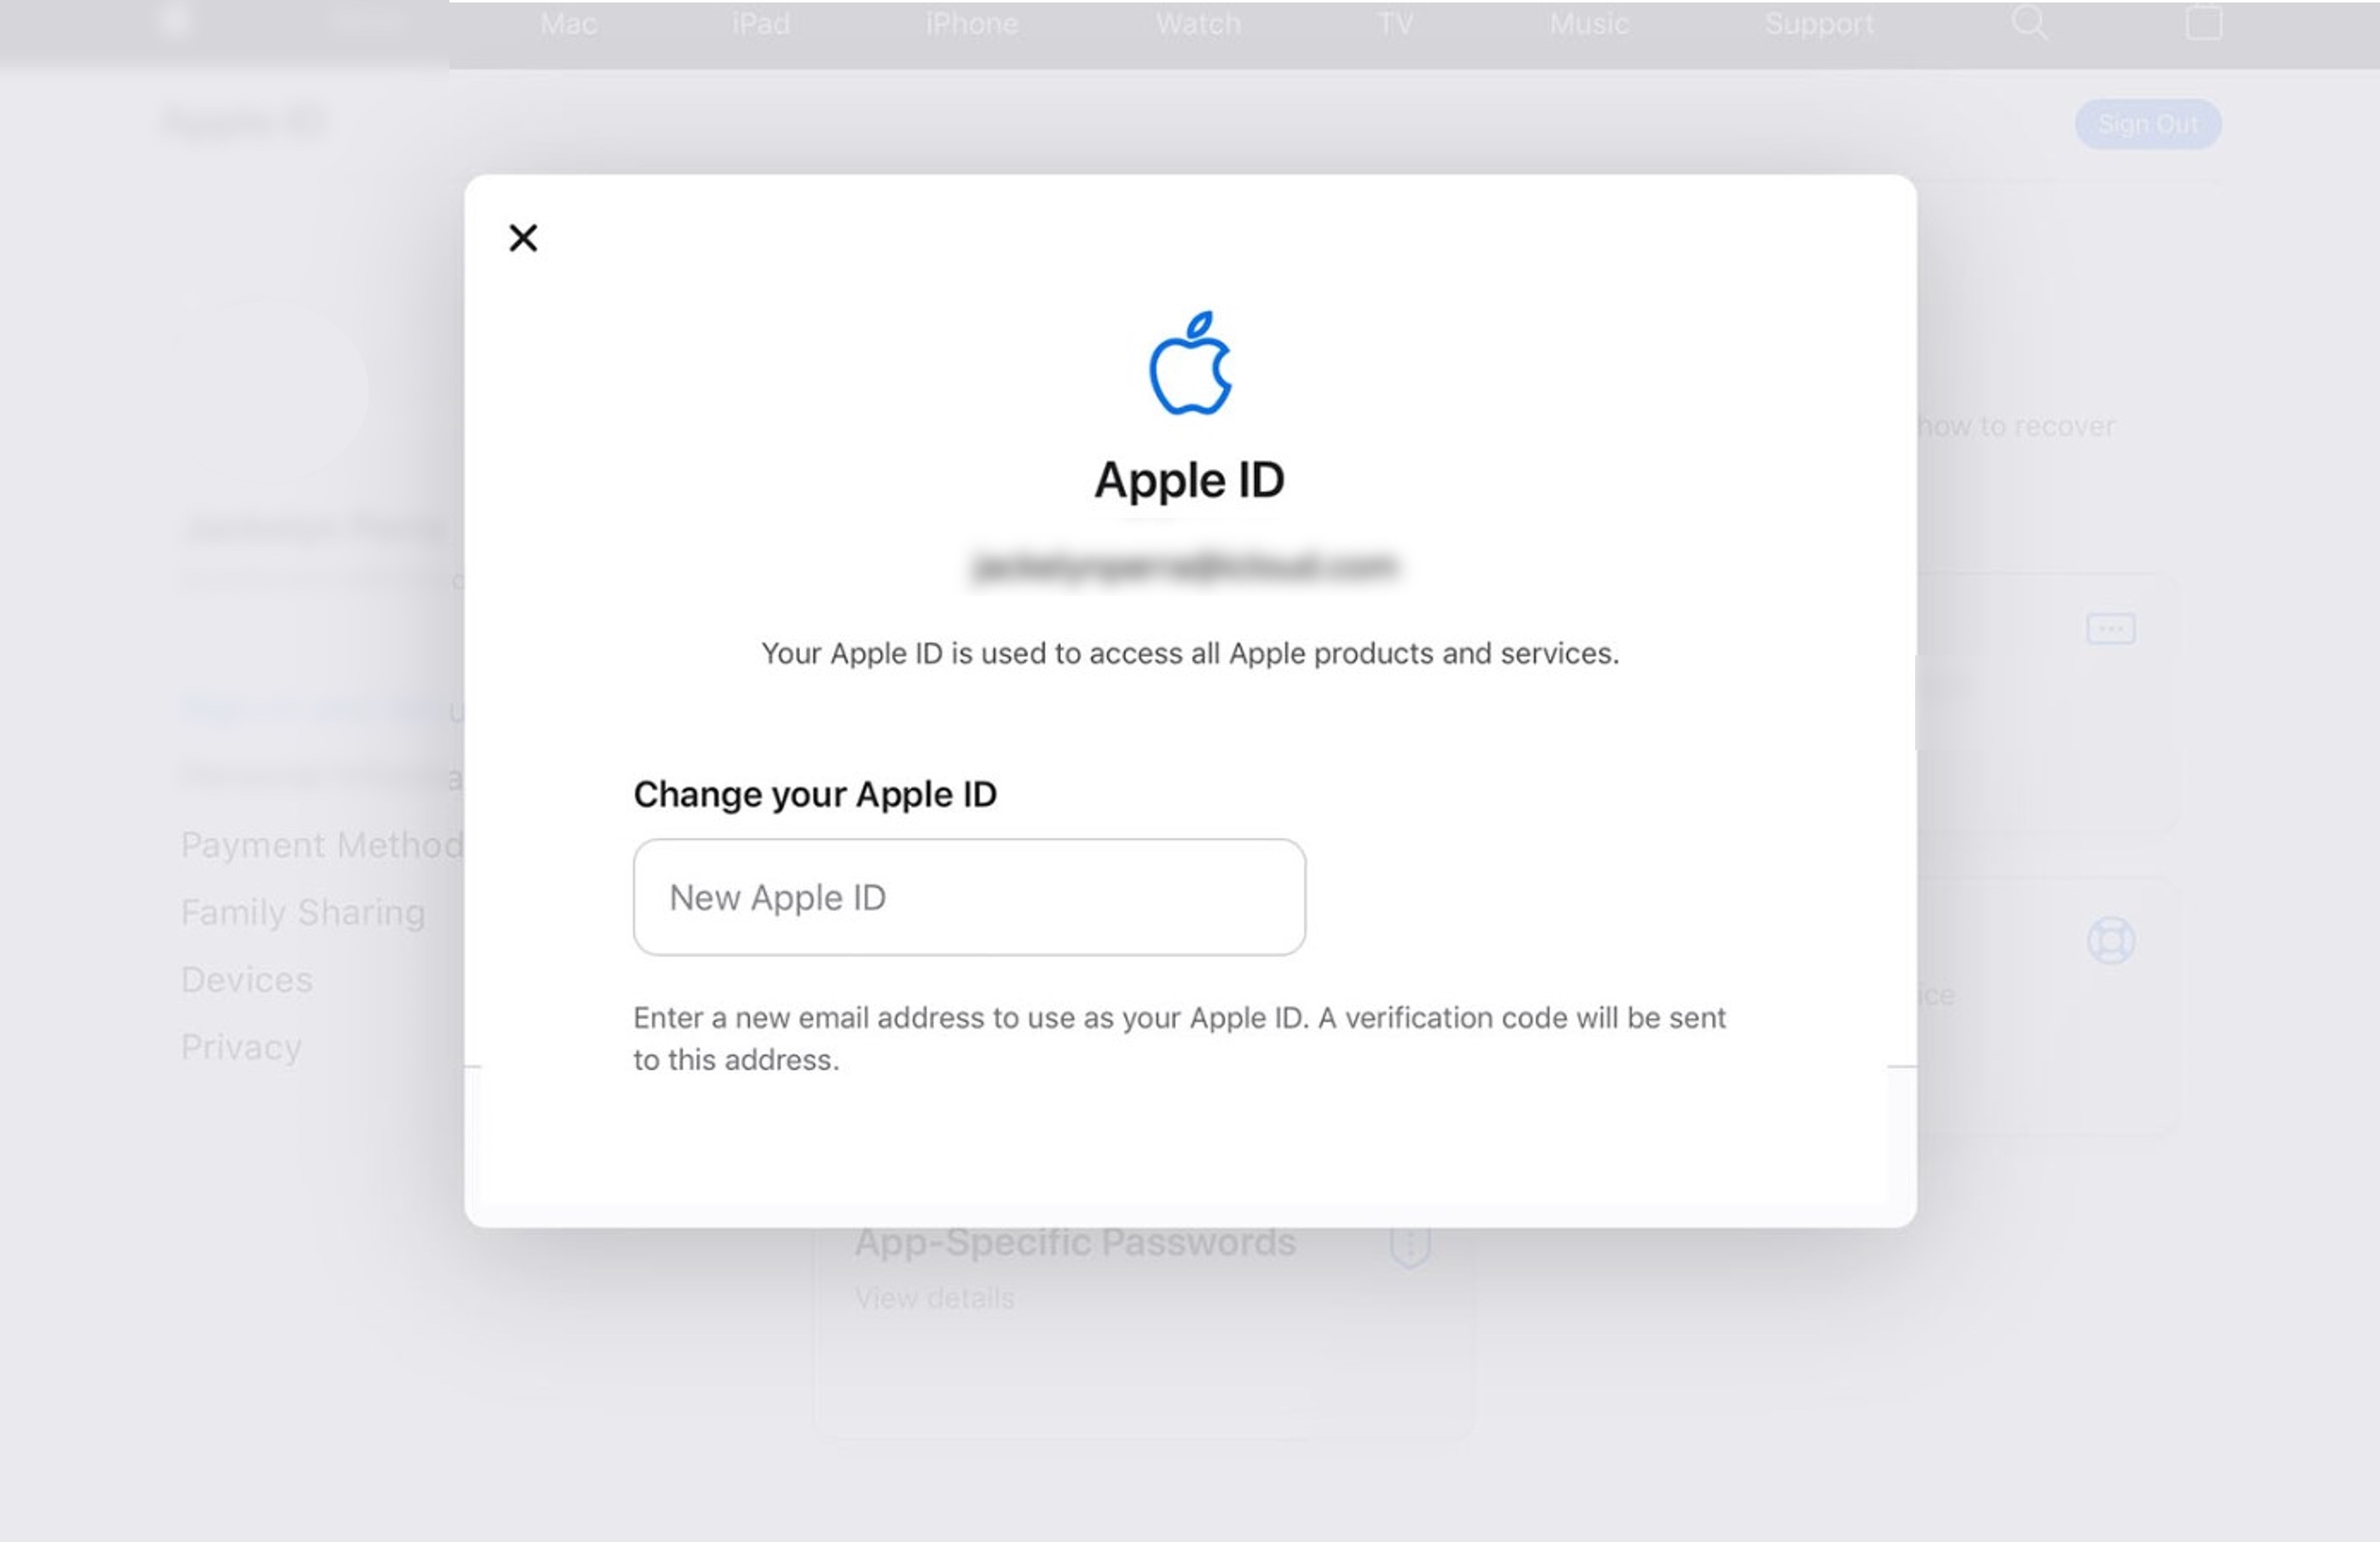
- Step 4: Select Change Apple ID to proceed.
- Step 5: Check your email to get a verification code sent by Apple to ensure that only you can change it to a third-party email address. Enter the code to complete the update.
Step 6: Sign in to Apple services such as iCloud and Messages, using your new Apple ID to continue sharing with others.
Steps To Change Your Apple ID to a Different Mobile Number
Do you want to use Your Apple iPhone 7 number as your Apple ID username? It’s possible, but it depends on your location, how you created your account, and what version of iOS you’re using.
If you’re in China mainland or India, and you’re using iOS 11 or later, you can create a new Apple ID with Your Apple iPhone 7 number as the username. However, Your Apple iPhone 7 number must be (+86) or (+91). So, if you’re thinking of, “How can I change my Apple ID on my iPad if it’s a mobile phone number?” then this guide is for you:
- Step 1: Log out of all Apple services and devices currently signed in with your Apple ID, except the one you’re using to change your Apple ID.
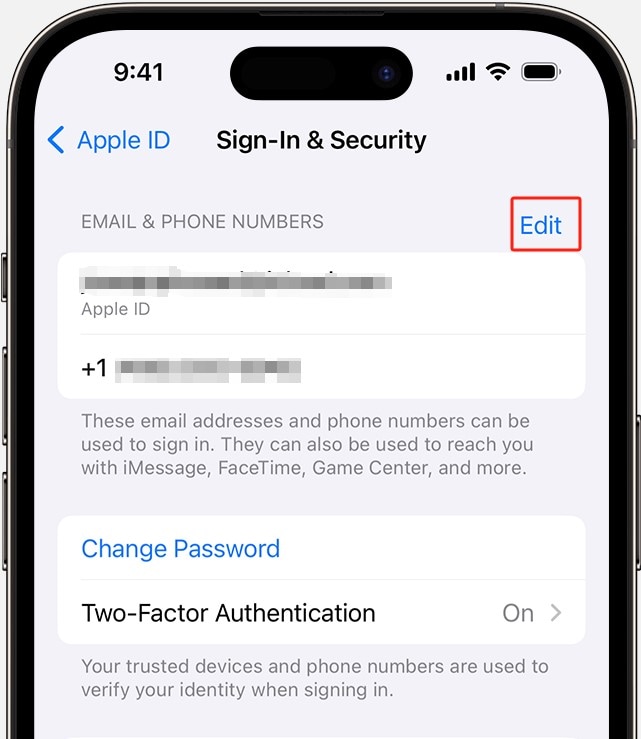
- Step 2: On your iPad, go to Settings > [your account name] > Sign-in & Security.
- Step 3: Tap Edit next to Email & Phone Numbers.
- Step 4: Go to the Delete icon next to your mobile number and follow the directions given.
- Step 5: Enter the code sent to the mobile number you added as your new Apple ID to verify it.
- Step 6: Log into all Apple services using your new Apple ID.
Even if you can’t change your Apple ID on your iPad to a mobile phone number, you can still associate it with a phone number on your account page. It means you can use a different email address or mobile phone number to log in to your Apple ID. See the next sections for more information on the workarounds you can try.
Part 3: What To Do if You Cannot Change Your Apple ID on iPad?
Changing your Apple ID on an iPad is usually easy. However, there can be setbacks during the process. Now, here’s what to do if you find yourself unable to do it and why it might be happening:
Try Again Later
If you encounter errors during the process, give it a little time and try again. Mayne it is because you changed your Apple ID on your iPad to an iCloud email address within 30 days.
Check if Apple ID Is Already in Use
Apple IDs are unique, and you can’t have two identical ones. If you’re trying to change your Apple ID to one that’s already in use, you’ll hit a roadblock. Ensure that the new Apple ID you want isn’t already taken. Remove it from the family member’s account if they are using it.
Your Apple ID Is an Email Address
If your current Apple ID is an email address, you won’t be able to change it to a mobile phone number directly. Instead, you can add an email or phone number to your account for contact purposes.
If you’ve addressed these issues and still can’t change your Apple ID, don’t worry. Apple customer support is available to assist you with account-related challenges. Contact them for guidance and solutions tailored to your situation.
However, if you can’t change your Apple ID on your iPad because you forgot or don’t have access to the password, you can use a third-party tool such as Dr.Fone. This tool is easy to use and can help you unlock your iPad and remove the Apple ID in a few clicks.
Part 4: Using Wondershare Dr.Fone To Remove Apple ID Without Password
Dr.Fone Screen Unlock (iOS) tool is your go-to solution for unlocking iOS devices without a passcode. The best part? It is easy to use for users of all technical backgrounds. With Dr.Fone, you can unlock iOS screens protected by 4 to 6-digit passcodes, Face ID, Touch ID, and more.
But it doesn’t stop there; Dr.Fone can also help remove the iCloud activation lock, unlock Apple ID without a password, and much more. This powerful tool is a lifesaver for iOS users, supporting the latest iPadOS 17, iOS 17, and iPhone 14.
Step-by-Step Guide to Removing Apple ID on iPad Using Dr.Fone
Dr.Fone can bypass the Find My/Find My iPhone feature to remove your Apple ID from your iPad, iPhone, or iPod Touch. Follow the steps below to learn how to use this feature on your iOS device.
Step 1: Get Wondershare Dr.Fone from their website and install it on your computer.
Step 2: From the app’s Toolbox homepage, click Screen Unlock, and select iOS.

- Step 3: Select Remove AppleID from the available Screen Unlock tools.

- Step 4: Connect your iPad or other iOS device to your computer, then click Unlock Now to continue.

- Step 5: Click Yes to confirm your device has a screen lock. Otherwise, it won’t work.

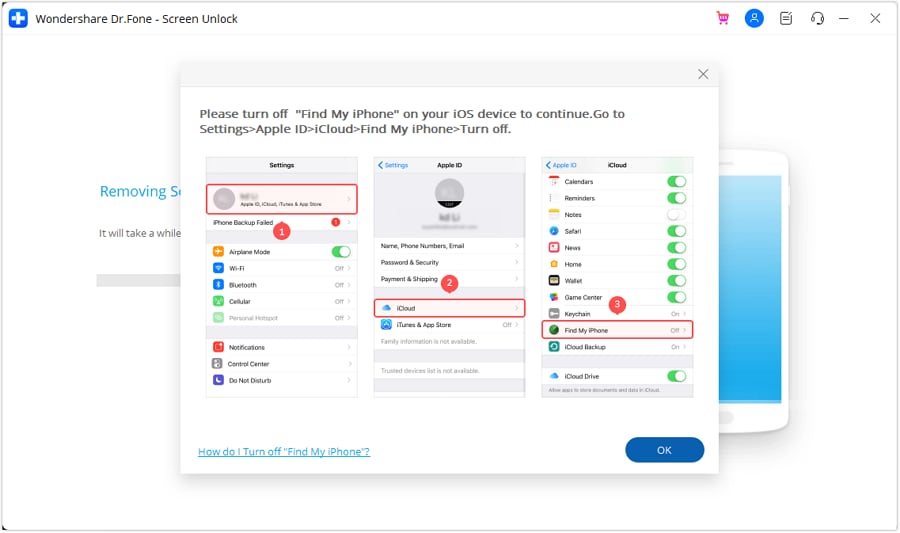
- Step 6: Enable the Two-Factor Authentication on your iPad so you can unlock your Apple ID. Then, click Yes to proceed.

- Step 7: Follow the on-screen instructions to put your iPad in Recovery Mode.

- Step 8: The next screen will demonstrate the Device Model information. Select an option from the System Version dropdown list and click Start.

- Step 9: The iOS firmware will start downloading, and you can see the progress on the next screen. If you’re experiencing slow download speeds, click Copy to get the link and download it.

- Step 10: Review the Device Model and System Version, then click Unlock Now to proceed.

- Step 11: From the Warning dialogue box, enter the code shown in the text field, then click Unlock.

- Step 12: Wait and refrain from using your device while it’s connected to avoid a bricked device.

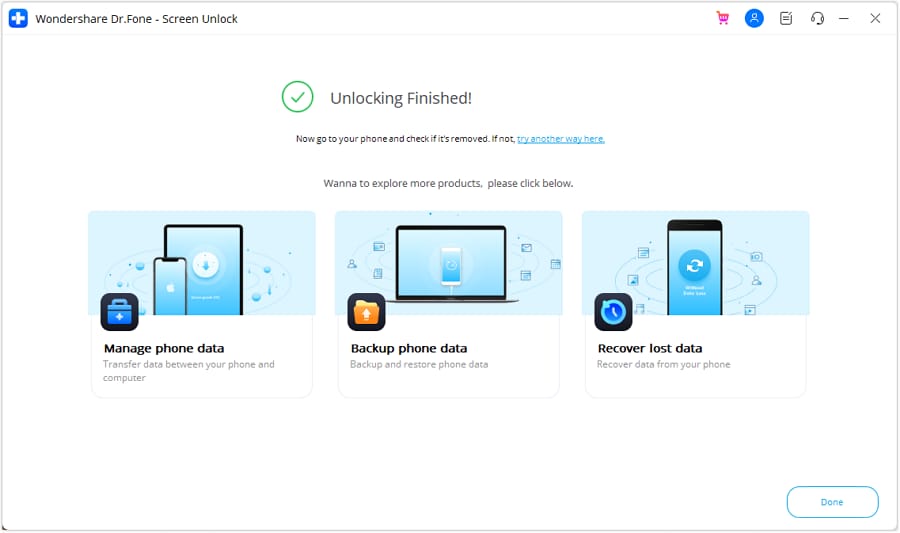
- Step 13: Once finished, click Done, then check your iPad. If your Apple ID is not unlocked, you may need to click Try again to restart.

Best Practices To Secure Your iOS Data
Changing your Apple ID on your iPad can be a great way to protect your privacy and security. However, it’s important to take steps to ensure that your iOS data remains safe during the process. Here are some tips to help you do just that:
- Backup Your Files
Before you change your Apple ID on your iPad, create a backup of your data so you don’t lose important files. You can create a backup using iCloud or Dr.Fone.
Dr.Fone also allows you to view the contents of your backup before you restore it, so you can ensure that you’re getting back exactly what you want. This way, you can restore your data to your new Apple ID if needed.
- Password Check
Review your current passwords. Change any weak or compromised ones, including your Apple ID password, and never share it with anyone.
- Avoid Sharing an Apple ID
It’s best practice for each family member to have their own Apple ID. Sharing one can lead to problems with app purchases, data syncing, and privacy.
- Enable Two-Factor Authentication (2FA)
If not already enabled, turn on 2FA for an extra layer of security. It’s simple and highly effective.
Conclusion
Changing your Apple ID on your iPad or other iOS devices is a simple process that can help you protect your privacy and information. With the tips above, you can ensure your iOS data is safe and secure during the switch.
And if you need to remove your Apple ID without a password, Dr.Fone is a good option. Dr.Fone is a powerful iOS toolkit that can help you with various phone solutions. It’s easy to use and can help you solve mobile problems in just a few minutes.
Disabling Apple iPhone 7 Parental Restrictions With/Without Password
Among smartphones, the Apple iPhone 7 is well known for its quality and reliability. It is celebrated for its elegant design, robust capabilities, and exceptional security attributes. This device holds innovation within the smartphone industry. Among its array of security features lies the parental controls. These are a specialized set of features and settings crafted to aid parents.
It allows them to manage their children’s access to certain content and functionalities. This article aims to go through the details of how to disable parental controls on iPhones. It will offer a range of methods catering to both scenarios: disabling parental controls with and without a password. Moreover, it will feature an in-depth exploration of the most effective method to disable parental control.

Part 1. Defining Parental Controls on iPhone and Why People Want To Disable/Remove It?
Parental controls on an iPhone refer to features designed to allow parents to track various aspects of the Apple iPhone 7 device’s usage. These controls aim to provide younger users with a safer, more regulated digital experience. They include a range of functions, such as screen time limits and app restrictions. Moreover, content filtering and purchase controls also fall under parental control.
Primarily, parental controls serve as a protective measure. They enable parents to safeguard their children from potential online dangers. These include inappropriate content and excessive screen time. It turns out valuable for managing a child’s interaction with digital devices.
Why Do People Want To Disable/Remove Parental Control?
Parental controls can be a great way to manage children’s digital lives. However, there are equally good reasons why users seek how to remove restrictions on iPhone without passcode:
1. Age Appropriateness
As children grow older, they may desire increased independence and responsibility. Parental controls might become restrictive or unnecessary. This leads to the desire for removal to grant them more freedom.
2. Technical Glitches or Restrictions
Sometimes, parental control settings might malfunction or impose unintended restrictions. This can hamper the Apple iPhone 7 device’s regular functionality. Users seek removal to rectify these technical issues.
3. Privacy Concerns
Older users may find parental controls intrusive or overly restrictive. These can affect their privacy and autonomy. Disabling these controls allows for a personalized and private user experience.
4. Change in Circumstances
Situations change, and what was once appropriate may no longer apply. Families might undergo changes in dynamics or rules. This can prompt the need to adjust or remove parental controls accordingly.
Part 2. [With Password] How To Disable Parental Controls on iPhone?
Do you have the password to access parental control settings on your Apple iPhone 7? The process of disabling these controls becomes straightforward. Here, we present 2 distinct methods for how to remove parental controls on iPhone:
Way 1. By Turning Off Screen Time Settings
Accessing Screen Time settings allows you to manage and disable parental controls. This method is recommended if you have the passcode. Follow these steps to know how to turn off restrictions on your Apple iPhone 7 with the password:
- Step 1. To disable Screen Time settings, navigate to “Settings” and select “Screen Time.” On the following screen, choose “Content & Privacy Restrictions” under the “Restrictions” section.

- Step 2. Now, switch the slider next to “Content & Privacy Restrictions” to turn it off. It will disable all parental control on the targeted device. However, before it disables, the Apple iPhone 7 will prompt for the Screen Time passcode, which needs to be added.

Way 2. By Resetting the Entire iPhone
Resetting the entire settings of your Apple iPhone 7 is a drastic but effective method. It can disable parental controls by removing all settings, including restrictions and passcodes. Note that this process will erase personalized settings on your device. However, it does not delete data like photos, videos, or apps. Below are the steps on how to remove parental controls iPhone by resetting:
- Step 1. You will need to access the “General” tab within Settings of your Apple iPhone 7. Here, scroll down and tap “Transfer or Reset iPhone.” On the following screen, tap the “Reset” option.

- Step 2. From the available options, after tapping “Reset,” choose “Reset All Settings.” You will be asked to provide the passcode to successfully reset your Apple iPhone 7 and disable parental control settings.

Part 3. [Without Password] How Do You Disable Parental Controls on iPhone?
Disabling parental controls on an iPhone is still possible, even without the password. Below, we explore two methods that can be used to bypass parental controls without requiring a password.
Way 1. Wondershare Dr.Fone - Screen Unlock (iOS)
Removing a Screen Time passcode without the associated passcode can be challenging. Utilizing Wondershare Dr.Fone presents a potential solution. It is a robust tool that tackles a range of iOS-related problems. You will discover it as a convenient method to surpass the limitations imposed by Screen Time.
Among its functions, Wondershare Dr.Fone - Screen Unlock (iOS) caters to resolving passcode-related concerns. This also includes the removal of Screen Time passcodes. The best thing about using Dr.Fone to remove the Screen Time passcode is that it bypasses the lock without data loss. Along with Screen Time passcodes, Dr.Fone is also an expert in unlocking various screen locks.
Notable Features of Wondershare Dr.Fone
- It lets users bypass MDM on their iOS devices without losing their data.
- If your iOS device is stuck at the iCloud Activation Lock, Dr.Fone bypasses this lock without requiring a passcode.
- For those facing issues with forgotten Apple ID passwords, Dr.Fone facilitates the removal of Apple ID from devices.
Steps To Disable Parental Controls on iPhone via Wondershare Dr.Fone
Forgetting passwords, be it Screen Time lock or device screen lock, can be a stress-inducing experience. Following are the steps for how to turn off parental controls without a password:
- Step 1. Access Unlock Screen Time Passcode
To initiate the procedure, open Wondershare Dr.Fone on your computer. Navigate to “Toolbox,” tap “Screen Unlock,” and choose “iOS” as the Apple iPhone 7 device type. On the following screen, choose “Unlock Screen Time Passcode.” Establish a USB connection between your iOS device and the computer before commencing.

- Step 2. Start Unlocking by Disabling Find My Feature
Upon connecting the Apple iPhone 7 device, the platform will detect the iDevice and showcase its status on the screen. Afterward, you are required to proceed by clicking on the “Unlock Now” button. However, it is necessary to deactivate the Find My service as indicated in the prompt. Navigate to your Apple iPhone 7’s Settings and select the Apple ID at the top of the settings menu. Access the “Find My” settings and toggle off the “Find My iPhone” feature.
- Step 3: Complete Screen Time Passcode Removal Process
Upon completion, confirm by clicking “OK” on the computer screen. The progress bar on the screen indicates the progress of unlocking the screen time passcode process. When the Apple iPhone 7 device is unlocked, the platform will present a confirmation message. To conclude the entire process, click on the “Done” button.
Way 2. Restore iPhone From iTunes
Restoring an iPhone using iTunes is an alternative method for removing parental controls. iTunes is a multimedia management software that is developed by Apple. It provides various functions, including media playback and data synchronization. The most important function is the Apple iPhone 7 device backup and restoration. Restoring your Apple iPhone 7 via iTunes results in the complete erasure of all data and settings. Here is how to disable restrictions on iPhones without password:
- Step 1. Ensure that iTunes has been updated to the most recent version before opening the application. Connect your Apple iPhone 7 to the computer and grant iTunes permission to recognize the Apple iPhone 7 device. After detecting the Apple iPhone 7 device, access the “Summary” tab by tapping the Apple iPhone 7 device icon in iTunes. You can access the “Backups” section to create any backup before restoring.

- Step 2. Afterward, initiate the Apple iPhone 7 restoration by selecting “Restore iPhone.” A menu box will appear, asking you to create a “Back Up” or not. Choose the preferred option, and another dialog box will appear, alerting you about the deletion of all content and settings on your Apple iPhone 7. You should proceed by clicking “Restore” to confirm. Then, follow the on-screen instructions to finalize the process.

Conclusion
In summary, this article explored how to disable restrictions on iPhones without a password and with a password. Accessing settings with a passcode simplifies the process. Wondershare Dr.Fone stands out as the optimal solution for those seeking how to delete parental controls without password. When passcode access is limited, Dr.Fone – Screen Unlock (iOS) offers the most efficient solution.
Tips: Are you searching for a powerful iPhone Unlock tool? No worries as Dr.Fone is here to help you. Download it and start a seamless unlock experience!
How To Open Your Apple iPhone 7 Without a Home Button
Accidents happen, and sometimes they take a toll on your Apple iPhone 7’s essential components, like the Home button. Whether it’s a drop, spill, or wear and tear, a damaged Home button can be a problem over time. The frustration peaks when you find yourself locked out, and at a loss.
But fear not, for there are ways to unlock an iPhone without a Home button. This guide explores ways how to open an iPhone without a Home button. In case of a Home button malfunction, explore these quick and easy fixes for a reliable workaround. Read on to learn more.

Part 1. 7 Ways To Unlock iPhone Without Home Button
If your Apple iPhone 7’s Home button is out of commission, don’t worry. There are several ways to regain access to your device. Let’s explore seven methods on how to unlock an iPhone without a Home button.
Method 1: Unlock the Apple iPhone 7 Without the Home Button via Touch ID
If your device supports Touch ID, you can use your fingerprint to unlock it. Follow the steps:
- Step 1: Head to Settings > Touch ID & Passcode. Next, tap Add a Fingerprint.

- Step 2: Follow the on-screen instructions to set up Touch ID.
_Note__:_ Please be aware that this approach is effective only when you can still navigate through your Apple iPhone 7’s settings. If that’s not the case, proceed to the following method.
Method 2: Unlock the Apple iPhone 7 Without the Home Button via the Rest Finger to Open
Building upon the initial method, this resolution is effective only if you have previously configured Touch ID. To unlock an iPhone without using the Home button, you can activate the Rest Finger to Open feature. Ensure that Touch ID is permitted for unlocking your Apple iPhone 7, and then follow the steps below:
- Step 1: Go to Settings > General > Accessibility > Home Button.

Step 2: Toggle the switch next to Rest Finger to Open to enable this feature.
Method 3: Unlock the Apple iPhone 7 Without the Home Button via AssistiveTouch
The alternative solution for how to open an iPhone without the Home button but with AssistiveTouch. The feature is designed to simplify iPhone usage. It allows various actions without pressing the Home button or other physical buttons. Here’s how.
- Step 1: Go to Settings > General > Touch > Accessibility, and activate AssistiveTouch. The action will display the AssistiveTouch menu button on your screen.

- Step 2: A floating grayscale button will emerge on your screen after verification. Tap on it. A contextual menu will display, offering options to emulate the functions of your Home button.

- Step 3: Tap Customize Top Level Menu under Assistive Touch and choose Home. The action will guide you to the Apple iPhone 7 passcode screen. From here, you can input your passcode to unlock the Apple iPhone 7 without using the Home button.
Method 4: Unlock iPhone Without Home Button via Dedicated Tool
Unlocking your Apple iPhone 7 without a functional home button becomes effortless with Wondershare Dr.Fone - Screen Unlock (iOS). It’s a specialized tool designed to handle various lock screen issues. Here’s a comprehensive list of key features to get you started:
- **Remove all types of Lock Screens.**Fone Screen Unlock (iOS) can bypass various lock screen types, including passcodes, Touch ID, and Face ID.
- **Bypass Apple ID without a password.**If your Home button is compromised, and you can’t enter the Apple ID password, Dr.Fone can bypass it.
- The tool is compatible with all iPhones equipped with a Home button, ensuring versatility across multiple iPhone models.
- **High success rate.**The platform boasts a high success rate in unlocking devices and follows a straightforward 3-step process.
How To Unlock iPhone Without Home Button With Dr.Fone
Dr.Fone - Screen Unlock (iOS) simplifies the process of unlocking your Apple iPhone 7 without a functional Home button. Follow the steps below:
- Step 1: Visit the official Dr.Fone website and download software. Install the software on your computer and launch it. Next, click Toolbox > Screen Unlock > iOS. Connect your Apple iPhone 7 using a USB cable and choose Unlock iOS Screen. Ensure the software recognizes your device.

- Step 2: Click Start and follow the on-screen instructions. Dr.Fone will automatically detect your device and provide the appropriate firmware package for download. Confirm and proceed.

- Step 3: Once the firmware is downloaded, Dr.Fone will verify it. Confirm the details and click Unlock Now to begin the unlocking process. Follow the on-screen instructions once more.
- Step 4: The software will remove the lock screen from your Apple iPhone 7. Click Try again if your Apple iPhone 7 is still locked. Otherwise, click the Done button. After successful unlocking, set up your Apple iPhone 7 as new. You can now unlock your Apple iPhone 7 without the Home button.

Method 5: Unlock iPhone via Erase iPhone Features (iOS 15.2)
With iOS 15.2, Apple introduced the Erase iPhone feature, aiding users in resetting devices with forgotten passcodes. The functionality applies to iPhones connected to the network with a broken Home button. Compatible devices include iPhone 6 series, iPhone SE series, and newer models. However, it comes at the cost of erasing all content and data on the Apple iPhone 7 device. Follow the steps:
- Step 1: Power on your Apple iPhone 7 by tapping the Power button, then enter the wrong passcode multiple times until the Erase iPhone button appears at the bottom right corner of the screen.

- Step 2: Tap the Erase iPhone button and input your Apple ID passcode to initiate the process. Once the Apple logo displays on your Apple iPhone 7 screen, you can now access your device without the need for a passcode.
_Note__:**_**Keep in mind that all previous content and data on the phone will be erased during this operation.
Method 6: Unlock iPhone via iTunes/Finder
For Mac or Windows users, both Finder and iTunes can unlock your Apple iPhone 7 without the Home button. Windows or Mac Mojave users are recommended to use iTunes. Mac Catalina and newer users should use Finder. Before using iTunes or Finder, it’s advisable to back up your Apple iPhone 7 on iCloud. Here’s how to proceed:
- Step 1: Put your Apple iPhone 7 in the recovery mode and connect it to the computer. Launch Finder or iTunes for Windows or Mac Mojave users.

- Step 2: A window in Finder will prompt you to choose between restoring or updating; click Restore. Confirm your action by tapping Restore again. Upon completion, your Apple iPhone 7 will be unlocked without the Home button.
Method 7: Unlock iPhone via iCloud
If none of the methods work or Dr.Fone is unavailable to you for some reason, then you can use iCloud. To unlock your Apple iPhone 7 without the Home button, visit iCloud.com and sign in with your Apple ID. Next, go to Find My iPhone, select your device, and choose Erase iPhone to unlock it remotely.

Part 2. What To Do if Your Home Button Is Broken
When faced with a broken iPhone Home button, several quick fixes and solutions can sometimes help. Here are some effective measures before considering professional assistance:

Recalibrate the Home Button
Go to Settings > General > Accessibility and toggle the Bold Text switch. Restart your Apple iPhone 7, and this may recalibrate the Home button.
Restore iPhone Firmware
In extreme cases, restoring the iPhone firmware can resolve Home button issues. Tools like Dr.Fone offer a comprehensive solution to restore firmware and address various lock screen challenges.
Clean the Home Button
Dust and debris can affect the Home button’s functionality. Gently clean the area around the button using a small, soft brush or compressed air.
Use the Charger to Press Against the Home Button
This unconventional method involves using the charging cable to apply gentle pressure on the Home button. Be cautious to avoid excessive force.
Visit the Apple Store if Covered by a Warranty
If your Apple iPhone 7 is still under warranty, visiting an Apple Store is advisable. Apple’s warranty covers hardware issues, including malfunctioning Home buttons.
Conclusion
A broken iPhone Home button need not spell disaster. Embrace the solutions discussed and try the best solution available. Enable AssistiveTouch, recalibrate the Home button, clean the area, or even visit an Apple Store if under warranty.
For a comprehensive fix, consider Dr.Fone Screen - Unlock iOS if data loss is a concern. The tool can easily handle unlocking an iPhone without a functioning Home button. It ensures a hassle-free experience. Pick the method that meets your needs best, and regain full access to your device. The power to unlock an iPhone without a Home button is within your grasp.
Tips: Are you searching for a powerful Screen Unlock tool? No worries as Dr.Fone is here to help you. Download it and start a seamless unlock experience!
Also read:
- 7 Top Ways To Resolve Apple ID Not Active Issue For Apple iPhone 6
- In 2024, Complete Guide For iPhone 12 Pro Lock Screen
- Is Your iPhone 6 Plus in Security Lockout? Proper Ways To Unlock
- How Many Attempts To Unlock Apple iPhone 6
- In 2024, Apple iPhone 11 Pro Asking for Passcode after iOS 17/14 Update, What to Do?
- In 2024, Forgot iPhone Passcode Again? Unlock iPhone X Without Passcode Now
- iPhone 15 Plus Asking for Passcode after iOS 17/14 Update, What to Do?
- Learn How To Lock Stolen Your iPhone 8 Plus Properly
- In 2024, How to Turn Off Find My iPhone 6s when Phone is Broken?
- 3 Ways to Erase Apple iPhone 12 Pro Max When Its Locked Within Seconds
- In 2024, A Comprehensive Guide to Apple iPhone 6s Plus Blacklist Removal Tips and Tools
- How to Unlock Your iPhone XS Passcode 4 Easy Methods (With or Without iTunes)
- In 2024, 3 Ways to Unlock iPhone 6s without Passcode or Face ID
- In 2024, iPhone Is Disabled? Here Is The Way To Unlock Disabled iPhone SE (2020)
- Can You Unlock iPhone 12 Pro Max After Forgetting the Passcode?
- In 2024, Unlock Apple iPhone 14 Pro Max With Forgotten Passcode Different Methods You Can Try
- In 2024, 8 Safe and Effective Methods to Unlock Your Apple iPhone X Without a Passcode
- How To Fix Apple iPhone X Unavailable Issue With Ease
- In 2024, Detailed Review of doctorSIM Unlock Service For iPhone 14 Pro Max
- In 2024, How To Remove Passcode From Apple iPhone SE (2020)? Complete Guide
- In 2024, Disabled Apple iPhone 13 How to Unlock a Disabled Apple iPhone 13?
- In 2024, Detailed Review of doctorSIM Unlock Service For Apple iPhone 6s
- 5 Most Effective Methods to Unlock Apple iPhone 11 Pro Max in Lost Mode
- In 2024, How to Unlock iPhone 14 Pro Max Without Passcode?
- In 2024, Things You Should Know When Unlocking Total Wireless Of Apple iPhone 6s Plus
- In 2024, How To Fix iPhone XS Max Unavailable Issue With Ease
- How to Unlock Apple iPhone 11 Without Passcode?
- In 2024, Is Your iPhone 6s Plus in Security Lockout? Proper Ways To Unlock
- In 2024, How To Bypass the Required Apple Store Verification For Apple iPhone 14 Pro Max
- Disabled iPhone 8 Plus How to Unlock a Disabled iPhone 8 Plus?
- Complete Fixes To Solve iPhone 13 Pro Max Randomly Asking for Apple ID Password
- In 2024, How to Fix Apple iPhone 8 Plus Passcode not Working?
- How To Change Your Apple ID on Apple iPhone 13 mini With or Without Password
- How To Unlock Apple iPhone 11 Pro Without Passcode? 4 Easy Methods
- Locked Out of Apple iPhone 7? 5 Ways to get into a Locked Apple iPhone 7
- In 2024, How to Unlock Disabled Apple iPhone 14 Pro/iPad Without Computer
- In 2024, Complete Fixes To Solve iPhone 14 Pro Max Randomly Asking for Apple ID Password
- The Best Methods to Unlock the iPhone Locked to Owner for Apple iPhone 11
- In 2024, 7 Ways to Lock Apps on iPhone 7 Plus and iPad Securely
- Disabled Apple iPhone 11 Pro How to Unlock a Disabled Apple iPhone 11 Pro?
- Everything You Need To Know About Unlocked Apple iPhone 6s Plus
- Easy Steps on How To Create a New Apple ID Account On iPhone 6
- In 2024, How to Make the Most of Your iPhone 12 mini Lock Screen with Notifications?
- In 2024, The Best Methods to Unlock the iPhone Locked to Owner for Apple iPhone 7
- Read This Guide to Find a Reliable Alternative to Fake GPS On Huawei Nova Y91 | Dr.fone
- Sim Unlock Vivo X Fold 2 Phones without Code 2 Ways to Remove Android Sim Lock
- 3 Easy Methods to Unlock iCloud Locked iPhone SE (2022)/iPad/iPod
- The Ultimate Guide How to Bypass Swipe Screen to Unlock on Xiaomi Redmi Note 12 4G Device
- Does Life360 Notify When You Log Out On Samsung Galaxy S23 Tactical Edition? | Dr.fone
- New Free Filmora 13 Editor Download Create Stunning Videos
- Complete guide for recovering pictures files on Infinix Note 30 Pro.
- PassFab iPhone XS Max Backup Unlocker Top 4 Alternatives | Dr.fone
- The Easiest Methods to Hard Reset Nokia C210 | Dr.fone
- In 2024, How To Stream Anything From Vivo Y17s to Apple TV | Dr.fone
- In 2024, How PGSharp Save You from Ban While Spoofing Pokemon Go On Poco M6 Pro 5G? | Dr.fone
- Updated From Novice to Pro 3 Easy Game Recording Options
- Apply These Techniques to Improve How to Detect Fake GPS Location On Xiaomi Redmi K70 | Dr.fone
- How Can We Bypass Vivo V30 Lite 5G FRP?
- 9 Solutions to Fix Process System Isnt Responding Error on Itel P55 5G | Dr.fone
- How to Transfer Data from Nokia C32 to Any iOS Devices | Dr.fone
- 4 Ways to Fix Android Blue Screen of Death On Oppo Reno 10 Pro 5G | Dr.fone
- How to Change Lock Screen Wallpaper on Oppo A18
- The Ultimate Guide How to Bypass Swipe Screen to Unlock on Vivo X100 Device
- How to Remove Forgotten PIN Of Your Xiaomi 14
- Best OnePlus Nord N30 SE Pattern Lock Removal Tools Remove Android Pattern Lock Without Losing Data
- In 2024, 6 Proven Ways to Unlock ZTE Blade A73 5G Phone When You Forget the Password
- How to Rescue Lost Videos from Gionee F3 Pro
- In 2024, Fixing Foneazy MockGo Not Working On Asus ROG Phone 8 | Dr.fone
- In 2024, A Step-by-Step Guide to Finding Your Apple ID On Your Apple iPhone 14 Plus
- How to Mirror Your Honor X50 Screen to PC with Chromecast | Dr.fone
- Infinix Hot 40i Not Connecting to Wi-Fi? 12 Quick Ways to Fix | Dr.fone
- 2024 Approved Download Splice for Mac OS and Unleash Your Creativity
- App Wont Open on Your Huawei Nova Y91? Here Are All Fixes | Dr.fone
- 2024 Approved Create Your Own Subscribe Channel Graphics
- In 2024, How I Transferred Messages from OnePlus Nord N30 SE to iPhone 12/XS (Max) in Seconds | Dr.fone
- In 2024, Everything You Need To Know About Unlocked Apple iPhone 15 Plus | Dr.fone
- How To Transfer Data From iPhone 8 Plus To Other iPhone? | Dr.fone
- How To Transfer Data From iPhone 14 Pro To Other iPhone 12 Pro devices? | Dr.fone
- In 2024, How To Use Allshare Cast To Turn On Screen Mirroring On Huawei P60 | Dr.fone
- Top 4 Ways to Trace Xiaomi Redmi Note 13 5G Location | Dr.fone
- Does OnePlus Nord CE 3 Lite 5G Have Find My Friends? | Dr.fone
- In 2024, Here are Some Pro Tips for Pokemon Go PvP Battles On Apple iPhone 12 Pro Max | Dr.fone
- Updated 2024 Approved How to Animate Image on Scroll
- Title: How To Change Your Apple ID on iPhone 7 With or Without Password
- Author: Sophia
- Created at : 2024-05-19 07:09:36
- Updated at : 2024-05-20 07:09:36
- Link: https://ios-unlock.techidaily.com/how-to-change-your-apple-id-on-iphone-7-with-or-without-password-by-drfone-ios/
- License: This work is licensed under CC BY-NC-SA 4.0.
