
How to Fix iPhone 14 Plus Passcode not Working?
How to Fix Apple iPhone 14 Plus Passcode not Working?
Apple has always been one of the top successful companies. The reason for its success can be clearly seen through its efforts in pioneering top-notch products. It not only puts its efforts into ensuring the perfect working of the Apple iPhone 14 Plus device but also provides the user with essential security measures to protect the data of the Apple iPhone 14 Plus device from unauthorized access.
This is the sole reason why Apple focuses so much on privacy through passcodes. But sometimes, these passcodes can be a hurdle in the working of the iPhone.
If you’re facing this issue, then you’ve come to the right place. This article shall cover your queries regarding fixing the Apple iPhone 14 Plus passcode that is not working and providing full-depth details for your ease.
Part 1: Why iPhone is Saying Passcode is Wrong?
If you enter the wrong password, your Apple iPhone 14 Plus will not accept it and won’t open your phone. If you repeatedly enter the wrong password, it will disable your phone mainly because of security reasons. However, sometimes you’re genuinely trying to enter the correct password, but your device won’t accept it. This isn’t common, but there are quite a few reasons why iPhone is saying your passcode is wrong.
Sometimes the problem is trivial, like you may have entered the wrong keys in a hurry, due to which it won’t accept your passcode. In other cases, face recognition may not recognize your face if you’re wearing any mask.
However, occasionally the problem is technical. Sometimes, your Apple iPhone 14 Plus may be corrupted. This can cause trouble for your device to detect the security file where your passcode is stored. Other times, the operating system may not be installed properly after updating to the new version of iOS.
Part 2: Remove iPhone Passcode with Dr.Fone Without Losing Data
Everyone in the field of tech is familiar with Wondershare as it is the most innovative and versatile software in the market. Dr.Fone is a toolkit containing data recovery, phone manager software, etc., introduced by Wondershare. One of the many reasons for its success is the intuitive interface that has made it convenient for professionals as well as amateurs.
When it comes to fixing your Apple iPhone 14 Plus passcode, which is not working, Wondershare Dr.Fone - Screen Unlock does wonders.
iTunes is another great way to bypass the activation screen without a SIM card. If you’re new to this, here’s a small guide on how to use iTunes to bypass the activation screen.
Dr.Fone - Screen Unlock (iOS)
Remove iPhone Passcode.
- If you don’t have access to iTunes, Dr.Fone is a great alternative.
- Compatible with all models of iPhone and other iOS devices.
- It resets the factory settings without requiring the passcode.
- It recovers data after resetting iPhone’s passcode.
3981454 people have downloaded it
Step 1: Connect Apple iPhone 14 Plus to your Computer
The first step is to connect your Apple iPhone 14 Plus to your computer via cable and install Wondershare Dr.Fone - Screen Unlock.

Step 2: Screen Unlock Tool
Select the “Screen Unlock” tool from the given tools on the home interface. Another interface will be displayed on the screen in which you’ve to select “Unlock iOS Screen.”

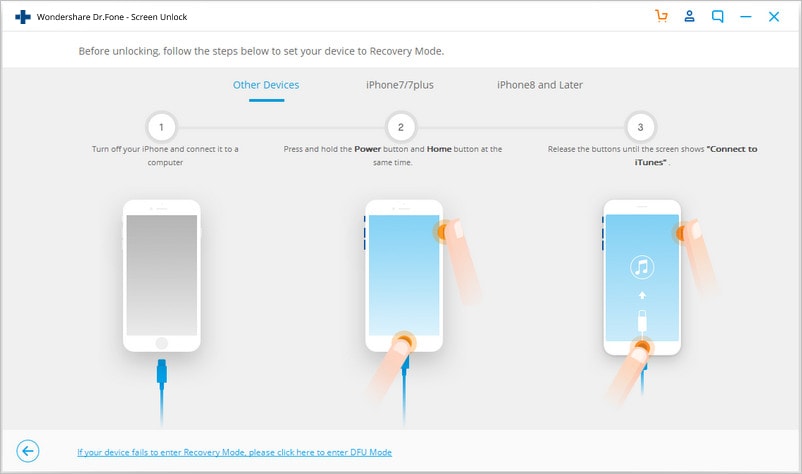
Step 3: DFU Mode
Before directly unlocking the Apple iPhone 14 Plus lock screen, you’ve to set it up in either Recovery mode or DFU mode. Mostly ‘Recovery Mode’ is recommended as it removes the passcode by default. However, if your device fails to activate it, you can opt for DFU mode.

Step 4: Download Firmware
Once your Apple iPhone 14 Plus is in DFU mode, another window will be displayed on the screen, asking for confirmation regarding the Apple iPhone 14 Plus device Model and System Version. Now click on the “Download” button placed at the bottom.

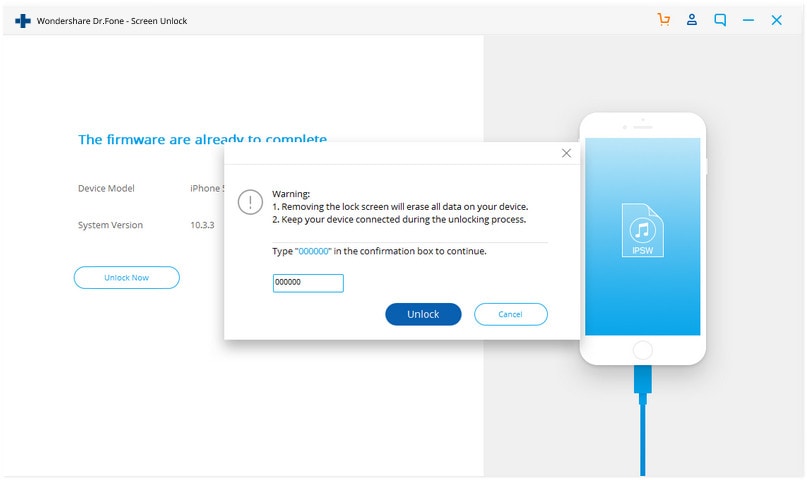
Step 5: Unlock your Apple iPhone 14 Plus.
After downloading the firmware, select “Unlock Now” to unlock your Apple iPhone 14 Plus.

Part 3: Effective Ways to Fix iPhone Password Not Working
This part shall assert its focus on the effective ways of resolving the issue involving the Apple iPhone 14 Plus password not working on your device. It revolves around the methods involving iTunes, iCloud, and iPhone Recovery Mode.
3.1 By using iTunes and iPhone Cables
iTunes is one of the most used and innovational software pioneered by Apple. It has proved to be the best software out there through its versatility and exceptional performance. This software is your savior if you’re looking for something to organize your files in iPhone as it has great integration with iOS.
If you want to fix your Apple iPhone 14 Plus passcode, which is not working, then iTunes can be an efficacious solution for your problem. Below we have explained step-by-step how to fix your passcode in iPhone using iTunes:
Step 1: Connect to Computer
The first step is to connect your Apple iPhone 14 Plus to the computer with which you’ve synced previously.
Step 2: Recovery Mode and Synchronize
Now open iTunes. If it asks for a passcode, try another computer that you’ve synced your device with. Else, put your phone to Recovery mode. Wait for iTunes to detect and sync your device. It will then create a backup.
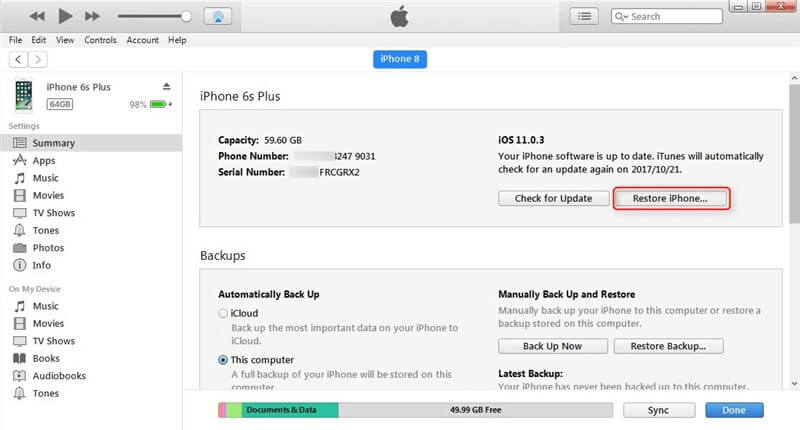
Step 4: Restore
Once your device is synced with iTunes, a “Set Up” window will pop up on the screen displaying two options, “Restore” or “Update.” Select “Restore” to proceed further.
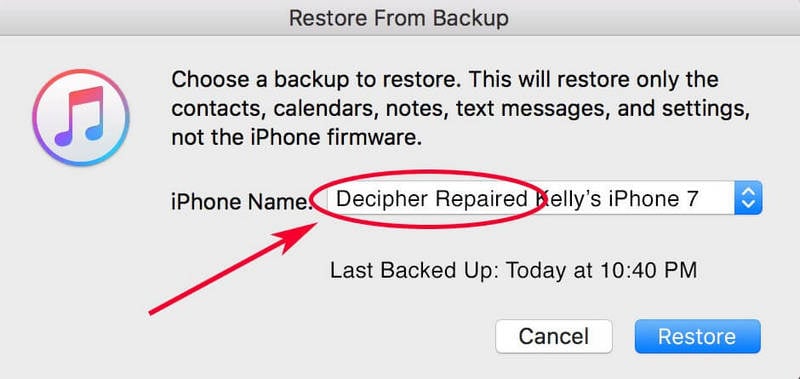
Step 5: Reset Passcode
Select your device and the appropriate backup for your device in iTunes. Once the process is completed, you can reset the passcode of your Apple iPhone 14 Plus in the settings.
3.2 Apple iCloud Feature
iCloud is a multifunctional drive compatible with iOS and macOS. It saves your data, your media and organizes your files in folders. Moreover, it allows the user to share media, data, files, and even location with the other iPhone/iOS user. The major feature of Apple iCloud is its ‘Backup’ which stores all your data in case you lose or damage your phone.
To fix the Apple iPhone 14 Plus passcode, which is not working, iCloud can come in handy. But this method can only work if you’ve logged in to your iCloud account on your Apple iPhone 14 Plus and your “Find My iPhone” application is turned on. All you have to do is erase your data which will automatically erase your passcode through iCloud.
Step 1: Sign in with Apple ID
First, open iCloud.com on another iOS and write your credentials to sign in your Apple ID.
Step 2: Select your Device
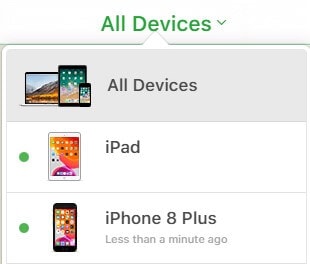
Click on “Find My iPhone” and select “All devices,” and a list of devices will come up which are working under the same Apple ID. Select your Apple iPhone 14 Plus.
Step 3: Erase Data and Set up your Apple iPhone 14 Plus.
Now click on the option of “Erase iPhone” to erase all your data and even your passcode. You have the autonomy to set up your Apple iPhone 14 Plus from a previous backup or set it up as a new device.

3.3 Using iPhone Recovery Mode
If you’ve never synced your Apple iPhone 14 Plus with iTunes or set up “Find my iPhone” and you’re out of options, then iPhone Recovery Mode can come to the rescue. Recovery Mode allows your Apple iPhone 14 Plus to connect with iTunes without restarting the system.
This process is quite time-consuming and different for different versions of the iPhone. Here we will guide you on how to fix the Apple iPhone 14 Plus passcode via Recovery Mode.
Step 1: Connect your device to the Computer
Connect your Apple iPhone 14 Plus to your computer and open iTunes.
Step 2: Activate Recovery Mode
Once the computer detects your Apple iPhone 14 Plus, it force restarts it. Activating Recovery Mode is different for different models of iPhone.
- For iPhone 6s and earlier versions: Press and hold the Home Button and the Power Button simultaneously.
- For iPhone 7 and 7 Plus: Press and hold the Power Button and Volume Down Button simultaneously.
- For iPhone 8 and latest versions: Press and release the Volume Down button instantly. Then again, press and release the Volume up button. Now press the Power Button till you see the option of “Recovery Mode.”
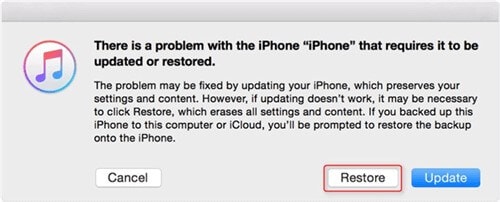
Step 3: Restore your Apple iPhone 14 Plus.
When you’re given the option of Restore or Update, choose ‘Restore.’ iTunes will automatically download the appropriate software.
Step 4: Set Up your Apple iPhone 14 Plus
Once the process has reached completion, set up your Apple iPhone 14 Plus, if this process takes more than 15 minutes, it will leave the Recovery Mode automatically and repeat the steps again.
Conclusion
This article has provided you the reasons and best possible ways to fix the issue of the Apple iPhone 14 Plus passcode not working in detail. You must follow these steps immediately if you’ve locked your Apple iPhone 14 Plus to avoid further trouble and anxiety.
We hope we have covered every bit of this article perfectly and you have successfully unlocked your Apple iPhone 14 Plus without any hassle.
Locked Out of Apple iPhone 14 Plus? 5 Ways to get into a Locked Apple iPhone 14 Plus
Is your Apple iPhone 14 Plus locked, and can’t seem to remember its passcode? If your response is “yes,” then you’re in. It might surprise you, but there are a lot of ways to get into a locked Apple iPhone 14 Plus. To help our readers, we have come up with this extensive post, covering different techniques for taking the lock off Apple iPhone 14 Plus. Follow these expert suggestions and unlock your iOS device when you are locked out of your Apple iPhone 14 Plus.
Part 1: How to get into a locked Apple iPhone 14 Plus with Dr.Fone?
If you are locked out of Apple iPhone 14 Plus, you should only use a reliable and secure way to unlock it. The chances are that the above-mentioned technique might not work on your device. Hence, you can use Dr.Fone - Screen Unlock for help to unlock your phone. Compatible with almost all iOS devices, its desktop application runs on Mac and Windows. One can learn how to get into a locked Apple iPhone 14 Plus by following these instructions.
Attention: All your data all be erased after you get into your locked Apple iPhone 14 Plus.Please make sure if you have backed up all your data.
Dr.Fone - Screen Unlock
Get Into Locked Apple iPhone 14 Plus In 5 Minutes!
- No special skills are required to get into a locked Apple iPhone 14 Plus.
- Unlock the iDevice effectively whether it is disabled or nobody knows its passcode.
- Works properly whether if you’re using Apple iPhone 14 Plus, iPad, and iPod touch.
- Fully compatible with the latest iOS.


4,395,216 people have downloaded it
You can watch the video below about how to unlock your Apple iPhone 14 Plus without Password, and you can explore more from Wondershare Video Community .
Step 1. Download Dr.Fone - Screen Unlock, install it on the computer, and launch it whenever you need to unlock your phone. Choose the option of “Screen Unlock” from the main screen.
Step 2. Connect your device with a computer. Afterward, choose the “Unlock iOS Screen” to get started.
Step 3. Then on the next screen, this tool will prompt you to enter the DFU mode to continue.
Step 4. Provide the essential details about your phone in the next window and Download the firmware update.
Step 5. Wait a moment until the download process is done, and then click on the “Unlock Now” button to activate the process.
Step 6. There will be a warning message showing up. Just confirm it by entering the on-screen code.
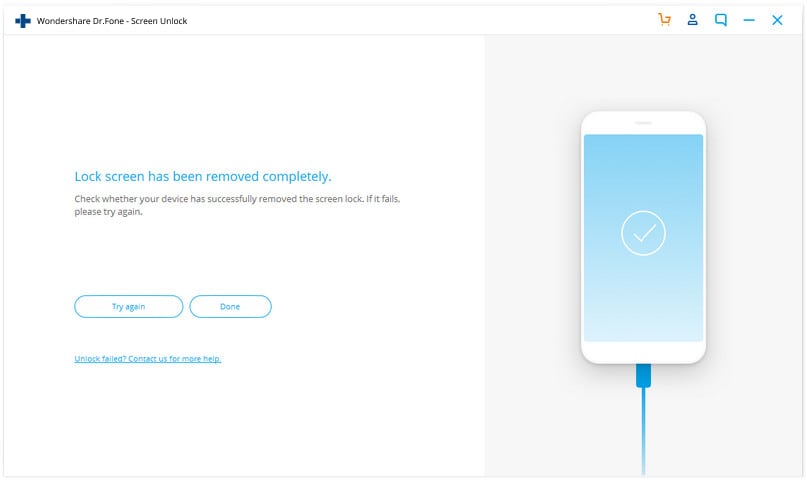
Step 7. Let the application resolve the issue on your phone. Once it is done, you will be notified that your lock screen is removed.
Part 2: How to get into a locked Apple iPhone 14 Plus with iTunes?
This is another popular way to resolve the locked out of the Apple iPhone 14 Plus problem. It can get a little complicated to start with, but in the end, your data would be erased. On Mac with macOS Catalina, you need to open Finder. On Windows PC and Mac with other macOS, you can use iTunes. Implement the following steps to restore your Apple iPhone 14 Plus.
Step 1. Connect your Apple iPhone 14 Plus to the computer.
Step 2. Enter the Recovery Mode.
- For Apple iPhone 14 Plus 8 and 8 Plus and later: Press and quickly release the ‘Volume Up’ button. Press and quickly release the ‘Volume Down’ button. Keep the Side (Top) button until the Recovery-mode screen appears.
- For Apple iPhone 14 Plus 7 and 7 Plus, iPod Touch (7th generation): Press and hold the ‘Top’ (‘Side’) and ‘Volume Down’ buttons simultaneously. Keep holding until it enters the Recovery mode.
- For iPad with Hom buttons and Apple iPhone 14 Plus 6s and former Apple iPhone 14 Plus: Press and hold the ‘Home’ and ‘Side’ (‘Top’) buttons at the same time. Keep holding both buttons until the iTunes symbol would appear on the screen.

Step 3. Click on the “Restore” button. This would reset your device.

Part 3: How to get into a locked Apple iPhone 14 Plus via Find My Apple iPhone 14 Plus?
Apple’s official Find My Apple iPhone 14 Plus is a smart and hassle-free way to locate your lost Apple iPhone 14 Plus or reset it remotely. All you need to remmber is your Apple ID and password. To use this method, preconditions are: Find My Apple iPhone 14 Plus is enabled and internet network is available. Follow these instructions to reset your Apple iPhone 14 Plus:
Step 1. Log in to iCloud’s website using your Apple ID and password. Visit the Find My Apple iPhone 14 Plus page and click on the “All Devices” option to view all the iOS devices linked to your Apple ID. Now, select the iOS device that is locked.

Step 2. This will provide various tasks that you can perform on the iOS device. Click on the “Erase Apple iPhone 14 Plus” button to reset the Apple iPhone 14 Plus device.

Part 4: How to get into a locked Apple iPhone 14 Plus with Siri?
If you don’t want to erase your device’s data while resolving this issue, you can use Siri. You should know that this is not an official fix and only works for limited iOS devices (iOS 8.0 to iOS 13). Ideally, it is considered a loophole in iOS, which can be exploited to fix a disabled phone. You can learn how to get in a locked Apple iPhone 14 Plus by implementing the following steps:
Step 1. To activate Siri, please long press your home button on the phone. Ask for the present time (by saying “Hey Siri, what time is it?”) and wait for its response. Now, tap on the clock icon.

Step 2. On the world clock interface, add another clock.

Step 3. The interface will ask you to search for a location of your choice. Type anything on the search tab and select it to get various options. Tap on the “Select all” text.

Step 4. A few added options will be displayed. Tap on “Share” to proceed.

Step 5. Out of all the options to share this text, select the Message app.

Step 6. A new interface will be opened from where you can draft a new message. Type anything in the “To” field and tap “return” from a keyboard.

Step 7. Then the text will be highlighted. Tap on the add icon.

Step 8. This will open another interface to add a new contact. From here, tap on the “Create new contact” option.

Step 9. Instead of adding a contact, tap on the photo icon and select the “Choose Photo” option.

Step 10. This will open the photo library on your phone. Visit an album or wait for a while.

Step 11. Now, press the home button. If nothing goes wrong, then you will enter the Home screen on your phone.

Conclusion
We hope that after learning how to get in a locked Apple iPhone 14 Plus in different ways, you would be able to resolve the issue on your iOS device. Choose the way you prefer and fix the locked out of the Apple iPhone 14 Plus problem. We recommend using Dr.Fone - Screen Unlock to get an easy fix to your issue without much trouble.
How to Unlock Disabled Apple iPhone 14 Plus/iPad Without Computer
Forgetting the Apple iPhone 14 Plus or iPad passcode could be the worst nightmare for plenty of iOS users. If you are also locked out of your Apple iPhone 14 Plus, then don’t worry. There are several ways to learn how to unlock a disabled Apple iPhone 14 Plus without a computer. Surprisingly, you don’t need to take the assistance of a computer to unlock your iOS device. This guide will make you familiar with how to unlock the iPad passcode without a computer. Read on and learn how to unlock the disabled Apple iPhone 14 Plus without a computer right away.
Part 1: How to unlock disabled Apple iPhone 14 Plus without computer using Siri?
Accessing Siri is the first thing that comes to iOS users’ minds whenever they get locked out of their Apple iPhone 14 Plus . It might surprise you, but you can also take the assistance of Siri to unlock your phone. Most users prefer this technique, as it doesn’t require a computer and can unlock an iOS device without erasing its data.
Though, before you proceed, you need to know the limitations of this method. Since it is considered a loophole in iOS, it doesn’t always yield desirable results. It has been observed that the method only works on devices running from iOS 8.0 to iOS 10.1. To learn how to unlock iPad passcode without a computer, follow these stepwise instructions:
Step 1. Activate Siri on your iOS device by holding the Home button. Ask for the present time by giving a command like “Hey Siri, what time is it?” to proceed. Siri will let you know the current time by displaying a clock. Tap on it.

Step 2. Tap on the Add (plus) icon.

Step 3. From here, you can search for a city. Just type anything you want and tap again to get various options. Choose the “Select all” button to get more options.

Step 4. Select the feature of “Share.”

Step 5. Tap on the message icon.

Step 6. It will open another interface to draft a new message. Wait for a while and write something in the “To” field. Once you are done, tap on the return button on the keyboard.

Step 7. This will highlight your text in green. Now, tap on the add icon located nearby.

Step 8. A new interface would be launched to add a new contact. From here, tap on the “Create New Contact” button.

Step 9. Instead of adding information regarding a new contact, tap on the photo icon, and choose the option of “Add Photo.”

Step 10. This will open your device’s gallery. You can browse your photo library from here.

Step 11. After a while, press the Home button. If everything goes right, you will enter the Home screen of your iOS device after unlocking it.

By following this technique, you would also learn how to unlock the disabled Apple iPhone 14 Plus 4. Though, you need to ensure that the iOS device you are using would support this feature.
Part 2: How to unlock disabled Apple iPhone 14 Plus using Find My Apple iPhone 14 Plus?
The chances are that your iOS device might not work with the above-stated solution, or it’s latest iOS version. Therefore, you would be required to take the assistance of another method to unlock your device. With the help of Apple’s official Find My Apple iPhone 14 Plus service, you can easily restore your device remotely. It is also used to locate an iOS device, play a sound, and lock it remotely.
After implementing this solution, your iOS device will reset, and your data would be erased. Nevertheless, in the end, it will automatically reset its lock as well. Follow these steps:
Step 1. Open iCloud’s website on any other handheld device of your choice. Not just your system, you can open the website on any other smart device as well. Use your Apple ID and password to log in to your iCloud account.
Step 2. Visit the Find My Apple iPhone 14 Plus service. Under the “All Devices” category, you can view all the iOS devices linked to your Apple ID. Select the Apple iPhone 14 Plus device you want to reset.

Step 3. Select the feature of the Erase device and confirm your choice. Wait for a while as your Apple iPhone 14 Plus or iPad would be restored remotely.

By following this method, you can learn how to unlock the iPad passcode without a computer remotely.
Part 3: Unlock disabled Apple iPhone 14 Plus/iPad using Dr.Fone - Screen Unlock?
Dr.Fone can help you to remove the screen from the disabled Apple iPhone 14 Plus or iPad. It can also unlock the Apple ID after you forgot the Apple ID email or password.
- Easy operations to unlock the Apple iPhone 14 Plus without the passcode.
- Removes the Apple iPhone 14 Plus lock screen without relying on iTunes.
- Works for all models of Apple iPhone 14 Plus, iPad, and iPod touch.
- Fully compatible with the latest iOS 14.
Step 1. Install Dr.Fone on your computer.
Step 2. Open ‘Screen Unlock’. Select ‘Unlock iOS Screen.’
Step 3. Follow the on-screen instruction.
Boot your Apple iPhone 14 Plus into DFU mode.
Select device information on Dr.Fone
Step 4. Start to Unlock. The phone will be unlocked after that.

Part 4: Tips to protect your Apple iPhone 14 Plus from being unlocked by thieves
As you can see, anyone can learn how to unlock the disabled Apple iPhone 14 Plus 4 without a computer and other iOS devices as well. Therefore, if you don’t want your Apple iPhone 14 Plus and iPad to be misused by thieves, you should take some added measures. Follow these suggestions to increase security on your iOS device.
1. Disable Siri from the lock screen
If someone can’t access Siri from the lock screen, then they won’t be able to follow the above-mentioned process to unlock an iOS device. Therefore, it is highly recommended to disable Siri from the lock screen. To do this, visit your device’s Settings > Touch ID & Passcode, and under the “Allow access when locked” section, disable the option of “Siri.”

2. Enable Find My Apple iPhone 14 Plus service
There are times when users forget to enable the Find My Apple iPhone 14 Plus feature on their iOS device. To access this feature, make sure that it is turned on. To do this, go to your device’s Settings > iCloud > Find My Apple iPhone 14 Plus and turn on the feature of “Find My Apple iPhone 14 Plus.” Additionally, you should turn on the “Send the last location” option as well.

3. Set a strong alphanumeric password
One of the best ways to secure your iOS device is by adding secure passwords. To do this, visit your device’s Settings > Touch ID & Passcode > Change Passcode and select the option of “Custom Alphanumeric Code.” Provide a strong alphanumeric passcode to boost the security of your device.

Conclusion
By implementing the above suggestions, you can easily make your iOS device more secure. Additionally, we have also listed two stepwise solutions that can unlock your iPad or Apple iPhone 14 Plus without taking the assistance of a computer. Now when you know how to unlock a disabled Apple iPhone 14 Plus without a computer, you can easily make the most out of your iOS device.
Also read:
- [Updated] In 2024, MinisculeRecordings Snapshot Scrutiny
- 5 Ways to Transfer Music from HTC U23 to Other Android Devices Easily | Dr.fone
- Come Ripristinare La Configurazione Di Sistema in Windows
- Expert Tips to Restore Headphone Connectivity in Malfunctioning Laptop Jacks
- Guide on How To Change Your Apple ID Email Address On Apple iPhone 15
- How to Bypass Apple iPhone XR Passcode Easily Video Inside
- How to Unlock Disabled iPhone SE (2020)/iPad Without Computer
- How to Unlock iPhone 14 Pro without Passcode or Face ID
- In 2024, The Speaker's Guide to Voiceover on Microsoft PPT
- In-Depth Analysis of the Philips HF3505 Smart Wake-Up Light Features & Performance
- Step by Step Instructions: Fetch and Set Up Epson XP-N410 Printer Software (Driver Downloads)
- Ultimate Guide: Powering Down, Refreshing, or Rebooting Your PS5 Console
- Unlock Your Disabled iPhone 14 Without iTunes in 5 Ways
- Title: How to Fix iPhone 14 Plus Passcode not Working?
- Author: Sophia
- Created at : 2024-10-31 01:22:17
- Updated at : 2024-11-01 03:19:00
- Link: https://ios-unlock.techidaily.com/how-to-fix-iphone-14-plus-passcode-not-working-by-drfone-ios/
- License: This work is licensed under CC BY-NC-SA 4.0.