
How to Turn Off Find My Apple iPhone 8 Plus when Phone is Broken?
How to Turn Off Find My Apple iPhone 8 Plus when Phone is Broken?
In today’s world, your phone is your most important asset. Especially when you own an iPhone, you’re much more careful because it is pretty expensive than normal phones. You’re always making sure to keep it safe and secure, but Apple has ways to keep you away from this hassle.
Apple ensures the privacy and security of its customers. For that, it has introduced this excellent feature of Find My iPhone, which keeps track of the location of your device no matter in which part of the world you are. So, if you’ve lost your Apple iPhone 8 Plus or it is stolen, this app is your savior.
Downloading and enabling Find My iPhone can be really easy and cinch but turning it off can be an arduous task. But we have you covered through this article that shall tell you about this app in detail and guide you on how to turn off Find My iPhone even when your Apple iPhone 8 Plus is broken.
Part 1: What is Find My iPhone?
Find My iPhone is an application forged by Apple that keeps track of your Apple iPhone 8 Plus’s location protects your data. Once you enable this application, it requires your iCloud password to unlock your phone to keep your Apple iPhone 8 Plus safe from the wrong hands. This application comes in handy when you accidentally lose or misplace your phone.
The best part about this application is that it is free of cost. It usually comes built-in your Apple iPhone 8 Plus already, but if not, you can easily download it from the app store. Sign in with your Apple ID, and it will automatically locate your Apple iPhone 8 Plus no matter where you go.
Part 2: Efficient Way of Turning Off Find My iPhone Within Second- Dr. Fone
Dr.Fone - Screen Unlock is an excellent data recovery and management software created by Wondershare. However, limiting it to just recovery and management of data will not be just as it offers much more than just that. Transferring files, repairing the operating system, changing the GPS location, and fixing the activation lock are its amazing services.
Dr.Fone - Screen Unlock (iOS)
Turning Off Find My iPhone Within Second.
- Maintains the security of your data and keeps it in its original form.
- Recovers your data from damaged or broken devices.
- Erase’s data in such a way that no other software can recover it.
- Has great integration with iOS and macOS.
3981454 people have downloaded it
Dr.Fone can also be a great solution for how to turn off Find My iPhone when your Apple iPhone 8 Plus is broken.
Step 1: Install Dr. Fone
Launch Wondershare Dr.Fone on your computer and connect your Apple iPhone 8 Plus with it via cable.
Step 2: Unlock Apple ID
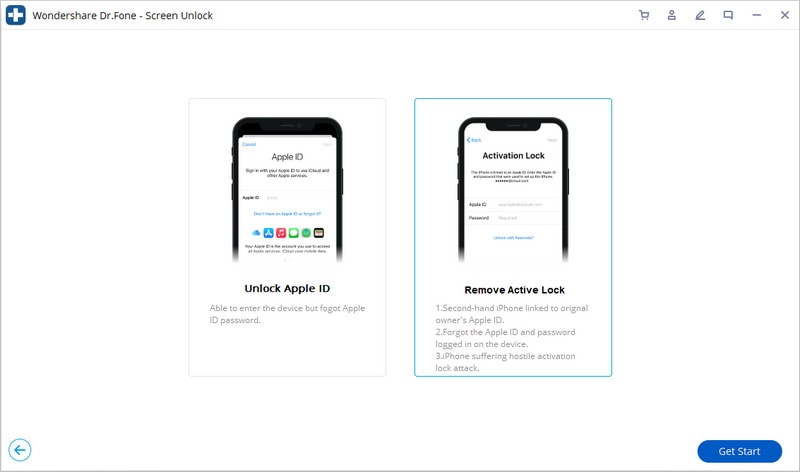
Open Wondershare Dr.Fone and select “Screen Unlock” among the other options on the home interface. Now another interface will appear displaying four options. Click on “Unlock Apple ID.”

Step 3: Remove Active Lock
After choosing the “Unlock Apple ID” option, an interface will be displayed that will show another two options, out of which you have to select “Remove Active Lock” to proceed further.
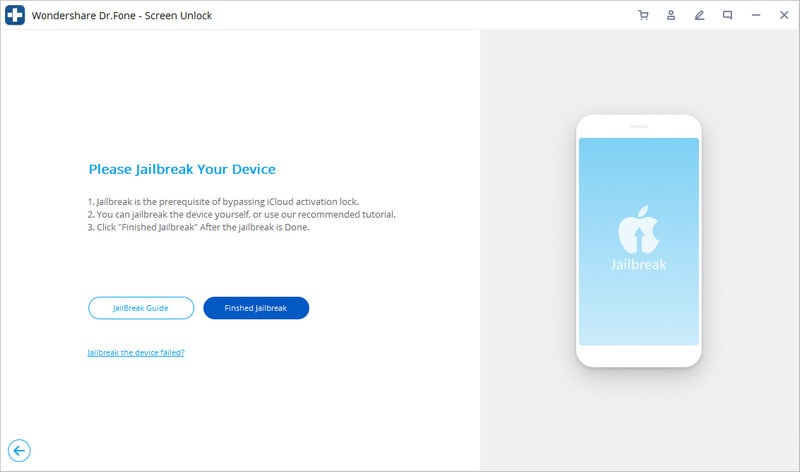
Step 4: Jailbreak your Apple iPhone 8 Plus
Jailbreak your Apple iPhone 8 Plus by following the instructions given by the system. Once you complete them, click on “Finish Jailbreak.”
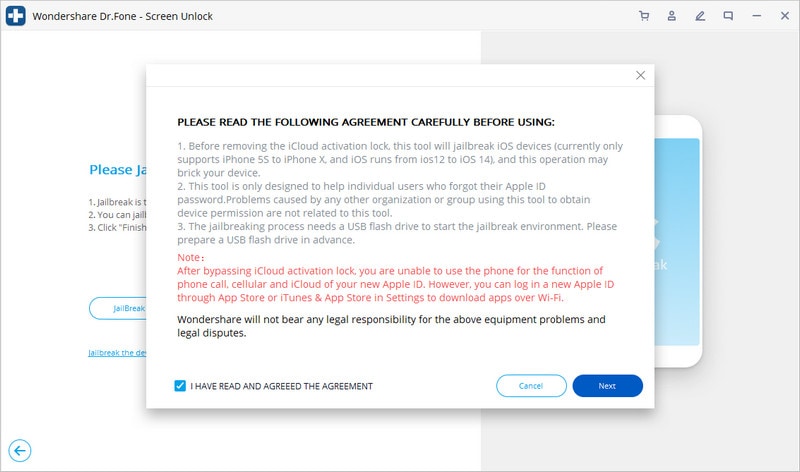
Step 5: Confirmation Window
A warning will be displayed on the screen asking for confirmation to remove the active lock. Then again, another confirmation message will pop up confirming the model of your device.
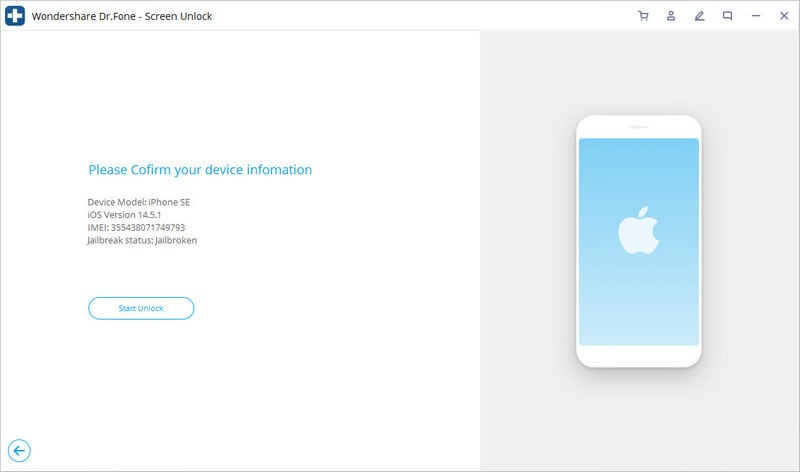
Step 6: Unlock your Apple iPhone 8 Plus
Click on “Start Unlock” to proceed. Once the process is started, you have to wait for a moment until the activation lock is successfully removed.
Step 7: Turn off Find My iPhone
As your activation lock is removed, go to the settings and remove your Apple ID. Consequently, Find My iPhone will be disabled.

Part 3: How to Turn Off Find My iPhone on Broken iPhone Using iCloud?
iCloud is the most secure storage drive introduced by Apple. It keeps your gallery, your reminders, contacts, and your messages up to date. Moreover, it also organizes and stores your files while keeping them private and secure. iCloud strongly integrates your Apple iPhone 8 Plus with other iOS devices so you can share your data, documents, and location with other iCloud users.
As mentioned earlier, turning off Find My iPhone can be very complex. But if your Apple iPhone 8 Plus is damaged in some way, turning it off can be much more stressful. Here, iCloud can come to the rescue as it’s the most effective solution for how to turn off Find My iPhone when your phone is broken.
Here we have explained to you step by step how to turn off Find My iPhone on broken iPhone using iCloud:
Step 1: Go to the official website of iCloud.com and enter your credentials to sign in with your Apple ID.
Step 2: Click on the “Find My iPhone” icon at the end of the page. The app will start locating your device, but as your Apple iPhone 8 Plus is damaged, it might not find anything.

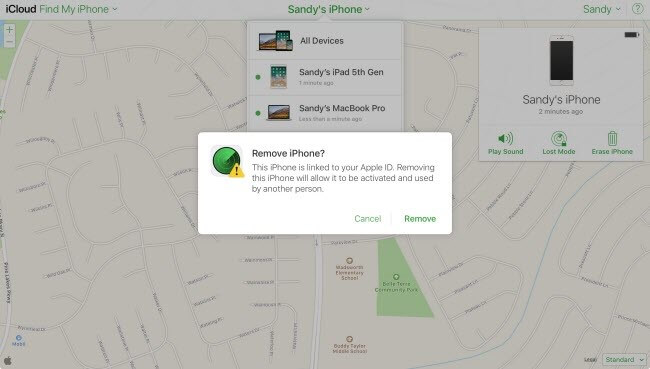
Step 3: Click on the “All Devices” option from the top. Select your Apple iPhone 8 Plus, which you want to remove by clicking on “Remove from account.”
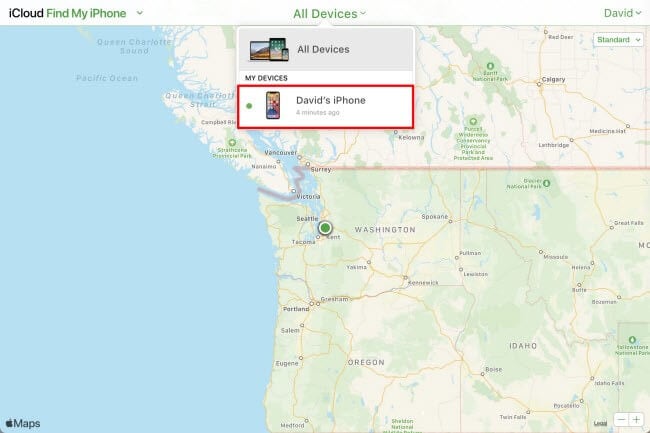
Step 4: Once your device is removed from the account, a window will pop up asking you to delete the option of that device from your iCloud account. Now you may log in Find My iPhone with your iCloud account on another device.
Part 4: Turn off Find My iPhone using Recovery Mode
The recovery model of the Apple iPhone 8 Plus allows you to reset or restore your data. It also offers data cleaning and backing up of apps to keep your Apple iPhone 8 Plus updated and free of glitches. When your phone is lagging or not working properly, then you need to put it into Recovery Mode.
However, Recovery Mode can also be useful to turn off Find My iPhone on your device. Here are the steps that will guide you on how to turn off Find My iPhone on a broken phone using Recovery Mode.
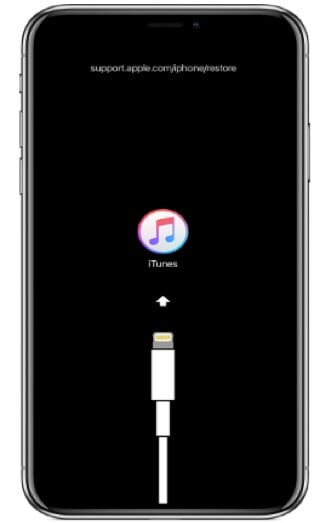
Step 1: Connect your Apple iPhone 8 Plus to your computer via cable and wait for your computer to detect your device.
Step 2: As soon as your Apple iPhone 8 Plus is detected, open iTunes and force restart your phone to activate the Recovery Mode. Activating this mode is different for different models of iPhone.
- For iPhone 8 and the later: Press the Volume Down button and release is immediately. Then press the Volume Up button and release it immediately again. After that, press and hold the Power Button until you see the Apple logo.
- For iPhone 7 and 7+: Press the Power Button and Volume Down button at the same time and hold them until the Apple logo appears on your screen.
- For iPhone 6s, and Previous Models: Press and hold the Home Button and Power button concurrently until your Apple iPhone 8 Plus shows the Apple logo.
Once your Apple iPhone 8 Plus shows the Apple logo, it means the Recovery Mode is activated.
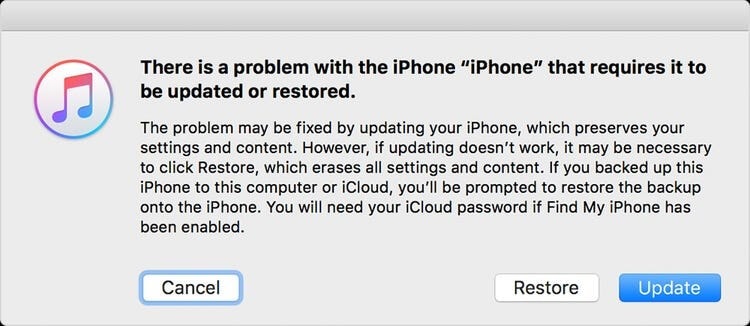
Step 3: Now click on “Restore” so iTunes can download software on your Apple iPhone 8 Plus. Once the process is completed, you can set up your Apple iPhone 8 Plus as new. This means your previous data will be erased, and Find My iPhone will be disabled automatically.
Conclusion
Now we’re done as we’ve provided you the best possible solutions to turn off Find My iPhone when your Apple iPhone 8 Plus is broken. It is obvious that it is a quite complicated process, but you have to be patient and follow the steps correctly to disable Find My Apple iPhone 8 Plus to avoid any inconvenience in the future. We hope this article answers all your queries regarding it.
How To Change Your Apple ID on Apple iPhone 8 Plus With or Without Password
The Apple ID is a unique identifier used to log in to all Apple services, including iCloud, the App Store, Apple Music, and more. You can track purchases and manage your account settings through your Apple ID. But what if you need a new one for security or moving to a new location?
Whatever the reason, learning how to change your Apple ID on your iPad is straightforward. And this guide will show the steps and provide some tips at the end.

Part 1: Reasons Why You Might Need To Change Your Apple ID
Your iOS devices contain most of your digital data. That includes your contact list, email, financial information, and social media passwords. All this data is valuable - others can use it to do identity theft, fraud, and other crimes.
If you feel the existing Apple ID isn’t secure enough, it’s a good idea to change your Apple ID on your iPad or other devices. Aside from this, there are a few scenarios where you might find yourself needing to change your details:
You No Longer Use the Email Address or Phone Number Associated With Your Apple ID
Life moves fast, and sometimes contact info changes. If the email or phone number linked to your Apple ID becomes outdated, it’s a good idea to update it. That way, you won’t miss out on vital notifications or have trouble recovering your account if needed.
You Want To Simplify Your Online Life
If you have multiple email addresses, you may want to consolidate them into one email address. It can make it easier to manage and remember your online accounts, including your Apple ID.
You Are Relocating to a Different Region or Country
Moving abroad? Your Apple ID may need an update to match your new location. It ensures access to region-specific apps and services. You need to have a few things in place before you can do that: add a payment method for your new location, cancel your subscriptions, and spend your store credit. Aside from that, you will also need to change your Apple ID country or region.
Changing your Apple ID can be smart, ensuring your digital life stays up-to-date, secure, and tailored to your needs. It’s not complicated, and it’s all about making your Apple experience better suited to you. So, go ahead and learn how to change your Apple ID on your iPad in the following sections.
Part 2: How To Change Apple ID on iPad Without Losing Data?
If you receive a notification from Apple about suspicious account activity, it’s time to act. Before you learn how to change the Apple ID on an iPad – for yourself or others, here are some common signs of a compromised Apple ID:
- A login attempt from a device or location that you don’t recognize
- A password change that you didn’t know about
- Unauthorized messages or purchases
- A password that no longer works
- Unfamiliar account details
If you suspect unauthorized access to your Apple ID, below is what you can do.
Steps To Change Your Apple ID to a Different Email Address
If you are worried about losing data such as purchases and contacts, don’t worry. You can update your Apple ID account anytime without disrupting your data. Here’s a step-by-step guide on how to change your Apple ID email address. Just sign out of all Apple services and devices that use your account first.
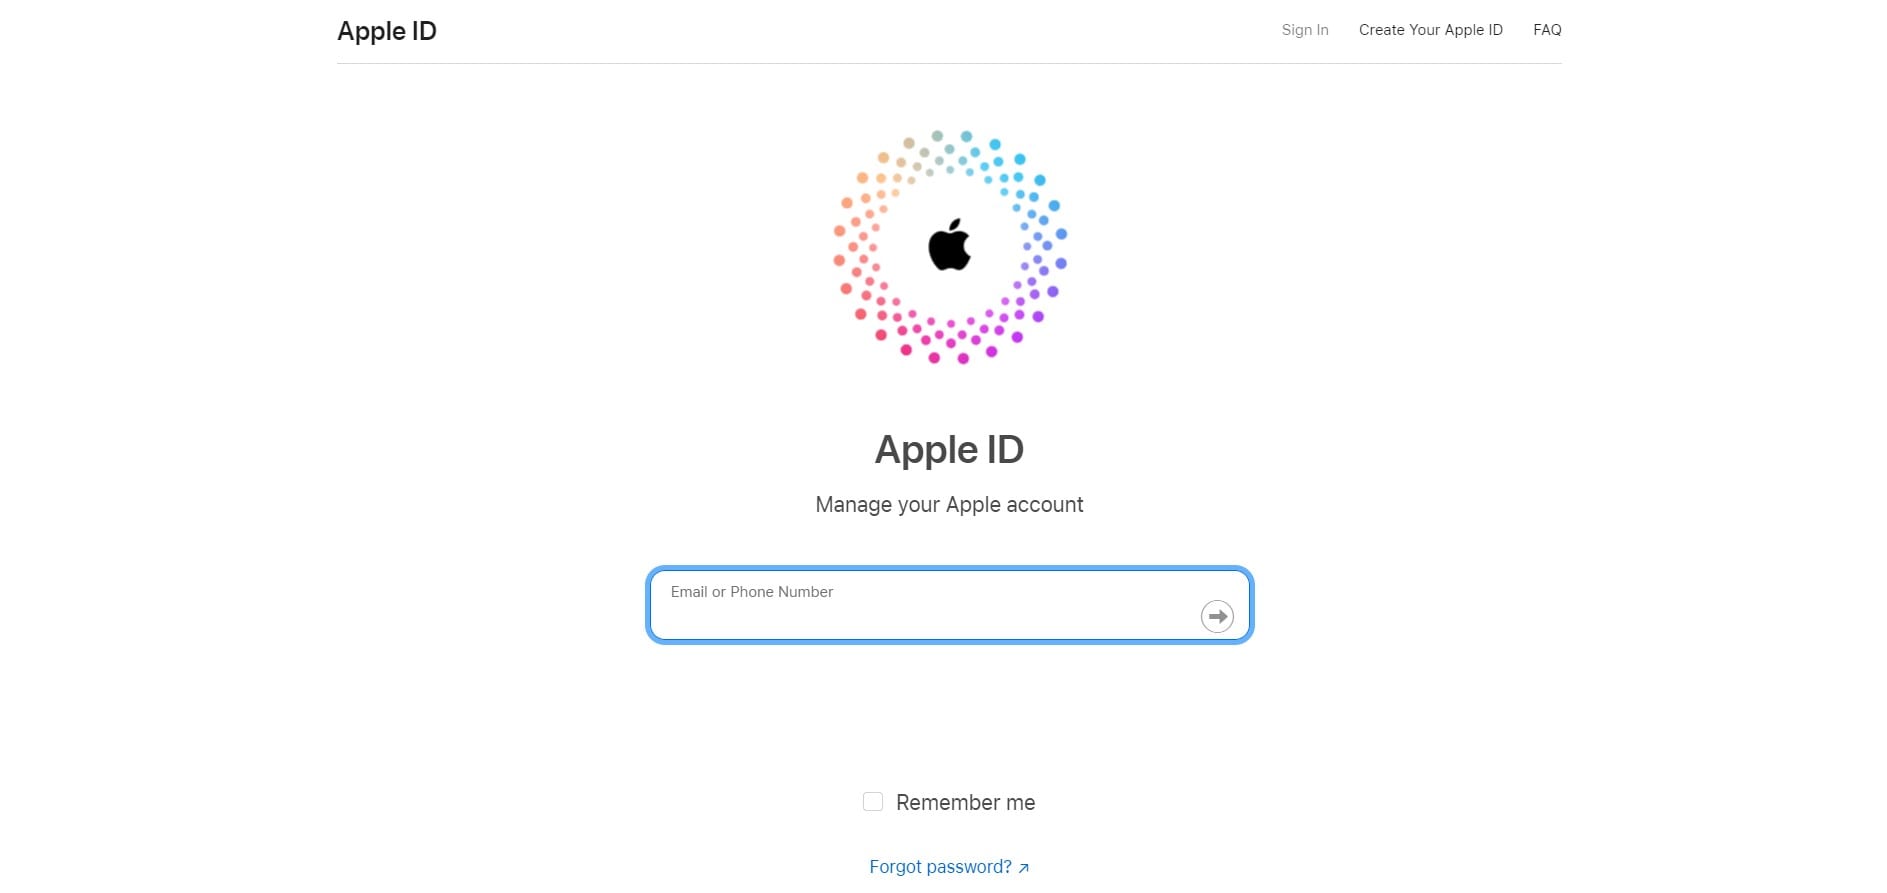
- Step 1: Visit the Apple ID official website and log in to your account credentials.
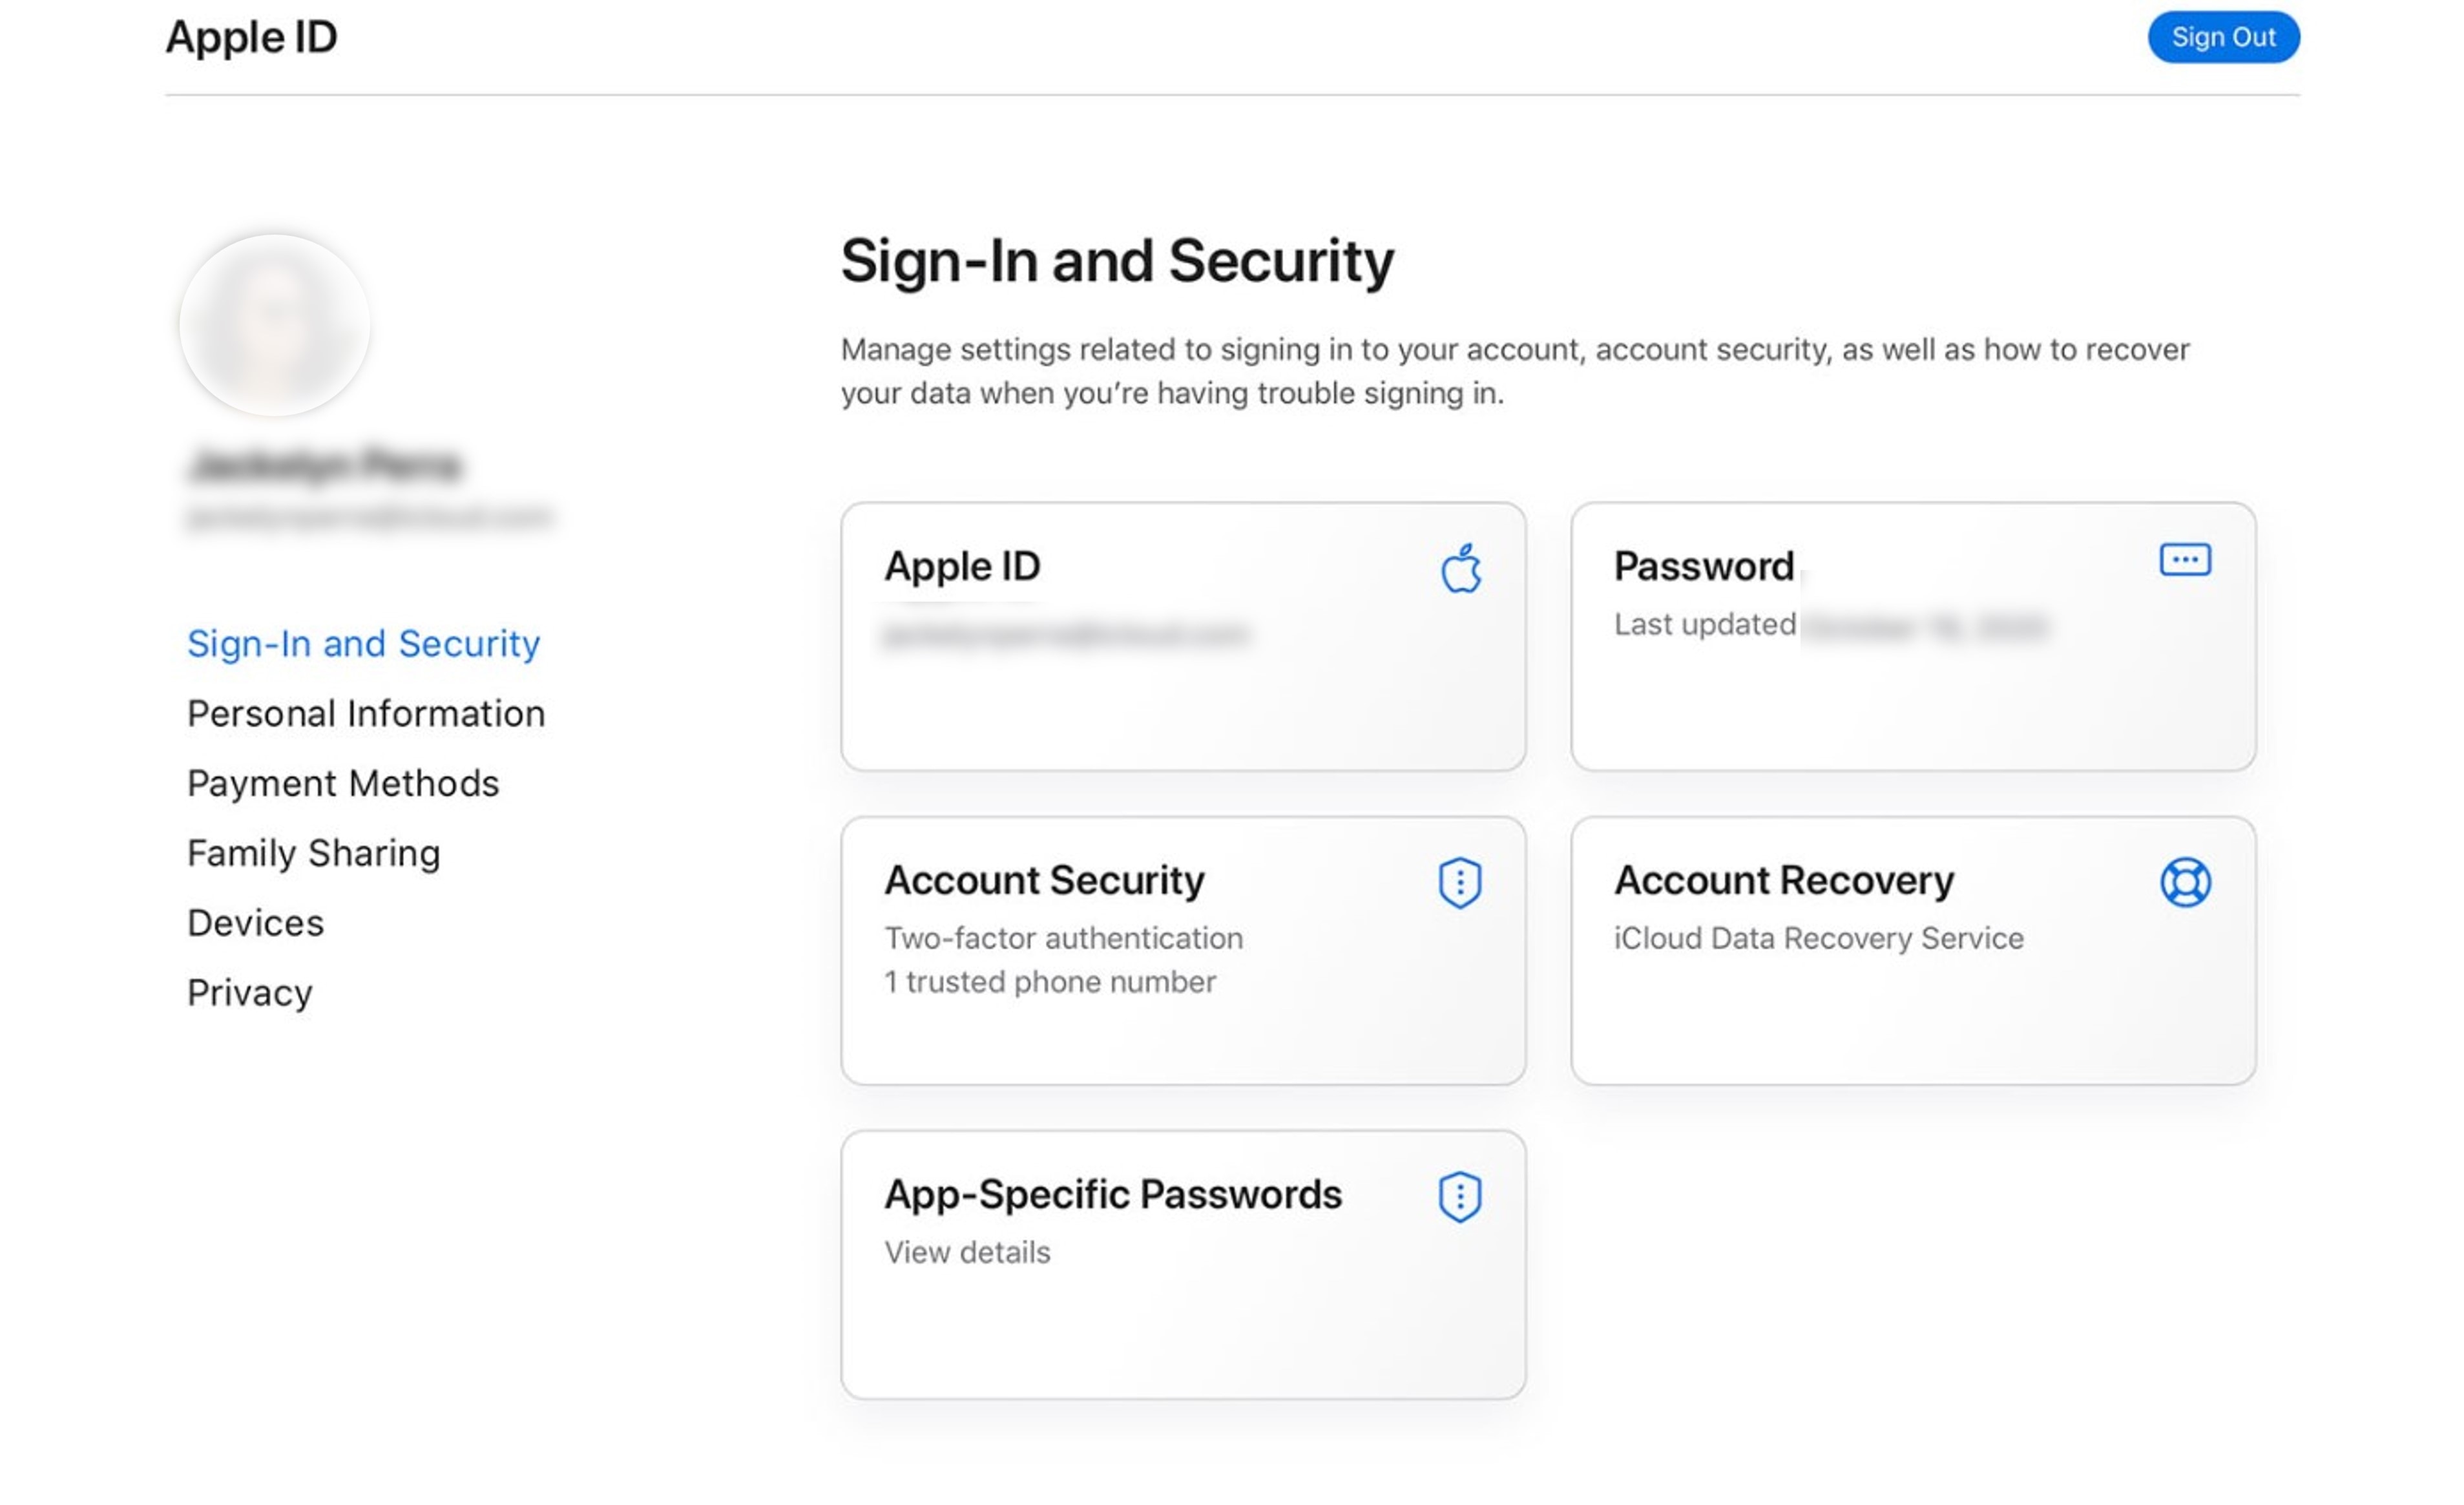
- Step 2: Once logged in, select Apple ID in the Sign-In and Security section.
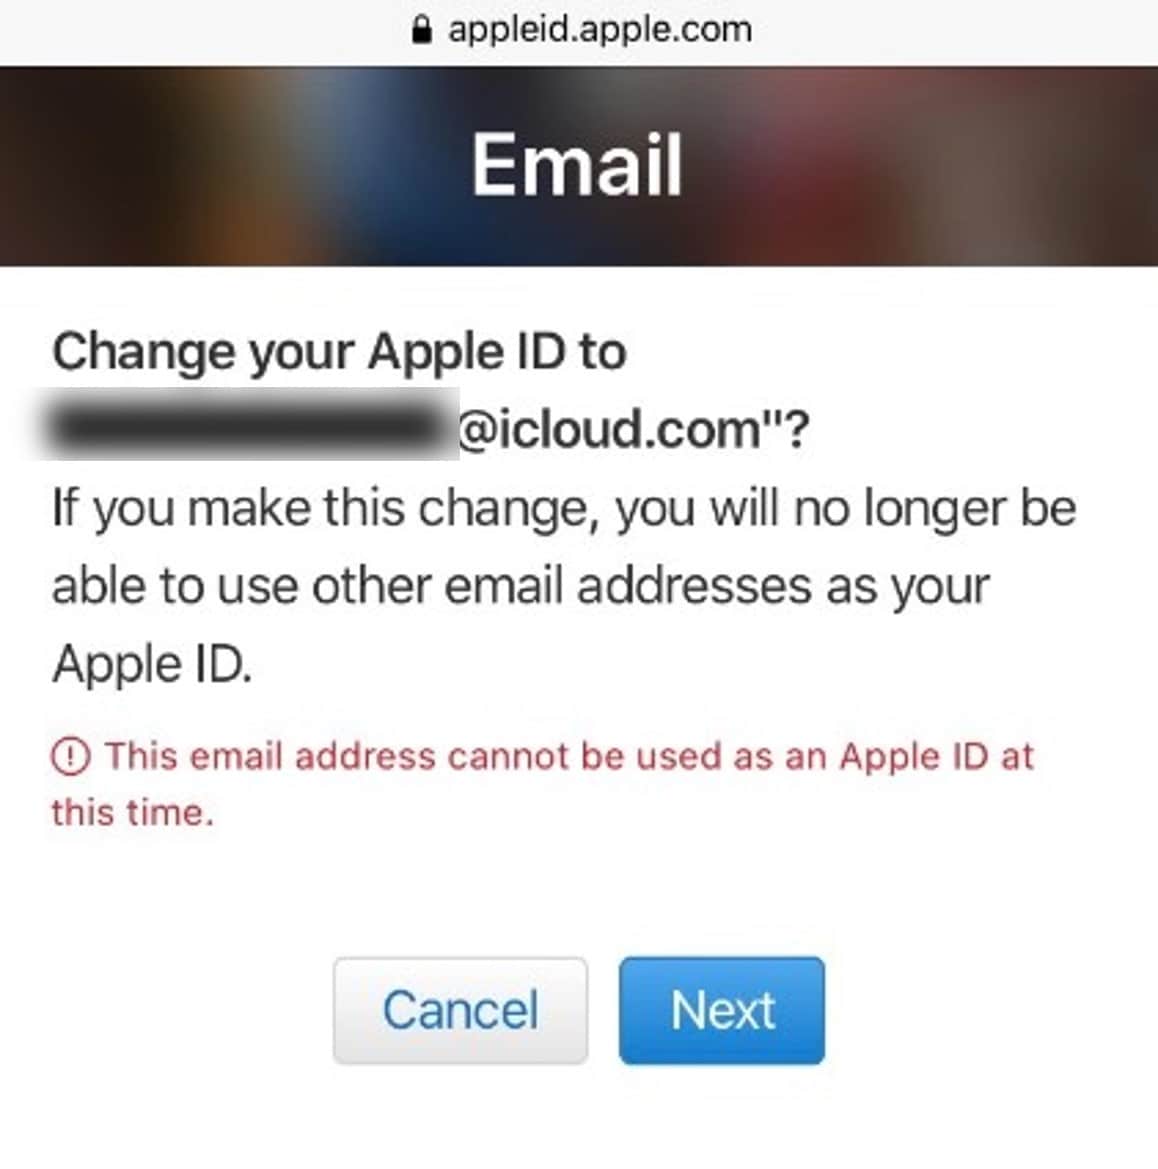
- Step 3: From the Apple ID pop-up window, enter your new Apple ID in the Change your Apple ID text field.
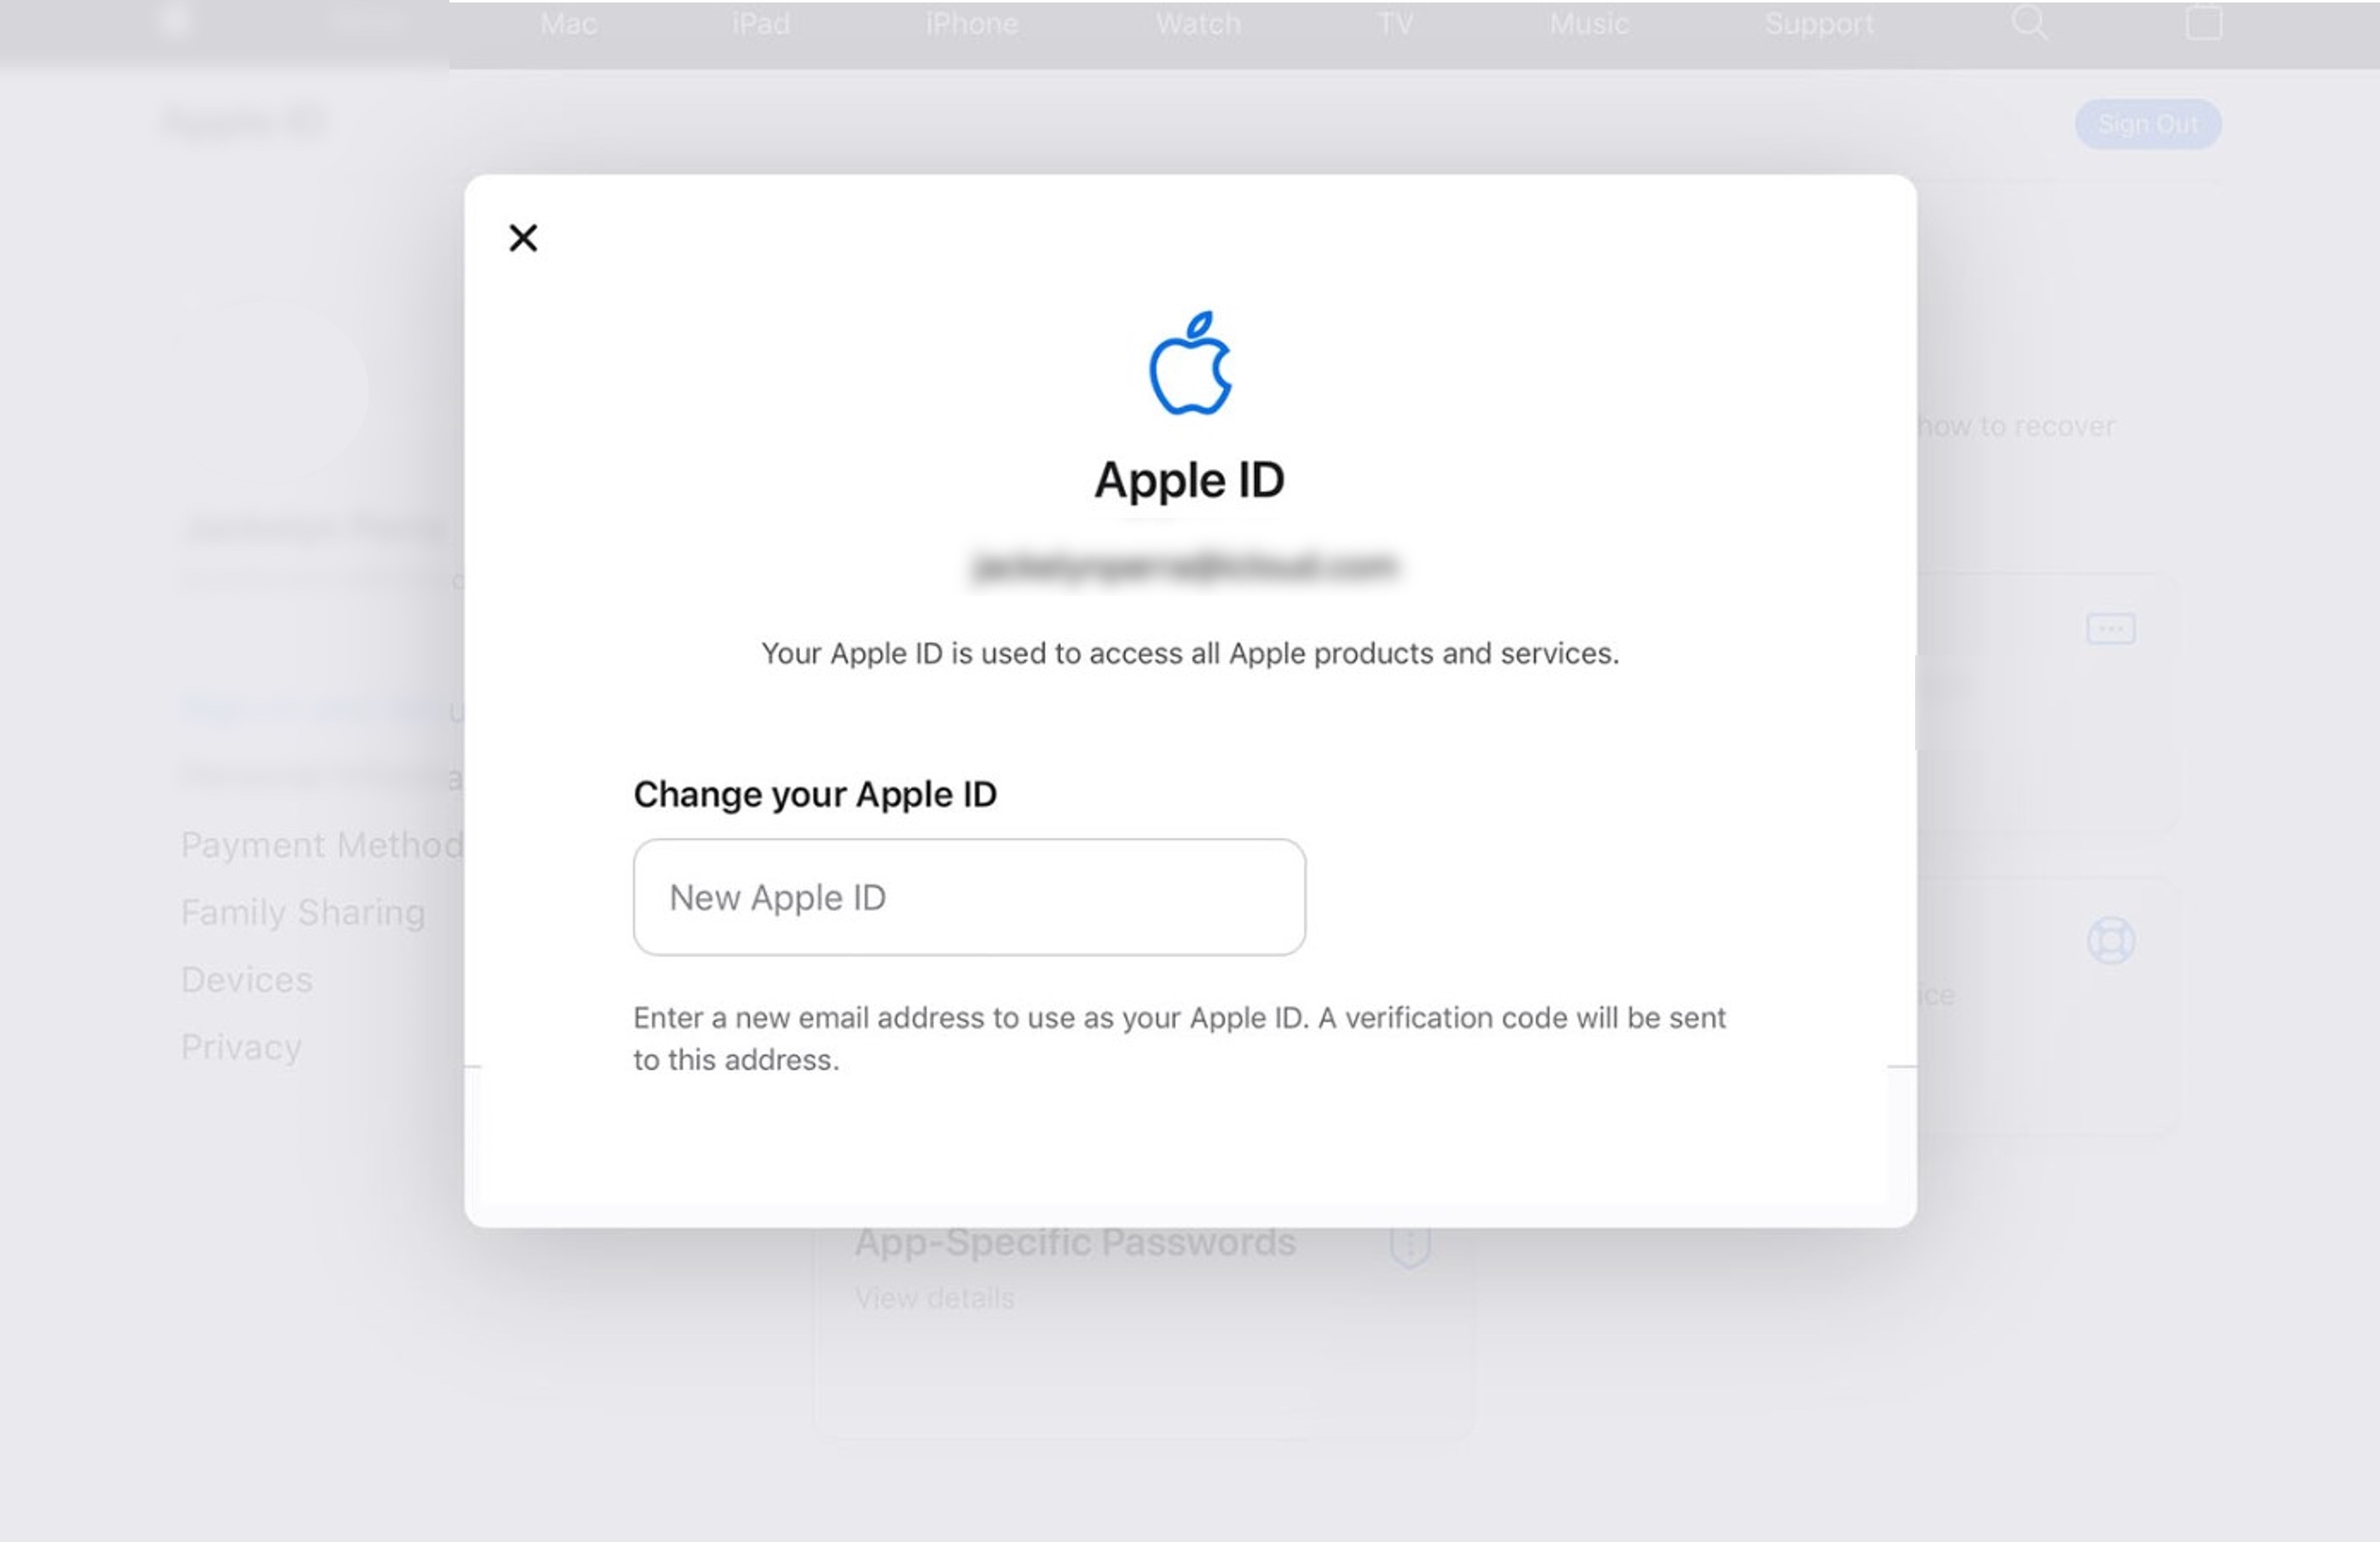
- Step 4: Select Change Apple ID to proceed.
- Step 5: Check your email to get a verification code sent by Apple to ensure that only you can change it to a third-party email address. Enter the code to complete the update.
Step 6: Sign in to Apple services such as iCloud and Messages, using your new Apple ID to continue sharing with others.
Steps To Change Your Apple ID to a Different Mobile Number
Do you want to use Your Apple iPhone 8 Plus number as your Apple ID username? It’s possible, but it depends on your location, how you created your account, and what version of iOS you’re using.
If you’re in China mainland or India, and you’re using iOS 11 or later, you can create a new Apple ID with Your Apple iPhone 8 Plus number as the username. However, Your Apple iPhone 8 Plus number must be (+86) or (+91). So, if you’re thinking of, “How can I change my Apple ID on my iPad if it’s a mobile phone number?” then this guide is for you:
- Step 1: Log out of all Apple services and devices currently signed in with your Apple ID, except the one you’re using to change your Apple ID.
- Step 2: On your iPad, go to Settings > [your account name] > Sign-in & Security.
- Step 3: Tap Edit next to Email & Phone Numbers.
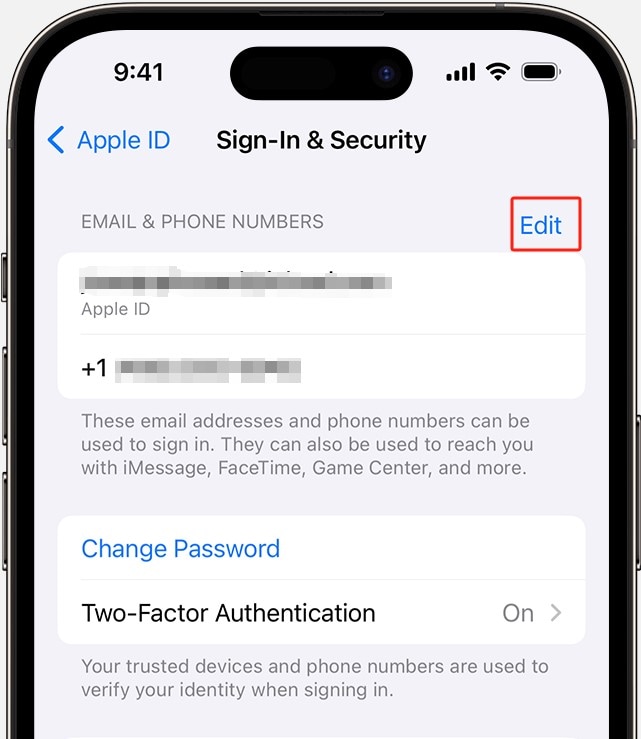
- Step 4: Go to the Delete icon next to your mobile number and follow the directions given.
- Step 5: Enter the code sent to the mobile number you added as your new Apple ID to verify it.
- Step 6: Log into all Apple services using your new Apple ID.
Even if you can’t change your Apple ID on your iPad to a mobile phone number, you can still associate it with a phone number on your account page. It means you can use a different email address or mobile phone number to log in to your Apple ID. See the next sections for more information on the workarounds you can try.
Part 3: What To Do if You Cannot Change Your Apple ID on iPad?
Changing your Apple ID on an iPad is usually easy. However, there can be setbacks during the process. Now, here’s what to do if you find yourself unable to do it and why it might be happening:
Try Again Later
If you encounter errors during the process, give it a little time and try again. Mayne it is because you changed your Apple ID on your iPad to an iCloud email address within 30 days.
Check if Apple ID Is Already in Use
Apple IDs are unique, and you can’t have two identical ones. If you’re trying to change your Apple ID to one that’s already in use, you’ll hit a roadblock. Ensure that the new Apple ID you want isn’t already taken. Remove it from the family member’s account if they are using it.
Your Apple ID Is an Email Address
If your current Apple ID is an email address, you won’t be able to change it to a mobile phone number directly. Instead, you can add an email or phone number to your account for contact purposes.
If you’ve addressed these issues and still can’t change your Apple ID, don’t worry. Apple customer support is available to assist you with account-related challenges. Contact them for guidance and solutions tailored to your situation.
However, if you can’t change your Apple ID on your iPad because you forgot or don’t have access to the password, you can use a third-party tool such as Dr.Fone. This tool is easy to use and can help you unlock your iPad and remove the Apple ID in a few clicks.
Part 4: Using Wondershare Dr.Fone
Dr.Fone Screen Unlock (iOS) tool is your go-to solution for unlocking iOS devices without a passcode. The best part? It is easy to use for users of all technical backgrounds. With Dr.Fone, you can unlock iOS screens protected by 4 to 6-digit passcodes, Face ID, Touch ID, and more.
But it doesn’t stop there; Dr.Fone can also help remove the iCloud activation lock, unlock Apple ID without a password, and much more. This powerful tool is a lifesaver for iOS users, supporting the latest iPadOS 17, iOS 17, and iPhone 14.
Step-by-Step Guide to Removing Apple ID on iPad Using Dr.Fone
Dr.Fone can bypass the Find My/Find My iPhone feature to remove your Apple ID from your iPad, iPhone, or iPod Touch. Follow the steps below to learn how to use this feature on your iOS device.
Step 1: Get Wondershare Dr.Fone from their website and install it on your computer.
Step 2: From the app’s Toolbox homepage, click Screen Unlock, and select iOS.

- Step 3: Select Remove AppleID from the available Screen Unlock tools.

- Step 4: Connect your iPad or other iOS device to your computer, then click Unlock Now to continue.

- Step 5: Click Yes to confirm your device has a screen lock. Otherwise, it won’t work.

- Step 6: Enable the Two-Factor Authentication on your iPad so you can unlock your Apple ID. Then, click Yes to proceed.

- Step 7: Follow the on-screen instructions to put your iPad in Recovery Mode.

- Step 8: The next screen will demonstrate the Device Model information. Select an option from the System Version dropdown list and click Start.

- Step 9: The iOS firmware will start downloading, and you can see the progress on the next screen. If you’re experiencing slow download speeds, click Copy to get the link and download it.

- Step 10: Review the Device Model and System Version, then click Unlock Now to proceed.

- Step 11: From the Warning dialogue box, enter the code shown in the text field, then click Unlock.

- Step 12: Wait and refrain from using your device while it’s connected to avoid a bricked device.

- Step 13: Once finished, click Done, then check your iPad. If your Apple ID is not unlocked, you may need to click Try again to restart.

Best Practices To Secure Your iOS Data
Changing your Apple ID on your iPad can be a great way to protect your privacy and security. However, it’s important to take steps to ensure that your iOS data remains safe during the process. Here are some tips to help you do just that:
- Backup Your Files
Before you change your Apple ID on your iPad, create a backup of your data so you don’t lose important files. You can create a backup using iCloud or Dr.Fone.
Dr.Fone also allows you to view the contents of your backup before you restore it, so you can ensure that you’re getting back exactly what you want. This way, you can restore your data to your new Apple ID if needed.
- Password Check
Review your current passwords. Change any weak or compromised ones, including your Apple ID password, and never share it with anyone.
- Avoid Sharing an Apple ID
It’s best practice for each family member to have their own Apple ID. Sharing one can lead to problems with app purchases, data syncing, and privacy.
- Enable Two-Factor Authentication (2FA)
If not already enabled, turn on 2FA for an extra layer of security. It’s simple and highly effective.
Conclusion
Changing your Apple ID on your iPad or other iOS devices is a simple process that can help you protect your privacy and information. With the tips above, you can ensure your iOS data is safe and secure during the switch.
And if you need to remove your Apple ID without a password, Dr.Fone is a good option. Dr.Fone is a powerful iOS toolkit that can help you with various phone solutions. It’s easy to use and can help you solve mobile problems in just a few minutes.
How to Unlock Apple iPhone 8 Plus with a Mask On
Are you tired of wearing a mask in this pandemic? Apple introduced a new feature through which people can unlock iPhone face ID while wearing a mask. Before this, people either had to use other types of passwords or put off the mask to use Face ID. However, this feature is only available on iOS 15.4, depicting that iPhones containing earlier iOS versions won’t be able to enjoy this feature.
Only iPhone 12 and the latest models can use Face ID with a mask on, which reflects that models like iPhone 11, iPhone X, and the older models cannot utilize this function. Moreover, an additional way to unlock iPhone is to use Apple Watch to unlock iPhone 11, X, or earlier models.
Once you meet these requirements, you can easily unlock your Apple iPhone 8 Plus while wearing a mask and get further details by reading this article.
Part 1: How to Unlock iPhone Face ID with a Mask on
Are you excited to unlock your Apple iPhone 8 Plus while wearing a face mask? This section will give you detailed steps to unlock your Apple iPhone 8 Plus with a mask on, but before proceeding, make sure that you have updated your phone’s model to iPhone 12 or iPhone 13. This iOS 15.4 version feature is only available on:
- iPhone 12
- iPhone 12 Mini
- iPhone 12 Pro
- iPhone 12 Pro Max
- iPhone 13
- iPhone 13 Pro Max
- iPhone 13 Pro
- iPhone 13 Mini
- iPhone 14
- iPhone 14 Pro
- iPhone 14 Pro Max
- iPhone 15
- iPhone 15 Pro
- iPhone 15 Pro Max
Once you have updated to iPhone 12 or iPhone 13 model, you will automatically receive the prompt to set your Face ID while wearing a mask. If you have missed the chance to scan your face during the setup of iOS 15.4, follow the below guidelines to activate this fantastic feature unlock iPhone with a mask:
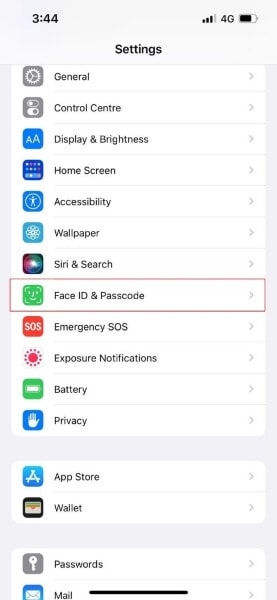
Step 1: Navigate to the app “Settings” from the home screen of your Apple iPhone 8 Plus. From the displayed menu, select “Face ID & Passcode.” Enter your passcode to give verification.

Step 2: Tap on the toggle switch of “Use Face ID with a Mask.” Afterward, select “Use Face ID with a Mask” to begin with settings.
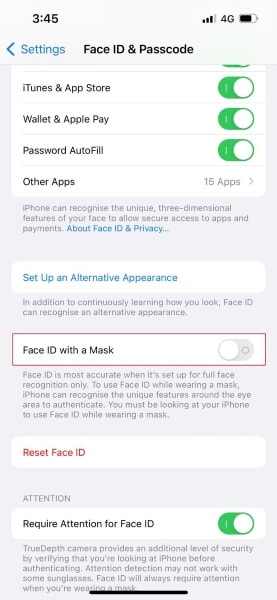
Step 3: Now, it’s time to scan your face with your Apple iPhone 8 Plus to initiate the setup. Again, you don’t have to wear a mask at this stage, as the Apple iPhone 8 Plus device’s main focus while scanning would be the eyes. Also, if you wear glasses, you can proceed without taking them off.

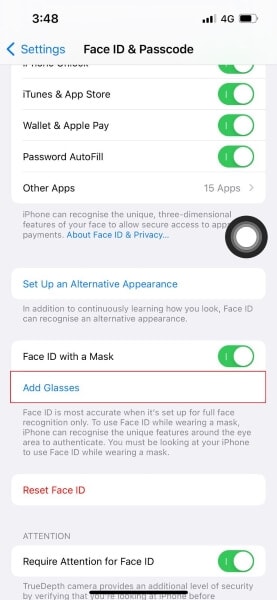
Step 4: After scanning your face twice, select “Add Glasses” by tapping on it. You can use your Face ID while wearing your regular glasses. Make sure that you scan your face with every pair of glasses daily.
After carefully following the steps mentioned above, you are ready to unlock your Face ID with a mask. Remember that Face ID will scan and focus mainly on your eyes and forehead. However, it cannot work in the scenarios if you have completely concealed your look by wearing hats or accessories that can hide your face.
Part 2: How to Unlock iPhone Face ID Using Apple Watch
Before unlocking iPhone through the Apple Watch, some requirements are necessary for security reasons. Read the following requirements to proceed further:
- First, you would need an Apple Watch that must be functioning on WatchOS 7.4 or later.
- The passcode on your Apple iPhone 8 Plus must be enabled from the settings. If you have not enabled the passcode on your Apple iPhone 8 Plus, you can do it by navigating to the “Settings” and tapping on “Passcode.” From there, enable the passcode by turning it on.
- You should be wearing the Apple Watch on your wrist, and it must be unlocked.
- Your Apple iPhone 8 Plus should be upgraded to iOS 14.5 or above.
- The wrist detection on your phone should be activated.
To enable the feature of unlocking the Apple iPhone 8 Plus with an Apple Watch, the steps are:
Step 1: Head to the “ Settings “ app and choose “Face ID & Passcode.” Give your passcode for authenticity and proceed further.
Step 2: Now, on the displayed menu, scroll down to the bottom, where you will see the toggle of “Unlock with Apple Watch.” Tap on that toggle to enable this feature.
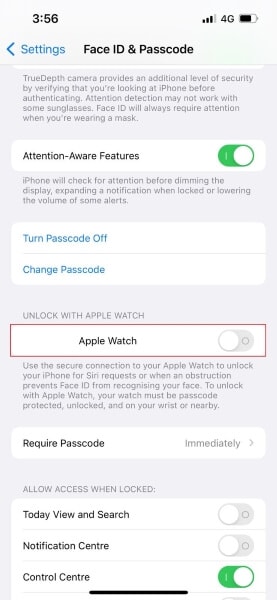
After enabling this feature, you can unlock your Apple iPhone 8 Plus with a mask on through your Apple Watch. You need to grab your phone and hold it the same way you would in a normal Face ID scan. The phone will be unlocked, and you will feel a slight vibration on the wrist. Also, a notification will pop up on your watch, indicating that your Apple iPhone 8 Plus has been unlocked.
Bonus Tips: Unlock iPhone Without Any Experience
Are you stuck with your locked iPhone? Don’t worry, as Dr.Fone - Screen Unlock can unlock any screen passcode, Face ID, Touch ID, and PINs. You don’t need any technical experience to use this tool, as the user interface is pretty simple and understandable. Moreover, it works perfectly well on all iOS devices at the best possible speed.
Dr.Fone - Screen Unlock (iOS)
Unlock iPhone/iPad Lock Screen Without Hassle.
- Intuitive instructions to unlock iPhone without the passcode.
- Removes the iPhone’s lock screen whenever it is disabled.
- Works for all models of iPhone, iPad and iPod touch.
- Fully compatible with the latest iOS 11,12,13.


3981454 people have downloaded it
You can also unlock Apple ID and iCloud passwords without losing the data. Also, while unlocking iPhone Screen Time Passcode through this platform, all of your data and information will be kept intact, and you can function your phone normally again.
Conclusion
We all can relate that unlocking an iPhone on Face ID while wearing a face mask in a pandemic era is annoying. That’s why Apple introduced a new feature of unlocking the Apple iPhone 8 Plus Face ID with a mask on to help individuals who rely entirely on Face ID. Find out about enabling this feature to easily unlock your Apple iPhone 8 Plus Face ID while wearing a mask.
Also read:
- [Updated] In 2024, Cutting-Edge Strategies for Mastering Full Screen Editing in Premiere
- Apple iPhone 14 Plus Asking for Passcode after iOS 17/14 Update, What to Do?
- Apple iPhone XR Backup Password Never Set But Still Asking? Heres the Fix
- Enhance Your Livestream with ManyCam: Premium Video Production & Digital Camcorder Solutions for Broadcasters
- Exploring the World of BIOS and How Revo Uninstaller Interacts
- In 2024, 2 Ways to Transfer Text Messages from Lava Blaze Pro 5G to iPhone 15/14/13/12/11/X/8/ | Dr.fone
- In 2024, 3 Ways to Unlock Apple iPhone XS without Passcode or Face ID
- In 2024, 4 Ways to Unlock Apple iPhone 11 to Use USB Accessories Without Passcode
- In 2024, Unlock Your Disabled iPhone 15 Without iTunes in 5 Ways
- Install HP Officejet Inkjet 574T Printer Driver on Your PC - Supports Windows 11, 10 & 8
- Mastering Finder View Options for Organized File Management on Your Computer
- Transforming Workflow with Task Scheduler & Batch Files
- Unleashing Your Laptop's Full Potential with a Hidden Gem of an Accessory - Discover How!
- Title: How to Turn Off Find My Apple iPhone 8 Plus when Phone is Broken?
- Author: Sophia
- Created at : 2025-02-11 20:41:27
- Updated at : 2025-02-14 21:51:27
- Link: https://ios-unlock.techidaily.com/how-to-turn-off-find-my-apple-iphone-8-plus-when-phone-is-broken-by-drfone-ios/
- License: This work is licensed under CC BY-NC-SA 4.0.