
How to Unlock Apple iPhone 8 Plus with a Mask On
How to Unlock Apple iPhone 8 Plus with a Mask On
Are you tired of wearing a mask in this pandemic? Apple introduced a new feature through which people can unlock iPhone face ID while wearing a mask. Before this, people either had to use other types of passwords or put off the mask to use Face ID. However, this feature is only available on iOS 15.4, depicting that iPhones containing earlier iOS versions won’t be able to enjoy this feature.
Only iPhone 12 and the latest models can use Face ID with a mask on, which reflects that models like iPhone 11, iPhone X, and the older models cannot utilize this function. Moreover, an additional way to unlock iPhone is to use Apple Watch to unlock iPhone 11, X, or earlier models.
Once you meet these requirements, you can easily unlock your Apple iPhone 8 Plus while wearing a mask and get further details by reading this article.
Part 1: How to Unlock iPhone Face ID with a Mask on
Are you excited to unlock your Apple iPhone 8 Plus while wearing a face mask? This section will give you detailed steps to unlock your Apple iPhone 8 Plus with a mask on, but before proceeding, make sure that you have updated your phone’s model to iPhone 12 or iPhone 13. This iOS 15.4 version feature is only available on:
- iPhone 12
- iPhone 12 Mini
- iPhone 12 Pro
- iPhone 12 Pro Max
- iPhone 13
- iPhone 13 Pro Max
- iPhone 13 Pro
- iPhone 13 Mini
- iPhone 14
- iPhone 14 Pro
- iPhone 14 Pro Max
- iPhone 15
- iPhone 15 Pro
- iPhone 15 Pro Max
Once you have updated to iPhone 12 or iPhone 13 model, you will automatically receive the prompt to set your Face ID while wearing a mask. If you have missed the chance to scan your face during the setup of iOS 15.4, follow the below guidelines to activate this fantastic feature unlock iPhone with a mask:
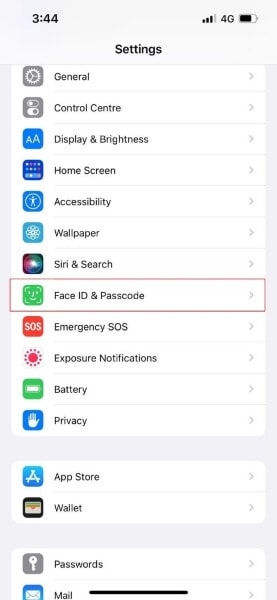
Step 1: Navigate to the app “Settings” from the home screen of your Apple iPhone 8 Plus. From the displayed menu, select “Face ID & Passcode.” Enter your passcode to give verification.

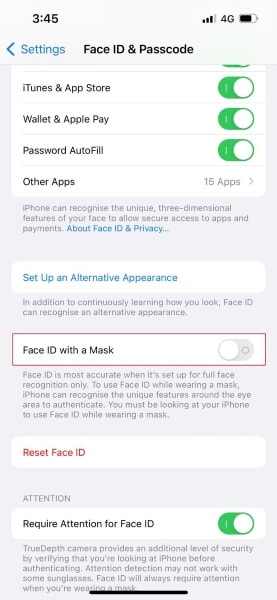
Step 2: Tap on the toggle switch of “Use Face ID with a Mask.” Afterward, select “Use Face ID with a Mask” to begin with settings.
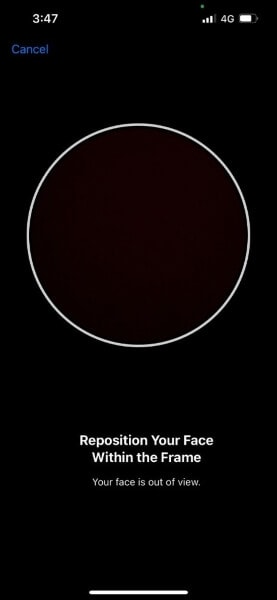
Step 3: Now, it’s time to scan your face with your Apple iPhone 8 Plus to initiate the setup. Again, you don’t have to wear a mask at this stage, as the Apple iPhone 8 Plus device’s main focus while scanning would be the eyes. Also, if you wear glasses, you can proceed without taking them off.
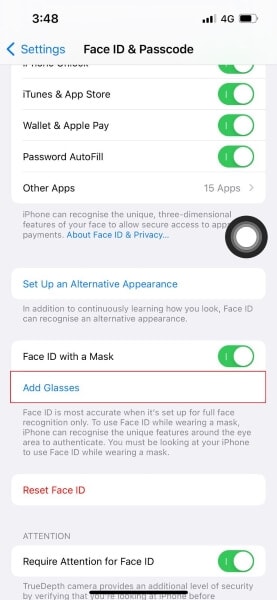
Step 4: After scanning your face twice, select “Add Glasses” by tapping on it. You can use your Face ID while wearing your regular glasses. Make sure that you scan your face with every pair of glasses daily.
After carefully following the steps mentioned above, you are ready to unlock your Face ID with a mask. Remember that Face ID will scan and focus mainly on your eyes and forehead. However, it cannot work in the scenarios if you have completely concealed your look by wearing hats or accessories that can hide your face.
Part 2: How to Unlock iPhone Face ID Using Apple Watch
Before unlocking iPhone through the Apple Watch, some requirements are necessary for security reasons. Read the following requirements to proceed further:
- First, you would need an Apple Watch that must be functioning on WatchOS 7.4 or later.
- The passcode on your Apple iPhone 8 Plus must be enabled from the settings. If you have not enabled the passcode on your Apple iPhone 8 Plus, you can do it by navigating to the “Settings” and tapping on “Passcode.” From there, enable the passcode by turning it on.
- You should be wearing the Apple Watch on your wrist, and it must be unlocked.
- Your Apple iPhone 8 Plus should be upgraded to iOS 14.5 or above.
- The wrist detection on your phone should be activated.
To enable the feature of unlocking the Apple iPhone 8 Plus with an Apple Watch, the steps are:
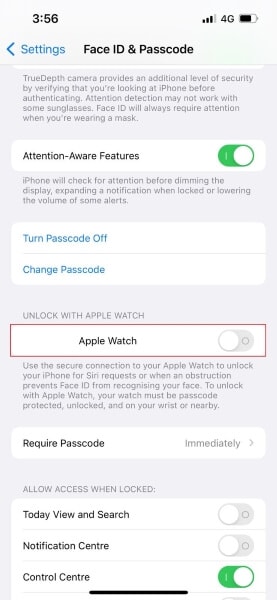
Step 1: Head to the “ Settings “ app and choose “Face ID & Passcode.” Give your passcode for authenticity and proceed further.
Step 2: Now, on the displayed menu, scroll down to the bottom, where you will see the toggle of “Unlock with Apple Watch.” Tap on that toggle to enable this feature.
After enabling this feature, you can unlock your Apple iPhone 8 Plus with a mask on through your Apple Watch. You need to grab your phone and hold it the same way you would in a normal Face ID scan. The phone will be unlocked, and you will feel a slight vibration on the wrist. Also, a notification will pop up on your watch, indicating that your Apple iPhone 8 Plus has been unlocked.
Bonus Tips: Unlock iPhone Without Any Experience
Are you stuck with your locked iPhone? Don’t worry, as Dr.Fone - Screen Unlock can unlock any screen passcode, Face ID, Touch ID, and PINs. You don’t need any technical experience to use this tool, as the user interface is pretty simple and understandable. Moreover, it works perfectly well on all iOS devices at the best possible speed.
Dr.Fone - Screen Unlock (iOS)
Unlock iPhone/iPad Lock Screen Without Hassle.
- Intuitive instructions to unlock iPhone without the passcode.
- Removes the iPhone’s lock screen whenever it is disabled.
- Works for all models of iPhone, iPad and iPod touch.
- Fully compatible with the latest iOS 11,12,13.


3981454 people have downloaded it
You can also unlock Apple ID and iCloud passwords without losing the data. Also, while unlocking iPhone Screen Time Passcode through this platform, all of your data and information will be kept intact, and you can function your phone normally again.
Conclusion
We all can relate that unlocking an iPhone on Face ID while wearing a face mask in a pandemic era is annoying. That’s why Apple introduced a new feature of unlocking the Apple iPhone 8 Plus Face ID with a mask on to help individuals who rely entirely on Face ID. Find out about enabling this feature to easily unlock your Apple iPhone 8 Plus Face ID while wearing a mask.
Apple iPhone 8 Plus Backup Password Never Set But Still Asking? Here’s the Fix
Part 1: Why Do iTunes Ask Me for iPhone Backup Password?
When you use iTunes to create a backup, the backup will probably have a password that iTunes automatically create. This is for privacy reasons. Hence, it might ask for an iTunes backup password never set by you!
In most cases, this occurs when the Encrypt Backup option is activated. As an official iOS feature, its purpose is to provide iOS users with the iTunes backup encryption for further security.
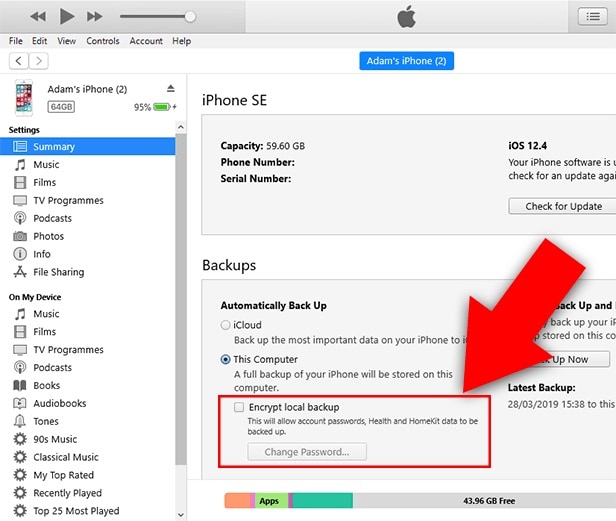
Unfortunately, this capability may also become problematic if you inadvertently take a backup without being able to provide the password. For example, you may have to enter the password for your Apple iPhone 8 Plus backup unlocking never set by you.
But the good news is you have some possible fixes. So, let’s talk about them.
Part 2: 4 Possible Ways to Fix Asking for iPhone Backup Password
Many iPhone users have problems with iTunes when they back up their devices.
One of the most common issues is that people are asked for their iPhone backup password never set, but they need to know what it is. This can be frustrating because you can only back up your device if you have the password.
There are a few possible ways to fix this problem. Try resetting your password or using a different computer to back up your device. You could also try using a third-party software tool like Dr.Fone - Screen Unlock.
1. Try all passwords you use on iPhone
When iTunes prompts you for an iPhone backup password never set, what should your initial course of action be?
To get out of this predicament in the simplest way possible, try entering every potential password you will likely have used. In most cases, individuals will use the same password for many accounts.
A significant possibility is that you encrypted the iTunes backup with the same password from the iCloud account.
Therefore, before doing anything further, try all passwords to configure your iTunes account. For example, try entering 0000, 123456, name123, or 1111.
2. Find the password from Keychain on macOS
You may also attempt to find the password for the iTunes backup using the keychain approach if you are working on a Mac.
The likelihood of success with this approach is relatively low. However, it is still worthwhile to try it, particularly if you have also synchronized your iTunes account with your Mac.
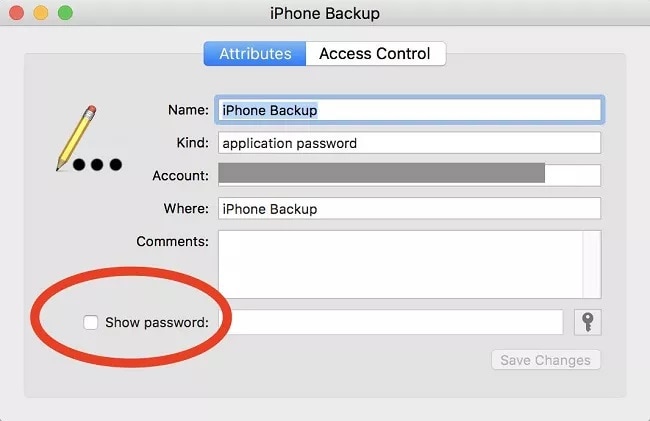
- On your macOS, go to Utilities by clicking the Applications menu item. At this point, launch the Keychain Access app and look for your Apple iPhone 8 Plus backup.
- To open a new dialogue box, double-click the most recent backup file, and you will see one appear before you.
- On this page, choose Show Password to get the password for the Apple iPhone 8 Plus backup. However, you will first be prompted to provide the administrator password associated with your iCloud account to recover the password.
3. “Reset All Settings”
Resetting the password is another option at your disposal if you encounter the Apple iPhone 8 Plus backup password never set problem. How you do this will be different depending on the version of iOS that you have installed.
Here are what you can do with your iOS smartphone if it has iOS 11 or a later version:
Step 1: Unlock your Apple iPhone 8 Plus, and then open the Settings app on your device.
Step 2: After locating the General menu, go to the Reset menu and then hit the Reset All Settings button. Please confirm your action by providing the password for your Apple iPhone 8 Plus.
Step 3: Once the reset has been completed, your previous password will be deleted.
Step 4: The next thing you should do is take a fresh backup of your Apple iPhone 8 Plus using iTunes, and then establish a new password for the backup that iTunes creates.
You will need to use an alternative strategy, which includes a factory reset if you use an older version of the iOS firmware than iOS 11.
Step 1: Before continuing, it is highly recommended that you create a backup of the data on your Apple iPhone 8 Plus using iCloud.
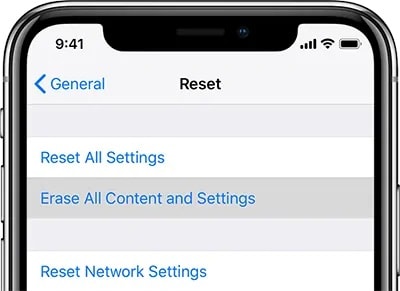
Step 2: After you have opened the Settings app, go to the General menu, then to the Reset menu, and finally to the Erase All Content and Settings option.
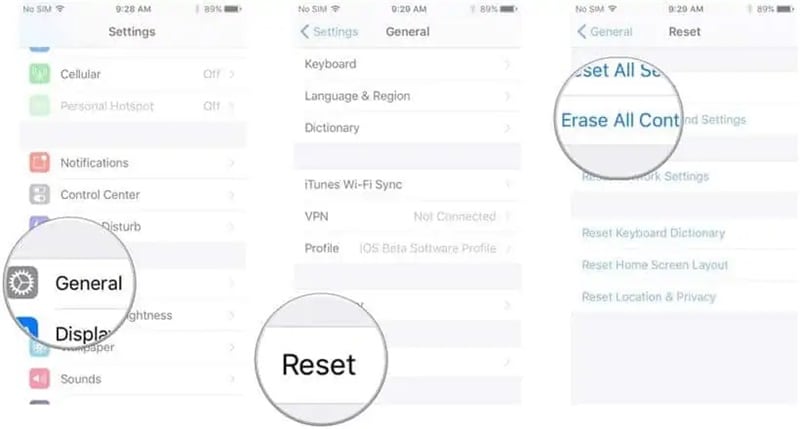
Step 3: Confirm that you want to reset your Apple iPhone 8 Plus to factory settings, and wait until it is done.
Step 4: Once the factory data reset is finished, you must restore your iCloud backup. To do this, follow the steps for setting up iOS until you reach the Apps & Data option.
Step 5: Create a new backup in iTunes and change the password for the existing backup in iTunes.
You should be aware that resetting the Apple iPhone 8 Plus device to factory settings will not make your encrypted backups accessible again.
On the other hand, it does make it possible for you to generate a fresh backup in iTunes that is not encrypted.
4. Dr.Fone-Screen Unlock
First step: After installing Dr.Fone on your device, please run the program and look for the red button labeled “Screen Unlock.”

Step 2: While in the interface for Screen Unlock, navigate to the bottom right of the screen and tap on the feature labeled “Remove iTunes BackUp Encryption.” This will allow you to proceed.

Step 3: When brought to this screen, please use a USB cord to connect your iOS device to your personal computer. If Dr.Fone can identify this relationship, the following picture will appear for you to see.
Please read the following three notes carefully before clicking the “Remove Now” button:
- Check to ensure that “Find My iPhone” is not turned on.
- During this procedure, you should not launch “iTunes.”
- During the process, your Apple iPhone 8 Plus will restart.

Step 4: If you have an iTunes backup, Dr.Fone may automatically verify it and delete it. This encryption will be removed once the percentage on the progress meter reaches the end. This procedure won’t take a lot of time at all.

Step 5: The encryption of the iTunes backup has been successfully erased! Your backed-up data may be quickly restored, transferred, wiped clean, and backed up again. Hence, you can enter the password to unlock your Apple iPhone 8 Plus backup never set in the first place!

The Bottom Line
There are four ways to fix the problem if iTunes keeps asking for your Apple iPhone 8 Plus backup password. The first method is to try all the passwords you use on your Apple iPhone 8 Plus. You can try finding the password from Keychain on macOS if this does not work. Another option is to “Reset All Settings” on your Apple iPhone 8 Plus.
Lastly, Dr.Fone-Screen Unlock is a program that can help you bypass the passcode and get into your backups. So, what are you waiting for? It’s time to avoid the problem of iTunes backup password never set.
How to Access Your Apple iPhone 8 Plus When You Forget the Passcode?
We all have secrets in our iPhone or some important financial or business data that we all wish to protect from unwanted access. For this, we set up a passcode. But what if Apple iPhone 8 Plus passcode is forgotten by you? Well, you may now wonder how to perform Apple iPhone 8 Plus passcode bypass, right? Worry no more! We’re right here to help you with the proven solutions for Apple iPhone 8 Plus passcode reset without iTunes or with it too. Let’s explore.
Part 1. Unlock Apple iPhone 8 Plus screen passcode in one click (unlock tool needed)
The first and the ultimate measure for Apple iPhone 8 Plus passcode removal in just a matter of a single click is Dr.Fone - Screen Unlock (iOS) . With the help of this mighty tool, performing Apple iPhone 8 Plus passcode reset is even easier than any other alternative. Not only it can perform Apple iPhone 8 Plus passcode bypass, you can also make use of this tool to bypass lock screen of an Android smartphone too. Isn’t it amazing? Moreover, this powerful tool works effortlessly with the latest iOS 13 version and even with the most recent iPhone models as well. Here is the step by step tutorial on Apple iPhone 8 Plus passcode bypass.
Step 1: Install and launch Dr.Fone - Screen Unlock (iOS)
Get the tool Dr.Fone - Screen Unlock (iOS) downloaded and installed over your computer system. Then establish a connection between your computer and iPhone.
Now, launch the tool and then opt for the “Unlock” tile from the main screen.
Step 2: Boot in Recovery/DFU mode
Next move that you need to perform is to opt for the correct mode, i.e. “Unlock iOS Screen”. Then, you’ll be prompted to boot your device in Recovery/DFU mode. The on-screen instructions will guide you on how to do it.

Step 3: Double-Check iPhone information
On the upcoming screen, you’ll be displayed the “Device Model” and most recent “System Version” which is compatible with your Apple iPhone 8 Plus. Simply, hit the “Start” button here.

Step 4: Perform Apple iPhone 8 Plus passcode removal
Once, the software downloads the firmware automatically, you can then proceed to Apple iPhone 8 Plus passcode reset. Hit the “Unlock Now” button over the next screen and in a short while you’ll be notified that Apple iPhone 8 Plus passcode removal is completed.

 safe & secure
Part 2. Restore an iTunes backup for Apple iPhone 8 Plus
Here we’re going to be familiar with the Apple iPhone 8 Plus passcode reset using the renowned iOS data management tool, iTunes. But be sure that iTunes version installed over your computer is up to date or else unknown errors may crop up in between. Eventually, your all-new Apple iPhone 8 Plus may even get bricked. Think this is it? Well, here’s another problem with iTunes, you need to get your Apple iPhone 8 Plus connected only to a pre-synced or pre-trusted computer. Or else, this tutorial won’t bring any good to you.
Step 1: First, get your Apple iPhone 8 Plus connected to your PC. Then, launch the iTunes most recent version. It will automatically detect your Apple iPhone 8 Plus. Once detected, tap the “Device” icon over the left top corner of iTunes.
Step 2: Then, hit the “Summary” option from the left panel and then you need to hit the “Restore iPhone” button. Confirm your actions by simply pushing the “Restore” button on the pop-up message and you’re done. Now, just wait for the process to complete.

Part 3. Restore Apple iPhone 8 Plus in recovery mode to remove screen passcode
If somehow, the above solution fails and you’re just not able to get Apple iPhone 8 Plus passcode reset. You need to boot your device into recovery mode and then perform the factory reset. This would certainly wipe off everything from your Apple iPhone 8 Plus including the passcode as well. Here are the steps involved in booting your Apple iPhone 8 Plus in recovery mode.
- First things first, power off your Apple iPhone 8 Plus by pushing the “Side” button down along with either of the “Volume” button. Keep them pressed till you get to see “Power-off” slider over your screen. Now, simply drag it to power off your device.
- Next, connect your Apple iPhone 8 Plus and your computer firmly with the help of an authentic cable. Please make sure to press and hold the “Side” button meanwhile.
- Ensure not to let go the Side button till the recovery mode screen appears over your Apple iPhone 8 Plus.

- Once the Apple iPhone 8 Plus device is booted in recovery mode, iTunes will throw a pop up message that “iTunes has detected an iPhone in recovery mode”. Simply, hit the “OK” button over the message and then push the “Restore iPhone” button followed by confirming your actions.

Part 4. Use “Find iPhone” from iCloud
The next pro tutorial for Apple iPhone 8 Plus passcode removal is via iCloud. For this, grad access to any computer available on your side. Or, you can also make use of any other smartphone device but ensure it must be connected to a WiFi network or have an active data pack. Moreover, the locked iPhone on which you’re going to perform Apple iPhone 8 Plus passcode reset should also have an active internet connection to make this tutorial work.
Note: Since we’re going to unlock your Apple iPhone 8 Plus using Find My iPhone service of iCloud. It is important that “Find My iPhone” service was enabled beforehand over your Apple iPhone 8 Plus.
Step 1: Launch the browser over any other smartphone device or computer. Then, visit the official web page iCloud.com.
Step 2: Now, make use of same Apple account configured with your Apple iPhone 8 Plus to sign in to iCloud. Then, opt for the “Find My iPhone” icon over the launch pad.

Step 3: Next, tap on the “All Devices” drop-down menu available over the top midsection and then select the Apple iPhone 8 Plus that you wish to bypass the passcode off.
Step 4: Then, you’ll get to witness a pop-up window over your screen. Tap the “Erase iPhone” button over it and then confirm your actions. All the settings and data will be wiped off remotely from your Apple iPhone 8 Plus now.

Step 5: Lastly, wait for the process to complete and upon completion set up your device as usual.
Part 5. How about Apple iPhone 8 Plus restrictions passcode?
Apple iPhone 8 Plus restrictions is a vital setting that is used to lock down a set of functions of the iPhone. These iPhone restrictions are also known as Parental Controls. That implies one can make use of these settings to block or hide songs that have explicit lyrics/content or barring YouTube from running, etc.
It is vital to set up a 4 digit passcode if you want to use iPhone restriction settings. Now, if you somehow forgot the passcode that was set to make use of iPhone restrictions, you need to restore your Apple iPhone 8 Plus with the help of iTunes to remove the previous passcode. But ensure not to restore an old backup of iPhone or else, the old passcode which you may not know will also get activated. Eventually, making your situation even worse.
Reset/Change Apple iPhone 8 Plus restrictions passcode
Now, in case you know the Apple iPhone 8 Plus restrictions passcode and just wish to reset it. Then follow the streak of steps mentioned below.
- Launch “Settings” of your Apple iPhone 8 Plus and then get into “General” followed by “Restrictions”. Now, you’ll be asked to key in the current passcode.

- Once you’ve entered the current passcode, hit on the “Disable Restrictions” and to confirm your actions, key in your passcode when prompted.

- Lastly, hit on “Enable Restrictions”. You’ll be asked to set up a new passcode now. Do it and you’re done.

Also read:
- [New] Calculating Best Podcast Debut Days for 2024
- [New] Unique Stories Crafting Powerful YT Narratives
- [Updated] 2024 Approved The Leading 7 Android Apps to Cut Out Intrusive Ads
- [Updated] Best Online Voice Recorders for 2024
- [Updated] Checking Credentials on YouTube
- Enhance Performance & Security Using Revo Uninstaller Pro V5
- How Many Attempts To Unlock iPhone SE (2022)
- How To Change Your Apple ID Password On your Apple iPhone 13
- In 2024, 5 Most Effective Methods to Unlock Apple iPhone 8 Plus in Lost Mode
- In 2024, How to Unlock Apple iPhone XS Max Without Passcode?
- In 2024, How To Unlock iPhone 15 Without Swiping Up? 6 Ways
- In 2024, How to Unlock Poco Phone with Broken Screen
- Microsoft-Compatible iCloud Now Packed with Fresh Improvements & Patches, Says ZDNet | Technology Insights
- The Streaming Spectrum Digital vs Physical Frontiers
- Title: How to Unlock Apple iPhone 8 Plus with a Mask On
- Author: Sophia
- Created at : 2025-02-10 20:19:47
- Updated at : 2025-02-14 20:44:59
- Link: https://ios-unlock.techidaily.com/how-to-unlock-apple-iphone-8-plus-with-a-mask-on-by-drfone-ios/
- License: This work is licensed under CC BY-NC-SA 4.0.