
How to Unlock iPhone 7 Plus with a Mask On
How to Unlock Apple iPhone 7 Plus with a Mask On
Are you tired of wearing a mask in this pandemic? Apple introduced a new feature through which people can unlock iPhone face ID while wearing a mask. Before this, people either had to use other types of passwords or put off the mask to use Face ID. However, this feature is only available on iOS 15.4, depicting that iPhones containing earlier iOS versions won’t be able to enjoy this feature.
Only iPhone 12 and the latest models can use Face ID with a mask on, which reflects that models like iPhone 11, iPhone X, and the older models cannot utilize this function. Moreover, an additional way to unlock iPhone is to use Apple Watch to unlock iPhone 11, X, or earlier models.
Once you meet these requirements, you can easily unlock your Apple iPhone 7 Plus while wearing a mask and get further details by reading this article.
Part 1: How to Unlock iPhone Face ID with a Mask on
Are you excited to unlock your Apple iPhone 7 Plus while wearing a face mask? This section will give you detailed steps to unlock your Apple iPhone 7 Plus with a mask on, but before proceeding, make sure that you have updated your phone’s model to iPhone 12 or iPhone 13. This iOS 15.4 version feature is only available on:
- iPhone 12
- iPhone 12 Mini
- iPhone 12 Pro
- iPhone 12 Pro Max
- iPhone 13
- iPhone 13 Pro Max
- iPhone 13 Pro
- iPhone 13 Mini
- iPhone 14
- iPhone 14 Pro
- iPhone 14 Pro Max
- iPhone 15
- iPhone 15 Pro
- iPhone 15 Pro Max
Once you have updated to iPhone 12 or iPhone 13 model, you will automatically receive the prompt to set your Face ID while wearing a mask. If you have missed the chance to scan your face during the setup of iOS 15.4, follow the below guidelines to activate this fantastic feature unlock iPhone with a mask:
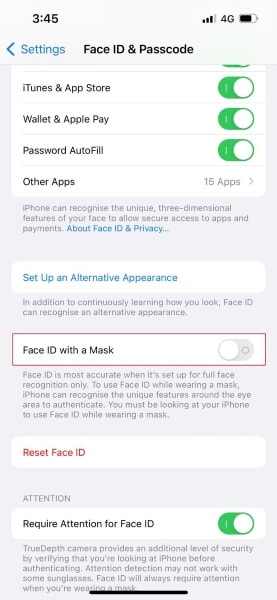
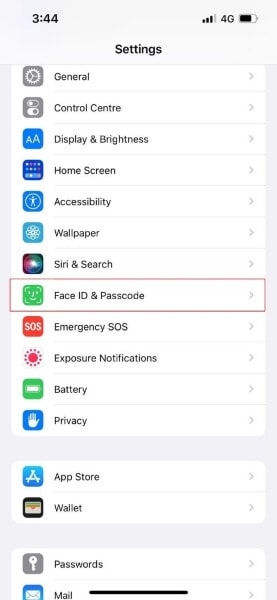
Step 1: Navigate to the app “Settings” from the home screen of your Apple iPhone 7 Plus. From the displayed menu, select “Face ID & Passcode.” Enter your passcode to give verification.

Step 2: Tap on the toggle switch of “Use Face ID with a Mask.” Afterward, select “Use Face ID with a Mask” to begin with settings.
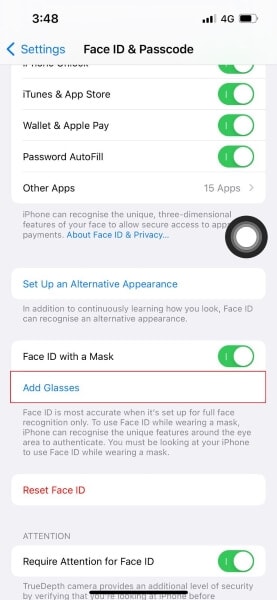
Step 3: Now, it’s time to scan your face with your Apple iPhone 7 Plus to initiate the setup. Again, you don’t have to wear a mask at this stage, as the Apple iPhone 7 Plus device’s main focus while scanning would be the eyes. Also, if you wear glasses, you can proceed without taking them off.

Step 4: After scanning your face twice, select “Add Glasses” by tapping on it. You can use your Face ID while wearing your regular glasses. Make sure that you scan your face with every pair of glasses daily.
After carefully following the steps mentioned above, you are ready to unlock your Face ID with a mask. Remember that Face ID will scan and focus mainly on your eyes and forehead. However, it cannot work in the scenarios if you have completely concealed your look by wearing hats or accessories that can hide your face.
Part 2: How to Unlock iPhone Face ID Using Apple Watch
Before unlocking iPhone through the Apple Watch, some requirements are necessary for security reasons. Read the following requirements to proceed further:
- First, you would need an Apple Watch that must be functioning on WatchOS 7.4 or later.
- The passcode on your Apple iPhone 7 Plus must be enabled from the settings. If you have not enabled the passcode on your Apple iPhone 7 Plus, you can do it by navigating to the “Settings” and tapping on “Passcode.” From there, enable the passcode by turning it on.
- You should be wearing the Apple Watch on your wrist, and it must be unlocked.
- Your Apple iPhone 7 Plus should be upgraded to iOS 14.5 or above.
- The wrist detection on your phone should be activated.
To enable the feature of unlocking the Apple iPhone 7 Plus with an Apple Watch, the steps are:
Step 1: Head to the “ Settings “ app and choose “Face ID & Passcode.” Give your passcode for authenticity and proceed further.
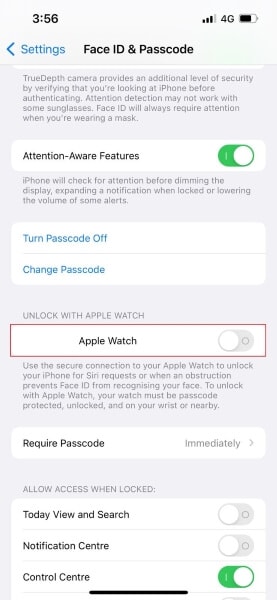
Step 2: Now, on the displayed menu, scroll down to the bottom, where you will see the toggle of “Unlock with Apple Watch.” Tap on that toggle to enable this feature.
After enabling this feature, you can unlock your Apple iPhone 7 Plus with a mask on through your Apple Watch. You need to grab your phone and hold it the same way you would in a normal Face ID scan. The phone will be unlocked, and you will feel a slight vibration on the wrist. Also, a notification will pop up on your watch, indicating that your Apple iPhone 7 Plus has been unlocked.
Bonus Tips: Unlock iPhone Without Any Experience
Are you stuck with your locked iPhone? Don’t worry, as Dr.Fone - Screen Unlock can unlock any screen passcode, Face ID, Touch ID, and PINs. You don’t need any technical experience to use this tool, as the user interface is pretty simple and understandable. Moreover, it works perfectly well on all iOS devices at the best possible speed.
Dr.Fone - Screen Unlock (iOS)
Unlock iPhone/iPad Lock Screen Without Hassle.
- Intuitive instructions to unlock iPhone without the passcode.
- Removes the iPhone’s lock screen whenever it is disabled.
- Works for all models of iPhone, iPad and iPod touch.
- Fully compatible with the latest iOS 11,12,13.


3981454 people have downloaded it
You can also unlock Apple ID and iCloud passwords without losing the data. Also, while unlocking iPhone Screen Time Passcode through this platform, all of your data and information will be kept intact, and you can function your phone normally again.
Conclusion
We all can relate that unlocking an iPhone on Face ID while wearing a face mask in a pandemic era is annoying. That’s why Apple introduced a new feature of unlocking the Apple iPhone 7 Plus Face ID with a mask on to help individuals who rely entirely on Face ID. Find out about enabling this feature to easily unlock your Apple iPhone 7 Plus Face ID while wearing a mask.
Forgot Apple iPhone 7 Plus Backup Password? Here’s What to Do
Forgetting your Apple iPhone 7 Plus backup password can be a real pain. Not only does it mean you can’t access your data, but it also means you can’t restore your phone if something goes wrong.
There are still chances that you could forget your Apple iPhone 7 Plus backup password. Fortunately, you have a chance to recover your password. So, if you’re having trouble remembering your Apple iPhone 7 Plus backup password, don’t despair. There are still ways to get it back!
Part 1: Overview of iPhone Backup Password
The Apple iPhone 7 Plus is secured using a combination that is the backup password. Passwords, Wi-Fi settings, browser history, and health records are sensitive information that an encrypted device may back up.
Remember that this is not the same as your Apple ID or passcode (the sequence you input to unlock the iPhone).
Note:
The encryption of backups is not turned on by default. You will only need to activate the Encrypt Backup option the first time you use either iTunes or Finder. After that, each of your backups will encrypt on its own automatically.
So, if you choose to store your backups in iCloud, it will automatically encrypt all of your data each and every time.
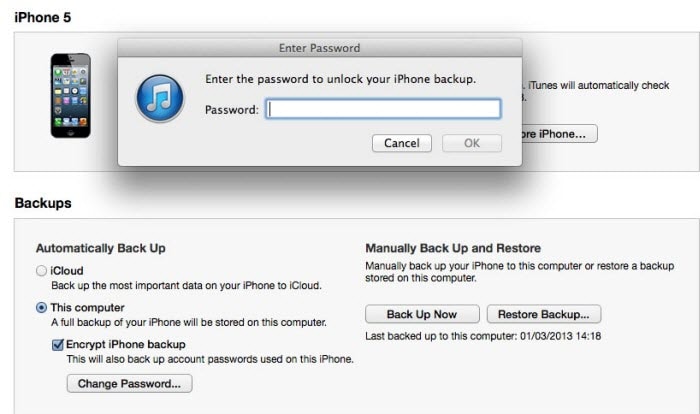
To get the password for the encrypted backup of iTunes:
Step 1: Open iTunes
Launching iTunes is the first thing to do if you have a Mac computer running Mojave 10.14 or an older operating system version. On the other hand, if you use the Mac operating system known as Catalina 10.15, you need to run the Finder application.
Step 2: Link your Apple iPhone 7 Plus to your PC
At this point, a USB cable should be used to connect the Apple iPhone 7 Plus device to a computer. The next step is to find the widget on your desktop computer or portable device.
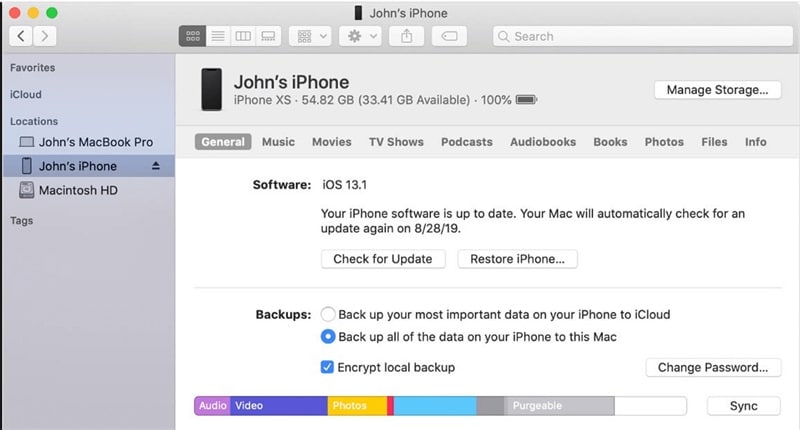
Step 3: Begin the Encryption Process
Select the Encrypt Local Backup option in the Backups section directly from either the Summary or General tab of the Backups section.
Step 4: Create a Password
When prompted in the window, create a password for the account. Make it powerful yet that is simple for you to remember. You might also save it somewhere secure to help you recall it later.
After establishing the password, all your previous backups will immediately undergo an automated overwrite and encryption. Make it a priority to ensure that the encryption procedure is finished effectively.
Part 2: 5 Fixes When We Forgot iPhone Backup Password
1. Try all passwords you used on your Apple iPhone 7 Plus
The typical method that each individual attempts for the first time is to input all of the available passcodes. Even if it is the most straightforward technique, there is still a possibility that you miss one of them. Therefore, think about all of the passwords you may input, which are listed below.
- The password to log in to the computer
- The password to access Apple ID
- The password to access the encrypted data on the hard disk
- The password to access various websites
- The password to log in to the computer
- Password for the wireless network
- Password for the email account
- Passcode for the administrator
- Passcode for the iPhone
2. “Reset All Settings” via “Settings”
To begin, go to the Settings app on your iOS device, then choose General, followed by Reset.
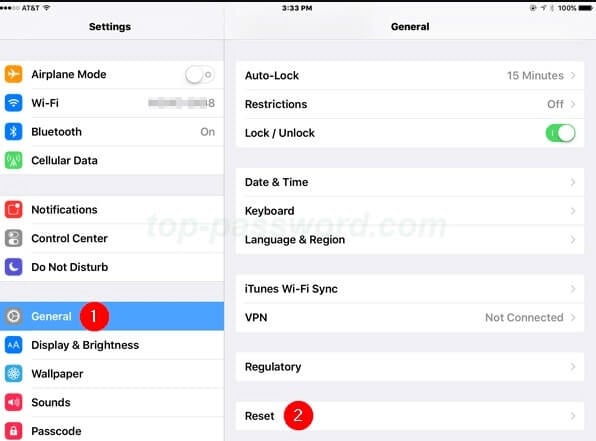
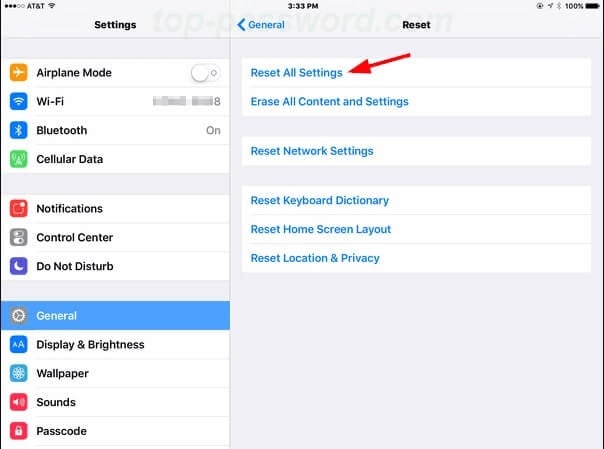
You may now go to Reset All Settings and confirm by entering the security passcode when prompted. Then, your phone will automatically go through the process of resetting and returning to its default settings.
You can also get rid of the password for the last backup without deleting any other apps or data.
Use a USB cable to link your Apple iPhone 7 Plus to your PC. Look at the small iOS icon in the figure below. Just click on it.
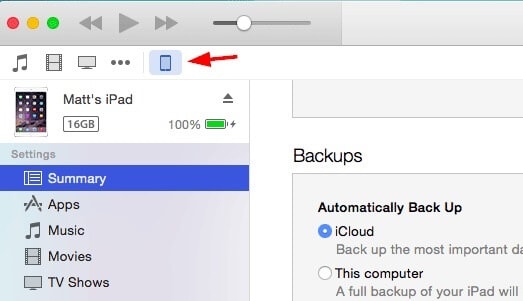
Proceed to the Summary Page and make your selection there for The Computer. After selecting Encrypt Local Backup, you must create a new password. After you have pressed the Backup Now option, wait for iTunes to create a new password for you.
3. Find your password in the macOS keychain
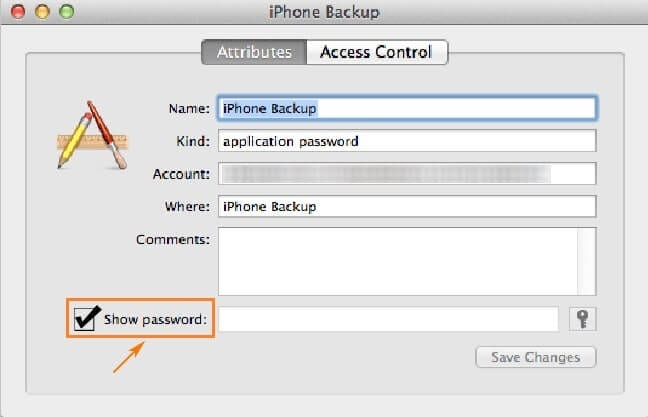
Step 1: Launch Keychain Access by going to Application > Utilities > Keychain Access once your Mac has booted up.
Step 2: Check for a backup of your Apple iPhone 7 Plus by entering it into the search box and looking for it there.
Step 3: Double-click the Show Password option, and then choose it from the drop-down menu. After that, type in the password for the keychain. At long last, the password for your Apple iPhone 7 Plus backup will be shown.
4. Select “Back Up Now” via iCloud to remove password
If you already have a backup stored in iCloud, you may use iCloud for recovery.
First, power up the gadget and look for the “Hello” screen. If you have previously set up your Apple iPhone 7 Plus, you must delete or remove all of the material before continuing.
Navigate to the Apps & Data menu and choose the Restore from iCloud Backup option.
After successfully signing in with your Apple ID, choose Backup.

During the time that the system is being restored, it is essential that the Wi-Fi connection remains active.
5. Dr.Fone-Screen Unlock
With Dr.Fone - Screen Unlock, it’s easy to follow all the steps to get rid of the iTunes backup password.
Step 1: After installing Dr.Fone, open it and look for the red Screen Unlock button.

Step 2: In the Screen Unlock interface, tap Remove iTunes BackUp Encryption in the bottom right corner to move forward.

Step 3: When you get to this page, use a USB cable to connect your iOS device to the PC. If Dr.Fone can find this connection, you will see the picture below.
Before you click Remove Now, please carefully read the following three notes:
- Make sure to turn off Find My iPhone.
- Don’t open iTunes while doing this.
- Your device will reboot

Step 4: Dr.Fone can check your iTunes backup and delete it by itself. This encryption will be erased when the progress bar reaches 100%. This will take a short time to do.

Step 5: The encryption on the iTunes backup has been removed successfully! Now you can easily back up, restore, move, or wipe your device.

Part 3: 3 Tricks to Help You Remember the Passwords
If you have an iPhone, you know it can be tricky to keep track of all your passwords. From your email password to your banking login, there are a lot of different codes to remember.
Here are three tricks to help you keep track of your passwords so you don’t have to stress the next time you can’t log in to your account.
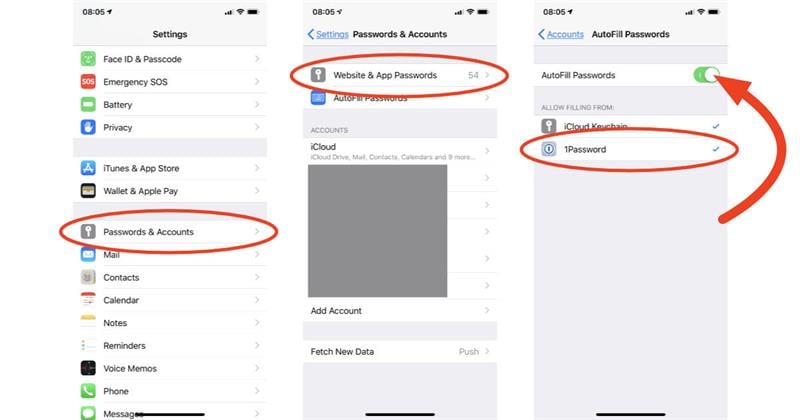
- Turn on “AutoFill” in “Settings”
You can turn on AutoFill in the Settings app. This will allow your Apple iPhone 7 Plus to fill in passwords when you visit websites and apps automatically. All you need to do is ensure you’ve entered the correct username and password once, and your Apple iPhone 7 Plus will save the information, so you don’t have to enter it again.
- Try iCloud Keychain to keep your passwords
iCloud Keychain is a great way to keep all your passwords in one place. Once you’ve turned on the iCloud Keychain, all your passwords will be synced across your devices. That means if you create a new password on your laptop, it will automatically appear on your Apple iPhone 7 Plus.
- Use Notes for passwords
If you’re finding a simple way to keep all your passwords, try using the Notes app. Create a new note and title it “Passwords.” Then, add it to the note whenever you create a new password.
You can even add a description of the password, so you remember which account it’s for.
The Bottom Line
As a last piece of advice, please safely save your newly created passwords. Rather than writing them down in the iPhone’s notepad, you should save the passwords in a secure location.
However, no matter how secure your gadget is, password leakage may happen, sending you to unpleasant situations that you can’t even conceive. It’s best to use Dr.Fone - Screen Unlock as soon as you encounter any problem!
How Many Attempts To Unlock Apple iPhone 7 Plus
Unlocking your Apple iPhone 7 Plus involves a delicate balance to avoid pitfalls. Knowing how many attempts to unlock an iPhone is vital due to Apple’s security measures. Exceeding the limit triggers consequences, such as temporary disablement or even data erasure.
These restrictions highlight the need to learn how many attempts for iPhone passcodes are allowed before facing potential data loss. When dealing with failed passcode attempts, exploring methods for successful access is essential. Let’s delve into the intricacies of iPhone passcode security and unveil strategies for a seamless unlocking process. Read on to learn more.

Part 1. How Many Times Until the Apple iPhone 7 Plus Is Permanently Disabled?
Unlocking an iPhone involves a series of attempts, each with distinct consequences. Here’s a breakdown of how many failed passcode attempts on an iPhone you can do before it locks you out:
First 5 Attempts
- No significant consequences.
- Users have the flexibility to enter their passcode without any penalties.
6th Attempt
- iPhone is disabled for 1 minute.
- An iPhone is Disabled message appears on the screen.

7th Attempt
- Disabled for 5 minutes.
- The same on-screen message persists, but the Apple iPhone 7 Plus enforces a longer wait time.
8th Attempt
- Disabled for 15 minutes.
- Users must wait before attempting again. The escalating time delay discourages brute-force attacks.
9th Attempt
- Disabled for 60 minutes.
- A considerable waiting period is imposed. It increases the frustration for unauthorized users attempting to gain access.

10th Attempt
- iPhone is disabled.

Two things can happen on the tenth failed attempt to unlock your Apple iPhone 7 Plus. If you have Erase Data enabled, your phone’s data gets wiped. If it’s disabled, the Apple iPhone 7 Plus is permanently locked, requiring a connection to iTunes for restoration. It’s crucial to back up your data on iCloud or locally to avoid permanent loss.
Part 2. What Are the Consequences After Consecutive Failed Attempts?
When you exceed ten unsuccessful passcode entries, the Apple iPhone 7 Plus device takes stringent actions to protect sensitive data. It can initiate a data wipe or lock the iPhone, needing a connection to iTunes for restoration. After a series of failed attempts, the Apple iPhone 7 Plus can activate a security measure often referred to as a “self-destruct” mode.
To turn this mode on or off, follow these steps:
How To Enable Erase Data Mode
Safeguard your personal information with these simple steps to remotely wipe your device in case of loss or theft.
- Step 1: Go to Settings > Face ID & Passcode or Touch ID & Passcode, depending on your device. Enter your current passcode.

- Step 2: Scroll down and find the Erase Data option. Toggle the button to activate the feature.
How To Disable Erase Data Mode
Here are the steps to disable Erase Data Mode on your Apple iPhone 7 Plus, ensuring controlled access to your device.
- Step 1: Follow the same steps to access the Erase Data toggle. Next, disable the toggle to turn off this feature.
- Step 2: Confirm your choice, ensuring the “self-destruct” mode is deactivated to prevent accidental data loss.
Part 3. Top 5 Methods To Unlock an iPhone After Too Many Attempts
When wondering how many tries to unlock an iPhone, consider the following methods to restore functionality. The section below explores the most effective ways to regain access to your device. Let’s start with the use of a dedicated screen unlock tool.
Method 1: Using a Dedicated Screen Unlock Tool
When facing a disabled iPhone, Wondershare Dr.Fone - Screen Unlock (iOS) stands out as a reliable solution. It’s a comprehensive platform that unlocks iOS devices without a passcode. Here are some of the tool’s key features to help you get started:
- Removes all types of lock screens. Fone Screen Unlock tackles various lock screen types, like pattern lock, etc. It offers a comprehensive solution for different scenarios.
- Unlock Apple ID without a password. The tool provides a secure method to unlock Apple ID without needing a password.
- No data loss. Users can regain access without losing data, a crucial aspect of dealing with a disabled iPhone.
- High success rate.Fone Screen Unlock boasts a high success rate, instilling confidence in users seeking a swift and effective solution.
How To Unlock iPhone With Dr.Fone
After many failed passcode attempts on your Apple iPhone 7 Plus,Dr.Fone can help you access it again in no time. Follow the steps:
- Step 1: Download and install Dr.Fone on your computer. Next, click Toolbox > Screen Unlock > iOS to start. In the next window, choose Unlock iOS Screen.

- Step 2: Follow the on-screen instructions. Dr.Fone will automatically detect your Apple iPhone 7 Plus model. If necessary, choose the System Version according to your preference. Next, click Start to start the iOS firmware download.

- Step 3: Wait for the iOS firmware to download successfully. Click on Unlock Now to initiate the unlocking process. Follow the on-screen instructions again and wait for Dr.Fone to unlock your device. If unsuccessful, click on the Try again option.

Method 2: Using iTunes To Unlock a Locked or Disabled iPhone
An alternative method to unlock your Apple iPhone 7 Plus when locked or disabled involves using iTunes. Note that if your iTunes is not synchronized with the iPhone, you risk losing your existing data. Here’s how:
- Step 1: Launch iTunes on your computer. Connect your locked iPhone using a cable and let iTunes identify the Apple iPhone 7 Plus device. Next, navigate to the Summary section and select the Restore iPhone option.

- Step 2: Allow iTunes to identify your device. Start the restoration of previous data by selecting Restore Backup. Your Apple iPhone 7 Plus will be unlocked with all the associated data if you have backed up your information on iTunes. Otherwise, you will need to set it up as a new iPhone.
Method 3: Using Recovery Mode To Unlock a Locked or Disabled iPhone
Activating Recovery mode is another useful method for accessing a locked phone. The approach erases all data on the phone, restoring it to factory settings. Any data not backed up will be lost using this method. Follow the steps:
- Step 1: Download and Launch iTunes on your computer. Connect your Apple iPhone 7 Plus with a USB cable.
- Step 2: For iPhone 8 models or newer, press and release the volume up button, followed by the volume down button. Next, press and hold the power button. If executed, the iTunes connect screen will appear. For earlier iPhone models, you can refer to here.

- Step 3: iTunes will prompt you to either restore or update your Apple iPhone 7 Plus. Choose the Restore iPhone option to reset your device to its factory settings. If the restoration process extends beyond 15 minutes and your Apple iPhone 7 Plus exits recovery mode, you’ll need to repeat the steps.
Method 4: Using iCloud To Unlock a Lock or Disabled iPhone
After many failed passcode attempts on your Apple iPhone 7 Plus,it got disabled, but iCloud offers a convenient solution. Your phone must have the Find My iPhone option enabled for the method to work. You should be aware of the Apple ID password associated with your iCloud account. Once these prerequisites are fulfilled, access the iCloud account from another device. Here’s how.
- Step 1: Go to iCloud.com using another device, such as a computer, and log in with your Apple ID and password.

- Step 2: Select All Devices, and pick the locked iPhone from the dropdown menu. Once you’ve chosen the Apple iPhone 7 Plus device, click the Erase iPhone icon in the lower-right corner. Although the action deletes the data on the phone, you can retrieve it from your iCloud backup once the Apple iPhone 7 Plus device is operational again.
Method 5: Contact Apple Support or Visit an Apple Store
If all methods fail or you don’t have access to Dr.Fone, consider contacting Apple Support. You can also try visiting an Apple Store. Apple experts will guide you through the appropriate steps based on your unique situation.
Conclusion
If you are wondering how many passcode attempts on iPhone will lock your device and not sure how to fix this issue, here is the way to go. Methods like iTunes, Recovery Mode, iCloud, or seeking Apple Support all offer potential solutions.
Consider using Dr.Fone Screen Unlock (iOS) for a secure and data-preserving unlock. It safeguards your data even if you forget your passcode. Remember that surpassing the allowed attempts could result in data loss or permanent device disablement. Safeguard your data wisely by exploring these methods.
Tips: Are you searching for a powerful Screen Unlock tool? No worries as Dr.Fone is here to help you. Download it and start a seamless unlock experience!
Also read:
- [New] Crafting a Viral Narrative on Social Media for 2024
- [New] Straightforward Stories' Essence
- 1. Diagnosing Hardware Issues in Your Windows Machine: A Comprehensive Guide by YL Computing
- 8 Safe and Effective Methods to Unlock Your Apple iPhone 15 Pro Max Without a Passcode
- Best Storing Solution for Sony A7S II
- Crafting Personalized Storytelling on Snapchat
- In 2024, 3 Ways to Erase iPhone 15 Plus When Its Locked Within Seconds
- In 2024, How To Unlock iPhone 11 Pro Max Without Passcode? 4 Easy Methods
- In 2024, How To Unlock iPhone 7 Plus Without Swiping Up? 6 Ways
- In-Depth Analysis LG BP350's Visual Clarity and Color Range
- iPhone 13 Pro Max Asking for Passcode after iOS 17/14 Update, What to Do?
- The Pathway to Aural Brilliance Incorporating & Fine-Tuning Sounds in Canvas
- The Problem's Behind Us! Play Games and Stream Sound on Discord Effectively.
- Unlocking Your iPhone's Secrets: Steps to Retrieve Data Without Needing iTunes or iCloud
- Title: How to Unlock iPhone 7 Plus with a Mask On
- Author: Sophia
- Created at : 2025-02-27 17:43:51
- Updated at : 2025-03-03 22:08:14
- Link: https://ios-unlock.techidaily.com/how-to-unlock-iphone-7-plus-with-a-mask-on-by-drfone-ios/
- License: This work is licensed under CC BY-NC-SA 4.0.