
How To Unlock Stolen Apple iPhone 14 In Different Conditionsin
How To Unlock Stolen Apple iPhone 14 In Different Conditionsin
Whenever your Apple iPhone 14 gets stolen, multiple concerns involve accessing the Apple iPhone 14 device and stored data. However, you might get it back after some time only to find that your stolen iPhone is now locked. The reasons could be long inactivity or someone who has entered the wrong passcode multiple times.
These cases most probably lead you to search for how to unlock stolen iPhones. For this, we have outlined the best methods to unlock stolen iPhones in this detailed guide. From using built-in old methods to third-party tools, this article covers it all with easy-to-follow steps.

Part 1. [Easiest Way] Unlock Easily With Wondershare Dr.Fone - Screen Unlock
Now that we are familiar with certain scenarios, the first method that provides the simplest way to unlock a stolen iPhone is using Wondershare Dr.Fone – Screen Unlock (iOS) . Users can easily continue using their locked device once they find it back after getting stolen. It is also possible that you might have activated Lost Mode by yourself to secure the data of the stolen device. But no need to worry, as Wondershare Dr.Fone offers a universal unlocking solution.
Wondershare Dr.Fone can unlock all lock screens, including Face ID and passcodes for the latest iOS models. If you have forgotten your Apple ID, this tool helps you remove it without any password. Even if MDM restrictions are imposed on your device, you can remove them without any data loss.
Notable Features of Wondershare Dr.Fone
- This tool is compatible with the latest iOS version and models, such as iPhone 15 and iOS 17.
- Wondershare Dr.Fone removes iTunes backup encryption without asserting any damage to the data.
- If your iOS device faces any carrier or SIM locks , Dr.Fone helps you remove it without any data loss.
Steps To Unlock Stolen iPhone With Wondershare Dr.Fone
After learning about the various iOS unlocking features Wondershare Dr.Fone offers, it is time to learn how to unlock a stolen iPhone. The steps below can help you quickly resolve the “I found my lost iPhone how do I unlock it” query:
- Step 1. Install Dr.Fone and Access the Built-In Toolbox
After installing Wondershare Dr.Fone, launch and navigate to the “Toolbox” section from the left panel. Continue to select “Screen Unlock” and continue by choosing “iOS” as the Apple iPhone 14 device type.

- Step 2. Start Unlocking iOS Screen Lock
From the available features, proceed with “Unlock iOS Screen” and click “Start” to initiate the unlocking process.

- Step 3. Put iOS Into Recovery Mode and Specify Details
Moving on, you must put your iOS device into Recovery Mode. For this, follow the instructions on the screen based on your Apple iPhone 14 model. Once it is in Recovery Mode successfully, you need to verify the Apple iPhone 14 device details. Verify the “Device Model,” select the specific “System Version,” and continue to device unlocking by clicking “Start.”

- Step 4. Confirm the Unlocking Process and Successfully Execute
As the respective iOS firmware downloads, wait a few minutes and press the “Unlock” button. A prompt window appears where you have to enter the code “00000” to confirm the screen unlocking process. Once the iOS unlocking process is concluded, tap the “Done” button to check if you can access your Apple iPhone 14. Users with unsuccessful processes have the option to “Try Again” if required.

Part 2. [Old Ways] Using Siri To Unlock Stolen iPhone
It might come as a surprise to you that Siri can be used to unlock a lost iPhone. When you seek the answer to how to unlock a lost iPhone with Siri, you need to be aware of a very specific pointer. It is necessary to note that this method only works for devices operating between iOS 8 and 11.
This later turned out to be an anomaly in Siri that led users to unlock their iOS devices. If you have a device running within this iOS version range, learn how to unlock it with the provided steps:
- Step 1. Start by activating the Siri on your iOS device. Ask a simple question about time, like “What time is it?” Once Siri is active, a clock will display on your device screen. Next, access the clock and find the “World Clock” screen on your Apple iPhone 14. Tap the “+” button at the screen’s top right corner. Enter the name of any city in the “Search Bar,” tap Select All, and choose “Share.”

- Step 2. In the sharing options, look for “Messages.” As you access the next screen, type anything in the “To” section and continue to select it by navigating to the “Create a New Contact” option. When providing the contact details, tap the “Add Photo” button. Lead into the Photos app from there and swipe up the screen or press the “Home” button to access the home screen.

Part 3. [All Data Lost] Trying Recovery Mode for Unlocking Stolen iPhone
Another lifesaver method to unlock stolen iPhones is by utilizing the Recovery Mode. For this purpose, users need to connect their iPhones to their PC using iTunes . Its ability to facilitate data restoration makes it an effective method to unlock iOS devices. Rather than searching for “I bought a lost iPhone how do I unlock it,” simply follow the instructions below:
Step 1. Connect your locked stolen Apple iPhone 14 to the computer using a USB cable. To enter the Recovery Mode, you need to follow the steps below, depending on your Apple iPhone 14 model:
For iPhone 8 and Later: Press and release the “Volume Up” button, followed by the “Volume Down” button. Press and hold the “Side” button on the right side of the Apple iPhone 14 device to activate Recovery Mode.
For iPhone 7 and 7 Plus: Press and hold the “Volume Down” and “Side/Power” buttons to enable Recovery Mode in iPhone 7 models.
For iPhone 6 and Earlier: To activate Recovery Mode, press and hold the “Home” and “Side/Power” buttons until the respective screen displays.

- Step 2: Once your Apple iPhone 14 is in Recovery Mode, iTunes will detect it automatically. A pop-up window will appear within iTunes to detect some problems with the Apple iPhone 14 device. Tap the “Restore” button to start the process and unlock your Apple iPhone 14 by erasing all settings and content.

Part 4. Using Third-Party Unlocking Service To Unlock Stolen iPhone
In certain scenarios, when an iPhone gets stolen, it might enable the “Activation Lock.” This usually occurs to prevent the unauthorized access and usage of the Apple iPhone 14 device. When you face such a situation, third-party unlocking services can help you bypass the Activation Lock.
These services include IMEIUnlockSIM , IMEICHECK.CO and Apple iPhone Unlock . Below, we have outlined steps for using Apple iPhone Unlock to help you with how do I unlock a stolen iPhone issue:
Instructions: First, access the Apple iPhone Unlock official website and enter the IMEI number of the Apple iPhone 14 device. Select the particular iOS device model and continue to select “Remove Activation Lock.” Following this, review the order summary and pay the fee with the required option. Upon successful completion of payment, the service will contact you for instant unlocking within 24 hours.

Conclusion
Getting a stolen iPhone back is surely the best thing, but facing a device unlock situation worsens things. However, to help you with how to unlock a stolen iPhone, we have discussed 4 effective methods. Wondershare Dr.Fone is the best among these options. This screen unlock tool facilitates users with various screen unlocking options using the simplest methods.
Tips: Are you searching for a powerful Screen Unlock tool? No worries as Dr.Fone is here to help you. Download it and start a seamless unlock experience!
How to Unlock Apple iPhone 14 Passcode without Computer?
“How to unlock Apple iPhone 14 passcode without computer? I have been locked out of my iPhone and can’t seem to remember its passcode!”
Lately, we have got plenty of queries like this from users who have forgotten their iPhone passcode and can’t access it. If you are also going through the same and wish to learn how to bypass iPhone 5 passcode without computer, then you have come to the right place. In this post, we will make you familiar with two different solutions to unlock your Apple iPhone 14 and that too without using your computer. In this way, you don’t need to use any third-party tool to learn how to unlock iPhone 5 passcode without computer. We have provided a stepwise solution for the same in the coming sections.
Part 1: How to unlock Apple iPhone 14 passcode without computer using iCloud?
If you remember your iCloud credentials, then you can easily learn how to unlock Apple iPhone 14 passcode without computer. Though, this comes with a catch. Since Apple doesn’t allow a direct way to reset iPhone passcode, you need to erase your device. It will reset your device’s passcode and your data would be lost. Therefore, before we proceed, make sure that you have a backup of your device ready. In this way, you can restore the backup and won’t suffer from any kind of data loss. To learn how to bypass iPhone 5 passcode without computer, follow these steps:
1. To start with, you need to log-in to iCloud’s official website right here: https://www.icloud.com/ . You can do this on any other handheld device.
2. Provide the iCloud credentials of your account that is already linked to your Apple iPhone 14.
3. The iCloud home page will provide various options. Just click on the “Find iPhone” to proceed.

4. This will launch the Find my iPhone interface on the screen. To choose your Apple iPhone 14, click on the “All Devices” option and select the Apple iPhone 14 that is locked.

5. As you would select your Apple iPhone 14, it will display various options related to it.
6. Simply click on “Erase iPhone” and confirm your choice.

7. Wait for a while as it will reset your Apple iPhone 14 remotely.
As you can see, the Find my iPhone service was majorly introduced to discover the location of a lost iOS device. Though, you can use it to ring your device or erase it remotely as well. In this way, you can learn how to unlock iPhone 5 passcode without computer. The technique can also be implemented in other iPhone versions like Apple iPhone 14, 6 Plus, 7, 7 Plus, and more.
Attention: All your data will be erased while you are unlocking with this tool.
Dr.Fone - Screen Unlock (iOS)
Unlock iPhone/iPad Lock Screen Without Hassle.
- Intuitive instructions to unlock iPhone without the passcode.
- Removes the iPhone’s lock screen whenever it is disabled.
- Works for all models of iPhone, iPad and iPod touch.
- Fully compatible with the latest iOS 11.


3981454 people have downloaded it
Part 2: How to unlock Apple iPhone 14 passcode without computer using Siri bug?
This might surprise you, but there is a loophole in Siri that can be exploited to unlock the Apple iPhone 14 device. Even though the solution might not work every time, there is no harm in giving it a try. By following this technique, you would be able to learn how to unlock Apple iPhone 14 passcode without computer while experiencing no data loss. Essentially, it works for iOS devices running on iOS 8.0 to iOS 10.1. You would be needed to follow these stepwise instructions to learn how to bypass iPhone 5 passcode without computer.
1. To start with, you need to activate Siri on your device. This can be done by simply long pressing the Home button.
2. Now, ask Siri about the present time by giving a command like “Hey Siri, what time is it?”

3. This will make Siri display the present time with a clock icon adjoining to it. Just tap on the clock.
4. This will let you access the World clock feature on your device. From here, you can view the clock interface. Tap on the “+” icon to add another clock.

5. The interface will provide a search bar from where you can look for a city. Just write anything to provide a textual entry.
6. Tap on the text to get various options related to it. Go with the “Select all” option to proceed.

7. This will again provide various options like cut, copy, define, etc. Tap on the “Share” button.

8. From here, you can get various options to share this text. Out of all the provided options, tap on the Message icon.

9. This will open a new interface from where you can draft a new message. On the “To” field, you can type any text and tap on the return button on your keyboard to continue.
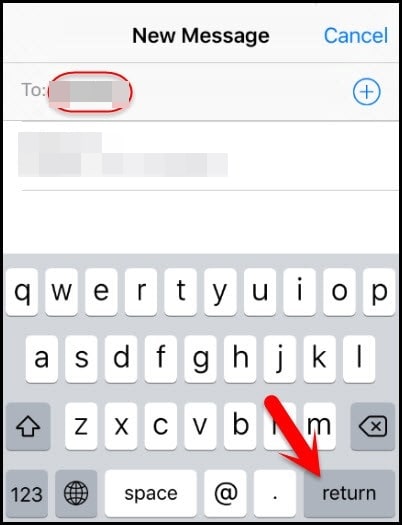
10. This will make the text go green. As it would be selected, tap on the add icon (“+”) once again.
11. As you would tap it, it will launch a new interface. Tap on the “Create new Contact” to proceed.

12. This will launch a new interface to add a contact. You can just tap on the “Add Photo” option.

13. From the provided options, tap on the “Choose Photo” button to select a photo from the library.
14. As the photo library will be launched, you can browse the album of your choice.

15. Wait for a few seconds and tap on the Home button one more time. This will lead you to the Home screen of your device.

By following these simple steps, you can learn how to unlock iPhone 5 passcode without computer. The same procedure can also be applied to other versions of iPhone as well to unlock it without any data loss.
You can follow either of these solutions to learn how to unlock iPhone 5 passcode without computer. Since iCloud will erase your iOS device, you can take advantage of Siri’s vulnerability. This will let you unlock your device without losing your data. Go ahead and give these solutions a try and let us know about your experience in the comments below.
How To Fix Auto Lock Greyed Out on Apple iPhone 14
Auto-lock on iOS devices serves multiple purposes - it conserves battery life, secures your data, and more. But have you encountered the Auto-Lock greyed-out dilemma, fixed at 30 seconds? When this setting becomes inaccessible, it limits your control over screen timeout.
Read on if you’ve encountered a similar problem on your iOS device. In this guide, we’ll explore the possible reasons and offer steps to fix Auto-Lock greyed out on iPhone and iPad devices. If force restarts or settings resets haven’t worked for you, we’ve got alternative solutions. Let’s get started.

Part 1: Why Is Auto-Lock Greyed Out on iOS Device?
There are a few reasons why the Auto-Lock might be greyed out on your Apple iPhone 14 or iPad device, preventing you from adjusting the duration. Here are the most common culprits:
Low Power Mode
When you activate Low Power Mode on your iOS device, you might notice the screen automatically locking after 30 seconds of inactivity. This quick sleep setting, implemented to minimize power usage, explains why the Auto-Lock option appears greyed out and inaccessible.
Screen Time Restrictions
Screen Time restrictions can impact Auto-Lock. For instance, if your downtime schedule blocks all apps, the screen locks itself, even if the Auto-Lock timer hasn’t run out.

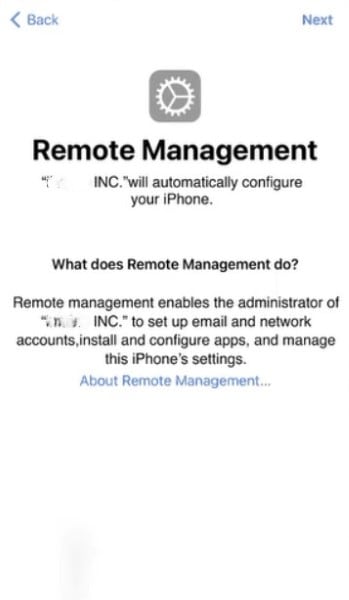
MDM Profile Restrictions
If the Auto-Lock is greyed out on your iPad or iPhone and you use it for work or school, a Mobile Device Management (MDM) profile might be the reason. This profile restricts settings, including Auto-Lock. To fix this, contact your IT administrator and ask if they can adjust the MDM profile settings.
Alright, you know the possible reasons why the Auto-Lock option is not working on your iOS device. Still, you might be wondering how to fix the Auto-Lock greyed-out issue. Below are several ways to get your iPad or iPhone Auto-Lock working normally again.
Fix No.1: Disable Low Power Mode
Your iPhone Auto-Lock greyed out because Low Power Mode limits background activities, including the Auto-Lock option. In this mode, you cannot change the Auto-Lock settings. Turn off Low Power Mode to fix this issue and choose your preferred timeout. Here’s how:
- Step 1: Go to your Apple iPhone 14 or iPad’s Settings app.
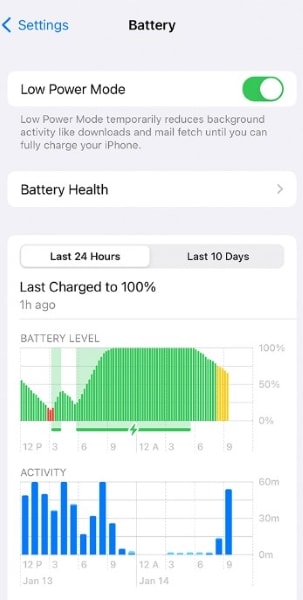
- Step 2: Scroll down and tap Battery. It will show you your device’s battery usage and available settings.
- Step 3: Turn off the Low Power Mode. Now, the greyed-out Auto-Lock option in Settings should be available again.

Low Battery Mode can stretch your battery life further. But if you need your screen to stay on longer, like while reading an article or watching a video, you can turn it off. It lets you adjust the screen timeout in Settings so it stays awake for as long as you like.
Fix No.2: Check Screen Time Restrictions
You’ve ruled out the Low Power Mode, but the Auto-Lock greyed out on iPad or iPhone remains. If Low Power Mode isn’t causing the problem, your screen time settings might be the issue. Some app restrictions can limit your screen use to specific times, causing it to lock automatically. Resolve this by removing limits, such as downtime and app restrictions, or turning it off.
- Step 1: Open the Settings app on your iOS device.
- Step 2: Go to Screen Time, then scroll down.
- Step 3: Tap Turn Off Screen Time.

Fix No.3: Remove MDM Configuration Profile
A configuration profile is a file that contains settings and restrictions that can be applied to an iOS device. Organizations, schools, or IT administrators often use it to manage devices remotely and enforce specific configurations. Once installed, the settings within a profile override the Apple iPhone 14 device’s default settings. It can include restrictions related to security, network access, app usage, and more.
Since an MDM configuration profile causes limitations, like the greyed-out Auto-Lock on iPad, removing it can be the solution. Doing so frees your iOS device from external settings imposed by the profile. Then, it could allow you to adjust the Auto-Lock time setting as you normally would.
Step 1: See the configuration profiles you installed on your iOS device.
Go to Settings> General > VPN & Device Management on your Apple iPhone 14.
Go to Settings> General > Profiles & Device Management on your iPad.
Step 2: Select the configuration profile you need to delete.
Step 3: Tap Remove Profile, enter your device passcode, then tap Remove.

Fix No.4: Remove Network Settings Installed by MDM
Businesses often use Mobile Device Management (MDM) to remotely manage their employees’ iPhones and iPads. MDM lets IT admins push software updates, restrict apps, and remotely wipe a lost device. This keeps corporate data safe and devices under control, whether the company or the employee owns them.
If you’re having trouble with a greyed-out Auto-Lock timeout setting, disassociating your device from MDM might be an option. But remember, this is a big step. Make sure you follow your company’s authorized procedures to avoid unintended consequences.
If your IT team gives the green light, you might also be able to remove the network settings installed by MDM. Just proceed with caution, as messing with these settings could lead to instability or data loss. Here’s how:
- Step 1: Open the Settings app on your iOS device.
- Step 2: Navigate to General > Profile or VPN & Device Management (or a similar section).
- Step 3: Select the management and tap Remove Management.

If the option is unavailable, only the person who used Apple Configurator 2 or handles your company’s mobile device management platform can remove it.
Fix No.5: Use Dr.Fone To Bypass MDM Lock Without Data Loss
Unfortunately, manually removing profiles can be tricky, especially if they’re associated with MDM, Apple School Manager, or supervised configurations. These often require the removal of passwords, admin privileges, or complete data wipes. But there’s good news. Wondershare Dr.Fone - Screen Unlock (iOS) provides a simpler and safer solution.
Here’s why you should try it:
- **Speedy and Efficient:**No more endless troubleshooting. Dr.Fone bypasses the MDM lock in minutes, saving you precious time.
- **Data Stays Safe:**Unlike factory resets, Dr.Fone keeps all your precious photos, messages, and apps right where they belong.
- **No Jailbreaking:**Say goodbye to complex hacks and warranty voiding. Dr.Fone works without jailbreaking your Apple iPhone 14, keeping it healthy and secure.
- **Universal Compatibility:**Whether you own the latest iPhone with iOS 17 or an older version, Dr.Fone has your back. It supports all iOS devices and versions starting from iOS 7.0.
Have you ever bought a used iPad or Apple iPhone 14 to find the Auto-Lock option greyed out and isn’t working? Mobile Device Management (MDM) profiles, often deployed by companies or schools, can restrict functionality. If you lack the credentials to bypass or remove it, Dr.Fone can help remove all MDM restrictions on your iOS device. Here’s how:
- Step 1: Download and open Dr.Fone on your computer. Next, connect your Apple iPhone 14 or iPad to the computer using a USB cable and navigate to Toolbox > Screen Unlock > iOS.
Tips: Are you searching for a powerful Screen Unlock tool? No worries as Dr.Fone is here to help you. Download it and start a seamless unlock experience!
- Step 2: Within the Screen Unlock tool window, select Unlock MDM iPhone.

- Step 3: Select Bypass MDM, then click Get Start to proceed.
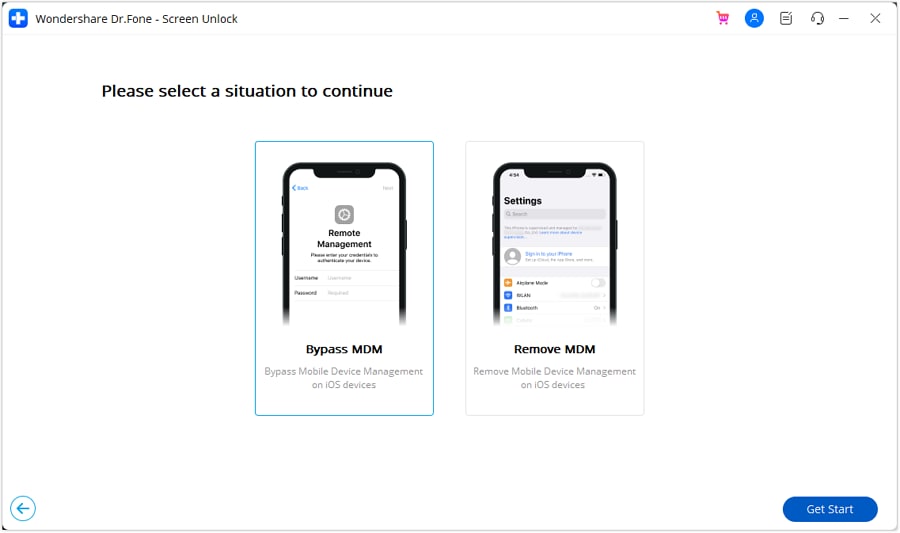
- Step 4: Please review the message carefully before initiating the MDM bypass process. Once you’ve read it, click Start to Bypass to proceed.

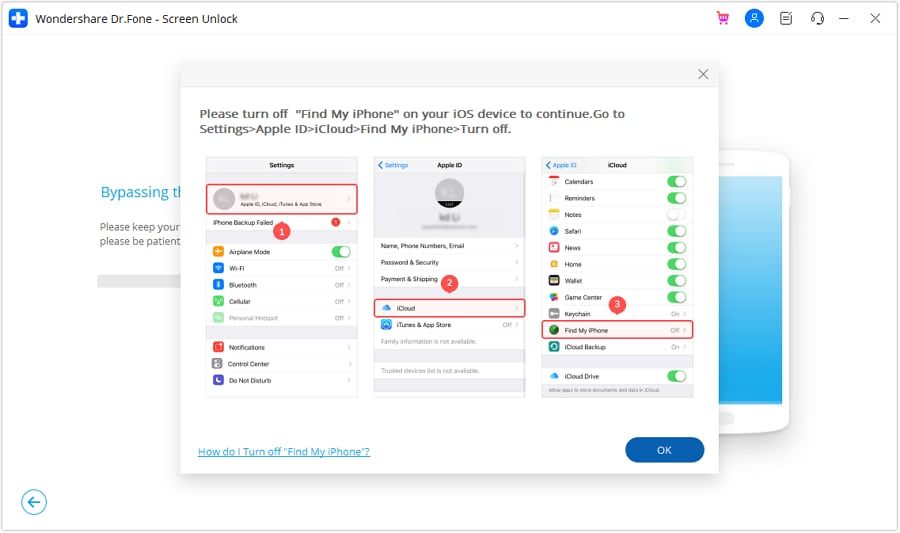
- Step 5: If prompted, go to your device’s Settings > Apple ID > iCloud and turn off the Find My feature. Next, click OK to initiate the MDM bypass.
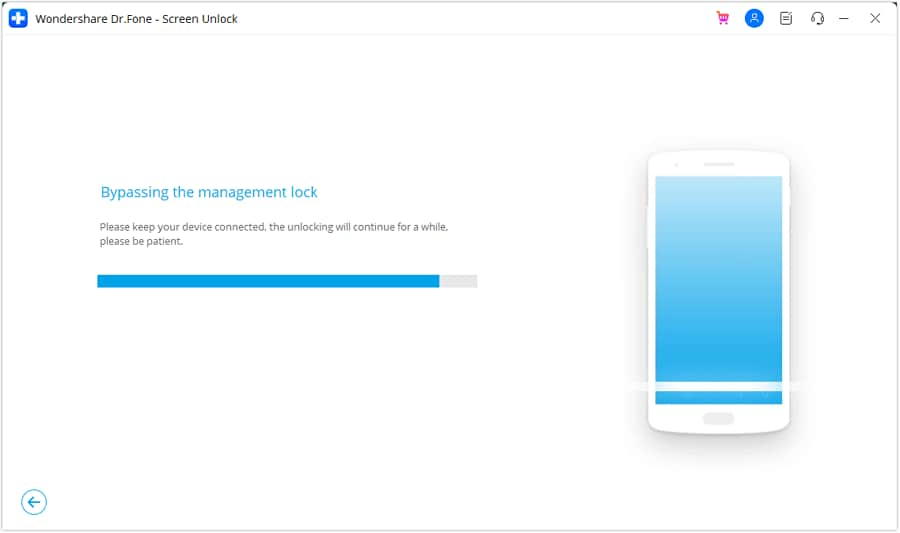
- Step 6: The software will display the progress of the bypass. Wait for it to complete.
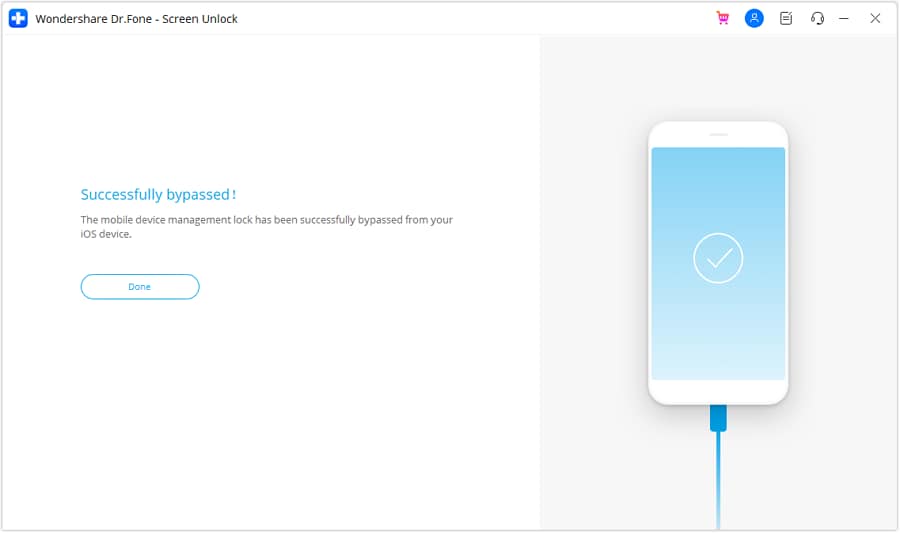
- Step 7: You’ll see a confirmation message once the bypass is successful. Click Done to exit. Your device should now be free from MDM restrictions.
Fix No.6: Check and Adjust Auto-Lock Settings
Once you’ve tried all the fixes above, you might need to set up the Auto-Lock timeout again.
- Setup Auto-Lock on iPad
Here are the steps on how to change Auto-Lock on iPad devices:
- Step 1: Within the Settings app, scroll down the list on the left-hand side and tap Display & Brightness.
- Step 2: On the right-hand side of the Display & Brightness screen, tap the Auto-Lock option.

- Step 3: A list of time options will appear, ranging from 2 minutes to 15 minutes, as well as Never. Select the time you want your iPad to wait before automatically locking the screen after inactivity. If you want the screen to stay on indefinitely, choose Never.

Step 4: Once you’ve selected your preferred auto-lock duration, you can exit the Settings app. The change will be applied automatically.
- Setup Auto-Lock on iPhone
Here’s how to change Auto-Lock on iPhone devices:
- Step 1: Open the Settings app.
- Step 2: Tap on Display & Brightness, scroll down, and tap Auto-Lock.
- Step 3: Choose the desired time interval for your Apple iPhone 14 to automatically lock. The available options typically range from 30 seconds to 5 minutes. You may also have the option to select Never if you prefer to have the screen stay on indefinitely until you manually lock it.

Conclusion
There you have it. This guide has equipped you with the knowledge and solutions to fix the Auto-Lock greyed out on your Apple iPhone 14 or iPad devices. From identifying the reasons like Low Power Mode and MDM configurations to implementing actionable fixes, you can now change your screen timeout. So, turn off those restrictions, remove MDM profiles, and head back to Settings.
For an easy solution, use Dr.Fone Screen Unlock to bypass MDM restrictions, giving you control over your device. Whether it’s a work phone or a personal device under MDM, Dr.Fone can offer an efficient solution. With a few clicks, you’ll have the Auto-Lock back on track, ensuring your iOS device works again just how you want it.
Tips: Are you searching for a powerful Screen Unlock tool? No worries as Dr.Fone is here to help you. Download it and start a seamless unlock experience!
Also read:
- 2 Ways to Transfer Text Messages from Xiaomi Redmi Note 12 Pro 5G to iPhone 15/14/13/12/11/X/8/ | Dr.fone
- Detailed Examination Panorama Lens Revolution by Samsung
- Discover How AI Can Elevate Your Storytelling Experience
- Easy steps to recover deleted videos from Vivo S17t
- Fix Oppo K11x Android System Webview Crash 2024 Issue | Dr.fone
- Get Into It: The Next-Level Conversation AI
- How To Fix Auto Lock Greyed Out on Apple iPhone 13 Pro
- How to Unlock Apple iPhone 14, Apples New iPhone
- How To Unlock Apple iPhone XS Max Without Passcode? 4 Easy Methods
- How to Unlock iPhone XS with a Mask On
- In 2024, Complete Fixes To Solve Apple iPhone 6s Randomly Asking for Apple ID Password
- In 2024, How to Bypass iPhone SE Passcode Easily Video Inside
- In 2024, How to Unlock iPhone 12 with a Mask On
- In 2024, Mastermakers in AV Production Top 5 List
- In 2024, The Best Methods to Unlock the iPhone Locked to Owner for Apple iPhone 15
- In 2024, Ultimate Guide to Free PPTP VPN For Beginners On Tecno Camon 20 Premier 5G | Dr.fone
- In 2024, Unlock Your Disabled Apple iPhone X Without iTunes in 5 Ways
- Leading Edge Data Center Solutions: Exploring the Premier Rack Systems of 2024
- New Top 10 Robotic Voice Generators (with Comparison Table)
- Title: How To Unlock Stolen Apple iPhone 14 In Different Conditionsin
- Author: Sophia
- Created at : 2024-10-31 11:30:32
- Updated at : 2024-10-31 19:38:58
- Link: https://ios-unlock.techidaily.com/how-to-unlock-stolen-apple-iphone-14-in-different-conditionsin-by-drfone-ios/
- License: This work is licensed under CC BY-NC-SA 4.0.