
In 2024, 3 Ways to Erase iPhone 11 When Its Locked Within Seconds
3 Ways to Erase Apple iPhone 11 When It’s Locked Within Seconds
Over the last few years, Apple has made remarkable progress with its flagship iPhone series. There are plenty of ways for users to back up, erase, and restore their data. It doesn’t matter if you are moving from one device to another or would like to reset your phone. You should know how to erase iPhone when locked. Too many times, after getting locked out of their device, users find it hard to wipe locked iPhone. If you are also going through the same dilemma, then don’t worry. Read on and learn how to wipe a locked iPhone in this extensive guide.
Part 1: Erase locked iPhone with Dr.Fone - Screen Unlock (iOS)
One of the best ways to wipe locked iPhone is by using Dr.Fone - Screen Unlock (iOS) tool. It is an extremely secure and reliable application. It is already compatible with every leading version of iOS and runs on almost all major iOS devices. Available for both Windows and Mac, the tool can be used to remove activation lock and Apple ID. The tool also provides an easy-to-use interface that can help you reset the activation lock on your device.
Dr.Fone - Screen Unlock (iOS)
Erase the data of an iPhone even if it is locked
- Erase iPhone data together with the lock screen.
- Remove the 4-digit/6-digit passcode, Touch ID, and Face ID , and activation lock.
- A few clicks and the iOS lock screen are gone.
- Fully compatible with all iDevice models and iOS versions.
4,395,216 people have downloaded it
To learn how to erase iPhone when locked, follow these steps:
Step 1. Download and install Dr.Fone.
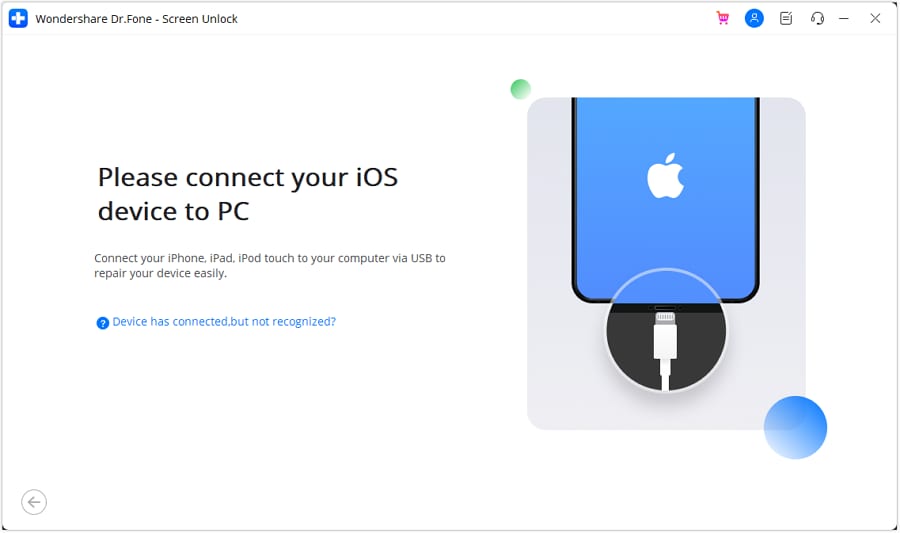
Start by downloading Dr.Fone - Screen Unlock (iOS) from its official website. Install it on your Windows or Mac and connect your Apple iPhone 11 to the system whenever you wish to resolve an issue with it. After launching the application, click on the “Screen Unlock” option from the welcome screen.

Step 2. Click Start button.
Wait for a while as the application will automatically recognize your phone. Click on the “Start” button to commence the process.

Step 3. Put the phone into DFU mode.
Follow the on-screen instructions to put your phone into the DFU (Device Firmware Update) mode. It can be done by pressing the Home and Power button simultaneously for 10 seconds. Afterward, it would help if you released the Power button while pressing the Home button for another 5 seconds.

Step 4. Download firmware package.
After putting your device into the DFU mode, the application will automatically move to the next window. Here, you would be required to provide essential information related to your phone like device model, firmware update, and more. After filling in the correct information, click on the “Download” button.

Sit back and relax as the application will download the essential firmware update for your phone.

Step 5. Start to unlock.
Once it is done, the application will automatically start resolving the issue on your phone. Make sure that you don’t disconnect your phone while Dr.Fone - Screen Unlock (iOS) will resolve the issue on your device.

Step 7. Unlock completed.
After completing the operation successfully, the interface will provide the following message.

You can check if you can unlock your phone or not. If you still have an issue, then click on the “Try Again” button. Else, you can safely remove your phone and use it without any constraint. By following this method, you would learn how to wipe a locked iPhone with Dr.Fone - Screen Unlock (iOS).
One of the best things about this technique is that you would wipe locked iPhone without causing any damage. Since it is a secure and reliable method with a high success rate, it is sure to provide a hassle-free experience.
Part 2: Erase locked iPhone by restoring it with iTunes
If you are looking for an alternative way to learn how to erase iPhone when locked, you can also take the assistance of iTunes. It provides a free and simple method to restore your device. Since it would wipe your data, you might end up losing your essential files in the process. We recommend following this technique only when you have taken a backup of your data via iTunes beforehand. To learn how to wipe a locked iPhone with iTunes, follow these steps:
1. Firstly, put your Apple iPhone 11 into recovery mode. To do this, launch an updated version of iTunes on your system and connect it to a lightning cable. Now, long-press the Home button on your device and connect it to the other end of the lightning cable. Release the Home button once the iTunes logo would appear.

2. As soon as your phone would be connected, iTunes will recognize an issue with it. From here, you can choose to restore it.

3. If you don’t get the above pop-up on your screen, launch iTunes and visit its “Summary” section. From here, choose “Restore backup” under the Backup section.

4. agree to the pop-up message by clicking on the “Restore” button.

Part 3: Erase locked iPhone by Find My iPhone
If you haven’t already taken a backup of your phone, then you might find it hard to recover it with iTunes. Another popular way to wipe locked iPhone is by using the Find My iPhone tool. This is mostly implemented in case of a stolen or lost device. One of the best features of Find My iPhone is that it can be used to reset your device remotely. With this, you can protect your personal data without much trouble. Implement these steps to learn how to erase iPhone when locked using Find My iPhone.
1. To start with, log in to your iCloud account and visit the “Find My iPhone” section.
2. Under the “All Devices” section, you can choose the Apple iPhone 11 you wish to reset.

3. After selecting your device, you will be presented with various options. Select the “Erase iPhone” feature to reset your device.

Confirm your choice and wipe locked iPhone remotely using the Find My iPhone feature on iCloud.
After following this informative guide, you would learn how to wipe a locked iPhone without any trouble. Go ahead and pick your preferred option to wipe locked iPhone. We recommend using Dr.Fone - Screen Unlock (iOS) to resolve this issue securely. Though, if you wish to do it remotely, then you can also give Find My iPhone a try as well. If you are familiar with any other reliable method, please let us know how to erase iPhone when locked in the comments below.
How To Unlock A Found Apple iPhone 11?
What to do if you find an iPhone? If you are here, you might have found an iPhone, and now you want to know how to unlock someone’s iPhone. Well, you should first try to find the owner, but if you can’t find the owner, it’s probably because you need help finding information about them.
That is why you want to unlock that iPhone. So, in this article, we will teach you how to unlock someone’s iPhone with different methods. These methods will be constructive for you to quickly unlock the Apple iPhone 11 so you can return it to the rightful owner.
So, let’s get started.
3 Efficient Ways to Unlock a Found iPhone
Unlocking an iPhone seems challenging, especially when it’s not yours, but it’s not impossible. You have various ways to unlock a found iPhone, but most are a waste of time. So, to save time and energy, we have compiled 3 efficient ways to unlock a found iPhone.

These methods will be easy to follow because of the detailed step-by-step guide.
1.Unlock it from Recovery mode
Many people need to realize that you can unlock your Apple iPhone 11 in Recovery Mode. This built-in feature of the Apple iPhone 11 allows you to turn your device to its factory settings.

But there are two ways to unlock a found iPhone from recovery mode. The old iPhones, like iPhone 5 to iPhone 7 and 7 Plus, can be unlocked from recovery mode differently, and the newer iPhone models have different methods.
So, let’s discuss both of them in detail.
Unlock iPhone 7 Plus and Older in Recovery Mode
If you want to unlock an iPhone 7 or older model in Recovery Mode, follow these instructions.
- First, connect your Apple iPhone 11 to the computer with a lightning cable and launch iTunes.
- Now, turn off your Apple iPhone 11 and then press and hold the Home button and Sleep/Wake button simultaneously. Keep holding both buttons until you see the recovery mode screen.
- Once you see the recovery mode screen, release both buttons. Now, you will see a message in iTunes saying, “There is a problem with the Apple iPhone 11 that requires it to be updated or restored.”
- Click on the Update button, and iTunes will try reinstalling iOS erasing your data. Once the process is completed, your Apple iPhone 11 will be unlocked.
Now, set up your Apple iPhone 11, and you are good to go.
Unlock iPhone 8 and Update Models in Recovery Mode
The process of unlocking an iPhone 8 or newer model differs from the older models. So, follow these instructions if you want to unlock an iPhone 8 or later in Recovery Mode.

- First, connect your Apple iPhone 11 to the computer with a lightning cable and launch iTunes.
- Now, turn off your Apple iPhone 11 and press and quickly release the Volume Up button. After that, press and release the Volume Down button immediately, and hold the Side button until you are in the recovery mode screen.
- Once you see the recovery mode screen, release the Side button. Now, you will see a message in iTunes that says, “There is a problem with the Apple iPhone 11 that requires it to be updated or restored.” Or another message that says restore this iPhone. You can click on any option.
- Click on the Update or Restore button, and iTunes will try reinstalling iOS while also erasing your data. Once the process is completed, your Apple iPhone 11 will be unlocked.
Now, set up your Apple iPhone 11, and you are good to go.
2. Unlock it via the DNS server
If the above method doesn’t work or iTunes is not detecting that iPhone, you can follow this method.
- This method is easy to follow and doesn’t require any technical skills.
- All you need is the DNS server IP address.
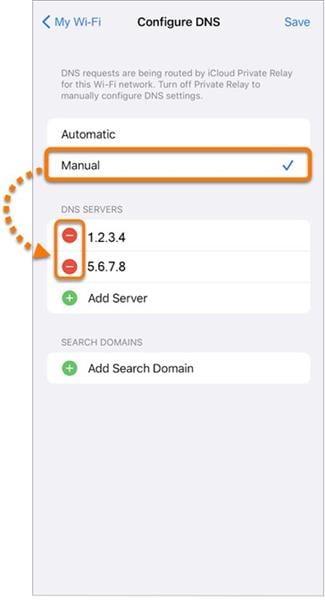
- Connect your Apple iPhone 11 to the Wi-Fi network and go to Settings -> Wi-Fi. Now, tap the “i” button next to the Wi-Fi network you need to connect to.
- Scroll down and tap on the Configure DNS option. Now, select the Manual option and enter the DNS server IP address.
- For US servers, you can use 74.82.42.42 or 208.67.222.222
- For UK servers, you can use 8.8.8.8 or 8.8.4.4
- For Canadian servers, you can use 199.85.126.10 or 208.67.222.222
- For Australian servers, you can use 1.1.1.1 or 208.67.222.222
- After that, tap the Save button and connect to the Wi-Fi network. Now, open the Safari browser, redirecting you to the activation screen.
- Follow the instructions on the screen, and your Apple iPhone 11 will be unlocked.
3. Dr.Fone-Screen Unlock
If none of the above methods can be used for you, there is an ultimate method that will surely help you if you want to unlock a found iPhone.
Here are the simple steps that can help you.
- First, connect your Apple iPhone 11 to the computer with a lightning cable and launch Dr.Fone on your computer.
- Now, click on the Screen Unlock option from the main interface.
- After that, click on the iOS Screen Unlock to begin the process.

- Now, put your Apple iPhone 11 in DFU mode or Recovery mode according to your Apple iPhone 11 model.
- If you have no idea about it, don’t worry. The software will provide on-screen instructions to help you put your Apple iPhone 11 in DFU mode or Recovery mode.

- Once your Apple iPhone 11 is in DFU mode or Recovery mode, the software will ask you to start downloading the necessary firmware for your device. So, choose an appropriate firmware according to the Apple iPhone 11 model.
- After downloading the firmware, click the Unlock Now button to begin the unlocking process.

- Once the process is completed, your Apple iPhone 11 will be unlocked, and you can set it up again.

So that’s how you can easily unlock a found iPhone. This method has been tested, and it will surely work for you. So, if you have an iPhone that is locked or disabled, you can use this method to unlock it without any problem.
What Can I Do to Contact Its Owner?
Once the found iPhone is successfully unlocked, you can contact its owner in many ways.
Following are some of them that work.
Contact the owner with the phone number in lost mode
Many iPhone owners habitually put their phone numbers in lost mode. So, you can check if any phone number is available in the lost mode. If a phone number is available, you can contact the owner and return the Apple iPhone 11 to them.

The rightful owner of the Apple iPhone 11 activates lost mode. You can see the lost mode on the notification panel, where a message will show that the phone is lost. The owner can also remotely lock the phone using this mode.
Check medical ID in an emergency call
There is a feature in the Apple iPhone 11 known as medical ID. This feature can help you contact the owner of the found iPhone if they are unavailable.

To do this, go to the emergency call screen and tap on the Medical ID option. Here, you can find out the name and phone number of the owner. So, you can use this information to contact the owner and return the iPhone.
Take photos to communicate with the owner via iCloud
This is a great way to contact the owner of a lost iPhone. You can use this method if you cannot find the owner’s phone number in the lost mode or medical ID.

To do this, go to Settings -> iCloud -> Photos and turn on the iCloud Photo Library. Now, take some pictures with the found iPhone, and they will be automatically uploaded to iCloud.
Most people who have lost their iPhones often check their iCloud, and once they find out that someone is taking pictures and uploading them to their iCloud, they will try to communicate with you.
And that’s how you can also communicate with them and ask for contact details so that you can return their phone and be a good citizen.
The Bottom Line
So, that’s how you can unlock a found iPhone and contact its owner. I hope this article will help you find the lost iPhone owner and return it to them.
All the methods mentioned above have a high success ratio, but the last ultimate method is better than all because it will unlock the Apple iPhone 11 within minutes.
Dr.Fone-Screen Unlock is one of the most effective ways can help you to unlock a found iPhone. This method has been tested, and it will surely work for you. So, if you have an iPhone that is locked or disabled, you can use this method to unlock it without any problem.
How To Change Country on App Store for Apple iPhone 11 With 7 Methods
Changing your App Store country can give you access to apps that are not available in your region. Whether getting region-specific apps, accessing exclusive content, or switching to a country with better app offerings, it’s a valuable capability.
The article below guides you through seven methods on how to change the country of your App Store.Following the guide ensures access to a world of apps and content tailored to your preferences. Keep reading the page below to achieve this.

Part 1. Pros and Cons of Changing Your App Store Country
Changing your App Store country on your Apple iPhone 11 can offer various benefits, but it also comes with certain drawbacks. It’s necessary to consider the pros and cons before making this decision.
Pros
- **Access to Region-Specific Apps.**Different countries have unique apps tailored to their markets. By changing your App Store country, you can access apps that might not be available in your current region. For example, some popular Chinese and Japanese apps are unavailable in the US App Store. If you want to use these apps, you will need to change your App Store country.
- **Getting App Updates.**Sometimes, apps receive updates and features in certain regions before others. Changing your App Store country can give you early access to these updates, improving your app experience. For example, a gaming app might first release new levels or features in select countries.
- **Access Exclusive Content.**Some apps and content are exclusive to certain countries. By switching your App Store country, you can enjoy movies, music, or TV shows unavailable in your current region. For instance, certain Netflix shows are restricted to specific countries due to licensing agreements.
Cons
- **Loss of Access to Purchases.**If you’ve made purchases in your current App Store country, changing it can result in losing access to those purchases. The loss includes paid apps, in-app purchases, and subscriptions. For example, if you switch from the US to the UK store, you may lose access to US-specific subscriptions.
- **Offload Apps.**When you change your App Store country, your device may prompt you to offload apps that are not available in your new region. This can be inconvenient if you rely on specific apps for daily use. For instance, a banking app may be region-specific and unavailable in your new country.
- **Family Sharing Issues.**If you’re part of a Family Sharing group, changing your App Store country can affect the access and sharing of purchased apps and subscriptions. Family members may lose access to content tied to your previous country. For example, if you switch from the UK to the US store, your family members might no longer have access to UK-specific content.
Part 2. Different Methods to Change Your App Store Country
Changing your App Store country can be done through various methods. Below are different ways to achieve that, along with step-by-step instructions for each technique.
Method 1: Changing Apple ID Region via iPhone
It is the most common and straightforward way to change your App Store country. To do this, follow these steps:
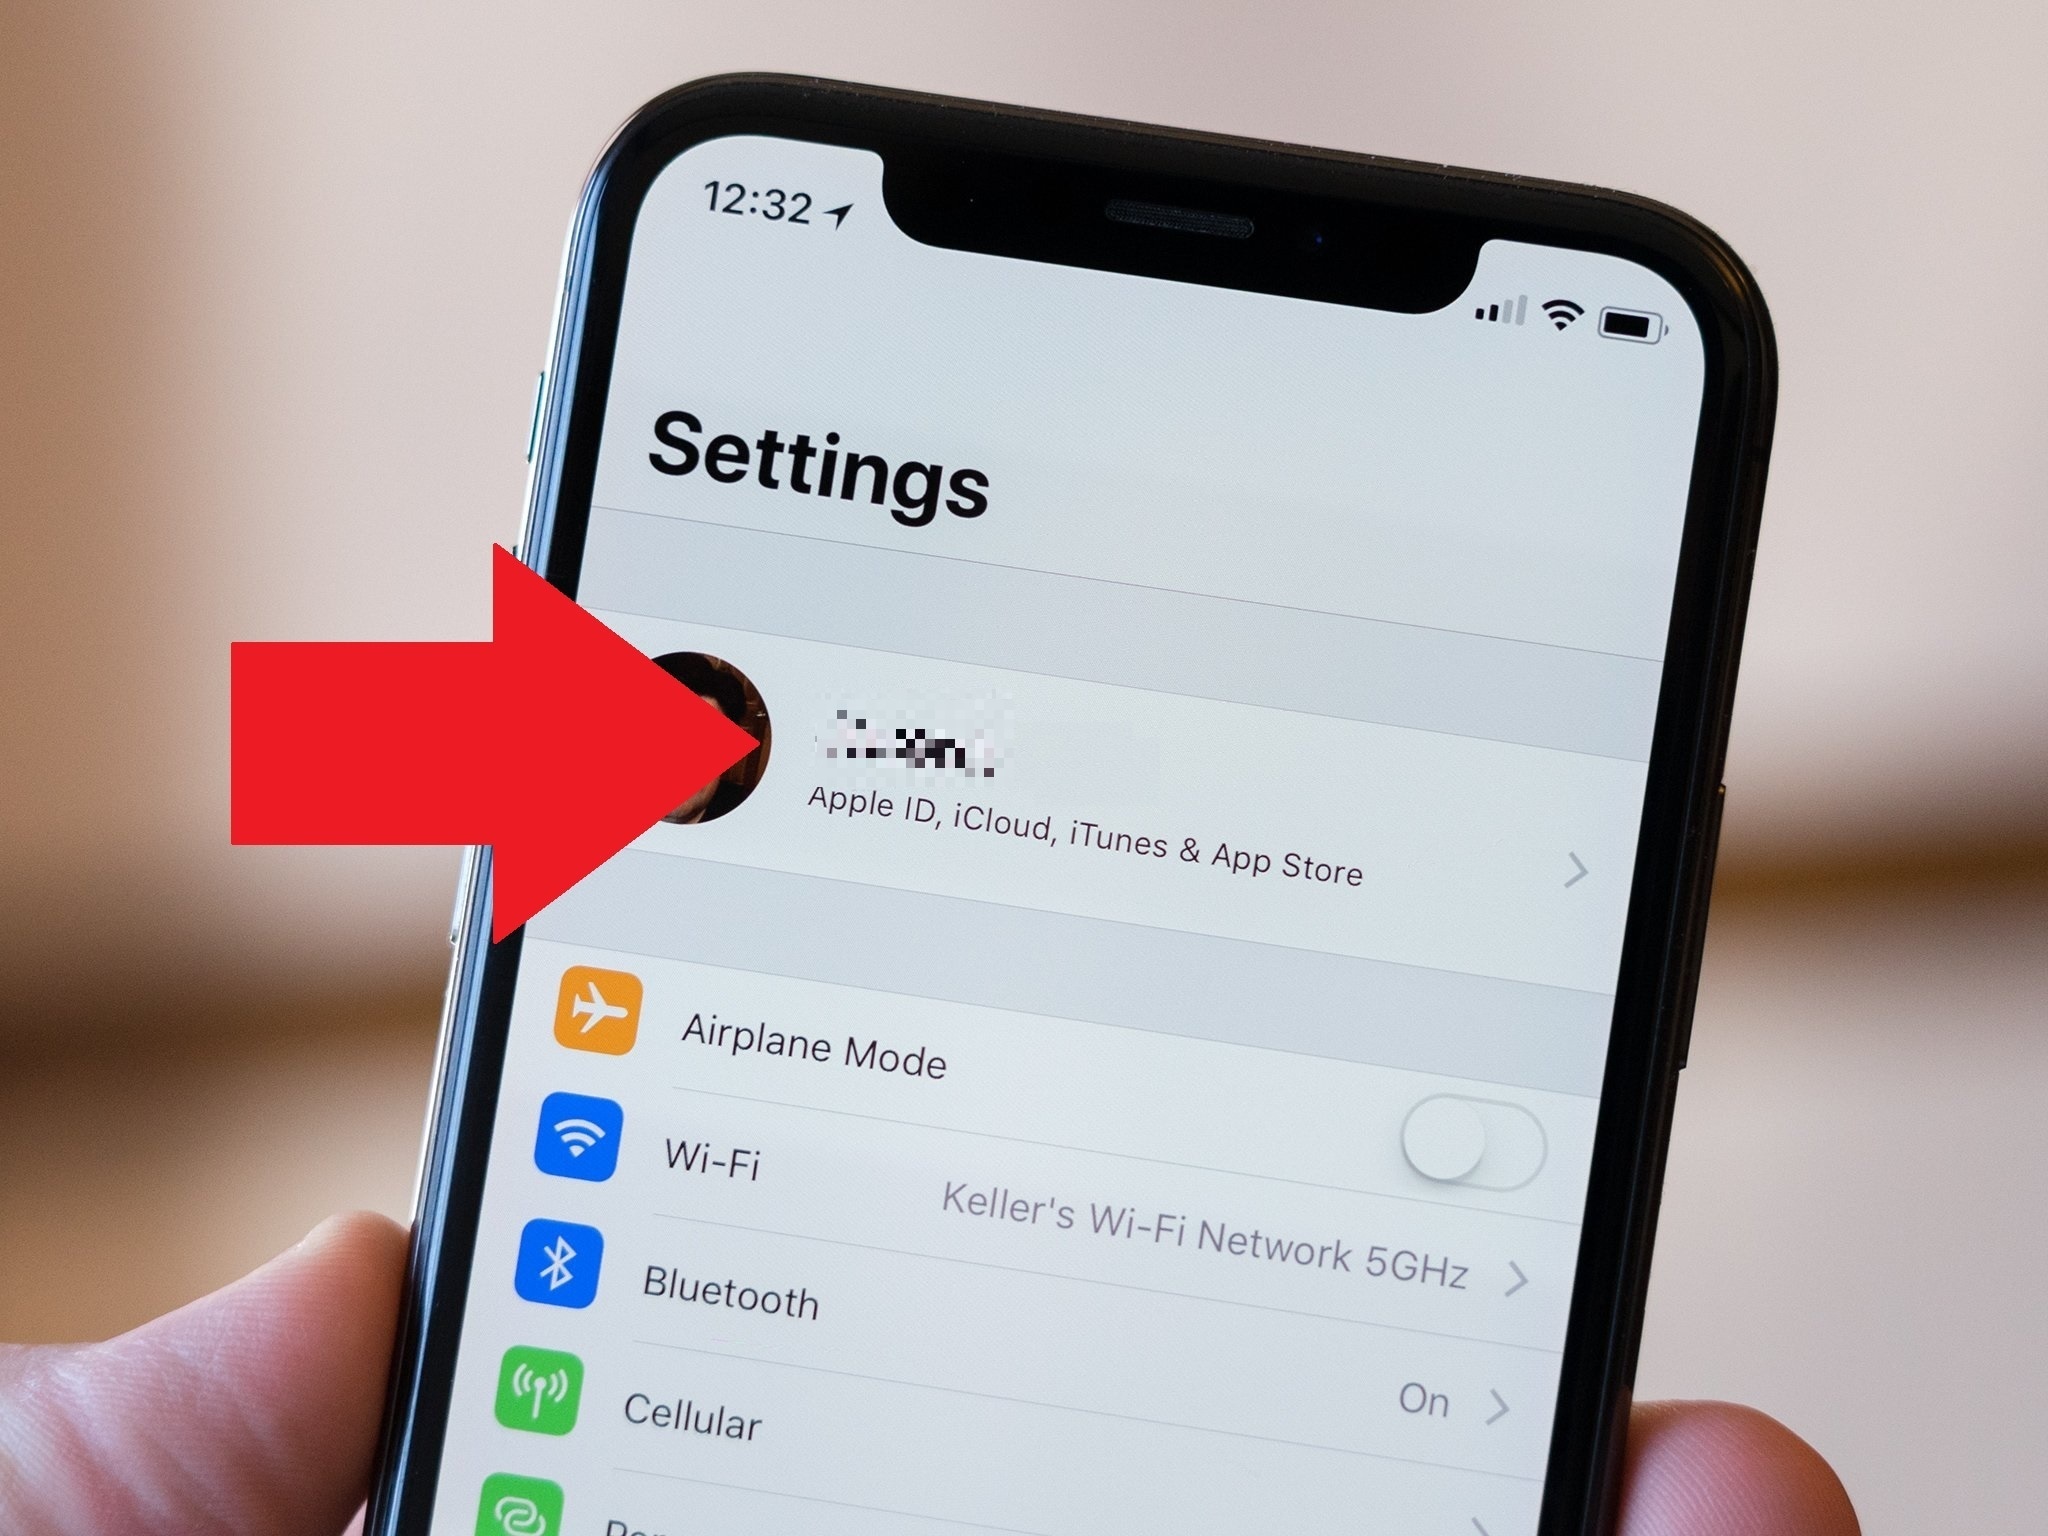
- Step 1: Open Settings on your Apple iPhone 11 and tap your Apple ID at the top.
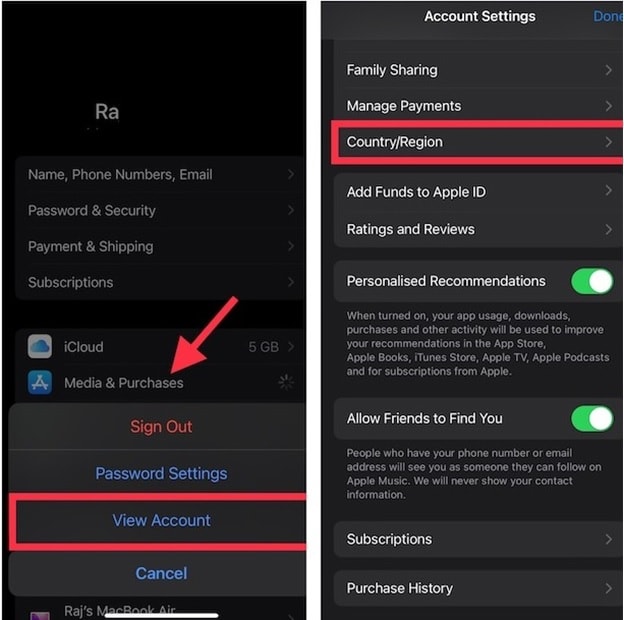
- Step 2: Tap on Media & Purchases > View Account. Sign in with your Apple ID. Next, Tap Country/Region > Change Country or Region and choose your desired country. Follow the on-screen prompts.
Method 2: Changing Apple ID Region via Mac/Windows
To change your Apple ID region via Mac/Windows, follow these steps:
- Step 1: Open iTunes (on Windows) or Music (on Mac). Sign in with your Apple ID.
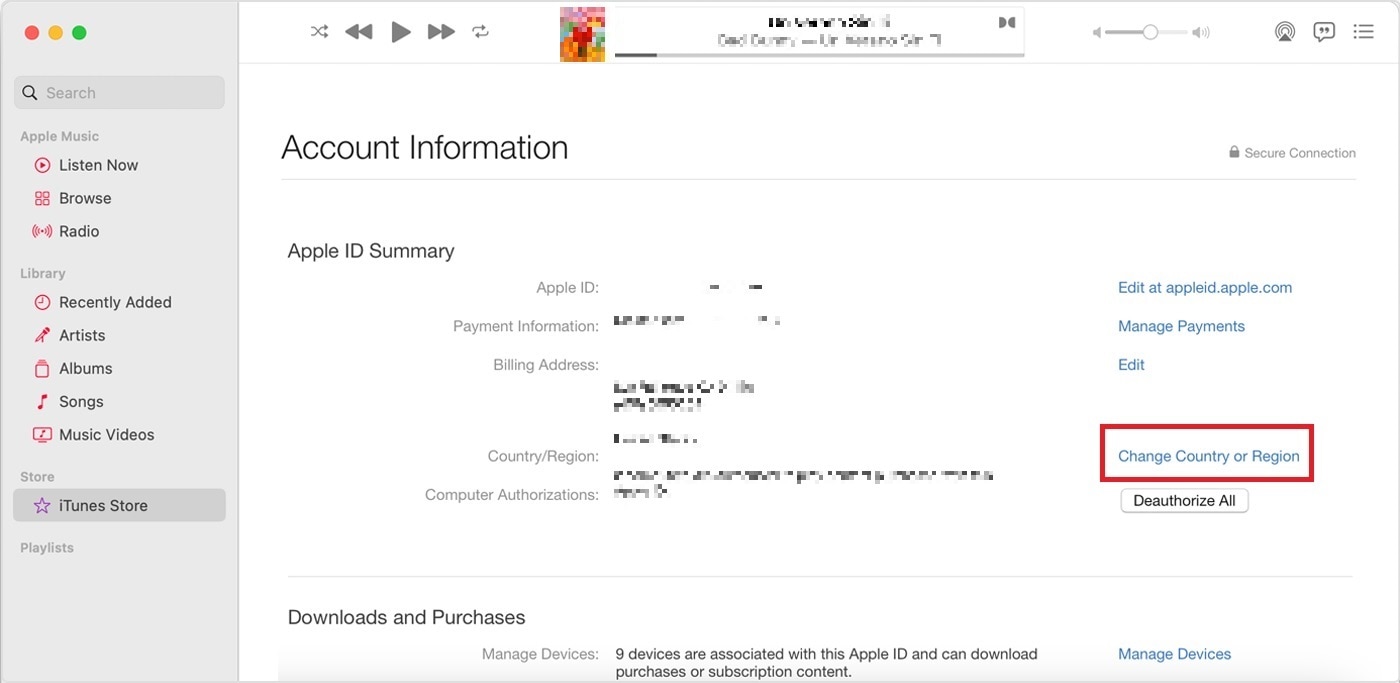
- Step 2: Go to Account > View My Account. Under Apple ID Summary, click Change Country or Region. Click your desired country and follow the instructions.
Method 3: Changing Apple ID Region via Web
The steps below are to change your Apple ID region via the web.
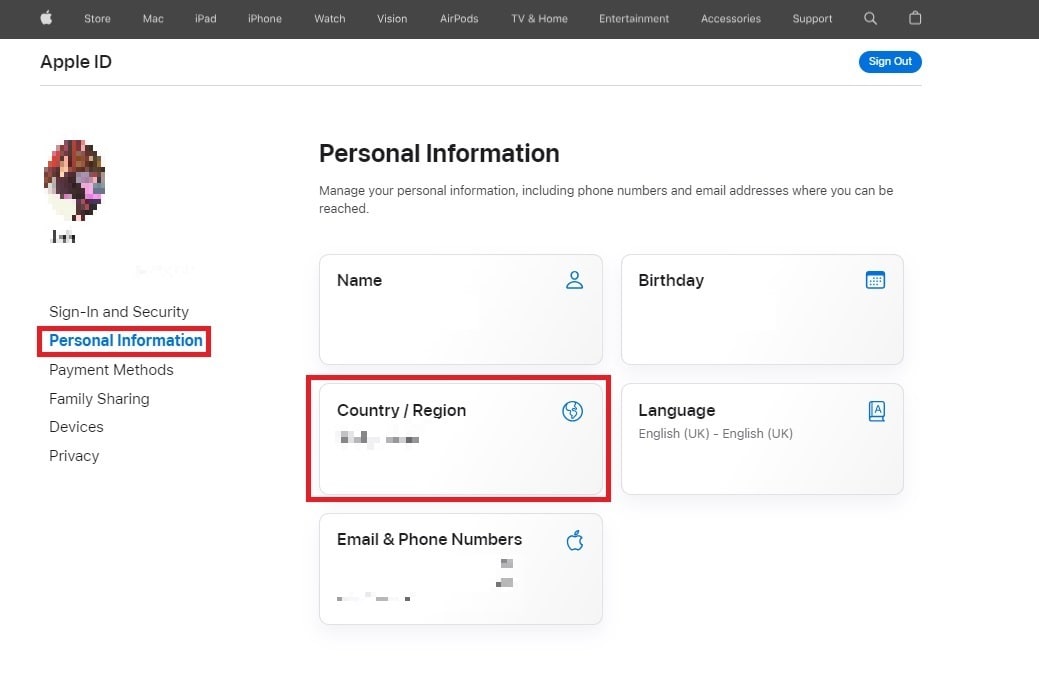
- Step 1: Open a web browser on your desktop or mobile device. Next, go to appleid.apple.com. Sign in with your Apple ID.
- Step 2: Under Personal Information, click the Country/Region button. Next, click the Change country or region and choose your preferred country.
Method 4: Leaving a Family-Sharing Group
If you’re part of a family sharing group, you need to leave the group before you can change your App Store country. To leave a family sharing group and change your app store country, follow the steps below.
- Step 1: Open the Settings app on your Apple iPhone 11 and tap Family.
- Step 2: Tap your name and tap Stop Using Family Sharing. Once you have left the family sharing group, you can change your App Store country by following the aforementioned manners.

Method 5: Cancel All Subscriptions
If you have any subscriptions, you must cancel them before changing your App Store country. Here are the steps below.
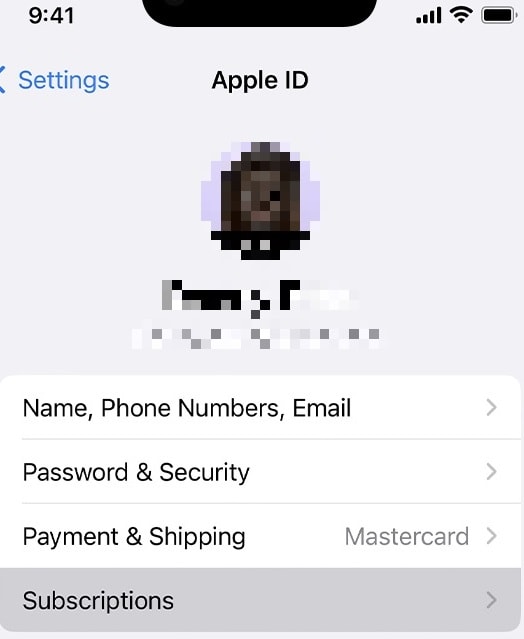
- Step 1: Open Settings on your Apple iPhone 11. Next, tap your name at the top of the screen.
- Step 2: Tap Subscriptions > Cancel Subscription. Once you cancel all of your subscriptions, you can change your App Store country.
Method 6: Using a VPN
You can also use a VPN to change your App Store country. However, this method is not recommended, as it can be unreliable and may result in your account being banned. Here are the steps below.
- Step 1: Install a VPN app from the App Store.
- Step 2: Connect to a server in your desired country. Open the App Store and see content from the connected country.
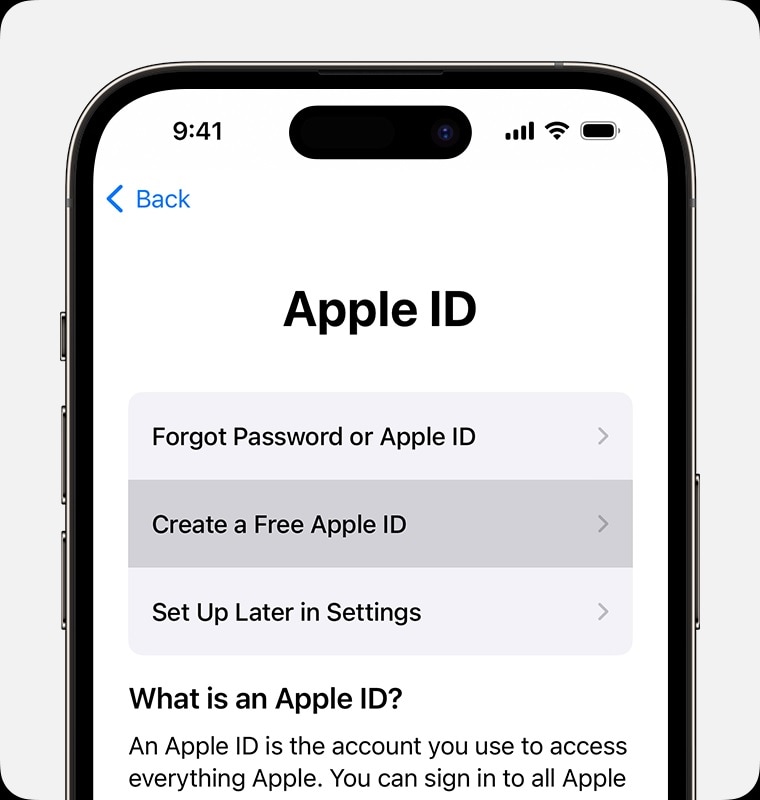
Method 7: Creating a New Apple ID
Finally, you can create a new Apple ID account with the country you want your App Store country to be. Here are the steps below.
- Step 1: Sign out of your current Apple ID in Settings.
- Step 2: Create a new Apple ID with your desired country as the region.
Sometimes, changing your App Store country can lead to issues. It can lock you out of your Apple ID, or you’re forgetting your password. During these events, it can restrict your App Store access. In such cases, a tool like Dr.Fone - Screen Unlock (iOS) can come to the rescue.
Part 3. Changing Countries Not Going Your Way? Use Wondershare Dr.Fone – Screen Unlock
Dr.Fone - Screen Unlock (iOS) helps you regain access to your Apple ID and fix any login-related problems. It ensures that you can continue enjoying your App Store without any hindrance. It’s a safe and reliable software tool that is used by millions of people to unlock their devices. It is also easy to use, even if you are not tech-savvy.
Key Features
Dr.Fone - Screen Unlock (iOS) is a powerful tool that can help you to:
- **Unlock iOS Device Without Passcode.**Regain access to your locked iPhone or iPad without needing the passcode.
- **Remove All Lock Screen Types.**Versatile unlock support for 4-digit/6-digit passcodes, Touch ID, and Face ID lock screens.
- **Unlock Apple ID Without Password.**Effortlessly unlock your Apple ID without requiring the password, simplifying access.
How To Unlock Your Apple iPhone 11 in Seconds
Dr.Fone’s Screen Unlock tool offers a streamlined solution to get you back into your device within seconds. Here’s a simple guide on how to do it.
- Step 1: Download Dr.Fone - Screen Unlock (iOS) on your computer and install it. Next, launch the app.
- Step 2: Connect your locked Apple iPhone 11 to your computer using a compatible USB cable. Afterward, click Start on the program. Follow the on-screen prompts on Dr.Fone. It will tell you to boot differently into DFU mode. Once your device enters DFU mode, Dr.Fone will present device details, including phone generation, iOS version, and more.
- Step 3: Dr.Fone will download the necessary firmware for your device. Follow the on-screen instructions to finish the unlocking process. Once done, Dr.Fone will remove the activation lock from your device.

Conclusion
Changing your App Store country can open doors to region-specific apps, exclusive content, and timely updates. However, it’s important to consider the potential drawbacks, such as losing previous purchases.
When changing the App Store country on your Apple iPhone 11, it’s important to consider Apple ID access issues. You never know when you will get locked out or suddenly forget your password. Wondershare Dr.Fone - Screen Unlock (iOS) offers a reliable solution during these instances. The tool ensures uninterrupted access to your App Store and Apple ID account, making it a valuable resource for managing your digital experience seamlessly.
Also read:
- [New] 2024 Approved Profit From Social Media Maximizing Facebook Earnings
- [New] Vive's Discomfort? Follow These Motion Sickness Fixes
- [Updated] 2024 Approved Studio vs Camper’s Contest
- 5 Most Effective Methods to Unlock Apple iPhone 13 Pro in Lost Mode
- Free and Easy: Download Your Perfect AOMEI Backuppers for Windows
- How To Bypass the Required Apple Store Verification For iPhone 12 mini
- How To Change Country on App Store for Apple iPhone X With 7 Methods
- How to Sync Your Favorite Tunes with Buddies on Spotify
- In 2024, How to Unlock Apple iPhone SE (2022) Passcode without Computer?
- iPhone SE (2020) Asking for Passcode after iOS 17/14 Update, What to Do?
- Rekindle Your Gaming Passion: Retro Xbox via Xemu and PC
- Revolutionize Your Live Broadcasts with ManyCam's Advanced Webcam Features
- Unlock Your Disabled iPhone 14 Pro Without iTunes in 5 Ways
- Title: In 2024, 3 Ways to Erase iPhone 11 When Its Locked Within Seconds
- Author: Sophia
- Created at : 2025-01-05 16:18:08
- Updated at : 2025-01-12 16:13:35
- Link: https://ios-unlock.techidaily.com/in-2024-3-ways-to-erase-iphone-11-when-its-locked-within-seconds-by-drfone-ios/
- License: This work is licensed under CC BY-NC-SA 4.0.