
In 2024, Apple iPhone 12 Asking for Passcode after iOS 17/14 Update, What to Do?
Apple iPhone 12 Asking for Passcode after iOS 17/14 Update, What to Do?
If you’ve recently updated your iOS iPhone and iPad to the iOS 17/14 operating system, you may notice a bit of a bug where the Apple iPhone 12 displays the passcode lock, even if you haven’t got a security code in place.
This obviously means you won’t be able to access your phone, and in many cases, you’re going to want to get back into your phone as quickly as possible. However, this may be easier said than done. Fortunately, today we’re going to go through multiple solutions to help you get your device working as it should!
Part 1. Don’t try passcodes blindly
One of the worst things you can do when faced with this situation is to enter passcodes blindly. Perhaps you’re trying random numbers and letters, or you’re trying passwords you’ve used in the past. If you get it wrong, you’re going to be locked out of your device for a long time.
The more times you get your code wrong, the longer you’ll be locked out, so avoid doing this at all costs, so make sure you move straight onto these approaches to get your phone working as quickly as possible.
Part 2. 5 ways to unlock iPhone after iOS 17/14 Update
2.1 Try a default passcode in your family
While we said, you shouldn’t type in random numbers to try and guess the password, of course, if you have a standard family passcode that you use across all iOS devices, perhaps an admin password or just something you use for everything, it can be well worth a try.

In reality, you get three attempts to put a passcode in before it locks you out, so try two passcodes that your family uses to see whether this will easily unlock your device. If you brought your device preowned and still have contact with the owner, they may have a passcode you can try.
2.2 Unlock iPhone with an unlock tool
The second approach you can take if you don’t know the passcode and can’t get it unlocked is to use a powerful software solution known as Dr.Fone - Screen Unlock (iOS) . This Wondershare software application completely unlocks your phone, even if you don’t know the passcode.
This software is easy to use and incredibly simple, yet it gets the job done. If you’re looking for a quick way to get your iOS device back up and running with full access after an iOS 17/14 update, it doesn’t get much better than this. Here’s how it works;
Step 1. Download and install the Dr.Fone - Screen Unlock (iOS) software to either your Mac or Windows PC and open it, so you’re on the homepage. Connect your iOS device to your computer using the USB cable and wait for the software to recognize your device.
When it does, close iTunes if it automatically opens and clicks the Screen Unlock option from the main menu.

Step 2. Click the Unlock iOS Screen option.

Step 3. You will now need to put your device in DFU mode, also known as Recovery Mode. Fortunately, this is easy thanks to the on-screen instructions where you will hold down the volume down and power button for a few seconds.

Step 4. Once Dr.Fone - Screen Unlock (iOS) has detected your device in DFU Mode. You’ll be able to select which device you’re using and what firmware you want to be repaired; in this case, iOS 17/14.

Step 5. Once everything has been confirmed and you’re happy to continue, press the Unlock option. The program will do its thing, and when it’s done, the software will say you’re able to disconnect your Apple iPhone 12 and use it without a lock screen!
That’s how easy Dr.Fone - Screen Unlock (iOS) makes the entire unlock process!

2.3 Restore an old backup from iTunes
Another key way that some users have found to unlock their device after an update is to restore their device to an older version, aiming to put your device back into a position where it didn’t have a lock screen.
It’s only possible to do this if you’ve backed up your iOS device in the past (which is why you’re encouraged to back up regularly), and it can all be done through the iTunes software on either your Mac or Windows computer. Here’s how it works;
Step 1. Ensure you’re running the latest version of iTunes and then connect your iOS device to your Mac or Windows computer using the official USB cable. This should automatically open the iTunes window.
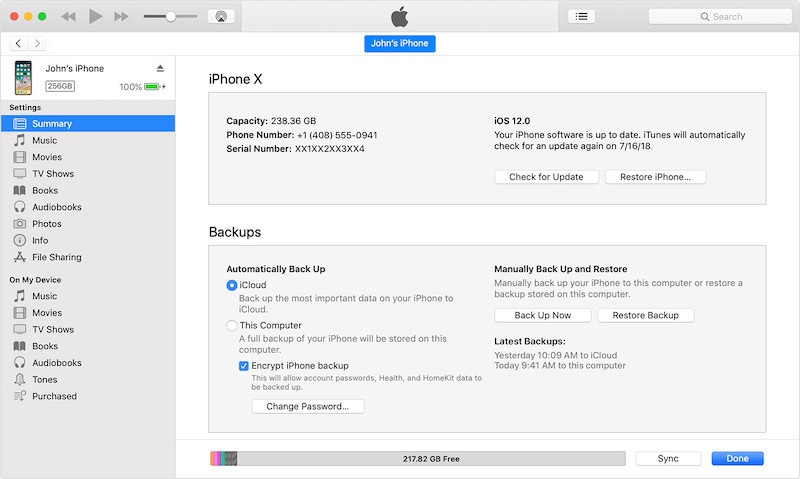
Step 2. In iTunes, click the symbol representing your device and then click Summary. On this screen, you’ll be able to choose the Restore iPhone option at the top to begin the restoring process.
Step 3. Follow the onscreen instructions where you’ll choose which backup file you want to use before iTunes, then restores your device. When the software has completed the process, you’ll be able to disconnect your Apple iPhone 12 and use it without a lock screen!
2.4 Restore in recovery mode
In some cases, restoring your device using just iTunes will not be good enough, and it won’t have the effect you’re looking for; in this case, restoring your device with no lock screen after an iOS 17/14 update.
If the above method of restoring your device via iTunes doesn’t work, or you haven’t got a backup file to load, you’ll need to restore your device using a move known as Recovery Mode, or DFU mode. This will hard reset your device and get it working to its full potential.
Here’s how to do it. (Note, the process will differ slightly depending on which model of iPhone you’re using).
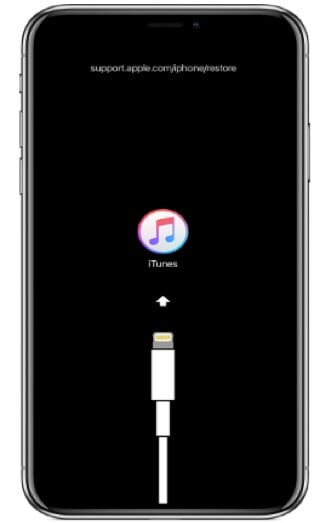
Step 1. Press and hold the volume up button for about one second, and then switch and press the Volume Down button for the same amount of time. You can then hold the side button (on devices without a home button), and the following screen should appear after a few seconds.
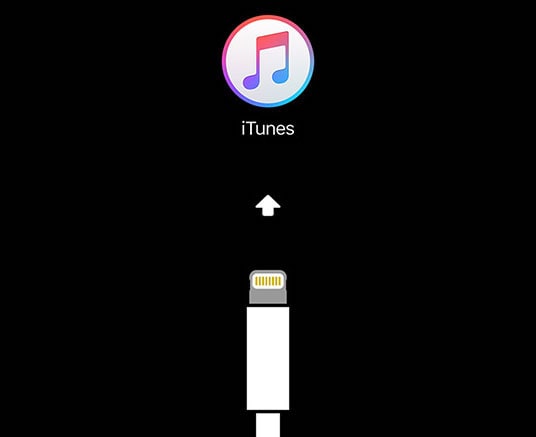
Step 2. Now connect your Apple iPhone 12 to your computer with iTunes and wait for iTunes to open. Make sure you’re running the latest version of iTunes before connecting up your device. Also, make sure you’re using the official USB cable for the most stability.
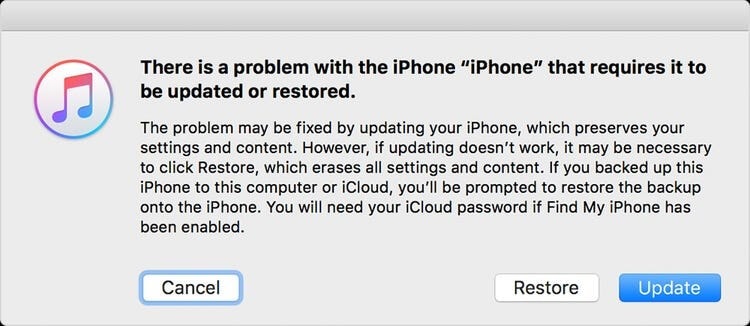
Step 3. iTunes should automatically detect that your device is in Recovery Mode and automatically restore your device to a default state without a lock screen. Wait until this process is completed before disconnecting your device and using it as normal.
2.5 Use Find My iPhone feature in iCloud
The fifth and final approach you can take to removing a lock screen from your recently updated iPhone or iPad when faced with the iOS 17/14 glitch is taking advantage of the integrated Apple technology and features are known as Find My iPhone.
While this feature originally allows you to literally find your Apple iPhone 12 in the situation where it’s lost and offers many other security features to help ensure your device and data don’t fall into the wrong hands, you can also use it to remove your device unwanted lock screen.
Of course, this will only work if the Find My iPhone features have been enabled in the past, so make sure you’re using it to get it to work. Here’s how to use the feature to get your phone access back.
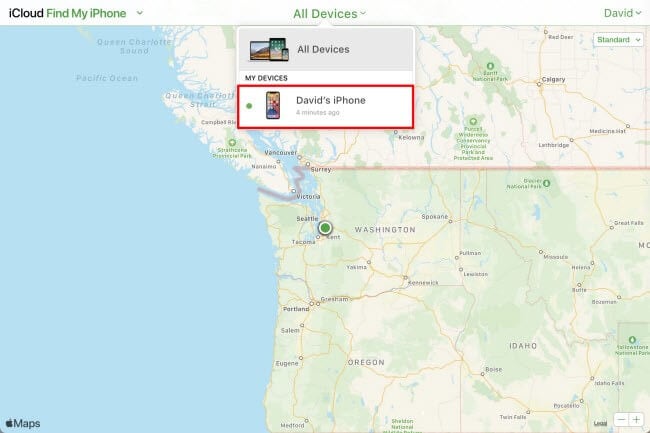
Step 1. From your computer, iPad, tablet, or mobile web browser, head over to iCloud.com and log into your iCloud account using the login in button at the top of the screen.

Step 2. Once signed in, scroll down the menu of features and select the Find iPhone feature. Click on the All Devices option at the top.
Step 3. From the list of devices connected to your account, click the Apple iPhone 12 device name with the locked screen and then click the Erase option. This will clear everything from your device, much like the process we’ve spoken about in the methods above.
Leave the Apple iPhone 12 device to erase, and once completed, you’ll be able to pick up and use your phone as normal without a lock screen. You should also now be able to update to iOS 17/14 without any problems!
Summary
And there you go, the five key ways you need to know when it comes to removing an unwanted lock screen from your iOS device after an iOS 17/14 update. We highly recommend the Dr.Fone - Screen Unlock (iOS) since the software makes the whole process incredibly easy, especially when managing any problems you may have on your iOS device!
Guide on How To Change Your Apple ID Email Address On Apple iPhone 12
Your Apple ID email is the key to your digital world with Apple devices. It’s the address Apple recognizes you by, allowing you to access your apps, music, and more. But sometimes, life brings changes, and your Apple ID email may need an update.
This guide will take you through the simple process of changing your Apple ID email address, ensuring it’s easy to understand every step. Explore why you might want to make this change, shedding light on common scenarios where this adjustment can enhance your Apple experience. So dive in and explore!

Part I: Why Change Your Apple ID Email?
Your Apple ID email helps you access your apps, music, and more. But sometimes, you might need to change it for simple reasons. Let’s look at why you might want to change your Apple ID email in easy-to-understand terms.
- Your email address is part of your identity. Changing it to something that better suits you can make your Apple experience more personal.
- If you think someone else knows your old email password, changing it can keep your Apple account safer. A fresh email means a new layer of security.
- Maybe you used an old email you don’t want to use anymore. Changing it lets you keep your personal life separate from your Apple stuff.
- **Email Problems.**If your old email is full of spam or not working well, switching to a new one is a good idea. You’ll get a cleaner and more reliable inbox.
- **Sharing Devices.**If you share Apple devices with someone and want to keep your stuff separate, changing your Apple ID email can help you do that easily.
- Using a more professional email address for your Apple ID can make a better impression when using Apple services for work or business.
These are the simple reasons why you might want to change your Apple ID email. It’s all about making your Apple experience better, safer, and more suited to your needs.
Part II: Step-by-Step Guide: How to Change Apple ID Email
Before you jump into changing your Apple ID email address, there’s an essential step to take. Just like you’d secure your valuables before embarking on a journey, backing up your device before going through the email change process is vital. This step ensures that none of your precious data is lost during the transition.
A. How To Change Your Apple Email Address on Various Devices
Now, let’s explore three different methods of how to change your Apple ID email address, tailored to various user preferences.
Method 1: For Mac Users
If you’re a Mac enthusiast, changing your Apple ID email is straightforward:
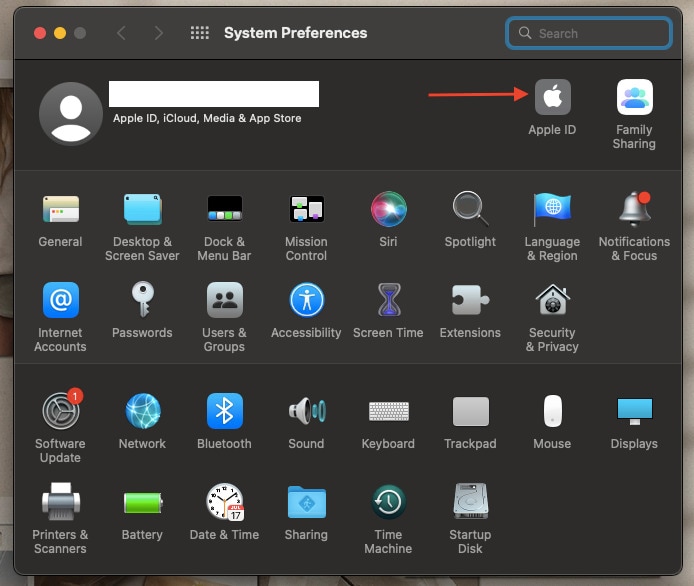
- Step 1: Click the Apple logo at the top left corner of your screen.
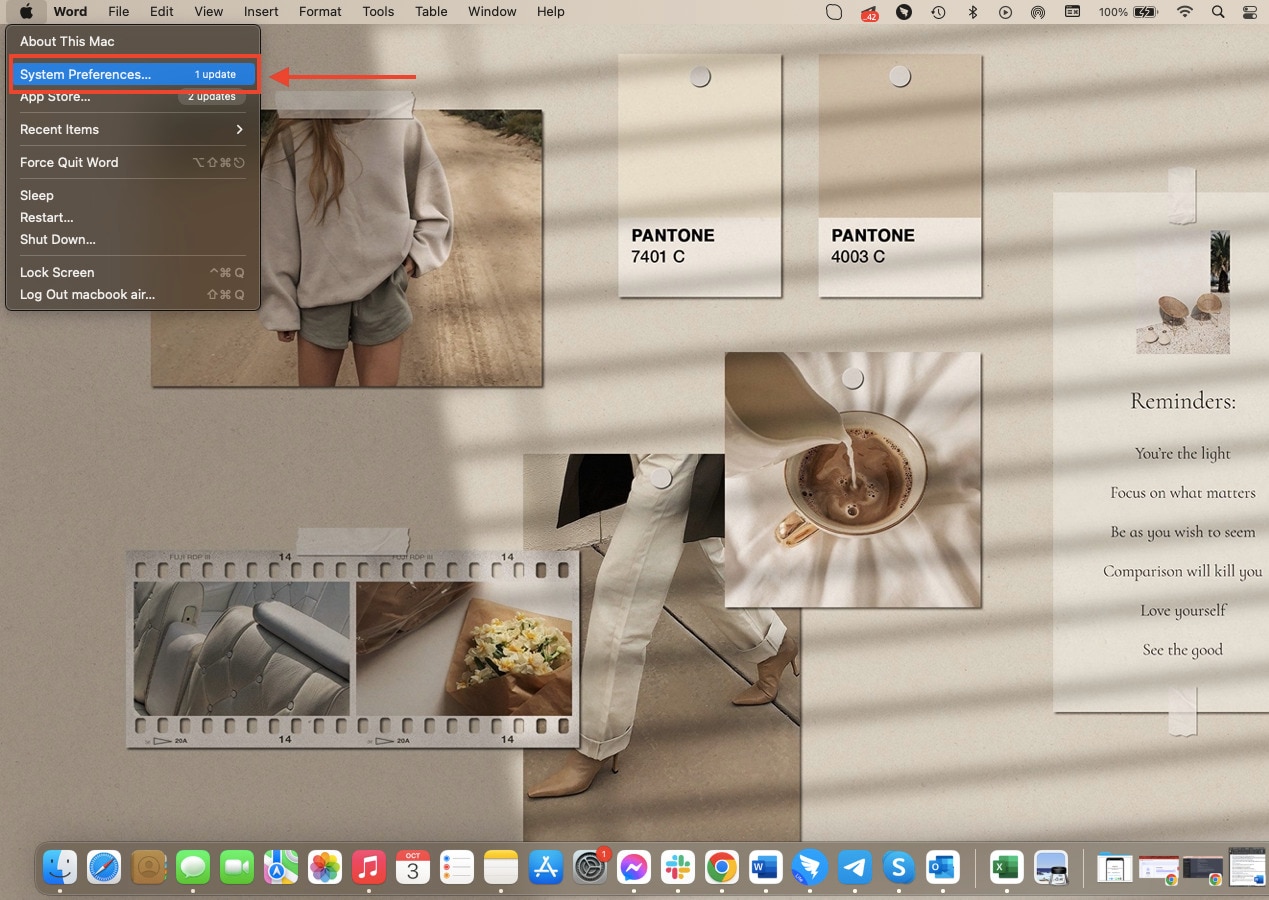
- Step 2: Click System Preferences, and then select Apple ID.
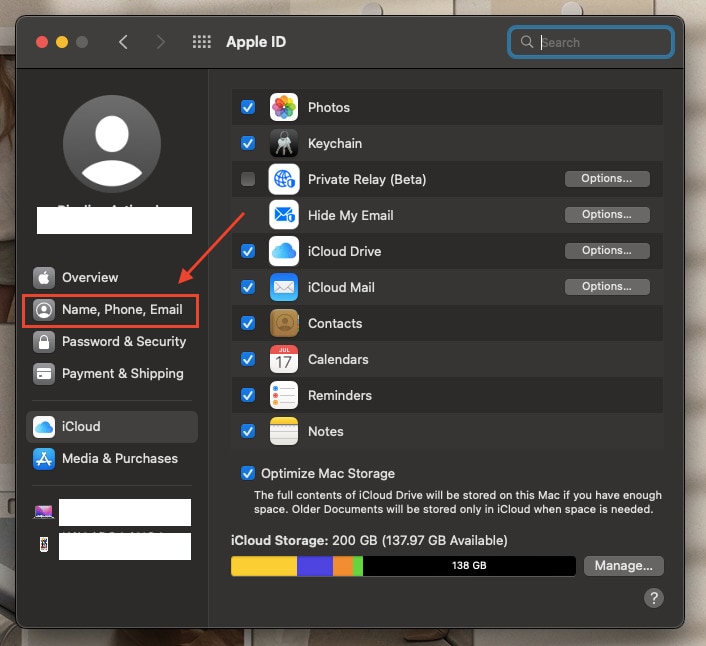
- Step 3: Navigate to the Name, Phone, Email section, then click Edit next to your email address.
- Step 4: Input your new email address, and Apple will send a verification code to it.
- Step 5: Check your new email for the verification code, enter it, and voilà! Your Apple ID email is updated on your Mac.
Method 2: For Mobile Device Users
For those who prefer the convenience of mobile devices:
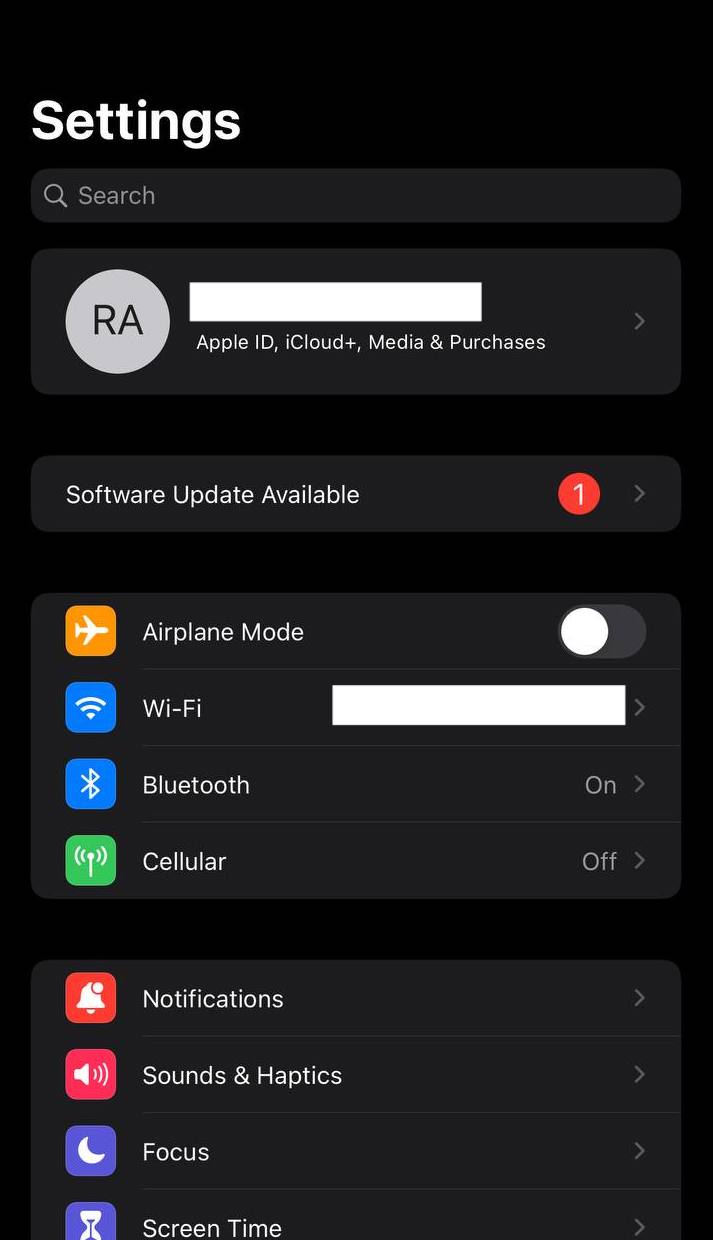
- Step 1: Open the Settings app on your Apple iPhone 12 or iPad, then tap your Apple ID at the top of the screen.
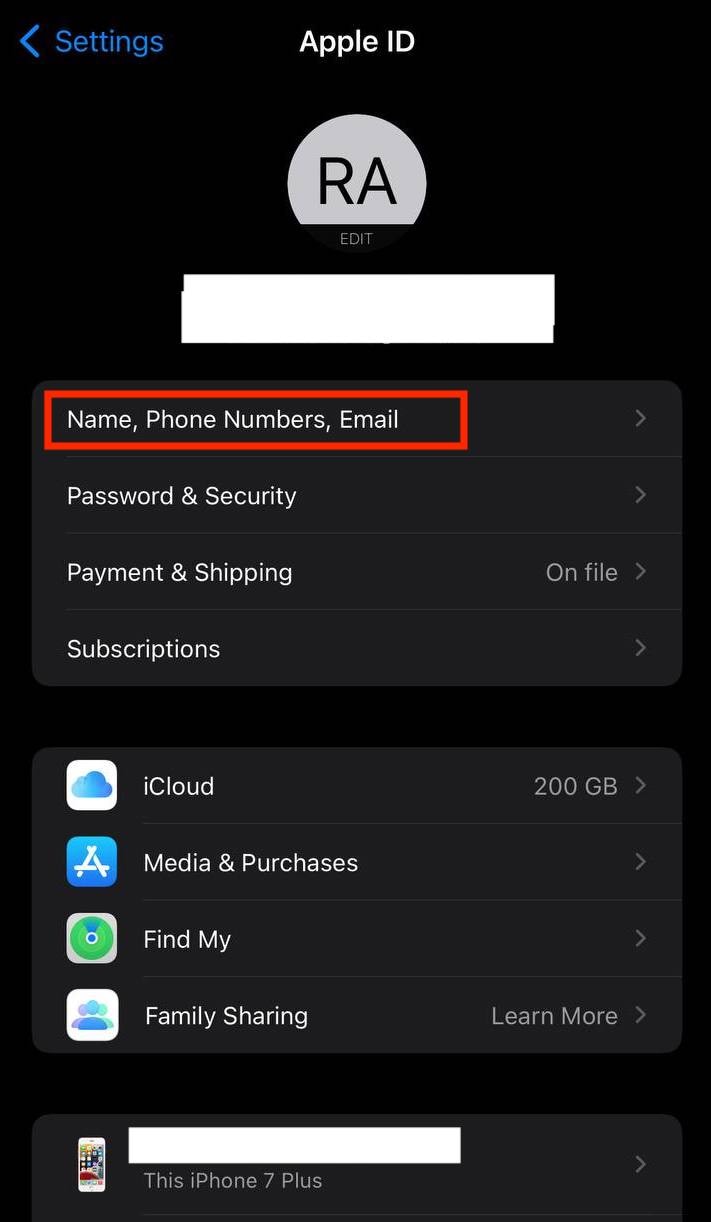
- Step 2: Tap Name, Phone Numbers, Email.
- Step 3: Tap Edit next to your email address, enter your new one, then tap Next.
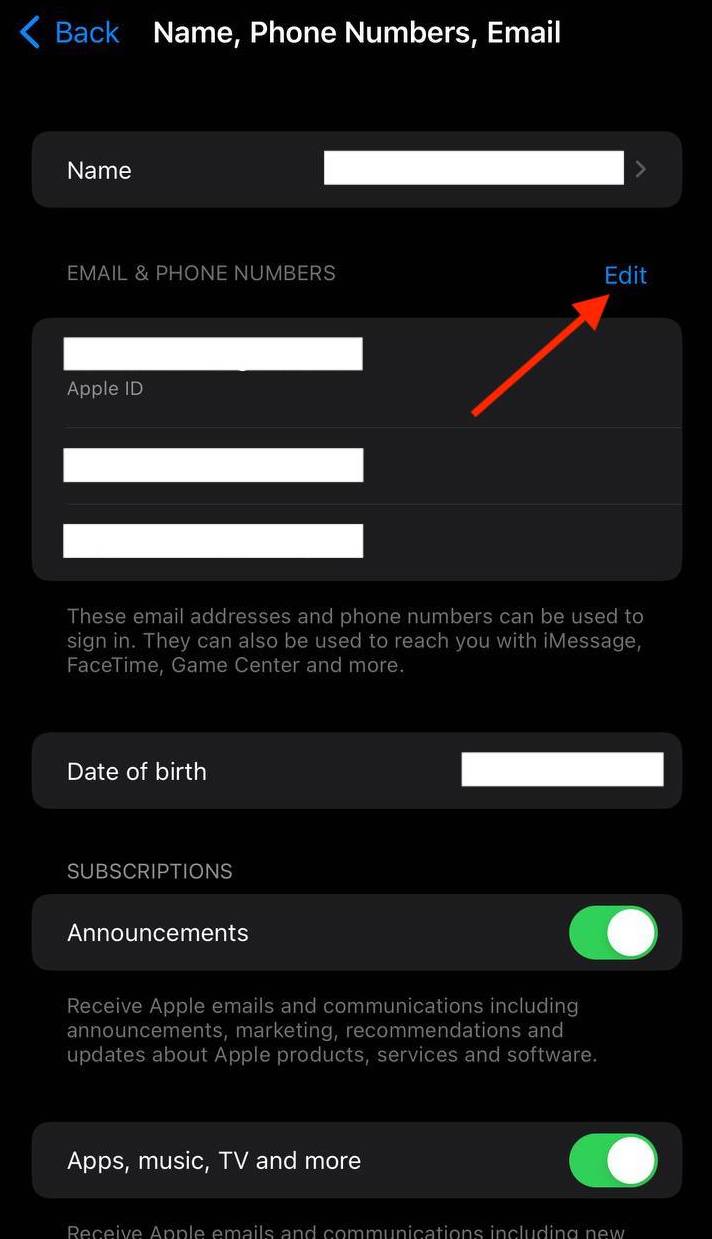
- Step 4: Apple will send a verification code to the new email. Enter it, and your Apple ID email on your mobile device is updated.
Method 3: For Browser Users
If you prefer the simplicity of a web browser:
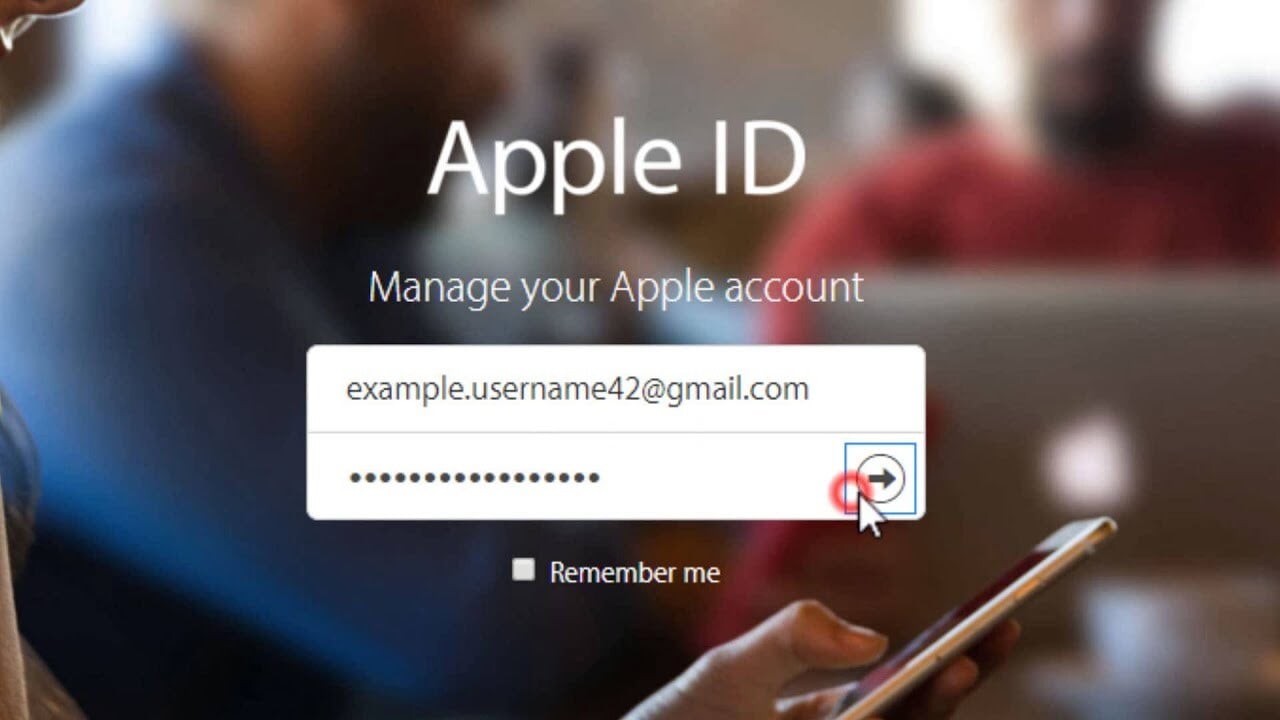
- Step 1: Open the web browser your prefer and go to the Apple ID account management page.
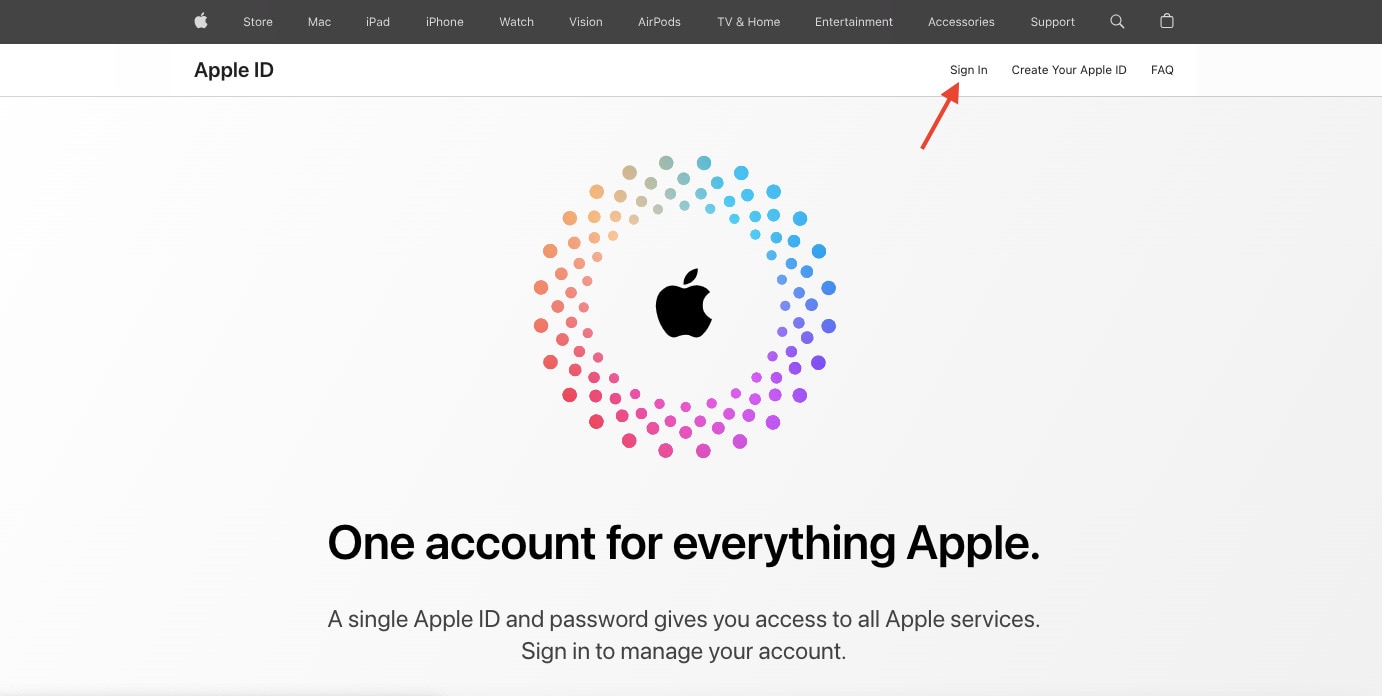
- Step 2: Click Sign In and tap your Email or Phone Number and Password.
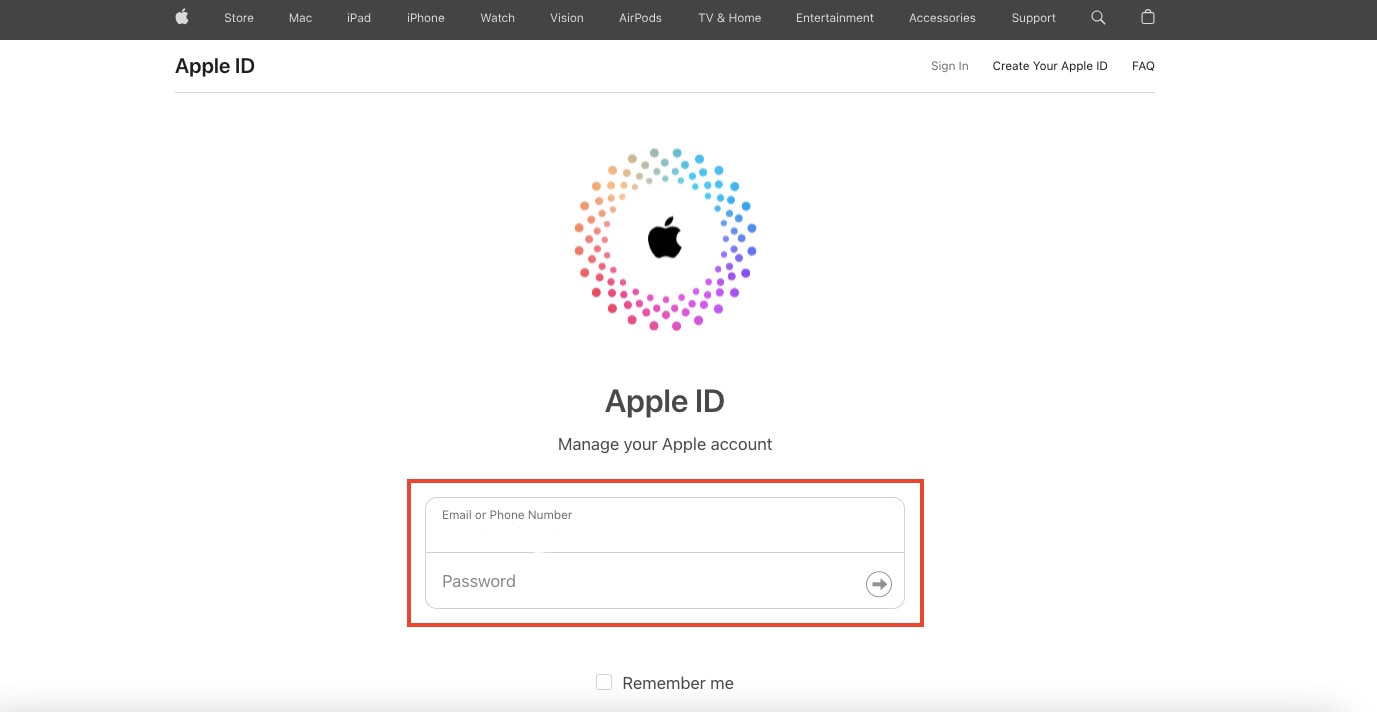
- Step 3: Click Edit next to your email address in the Account section.
- Step 4: Input your new email address and click Continue.
- Step 5: A verification code will be sent to your new email. Enter it to confirm your email change.
B. Updating Your Apple ID
Now that you’ve successfully changed your Apple ID email, it’s crucial to ensure that all your Apple devices are on the same page:
- Step 1: Tap the Settings application on your Apple iPhone 12 or iPad.
- Step 2: Go to Update Apple ID Settings below your Apple ID settings.
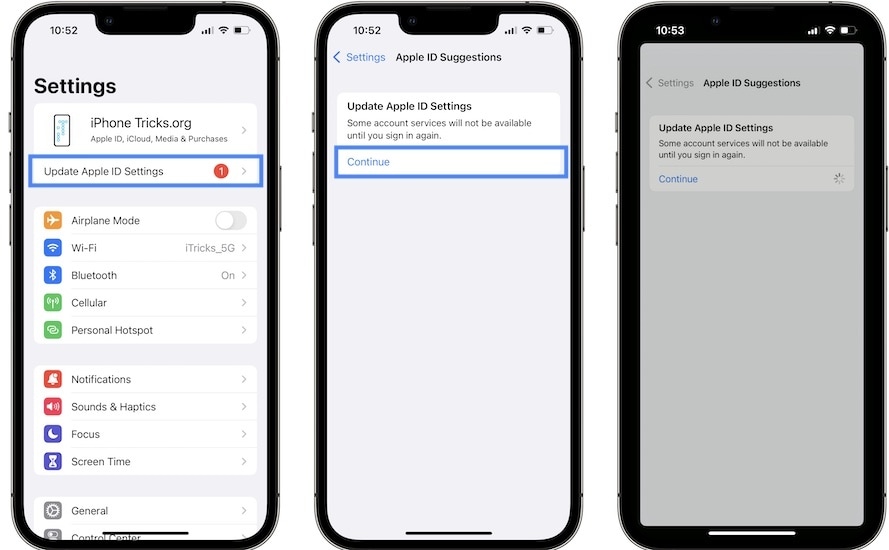
- Step 3: Tap Continue, then wait for a few moments. Your Apple ID will then get updated.
By following these steps, you’ll ensure that all your Apple devices are synced with your updated email address, providing a seamless and consistent Apple experience across all your gadgets. Now, with your new Apple ID email, you’re ready to explore the Apple ecosystem with renewed convenience and security.
Part III: Unlock iOS Screen With Wondershare Dr.Fone - Screen Unlock (iOS)
What if you find yourself in a situation where you want to change your Apple ID email address on your iOS device, but you’re locked out? Don’t worry; Dr.Fone - Screen Unlock (iOS) can rescue you. This handy tool is designed to help you unlock your iOS device, allowing you to change your Apple ID email address smoothly.
Key Features of Dr.Fone - Screen Unlock (iOS)
Check out the key features that Dr.Fone has to offer:
- **User-Friendly Interface.**Fone - Screen Unlock (iOS) is designed to be easy to use, making it accessible for users of all levels of technical expertise.
- It fits a wide range of iOS devices, including iPhones and iPads, ensuring that you can unlock your device no matter which one you have.
- **Multiple Unlock Modes.**Fone offers different unlock modes to cater to various scenarios. Whether you’ve forgotten your passcode, have a disabled device, or are dealing with a locked Apple ID, Dr.Fone has a solution.
- **No Data Loss.**One of the most significant advantages of Dr.Fone is that it unlocks your device without causing any data loss. Your photos, apps, and important information remain intact.
Step-by-Step Guide on Using Dr.Fone - Screen Unlock (iOS)
Outlined below is the step-by-step guide on how to use Dr.Fone – Screen Unlock for iOS devices:
- Step 1: When you’ve finished downloading and installing Wondershare Dr.Fone on your computer, go to Toolbox, then Screen Unlock, and choose iOS to open the tool in a new window.
- Step 2: Begin to pick the Unlock iOS Screen button in the new window to begin unlocking the screen of your iOS device. On the following screen, click the Start button to begin unlocking the iOS device.
Note: Ensure your device’s battery levels are enough before proceeding.

- Step 3: Following that, place your iDevice in Recovery Mode. Follow the on-screen instructions to set your iDevice into mode based on your phone model.
Note: If Recovery Mode does not work, try hitting the Try DFU Mode button at the bottom to access the instructions for putting the iDevice in DFU mode.
- Step 4: After successfully entering your device into Recovery Mode, the platform automatically recognizes the Device Model and shows it in the appropriate section. Modify the model and select the System Version to meet your needs if necessary. After that, select Start to begin unlocking your device’s screen.
- Step 5: The next screen shows the progress of your iOS firmware download. If at any point you decide you’d rather call it quits, hit the Stop button. If the iOS firmware takes a long time to download on your platform, you can copy the download link by clicking the Copy option.

- Step 6: After a successful download, the iOS firmware is checked and shown on the next screen. Select the Unlock Now option again to proceed with the unlocking procedure. A confirmation popup displays, requesting you to confirm the action. Enter the unlock code and press the Unlock button to continue.

- Step 7: You’ll see the unlocking status of your iOS device on the following screen. Don’t forget that keeping the gadget plugged in is necessary to avoid bricking it.
- Step 8: Click the Done button once the iDevice has been unlocked. If you’re still stuck with a locked iPhone, iPad, or iPod, select Try Again to retry the process.
By using Dr.Fone - Screen Unlock (iOS), you can regain access to your iOS device and continue with the process of changing your Apple ID email address hassle-free. It’s a reliable and user-friendly solution that ensures you can enjoy the benefits of the new email address without losing any of your precious data.
You May Also Like:
How to Show Email Password on iPhone and Find It Back
A Detailed Guide to Fix All iPad Email Problems [2023]
How to Fix Email Disappeared from iPhone?
Conclusion
This guide easily explored the process of changing your Apple ID email address. It started by understanding why this change might be necessary and provided straightforward methods for Mac, mobile, and browser users to accomplish it seamlessly.
But what if you’re locked out of your iOS device? Don’t fret; Dr.Fone - Screen Unlock (iOS) is a user-friendly tool that can help you regain access to your device. It ensures a smooth transition to your new email. Unlock new possibilities with Dr.Fone, a reliable companion in managing your iOS device. Explore its features and simplify your Apple journey today!
How to Turn Off Find My Apple iPhone 12 when Phone is Broken?
In today’s world, your phone is your most important asset. Especially when you own an iPhone, you’re much more careful because it is pretty expensive than normal phones. You’re always making sure to keep it safe and secure, but Apple has ways to keep you away from this hassle.
Apple ensures the privacy and security of its customers. For that, it has introduced this excellent feature of Find My iPhone, which keeps track of the location of your device no matter in which part of the world you are. So, if you’ve lost your Apple iPhone 12 or it is stolen, this app is your savior.
Downloading and enabling Find My iPhone can be really easy and cinch but turning it off can be an arduous task. But we have you covered through this article that shall tell you about this app in detail and guide you on how to turn off Find My iPhone even when your Apple iPhone 12 is broken.
Part 1: What is Find My iPhone?
Find My iPhone is an application forged by Apple that keeps track of your Apple iPhone 12’s location protects your data. Once you enable this application, it requires your iCloud password to unlock your phone to keep your Apple iPhone 12 safe from the wrong hands. This application comes in handy when you accidentally lose or misplace your phone.
The best part about this application is that it is free of cost. It usually comes built-in your Apple iPhone 12 already, but if not, you can easily download it from the app store. Sign in with your Apple ID, and it will automatically locate your Apple iPhone 12 no matter where you go.
Part 2: Efficient Way of Turning Off Find My iPhone Within Second- Dr. Fone
Dr.Fone - Screen Unlock is an excellent data recovery and management software created by Wondershare. However, limiting it to just recovery and management of data will not be just as it offers much more than just that. Transferring files, repairing the operating system, changing the GPS location, and fixing the activation lock are its amazing services.
Dr.Fone - Screen Unlock (iOS)
Turning Off Find My iPhone Within Second.
- Maintains the security of your data and keeps it in its original form.
- Recovers your data from damaged or broken devices.
- Erase’s data in such a way that no other software can recover it.
- Has great integration with iOS and macOS.
3981454 people have downloaded it
Dr.Fone can also be a great solution for how to turn off Find My iPhone when your Apple iPhone 12 is broken.
Step 1: Install Dr. Fone
Launch Wondershare Dr.Fone on your computer and connect your Apple iPhone 12 with it via cable.
Step 2: Unlock Apple ID
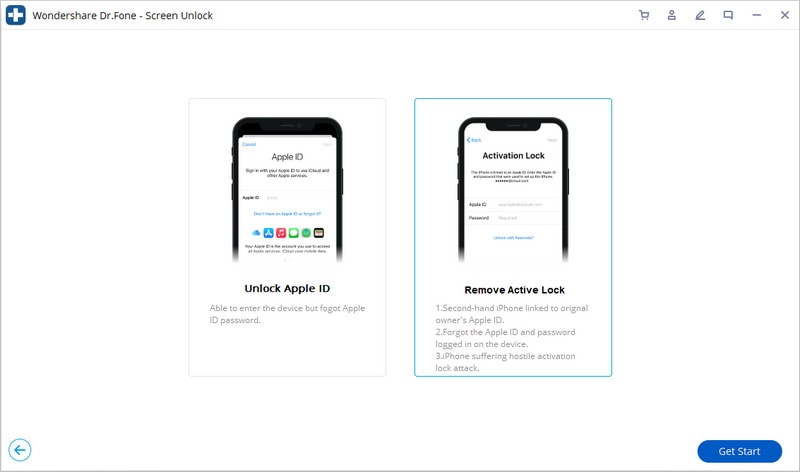
Open Wondershare Dr.Fone and select “Screen Unlock” among the other options on the home interface. Now another interface will appear displaying four options. Click on “Unlock Apple ID.”
Step 3: Remove Active Lock
After choosing the “Unlock Apple ID” option, an interface will be displayed that will show another two options, out of which you have to select “Remove Active Lock” to proceed further.
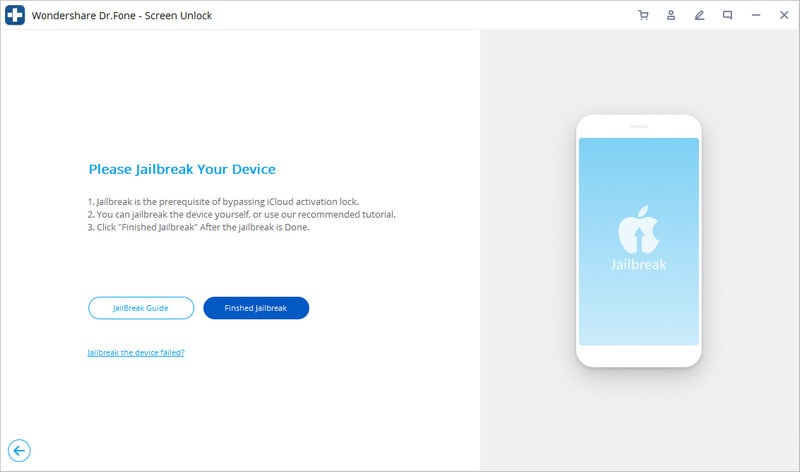
Step 4: Jailbreak your Apple iPhone 12
Jailbreak your Apple iPhone 12 by following the instructions given by the system. Once you complete them, click on “Finish Jailbreak.”
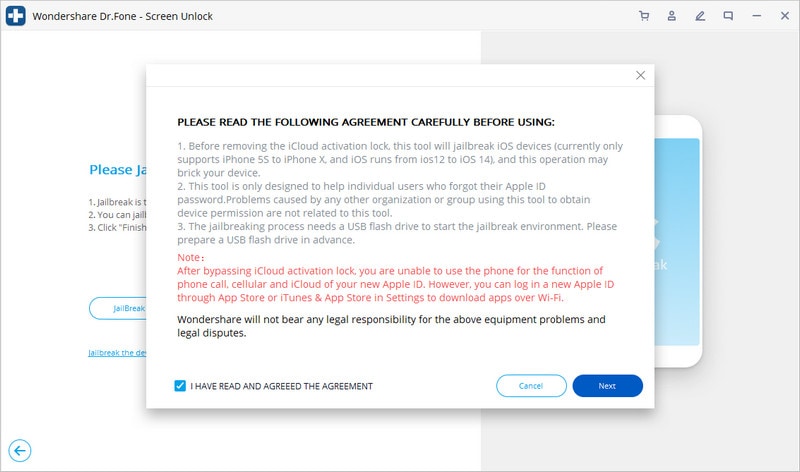
Step 5: Confirmation Window
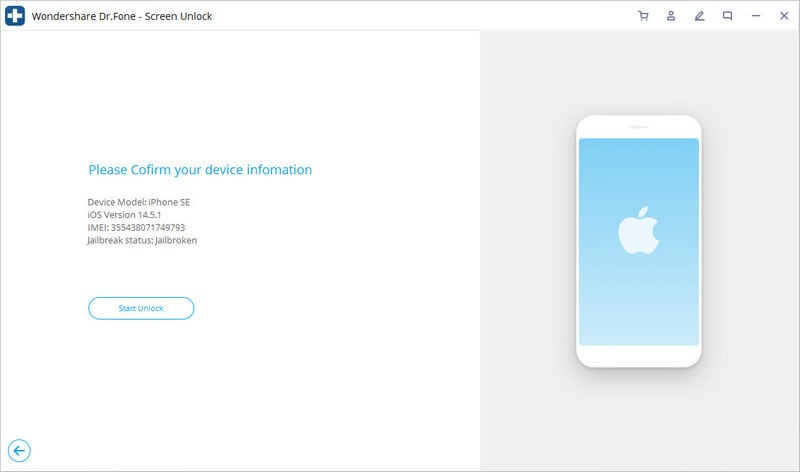
A warning will be displayed on the screen asking for confirmation to remove the active lock. Then again, another confirmation message will pop up confirming the model of your device.
Step 6: Unlock your Apple iPhone 12
Click on “Start Unlock” to proceed. Once the process is started, you have to wait for a moment until the activation lock is successfully removed.
Step 7: Turn off Find My iPhone
As your activation lock is removed, go to the settings and remove your Apple ID. Consequently, Find My iPhone will be disabled.

Part 3: How to Turn Off Find My iPhone on Broken iPhone Using iCloud?
iCloud is the most secure storage drive introduced by Apple. It keeps your gallery, your reminders, contacts, and your messages up to date. Moreover, it also organizes and stores your files while keeping them private and secure. iCloud strongly integrates your Apple iPhone 12 with other iOS devices so you can share your data, documents, and location with other iCloud users.
As mentioned earlier, turning off Find My iPhone can be very complex. But if your Apple iPhone 12 is damaged in some way, turning it off can be much more stressful. Here, iCloud can come to the rescue as it’s the most effective solution for how to turn off Find My iPhone when your phone is broken.
Here we have explained to you step by step how to turn off Find My iPhone on broken iPhone using iCloud:
Step 1: Go to the official website of iCloud.com and enter your credentials to sign in with your Apple ID.
Step 2: Click on the “Find My iPhone” icon at the end of the page. The app will start locating your device, but as your Apple iPhone 12 is damaged, it might not find anything.

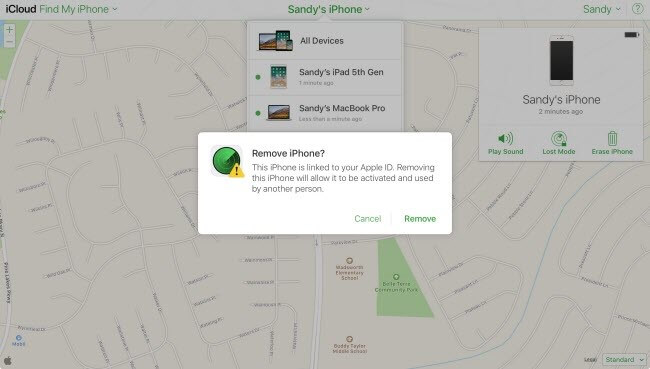
Step 3: Click on the “All Devices” option from the top. Select your Apple iPhone 12, which you want to remove by clicking on “Remove from account.”
Step 4: Once your device is removed from the account, a window will pop up asking you to delete the option of that device from your iCloud account. Now you may log in Find My iPhone with your iCloud account on another device.
Part 4: Turn off Find My iPhone using Recovery Mode
The recovery model of the Apple iPhone 12 allows you to reset or restore your data. It also offers data cleaning and backing up of apps to keep your Apple iPhone 12 updated and free of glitches. When your phone is lagging or not working properly, then you need to put it into Recovery Mode.
However, Recovery Mode can also be useful to turn off Find My iPhone on your device. Here are the steps that will guide you on how to turn off Find My iPhone on a broken phone using Recovery Mode.
Step 1: Connect your Apple iPhone 12 to your computer via cable and wait for your computer to detect your device.
Step 2: As soon as your Apple iPhone 12 is detected, open iTunes and force restart your phone to activate the Recovery Mode. Activating this mode is different for different models of iPhone.
- For iPhone 8 and the later: Press the Volume Down button and release is immediately. Then press the Volume Up button and release it immediately again. After that, press and hold the Power Button until you see the Apple logo.
- For iPhone 7 and 7+: Press the Power Button and Volume Down button at the same time and hold them until the Apple logo appears on your screen.
- For iPhone 6s, and Previous Models: Press and hold the Home Button and Power button concurrently until your Apple iPhone 12 shows the Apple logo.
Once your Apple iPhone 12 shows the Apple logo, it means the Recovery Mode is activated.
Step 3: Now click on “Restore” so iTunes can download software on your Apple iPhone 12. Once the process is completed, you can set up your Apple iPhone 12 as new. This means your previous data will be erased, and Find My iPhone will be disabled automatically.
Conclusion
Now we’re done as we’ve provided you the best possible solutions to turn off Find My iPhone when your Apple iPhone 12 is broken. It is obvious that it is a quite complicated process, but you have to be patient and follow the steps correctly to disable Find My Apple iPhone 12 to avoid any inconvenience in the future. We hope this article answers all your queries regarding it.
Also read:
- [Updated] In 2024, Highlighted Viewer Insights Unveiled
- 2024 Approved From Raw Renders to Rich Realities Grading in Post-Production
- Advanced Pro-Level NextJS Material Dashboard by Creative Tim: Exclusive Admin Templates
- Capturing the Moment Expert Tips for Amazing Android Slow Mo Videos
- Dealing with Unexpected Failures of In-Car Radio Systems
- How Do You Remove Restricted Mode on Apple iPhone 14 Plus
- How to get the dragon scale and evolution-enabled pokemon On Nubia Red Magic 8S Pro? | Dr.fone
- How to Make the Most of Your Apple iPhone 8 Lock Screen with Notifications?
- In 2024, iPhone Is Disabled? Here Is The Way To Unlock Disabled iPhone 11 Pro Max
- Learn How To Lock Stolen Your Apple iPhone 14 Plus Properly
- Unlock iPhone 12 With Forgotten Passcode Different Methods You Can Try
- Title: In 2024, Apple iPhone 12 Asking for Passcode after iOS 17/14 Update, What to Do?
- Author: Sophia
- Created at : 2024-12-17 16:20:30
- Updated at : 2024-12-20 16:06:47
- Link: https://ios-unlock.techidaily.com/in-2024-apple-iphone-12-asking-for-passcode-after-ios-1714-update-what-to-do-by-drfone-ios/
- License: This work is licensed under CC BY-NC-SA 4.0.