
In 2024, Full Guide to Unlock Apple iPhone 7 Plus with iTunes
Full Guide to Unlock Apple iPhone 7 Plus with iTunes
With such countless passwords, forgetting passwords on occasion isn’t surprising. What are your possibilities for iTunes unlock phone if you run over such circumstances and lose your password? Certainly, when this question springs up, you must not get terrified. We are here to direct you through the process of fixing this issue.
Losing a passcode is entirely normal and can happen to anyone. So, if you are also among the lot, we will elaborate on how to unlock iPhone with iTunes. After thorough research, our experts have laid out some essential unlocking methods for our readers. So, if you need to get things straight, read this detailed guide to go over your issue.
Part 1: Why Was My iPhone Disabled?
Using a lock screen passcode to secure your iDevice is an excellent way. However, it can become troublesome when you forget the key to your phone. Moreover, you may get stuck even if your screen breaks. On the other hand, someone may take your phone and type a few incorrect passcodes.
If your screen displays “iPhone disabled,” the most probable reason is an excess of wrong passcode attempts. However, this can sometimes occur without you understanding if the phone is in your pocket.
It would help if you erased your Apple iPhone 7 Plus to eliminate the lock and passcode, then re-sync it with iTunes. Then, you can restore your phone from an iCloud or an iTunes backup, but if you have never used a backup on your phone, your phone will have nothing. This guide illustrates how to unlock disabled iPhone with iTunes.
Part 2: How to Unlock iPhone with iTunes
At first, iTunes was only a media software used to play, download and see sound and video documents. Later in 2011, it became a valuable tool to support information and adjust it across numerous devices.
It added the ‘Restore’ option that can assist clients with unlocking their iPhones when they forget their passcode.
In any case, one has to know that iTunes is not an expert unlocking tool. Apple seldom updates iTunes, and its last update was long ago. Consequently, it has numerous tech bugs. As a result, the unlocking process using iTunes takes a lot of time. During the process, you may experience different error codes like 3004, 1100, 3194, 4000, and 4013. That makes it a tedious process.
Requirements for Windows PC:
- For iTunes unlock phone, your PC should have installed Windows 8 or later and the most recent iTunes variant.
Requirements for Mac:
- Open the Finder window if you have macOS Catalina or a more recent one.
- Open the most current version of iTunes using macOS Mojave or older.
- You must have a USB connector.
Steps (For Windows)
Step 1. Connect the locked Apple iPhone 7 Plus to the PC
Connect your locked Apple iPhone 7 Plus to your PC through a lightning or USB connector. Open iTunes on Windows PC.
Step 2. Put your Apple iPhone 7 Plus in recovery mode
To enter a Recovery Mode, press a combination of buttons on your Apple iPhone 7 Plus. Doing such, you will see a recovery mode screen on your Apple iPhone 7 Plus. To place the Apple iPhone 7 Plus in Recovery mode, follow these:
- iPhone 8 or above (second and third generation): Press and release the volume (+) button. Press and release the volume (-) button. Hold power/side button until seeing the recovery mode on your screen.
- iPhone 7 and 7 Plus: Press the top (or side) and volume down buttons simultaneously until the recovery screen shows up.
- iPhone SE (first generation) and iPhone 6S: Hold the home button and the power/side button simultaneously until the recovery mode screen shows up.
Note: If you see the passcode screen, switch off your Apple iPhone 7 Plus and do the process again until you see the Recovery mode screen.
Step 3. Restore your Apple iPhone 7 Plus
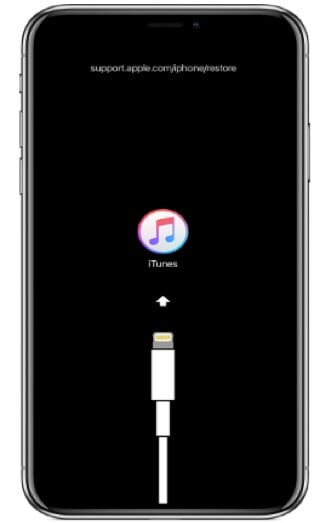
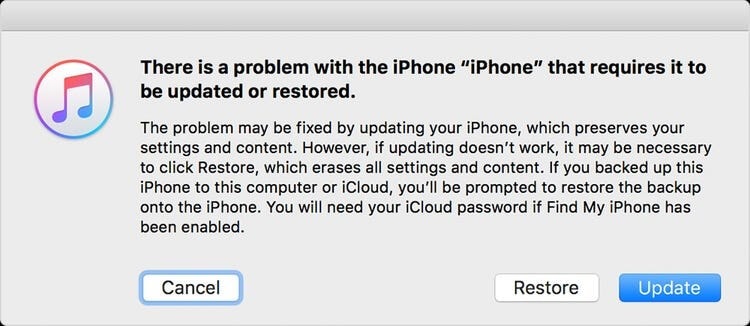
As the recovery Mode screen shows up on the iPhone, you will find your Apple iPhone 7 Plus on iTunes unlock phone screen. Then, a box shows up with a message saying there is an iPhone issue. It will expect you to update or restore your phone. So, click on Restore.
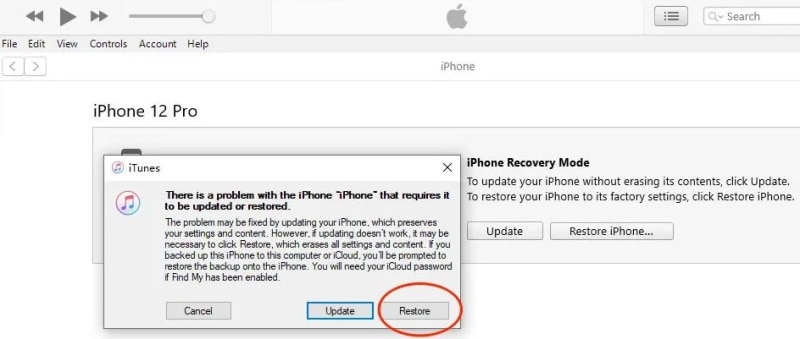
Step 4. It then asks you to confirm whether you are sure you need to restore the Apple iPhone 7 Plus to its default factory state. It does so because your media and data will be all erased. Then, click on Restore and Update.
Step 5. Then, “iPhone Software Update” may spring up. Click Next, and afterwards, click Agree. iTunes will begin downloading the software and restore your Apple iPhone 7 Plus when the download is finished.
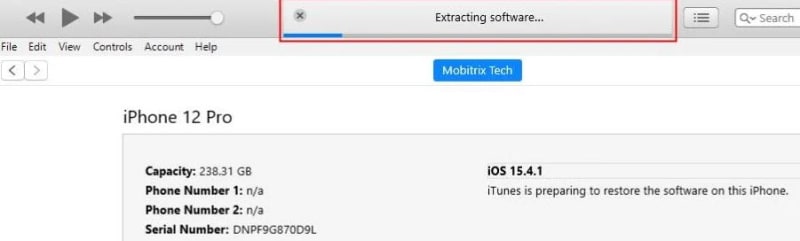
When the “iPhone software update” is downloaded, iTunes will show that it will erase your Apple iPhone 7 Plus and restore it to iOS 15.4.1. Then click on Restore.
The above bar will show “Extracting software… “. It implies iOS 15.4.1 iTunes is planning to restore the software on this iPhone.
Step 6. Your Apple iPhone 7 Plus will show the restore progress bar with the white apple logo. The length of the process relies upon how much data is on your cell phone. Generally, it takes 20 to 120 minutes. When done, your Apple iPhone 7 Plus will restart naturally. Furthermore, after your Apple iPhone 7 Plus restarts, you can reset your Apple iPhone 7 Plus. For example, you can make a new passcode.
Part 3: Unlocking iPhone without iTunes
1. Unlock it with Find My in iCloud
Find My is a famous element in Apple devices that allows you to find your lost phone through Maps. The component has been updated from that point forward, and presently it can be utilized to erase your Apple iPhone 7 Plus. Additionally, you can use it to erase your information without a passcode.
Steps to Unlock:
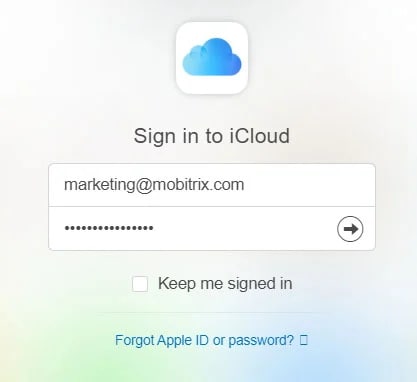
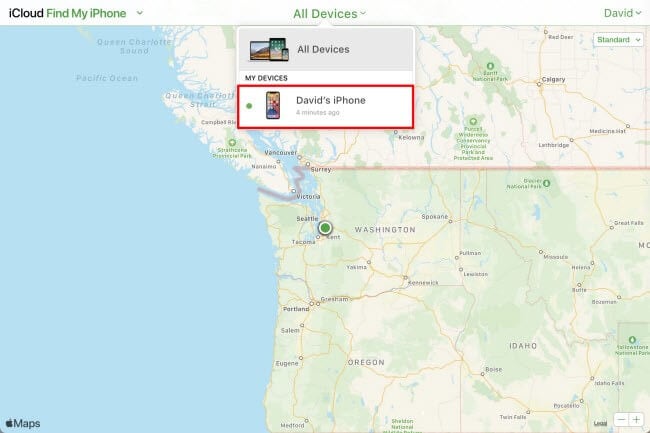
Step 1. Open iCloud.com on a mobile or internet browser.
Step 2. Enter your Apple ID and password as inquired.
Step 3. After signing in effectively, click on Find My and enter your Apple ID and password. Click on Sign In.
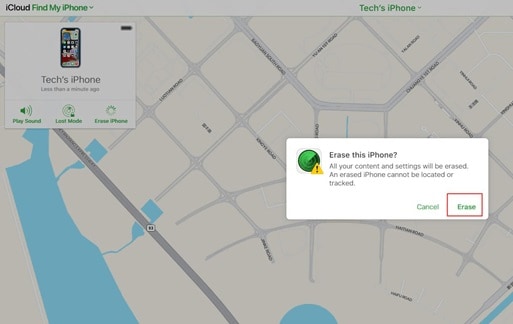
Pick your locked gadget under the “All Devices” area.

Step 4. Click on ‘Erase iPhone’. Click on ‘Erase’ again.
Step 5. Enter the Apple ID password to proceed.
Step 6. A check code will be sent to unlock your locked gadget. Enter the code to proceed.
Step 7. Presently, enter your number. Then, click Next and then Done.
Step 8. The iCloud will effectively begin the erase, and you can see the Apple sign with a white advancement bar noticeable on your locked iPhone. After an effective erase process, your Apple iPhone 7 Plus will restart.
Step 9. Swipe up on the Apple iPhone 7 Plus screen to begin once more.
Step 10. iPhone will show that it is locked to the owner. You have to sign in with your Apple ID again, enter the password, and tap on Next. You will currently be enabled to make your new passcode.
2. Dr.Fone-Screen Unlock
If you are searching for an elective way to unlock your Apple iPhone 7 Plus with iTunes, you can pick Wondershare Dr.Fone-Screen Unlock.
This software is an ideal iTunes elective that doesn’t need a passcode to unlock the iPhone. Whatever the situation, Dr.Fone can determine the issue in no time. It can eliminate Face ID, Touch ID, or a 4 to 6-digit passcode in no time. Moreover, it works with almost any iOS version at the moment. Here’s the alternate way to iTunes unlock phone:
Step 1. Connect your iDevice to the PC
From the Dr.Fone program on your PC, select “Screen Unlock” the tool.

Then use a USB connector to connect your iOS gadget to the PC. Then, click the “Unlock iOS Screen” option on your screen.

Step 2. Boot your iDevice in Recovery/DFU Mode
Before deleting the Apple iPhone 7 Plus screen, it is necessary to boot it in Recovery/DFU. You can follow the steps on your screen to do so. Moreover, the Recovery mode is the suggested way for your situation. However, you can use the DFU mode if this doesn’t work.

Step 3. Confirm Phone Model
After turning the DFU mode on, the program will show your phone information. In addition, it will show its model and software version. You can choose the correct data from the dropdown menu if it isn’t accurate. Then, it is time to download the firmware required for your phone model.

Step 4. Remove the Lock
After downloading the firmware, tap Unlock Now to begin the unlocking process.

Doing so will unlock your Apple iPhone 7 Plus within no time. However, kindly note this unlocking process will likewise wipe your Apple iPhone 7 Plus’s user data. Indeed, each solution removes your data. Therefore, you must be careful enough to back up your files before doing this process.
The Bottom Line
We hope you found out about how to unlock iPhone with iTunes. We likewise discussed what to do when you need an alternate method to iTunes. We know that using iTunes can be somewhat complicated; hence, the other options can help you a ton. However, we strongly suggest Dr.Fone-Screen Unlock for a more refined unlocking process.
How to Turn Off Find My Apple iPhone 7 Plus when Phone is Broken?
In today’s world, your phone is your most important asset. Especially when you own an iPhone, you’re much more careful because it is pretty expensive than normal phones. You’re always making sure to keep it safe and secure, but Apple has ways to keep you away from this hassle.
Apple ensures the privacy and security of its customers. For that, it has introduced this excellent feature of Find My iPhone, which keeps track of the location of your device no matter in which part of the world you are. So, if you’ve lost your Apple iPhone 7 Plus or it is stolen, this app is your savior.
Downloading and enabling Find My iPhone can be really easy and cinch but turning it off can be an arduous task. But we have you covered through this article that shall tell you about this app in detail and guide you on how to turn off Find My iPhone even when your Apple iPhone 7 Plus is broken.
Part 1: What is Find My iPhone?
Find My iPhone is an application forged by Apple that keeps track of your Apple iPhone 7 Plus’s location protects your data. Once you enable this application, it requires your iCloud password to unlock your phone to keep your Apple iPhone 7 Plus safe from the wrong hands. This application comes in handy when you accidentally lose or misplace your phone.
The best part about this application is that it is free of cost. It usually comes built-in your Apple iPhone 7 Plus already, but if not, you can easily download it from the app store. Sign in with your Apple ID, and it will automatically locate your Apple iPhone 7 Plus no matter where you go.
Part 2: Efficient Way of Turning Off Find My iPhone Within Second- Dr. Fone
Dr.Fone - Screen Unlock is an excellent data recovery and management software created by Wondershare. However, limiting it to just recovery and management of data will not be just as it offers much more than just that. Transferring files, repairing the operating system, changing the GPS location, and fixing the activation lock are its amazing services.
Dr.Fone - Screen Unlock (iOS)
Turning Off Find My iPhone Within Second.
- Maintains the security of your data and keeps it in its original form.
- Recovers your data from damaged or broken devices.
- Erase’s data in such a way that no other software can recover it.
- Has great integration with iOS and macOS.
3981454 people have downloaded it
Dr.Fone can also be a great solution for how to turn off Find My iPhone when your Apple iPhone 7 Plus is broken.
Step 1: Install Dr. Fone
Launch Wondershare Dr.Fone on your computer and connect your Apple iPhone 7 Plus with it via cable.
Step 2: Unlock Apple ID
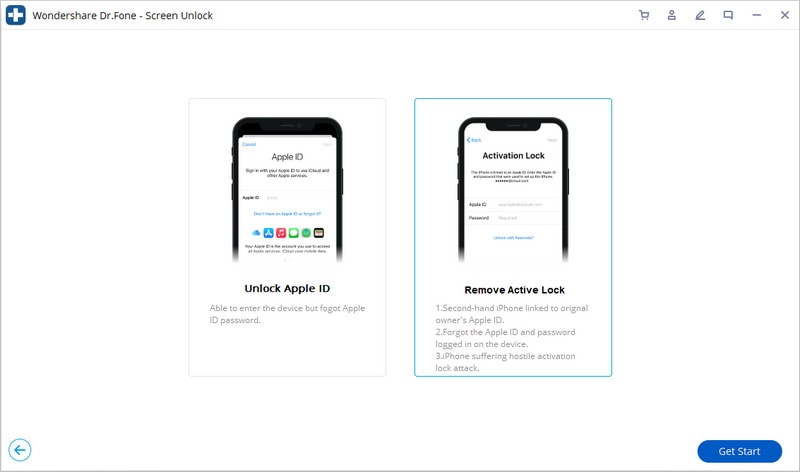
Open Wondershare Dr.Fone and select “Screen Unlock” among the other options on the home interface. Now another interface will appear displaying four options. Click on “Unlock Apple ID.”
Step 3: Remove Active Lock
After choosing the “Unlock Apple ID” option, an interface will be displayed that will show another two options, out of which you have to select “Remove Active Lock” to proceed further.
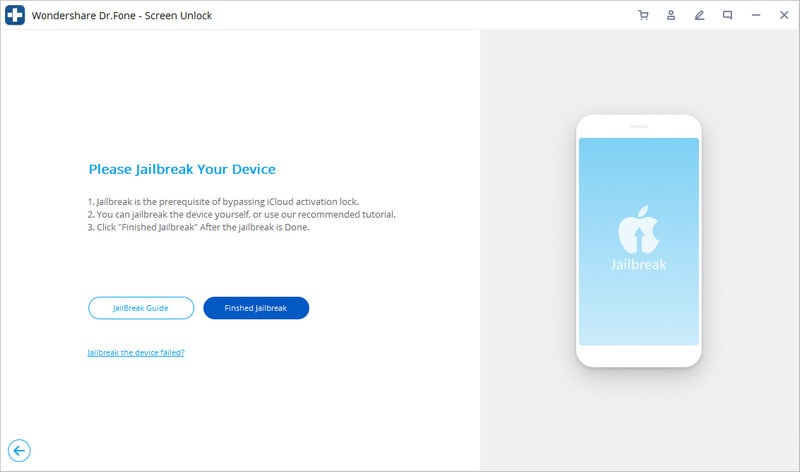
Step 4: Jailbreak your Apple iPhone 7 Plus
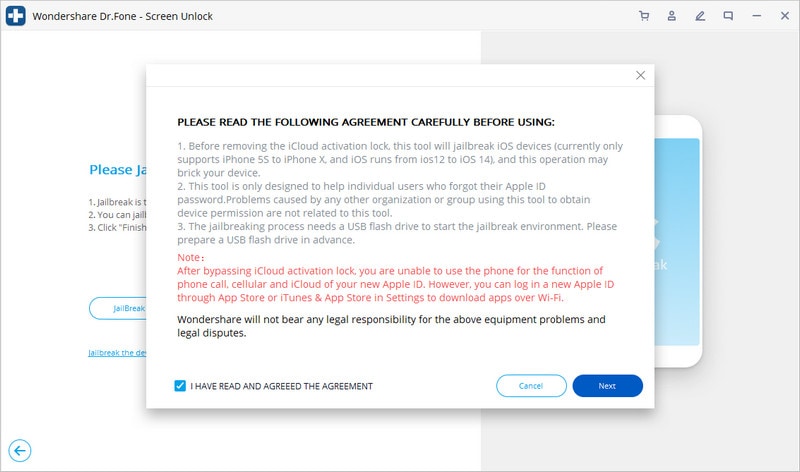
Jailbreak your Apple iPhone 7 Plus by following the instructions given by the system. Once you complete them, click on “Finish Jailbreak.”
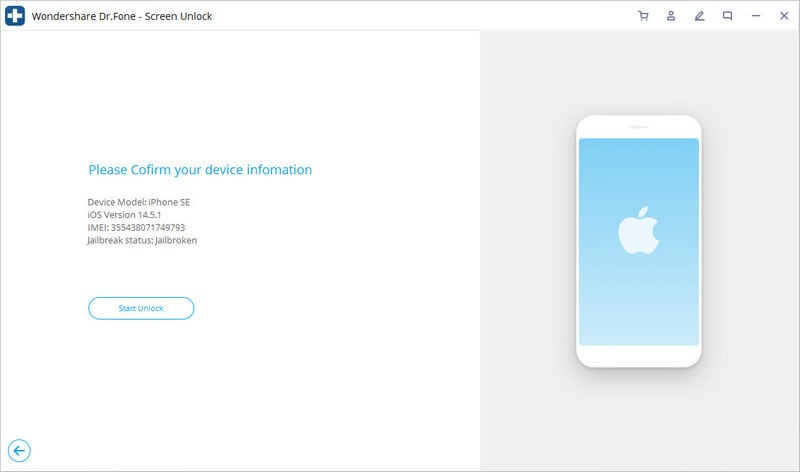
Step 5: Confirmation Window
A warning will be displayed on the screen asking for confirmation to remove the active lock. Then again, another confirmation message will pop up confirming the model of your device.
Step 6: Unlock your Apple iPhone 7 Plus
Click on “Start Unlock” to proceed. Once the process is started, you have to wait for a moment until the activation lock is successfully removed.
Step 7: Turn off Find My iPhone
As your activation lock is removed, go to the settings and remove your Apple ID. Consequently, Find My iPhone will be disabled.

Part 3: How to Turn Off Find My iPhone on Broken iPhone Using iCloud?
iCloud is the most secure storage drive introduced by Apple. It keeps your gallery, your reminders, contacts, and your messages up to date. Moreover, it also organizes and stores your files while keeping them private and secure. iCloud strongly integrates your Apple iPhone 7 Plus with other iOS devices so you can share your data, documents, and location with other iCloud users.
As mentioned earlier, turning off Find My iPhone can be very complex. But if your Apple iPhone 7 Plus is damaged in some way, turning it off can be much more stressful. Here, iCloud can come to the rescue as it’s the most effective solution for how to turn off Find My iPhone when your phone is broken.
Here we have explained to you step by step how to turn off Find My iPhone on broken iPhone using iCloud:
Step 1: Go to the official website of iCloud.com and enter your credentials to sign in with your Apple ID.
Step 2: Click on the “Find My iPhone” icon at the end of the page. The app will start locating your device, but as your Apple iPhone 7 Plus is damaged, it might not find anything.

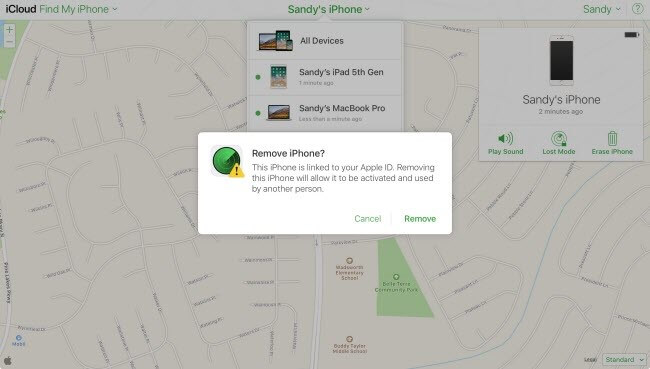
Step 3: Click on the “All Devices” option from the top. Select your Apple iPhone 7 Plus, which you want to remove by clicking on “Remove from account.”
Step 4: Once your device is removed from the account, a window will pop up asking you to delete the option of that device from your iCloud account. Now you may log in Find My iPhone with your iCloud account on another device.
Part 4: Turn off Find My iPhone using Recovery Mode
The recovery model of the Apple iPhone 7 Plus allows you to reset or restore your data. It also offers data cleaning and backing up of apps to keep your Apple iPhone 7 Plus updated and free of glitches. When your phone is lagging or not working properly, then you need to put it into Recovery Mode.
However, Recovery Mode can also be useful to turn off Find My iPhone on your device. Here are the steps that will guide you on how to turn off Find My iPhone on a broken phone using Recovery Mode.
Step 1: Connect your Apple iPhone 7 Plus to your computer via cable and wait for your computer to detect your device.
Step 2: As soon as your Apple iPhone 7 Plus is detected, open iTunes and force restart your phone to activate the Recovery Mode. Activating this mode is different for different models of iPhone.
- For iPhone 8 and the later: Press the Volume Down button and release is immediately. Then press the Volume Up button and release it immediately again. After that, press and hold the Power Button until you see the Apple logo.
- For iPhone 7 and 7+: Press the Power Button and Volume Down button at the same time and hold them until the Apple logo appears on your screen.
- For iPhone 6s, and Previous Models: Press and hold the Home Button and Power button concurrently until your Apple iPhone 7 Plus shows the Apple logo.
Once your Apple iPhone 7 Plus shows the Apple logo, it means the Recovery Mode is activated.
Step 3: Now click on “Restore” so iTunes can download software on your Apple iPhone 7 Plus. Once the process is completed, you can set up your Apple iPhone 7 Plus as new. This means your previous data will be erased, and Find My iPhone will be disabled automatically.
Conclusion
Now we’re done as we’ve provided you the best possible solutions to turn off Find My iPhone when your Apple iPhone 7 Plus is broken. It is obvious that it is a quite complicated process, but you have to be patient and follow the steps correctly to disable Find My Apple iPhone 7 Plus to avoid any inconvenience in the future. We hope this article answers all your queries regarding it.
Did Your Apple iPhone 7 Plus Passcode Change Itself? Unlock It Now
The Apple iPhone 7 Plus changing passcodes itself is not a commonly reported issue, but it surely can happen to anyone. While the reasons are uncertain, the issue can be resolved without putting much strain on your device. If you face this iPhone passcode changed itself issue by any chance, it makes it hard for you to get into your Apple iPhone 7 Plus.
However, you don’t need to worry, as this well-organized guide provides authentic methods to solve this issue. You will also find a bonus tool to fix your iPhone/iPad passcode changed itself issue without any need of knowledge.

Part 1. What Are the Reasons for iPhone Passcode Changing by Itself
Before solving the Apple iPhone 7 Plus or iPad passcode changed itself issue, you should know the actual reason behind it. Here are some points that precisely explain why the Apple iPhone 7 Plus changed its passcode by itself:
- Frequent iOS Updates: One major issue that can cause the problem of iPhone passcodes changing by itself is the ongoing iOS updates. An update can sometimes cause major glitches in the Apple iPhone 7 Plus device, which might automatically change the credentials.
- iOS System Error: Many users are reportedly known for installing and using the Beta version of iOS on their iPhones/iPads. These versions are known to hold major glitches and bugs in the software. Usually, the Apple iPhone 7 Plus changing passcode issue is normally reported by users under such scenarios.
- Malware: Malicious apps can damage your system security and make your iOS device change the passcode automatically. This can either happen due to device hacking or system security breaches.
Part 2. [The Simplest Solution] Remove iPhone Passcodes With Wondershare Dr.Fone
There are multiple ways to resolve the “iPhone changed passcode itself” issue, but they can be consistently difficult. Here, Wondershare Dr.Fone provides the simplest solution to fix your Apple iPhone 7 Plus without putting any effort. When fixing your Apple iPhone 7 Plus’s screen locks, Wondershare Dr.Fone caters to different scenarios. From Touch ID to Face ID and other basic screen locks, this tool unlocks it within minutes.
It clearly shows that you can easily get yourselves out of the miserable iPhone changed passcode itself issue. This is not only what Wondershare Dr.Fone offers its users. You can also find a high success rate for unlocking carrier and MDM locks.
Key Features of Wondershare Dr.Fone
- Wondershare Dr.Fone is compatible with all iOS devices up to iOS 17, which allows everyone to get help using its advanced functionality.
- If you lose access to your Apple ID, it can bypass the iCloud Activation Lock and help you set up your iOS device like a new one.
- Without damaging the data, Wondershare Dr.Fone allows you to remove the iTunes backup encryption . This allows you to back up, restore, transfer, or easily wipe out your device’s data.
Comprehensive Guide To Unlock Screen Using Wondershare Dr.Fone
Wondershare Dr.Fone provides the simplest solution to unlock your Apple iPhone 7 Plus and remove the passcode change issue. Follow this step-by-step guide to complete the screen unlocking process without wasting any time:
- Step 1. Start Tool and Choose Screen Unlock Function
Initially, launch Wondershare Dr.Fone on your computer and connect it to your concerned iPhone. Go into the “Toolbox” and choose the “Screen Unlock” function from the given options. Next, select “iOS” to run the process for the iOS device. Choose the “Unlock iOS Screen” option and hit the “Start” button to initiate the unlocking process.

- Step 2. Put Your Apple iPhone 7 Plus in Recovery Mode and Confirm Status
After that, follow the on-screen instructions to put your Apple iPhone 7 Plus in the Recovery Mode. In the next window, you can see your device model recognized. Then, enter your “System Version” and hit the “Start” button again to continue.
- Step 3. Download iOS Firmware and Confirm
Then, the system starts downloading the required iOS firmware according to your Apple iPhone 7 Plus model. Once the download is complete, click “Unlock Now” to implement the screen unlocking process. Enter the code in the confirmation box in the next window and choose the “Unlock” option.

- Step 4. Install iOS Firmware To Unlock Completely
After that, you can see a progress bar of the unlocking screen process. Then, it takes you to the next window after completion, where you click the “Done” button to accomplish the process.

Part 3. Set Up the Apple iPhone 7 Plus device Again Using the Security Lockout Procedure
Security Lockout or “iPhone Unavailable” happens when you attempt a wrong passcode 10 times. From there, you need to erase all your Apple iPhone 7 Plus data to regain access to the iOS device again.
While there is no direct way to regain access to your device when its passcode changes, you will have to perform a factory reset on your Apple iPhone 7 Plus to make it reusable. For that, look through the comprehensive guide on how to take your device out of this state:
- Step 1. After getting your iOS 17 device into the “iPhone Unavailable” stage, tap the “Forgot Passcode?” option in the bottom right corner.
- Step 2. To start the Apple iPhone 7 Plus reset, you need to tap on the “Start iPhone Reset.” Then, enter your Apple ID password in the given box and sign out your Apple ID. If you have an eSIM, you will be prompted with an option. Select the “Keep eSIM and Erase Data” or the “Delete eSIM and Erase Data” option according to your choice.

In another case, Apple allows you to temporarily sign in to your Apple iPhone 7 Plus using a recently changed passcode within 72 hours. But once you get into your device, set a new passcode immediately to retain your full access.
Part 4. Using iTunes To Set Up iOS Device Again
iTunes service allows you to reset your Apple iPhone 7 Plus to factory settings and unlock the screen lock if the Apple iPhone 7 Plus passcode changes on its own. Using iTunes to set up your Apple iPhone 7 Plus again is a good and safe method, but it removes your device data. If you can compromise losing data, you can follow these instructions to remove the Apple iPhone 7 Plus Passcode Changed Itself issue using iTunes:
Instructions. Firstly, launch iTunes on your desktop and connect your Apple iPhone 7 Plus. Then, you need to progress into putting your Apple iPhone 7 Plus in the Recovery Mode . Continuing this, iTunes detects your device in Recovery Mode and shows two options: “Update” or “Restore.” Click on the “Restore” option and hit the “OK” button to restore your Apple iPhone 7 Plus and regain access.

Part 5. Using iCloud To Set Up iOS Device Again
Using iCloud to unlock iOS devices is a safe and recommended method, but it also leads to complete data loss. If you wish to consider using the iCloud method, it is important for the Find My service to be active on the Apple iPhone 7 Plus device. Also, you need to be aware of your Apple ID and password before proceeding. Follow this comprehensive guide step-by-step to set up your iOS device again using iCloud.
- Step 1. First of all, open iCloud on your desktop web browser. Afterward, enter your “Apple ID” and “Password” to proceed. After trusting the Apple iPhone 7 Plus device, look for the “Grid” icon on the top right to find the “Find My” option in the list.

- Step 2. After that, choose the Apple iPhone 7 Plus device that you want to recover. Then, click the “Erase This Device” option to remove data and regain your device access.

Part 6. Using Find My App To Set Up iOS Device Again
This method needs you to have another iOS device signed into the same Apple ID with the Find My option enabled. After fulfilling these preconditions, you can follow these steps to set up your device whose iPhone passcode changed from 4 to 6 digits by itself:
- Step 1. Launch the Find My App on any other device, select the “Devices” tab from the bottom menu, find your locked iPhone in the list, and tap on that.
- Step 2. You must select the “Erase This Device” button to remove it from the iCloud account. This will instantly factory reset the Apple iPhone 7 Plus device as if it is a new iOS device.

Bonus Tip. How To Change Passcode on iPhone: A Simple Guide
We’ve discussed various reasons why the iPhone passcode changed itself above. However, there are several instances where you want to change the passcode yourself. What to do if you are looking for an effective way to change your Apple iPhone 7 Plus’s passcode? Follow the simple step-by-step guide to change the passcode from the iDevice’s “Settings:”
- Step 1. First, open iPhone “Settings” and go to the “Face ID & Passcode” option to access the Apple iPhone 7 Plus device’s security settings.

- Step 2. After that, tap “Change Passcode” and enter your six-digit passcode to see passcode options. Open “Passcode Options” and set a four-digit passcode easily or vice versa.

Conclusion
In this article, we’ve gone through the scenario of iPhone/iPad passcode changing itself due to system glitches. To fix this problem, we have introduced some effective and reliable methods with simple steps. However, Wondershare Dr.Fone is the recommended tool to bypass this issue because it provides a high success rate with an easy-to-follow system.
Tips: Are you searching for a powerful Screen Unlock tool? No worries as Dr.Fone is here to help you. Download it and start a seamless unlock experience!
Also read:
- [New] In 2024, Elite Circuit Experiences Best Five Titles
- [New] Proficient Strategies for Hyperlink Integration Into TikTok Profiles
- [Updated] In 2024, All-Encompassing Capture Suite - Detailed App Evaluations
- [Updated] Step Up Your Instagram Game with These Highest-Rated Grid Makers
- Fix Wordle Crash: IPhone/Android Streak Recovery
- How to Unlock Apple iPhone 12 mini Passcode without iTunes without Knowing Passcode?
- How To Unlock iPhone XR Without Swiping Up? 6 Ways
- How to Unlock Your Apple iPhone 8 Passcode 4 Easy Methods (With or Without iTunes)
- In 2024, Disabling iPhone 12 mini Parental Restrictions With/Without Password
- In 2024, Is Your iPhone 13 Pro Max in Security Lockout? Proper Ways To Unlock
- In 2024, Unlock Your Disabled Apple iPhone 8 Without iTunes in 5 Ways
- Recover Apple iPhone 15 Data From iOS iTunes Backup | Dr.fone
- Solution Steps for Overcoming 'Windows Cannot Reach the Specified Drive'
- Title: In 2024, Full Guide to Unlock Apple iPhone 7 Plus with iTunes
- Author: Sophia
- Created at : 2025-02-28 00:40:19
- Updated at : 2025-03-03 19:05:25
- Link: https://ios-unlock.techidaily.com/in-2024-full-guide-to-unlock-apple-iphone-7-plus-with-itunes-by-drfone-ios/
- License: This work is licensed under CC BY-NC-SA 4.0.