
In 2024, Guide on How To Change Your Apple ID Email Address On iPhone 6s Plus
Guide on How To Change Your Apple ID Email Address On Apple iPhone 6s Plus
Your Apple ID email is the key to your digital world with Apple devices. It’s the address Apple recognizes you by, allowing you to access your apps, music, and more. But sometimes, life brings changes, and your Apple ID email may need an update.
This guide will take you through the simple process of changing your Apple ID email address, ensuring it’s easy to understand every step. Explore why you might want to make this change, shedding light on common scenarios where this adjustment can enhance your Apple experience. So dive in and explore!

Part I: Why Change Your Apple ID Email?
Your Apple ID email helps you access your apps, music, and more. But sometimes, you might need to change it for simple reasons. Let’s look at why you might want to change your Apple ID email in easy-to-understand terms.
- Your email address is part of your identity. Changing it to something that better suits you can make your Apple experience more personal.
- If you think someone else knows your old email password, changing it can keep your Apple account safer. A fresh email means a new layer of security.
- Maybe you used an old email you don’t want to use anymore. Changing it lets you keep your personal life separate from your Apple stuff.
- **Email Problems.**If your old email is full of spam or not working well, switching to a new one is a good idea. You’ll get a cleaner and more reliable inbox.
- **Sharing Devices.**If you share Apple devices with someone and want to keep your stuff separate, changing your Apple ID email can help you do that easily.
- Using a more professional email address for your Apple ID can make a better impression when using Apple services for work or business.
These are the simple reasons why you might want to change your Apple ID email. It’s all about making your Apple experience better, safer, and more suited to your needs.
Part II: Step-by-Step Guide: How to Change Apple ID Email
Before you jump into changing your Apple ID email address, there’s an essential step to take. Just like you’d secure your valuables before embarking on a journey, backing up your device before going through the email change process is vital. This step ensures that none of your precious data is lost during the transition.
A. How To Change Your Apple Email Address on Various Devices
Now, let’s explore three different methods of how to change your Apple ID email address, tailored to various user preferences.
Method 1: For Mac Users
If you’re a Mac enthusiast, changing your Apple ID email is straightforward:
- Step 1: Click the Apple logo at the top left corner of your screen.
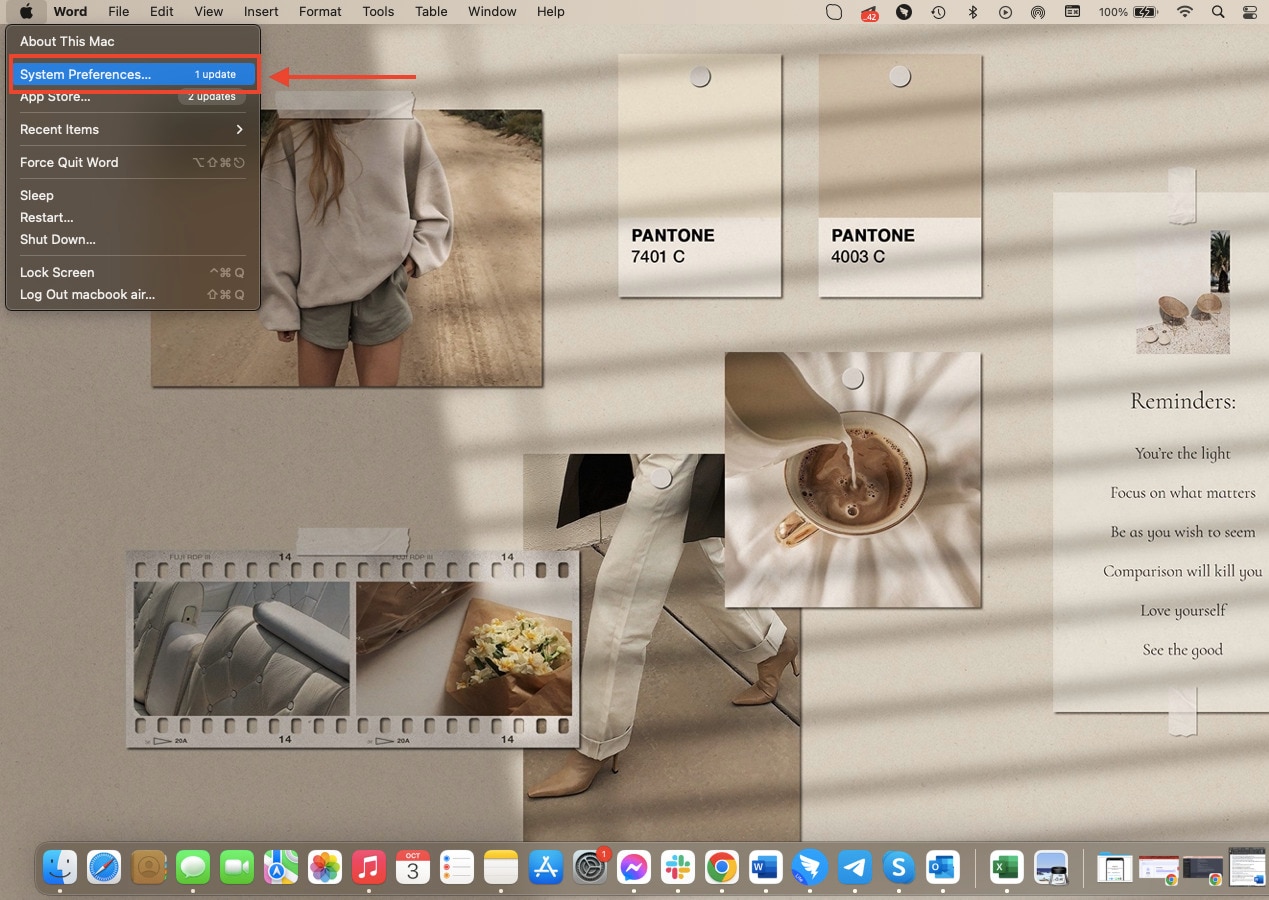
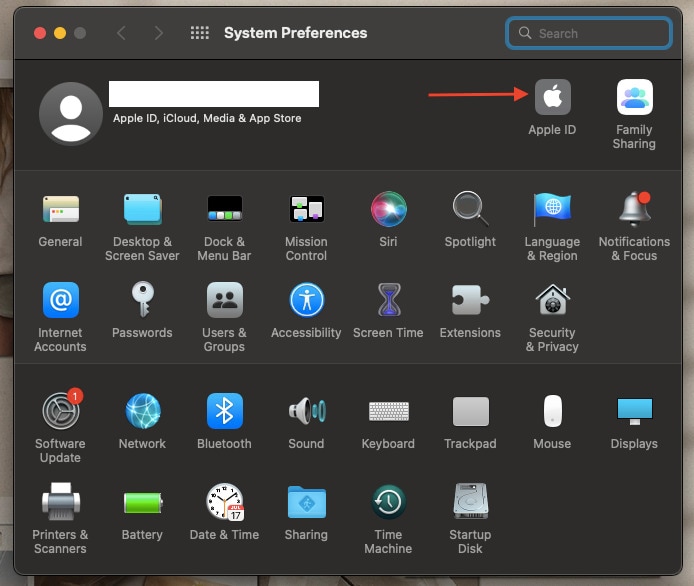
- Step 2: Click System Preferences, and then select Apple ID.
- Step 3: Navigate to the Name, Phone, Email section, then click Edit next to your email address.
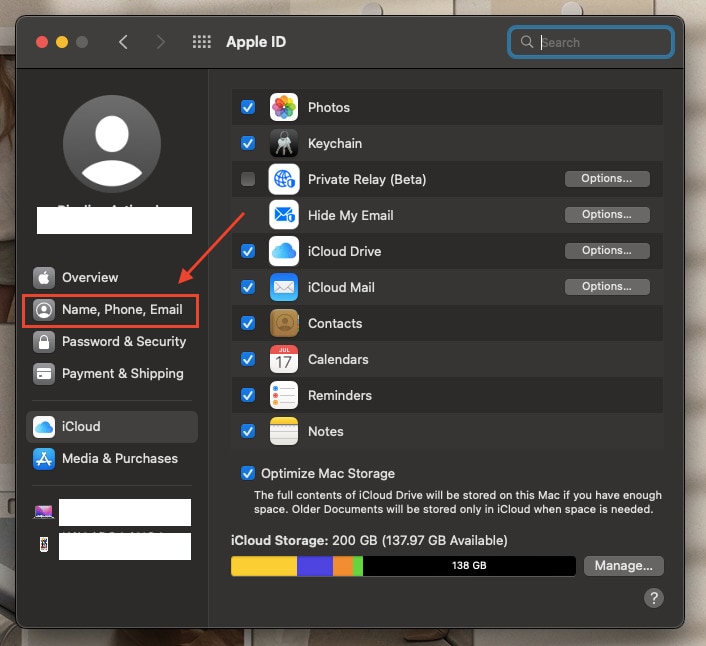
- Step 4: Input your new email address, and Apple will send a verification code to it.
- Step 5: Check your new email for the verification code, enter it, and voilà! Your Apple ID email is updated on your Mac.
Method 2: For Mobile Device Users
For those who prefer the convenience of mobile devices:
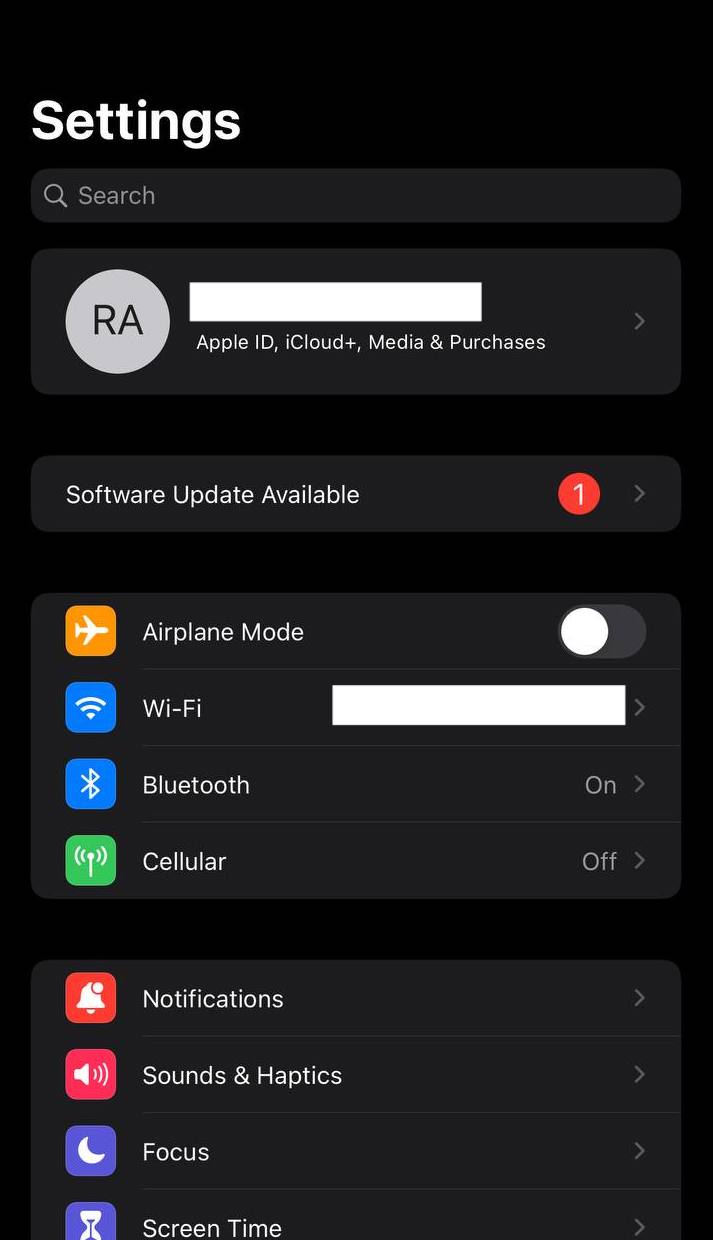
- Step 1: Open the Settings app on your Apple iPhone 6s Plus or iPad, then tap your Apple ID at the top of the screen.
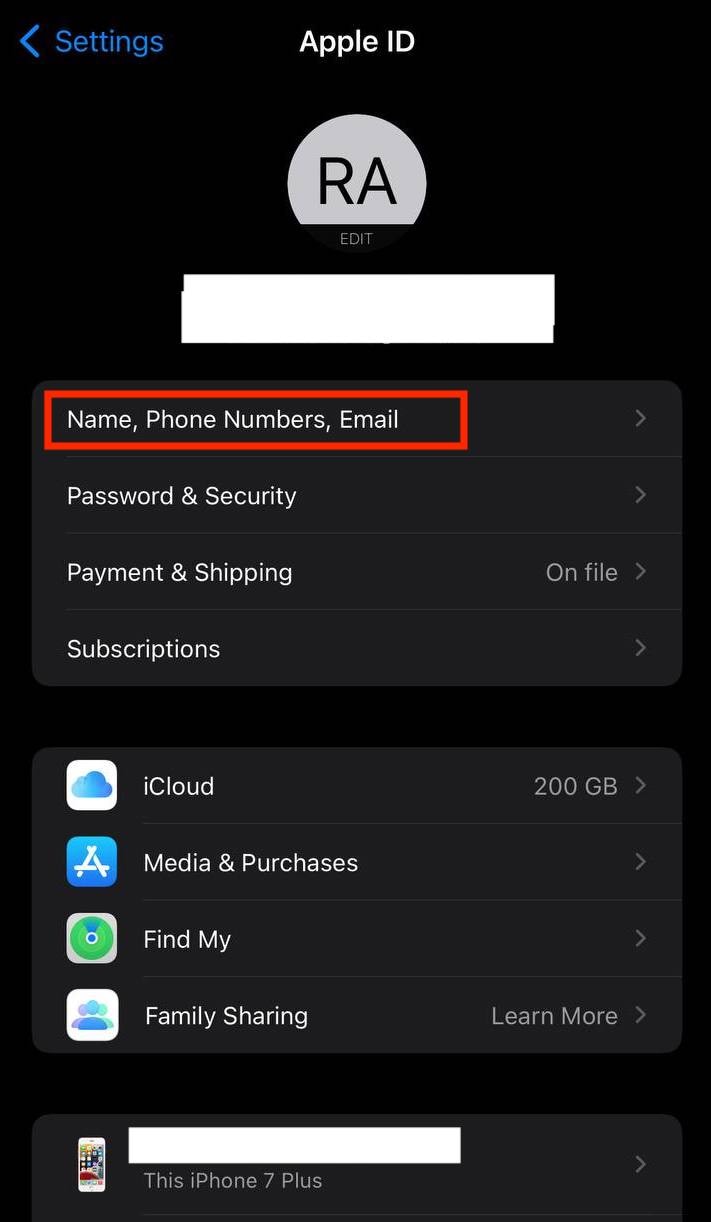
- Step 2: Tap Name, Phone Numbers, Email.
- Step 3: Tap Edit next to your email address, enter your new one, then tap Next.
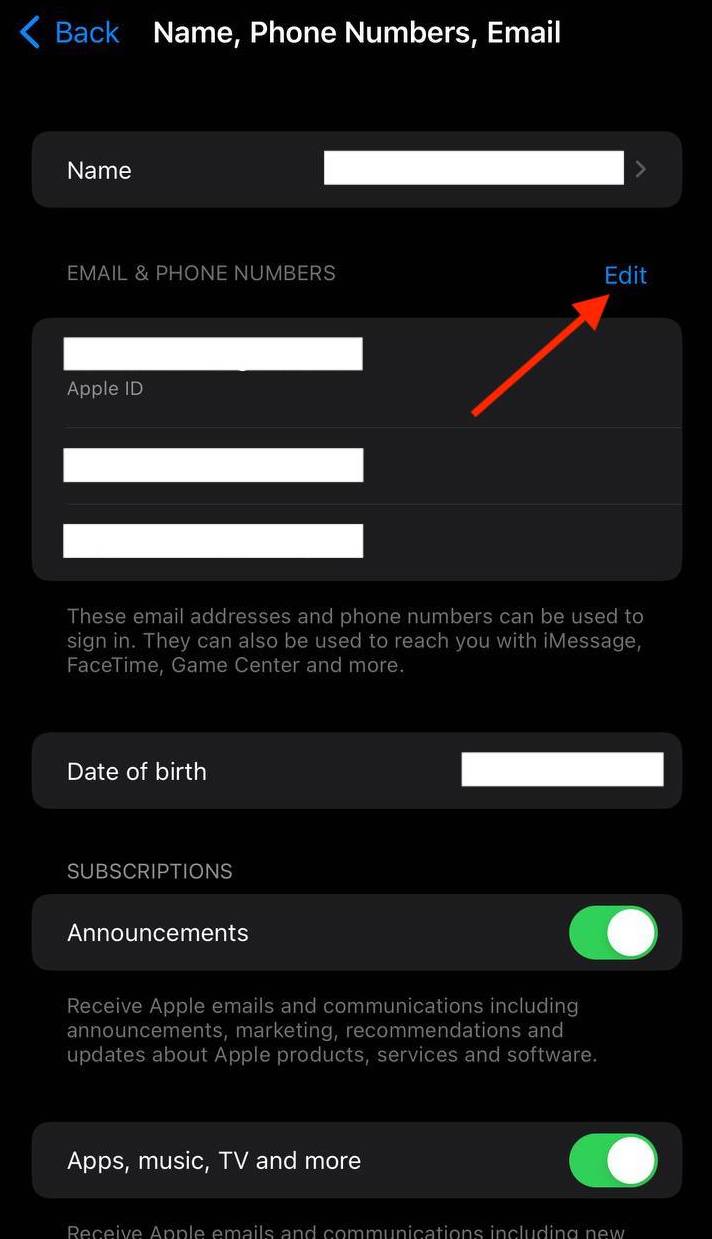
- Step 4: Apple will send a verification code to the new email. Enter it, and your Apple ID email on your mobile device is updated.
Method 3: For Browser Users
If you prefer the simplicity of a web browser:
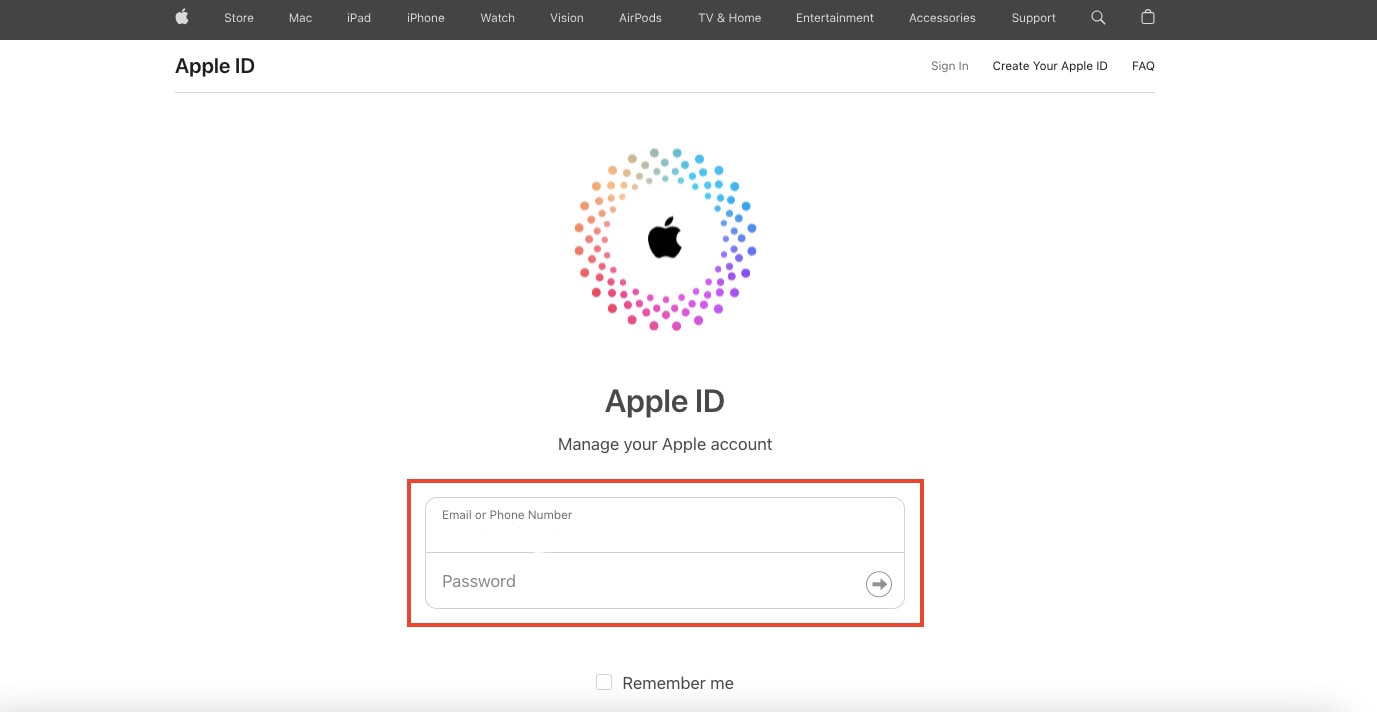
- Step 1: Open the web browser your prefer and go to the Apple ID account management page.
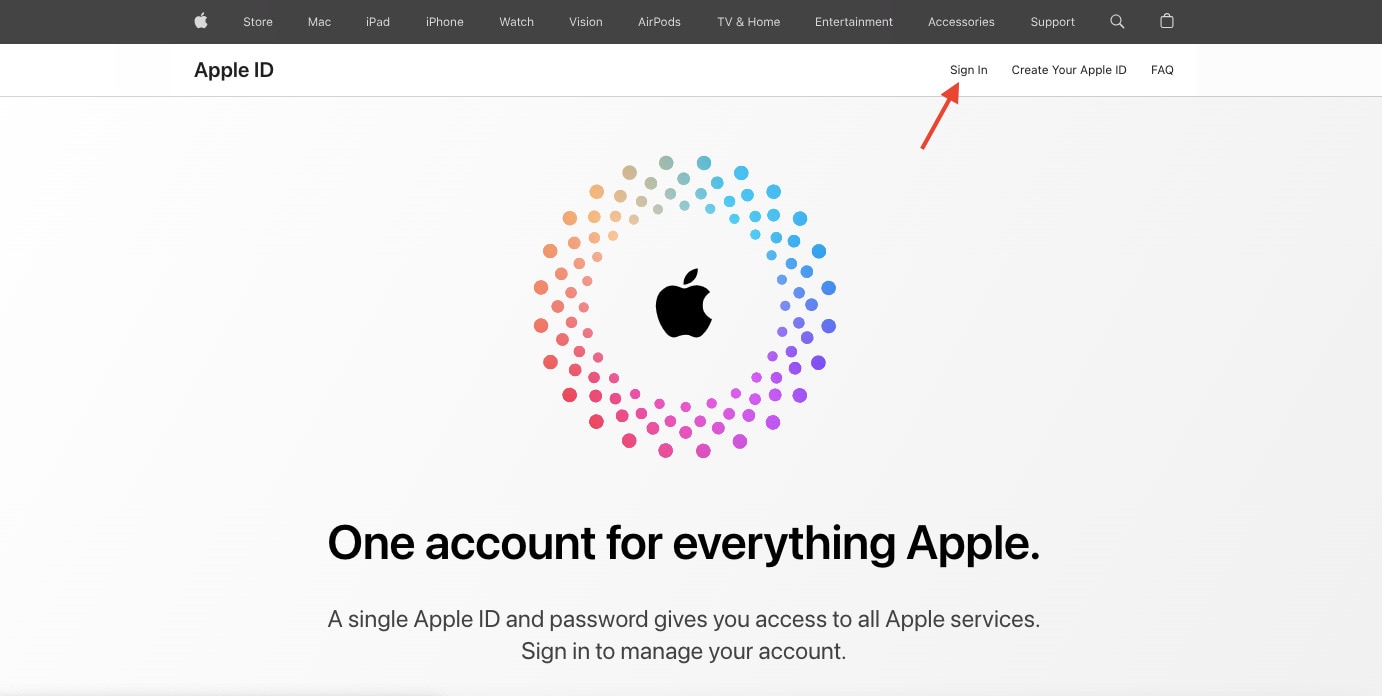
- Step 2: Click Sign In and tap your Email or Phone Number and Password.
- Step 3: Click Edit next to your email address in the Account section.
- Step 4: Input your new email address and click Continue.
- Step 5: A verification code will be sent to your new email. Enter it to confirm your email change.
B. Updating Your Apple ID
Now that you’ve successfully changed your Apple ID email, it’s crucial to ensure that all your Apple devices are on the same page:
- Step 1: Tap the Settings application on your Apple iPhone 6s Plus or iPad.
- Step 2: Go to Update Apple ID Settings below your Apple ID settings.
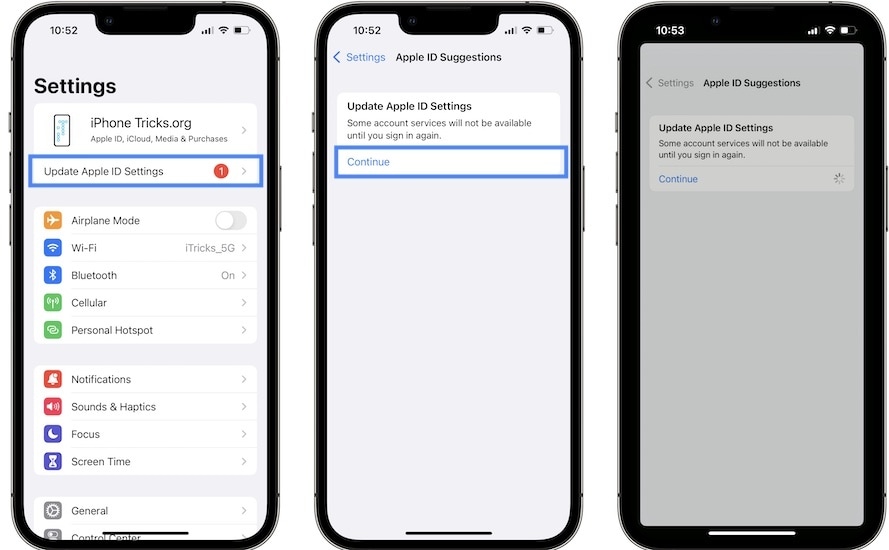
- Step 3: Tap Continue, then wait for a few moments. Your Apple ID will then get updated.
By following these steps, you’ll ensure that all your Apple devices are synced with your updated email address, providing a seamless and consistent Apple experience across all your gadgets. Now, with your new Apple ID email, you’re ready to explore the Apple ecosystem with renewed convenience and security.
Part III: Unlock iOS Screen With Wondershare Dr.Fone - Screen Unlock (iOS)
What if you find yourself in a situation where you want to change your Apple ID email address on your iOS device, but you’re locked out? Don’t worry; Dr.Fone - Screen Unlock (iOS) can rescue you. This handy tool is designed to help you unlock your iOS device, allowing you to change your Apple ID email address smoothly.

Key Features of Dr.Fone - Screen Unlock (iOS)
Check out the key features that Dr.Fone has to offer:
- **User-Friendly Interface.**Fone - Screen Unlock (iOS) is designed to be easy to use, making it accessible for users of all levels of technical expertise.
- It fits a wide range of iOS devices, including iPhones and iPads, ensuring that you can unlock your device no matter which one you have.
- **Multiple Unlock Modes.**Fone offers different unlock modes to cater to various scenarios. Whether you’ve forgotten your passcode, have a disabled device, or are dealing with a locked Apple ID, Dr.Fone has a solution.
- **No Data Loss.**One of the most significant advantages of Dr.Fone is that it unlocks your device without causing any data loss. Your photos, apps, and important information remain intact.
Step-by-Step Guide on Using Dr.Fone - Screen Unlock (iOS)
Outlined below is the step-by-step guide on how to use Dr.Fone – Screen Unlock for iOS devices:
- Step 1: When you’ve finished downloading and installing Wondershare Dr.Fone on your computer, go to Toolbox, then Screen Unlock, and choose iOS to open the tool in a new window.
- Step 2: Begin to pick the Unlock iOS Screen button in the new window to begin unlocking the screen of your iOS device. On the following screen, click the Start button to begin unlocking the iOS device.
Note: Ensure your device’s battery levels are enough before proceeding.


- Step 3: Following that, place your iDevice in Recovery Mode. Follow the on-screen instructions to set your iDevice into mode based on your phone model.
Note: If Recovery Mode does not work, try hitting the Try DFU Mode button at the bottom to access the instructions for putting the iDevice in DFU mode.

- Step 4: After successfully entering your device into Recovery Mode, the platform automatically recognizes the Device Model and shows it in the appropriate section. Modify the model and select the System Version to meet your needs if necessary. After that, select Start to begin unlocking your device’s screen.

- Step 5: The next screen shows the progress of your iOS firmware download. If at any point you decide you’d rather call it quits, hit the Stop button. If the iOS firmware takes a long time to download on your platform, you can copy the download link by clicking the Copy option.

- Step 6: After a successful download, the iOS firmware is checked and shown on the next screen. Select the Unlock Now option again to proceed with the unlocking procedure. A confirmation popup displays, requesting you to confirm the action. Enter the unlock code and press the Unlock button to continue.

- Step 7: You’ll see the unlocking status of your iOS device on the following screen. Don’t forget that keeping the gadget plugged in is necessary to avoid bricking it.
- Step 8: Click the Done button once the iDevice has been unlocked. If you’re still stuck with a locked iPhone, iPad, or iPod, select Try Again to retry the process.

By using Dr.Fone - Screen Unlock (iOS), you can regain access to your iOS device and continue with the process of changing your Apple ID email address hassle-free. It’s a reliable and user-friendly solution that ensures you can enjoy the benefits of the new email address without losing any of your precious data.
You May Also Like:
How to Show Email Password on iPhone and Find It Back
A Detailed Guide to Fix All iPad Email Problems [2023]
How to Fix Email Disappeared from iPhone?
Conclusion
This guide easily explored the process of changing your Apple ID email address. It started by understanding why this change might be necessary and provided straightforward methods for Mac, mobile, and browser users to accomplish it seamlessly.
But what if you’re locked out of your iOS device? Don’t fret; Dr.Fone - Screen Unlock (iOS) is a user-friendly tool that can help you regain access to your device. It ensures a smooth transition to your new email. Unlock new possibilities with Dr.Fone, a reliable companion in managing your iOS device. Explore its features and simplify your Apple journey today!
How to Unlock Apple iPhone 6s Plus Without Passcode?

It’s a frustrating situation where you forgot your Apple iPhone 6s Plus’s passcode and are now unable to unlock it. Unfortunately, if you are experiencing this situation with your Apple iPhone 6s Plus, you must be looking to learn how to unlock Apple iPhone 6s Plus without a passcode.
There are many ways to unlock the Apple iPhone 6s Plus without a passcode. You not only do it with the help of iPhone’s stock features like Find My Apple iPhone 6s Plus or iTunes, but you can also use third-party methods to unlock the Apple iPhone 6s Plus lock screen.
So, let’s get straight to the different methods to unlock the Apple iPhone 6s Plus lock screen.
4 Easy Methods to Unlock Apple iPhone 6s Plus without Passcode
Following are the four different methods to unlock Apple iPhone 6s Plus without a passcode:
Method #1: Unlock iPhone Screen Passcode With iTunes
Unlocking an iPhone through iTunes is one of the most common ways. If you have forgotten your Apple iPhone 6s Plus passcode, you can use iTunes to erase your device and reset it to its factory settings. This will remove the passcode, but it will also delete all of your data. If your device has a backup, you can use iTunes to restore your data after erasing your device.
Follow the steps to do this.
- First, connect your Apple iPhone 6s Plus to your computer and launch iTunes. You will have to install it if you don’t have it on your computer. For installation, click here and download
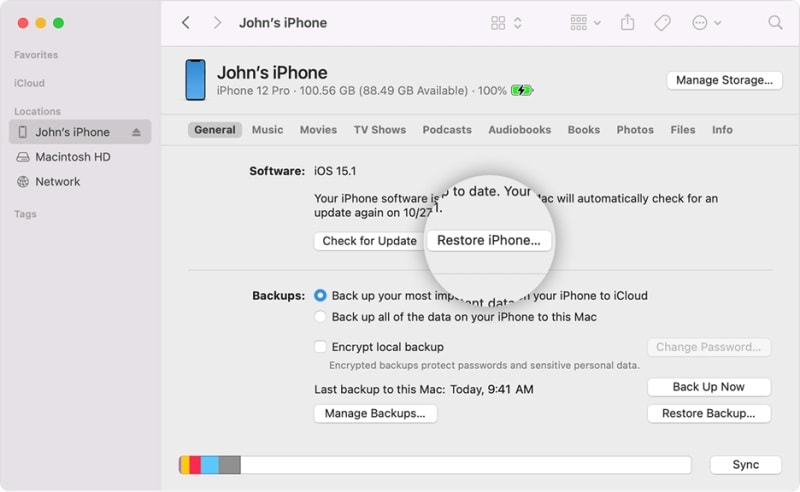
- Once you launch iTunes, you see few devices available to connect. So, select your device from the list.
- Now you will have two options under your Apple iPhone 6s Plus’s specifications. So you will have to click on the other option named Restore iPhone.
- By clicking this button, you will be asked again for confirmation. After confirmation, iTunes will wipe out everything on your Apple iPhone 6s Plus, and once the process is completed, you will be able to unlock your Apple iPhone 6s Plus XR lock screen without any passcode.
Method #2: Unlock It Via Find My iPhone
If the above-given method is not helpful or you haven’t used iTunes before, we have another solution. You can use the “Find My iPhone” feature to erase your device and unlock it. This is useful when you quickly want to unlock your Apple iPhone 6s Plus without a passcode.
All you have to do is follow the steps given below.
- Log in to the iCloud website on your MacBook or Computer. For this, you will need to use your Apple ID and Password that you are using on your Apple iPhone 6s Plus.
- Once you are logged in to iCloud, you will see many options and features but look for the Find My iPhone option.
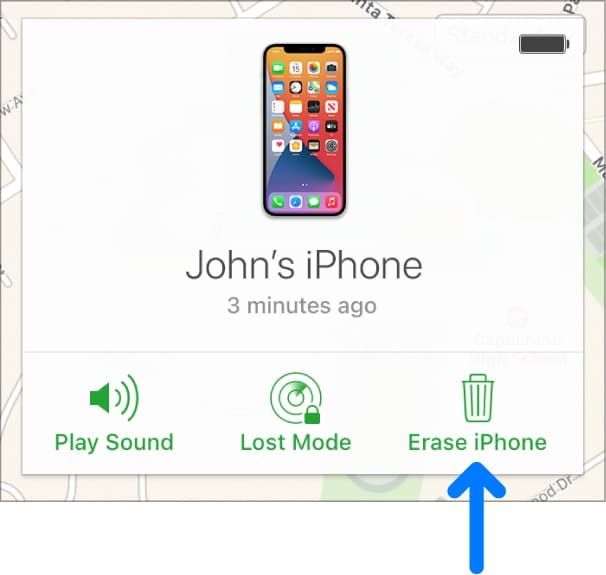
- Once you find it, click on it, and you will see a few more options, and one of them would be Erase iPhone.
- You will have to click on it, showing you a confirmation message to erase all your data on your Apple iPhone 6s Plus.
- Confirm it, and your Apple iPhone 6s Plus will be restored to the factory settings, and all your data will be removed.
- Once the process is completed, you can unlock your Apple iPhone 6s Plus X lock screen without any passcode.
Method #3: Remove Passcode With Tapping Erase Phone (iOS 15.2 only)
If both above-given methods don’t work for you, or you don’t have access to a computer or MacBook to use those methods, there is a 3rd method for you. But it only works on iPhones with iOS 15.2 versions.
With this method, you can follow the steps below to remove the screen lock passcode on Apple iPhone 6s Plus.
- First, you must try unlocking your Apple iPhone 6s Plus with all the possible passcodes you remember.
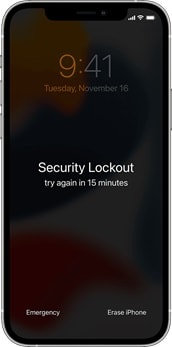
- When you try too many wrong passcode attempts, iPhone will show you a message that states that your Apple iPhone 6s Plus is locked for 1-15 minutes.
- By this message, you will also see another option at the bottom right corner named Erase iPhone.
- By clicking this option, you will be asked about your Apple ID and Password that you have used on this iPhone.
- So provide them, and you will be able to erase your Apple iPhone 6s Plus, and in the end, your Apple iPhone 6s Plus will be unlocked without needing a passcode or password.
Method #4: Dr.Fone-Screen Unlock
This is the most effective and easiest way to remove or break your Apple iPhone 6s Plus passcode. You can use this method if all the above methods don’t work for you or you don’t remember your Apple ID or Password.
Here are some easy steps that you should take.
Step #1: Download Dr.Fone Tool
First, you must go to your computer or MacBook and download the Dr.Fone tool. You can follow the link to download and install this tool for free.
Step #2: Connect Your Apple iPhone 6s Plus
After installing Dr.Fone on your computer, you will need to launch the Software and connect your Apple iPhone 6s Plus using the original iPhone’s cable.
(Using the original iPhone cable will make it easy to connect your Apple iPhone 6s Plus to the computer)
Step #3: Take your Apple iPhone 6s Plus to Recovery Mode:
Once your Apple iPhone 6s Plus is successfully connected, you must take it to recovery or DFU mode. For this, follow the instructions given below.
Step #4: Download Firmware
When your Apple iPhone 6s Plus enters into recovery mode, you will see a Start button on Dr.Fone. So, you will have to select the correct iPhone and software model and click the Start button.
It will download the iOS firmware for your Apple iPhone 6s Plus.
Step #5: Unlock iPhone X or XR Lock Screen
Once the downloading is completed, you will need to click on Unlock Now button, and the process to unlock your Apple iPhone 6s Plus X lock screen will begin.
Once the process is completed, you can unlock your Apple iPhone 6s Plus XR lock screen without the passcode.

FAQs
Following are 3 frequently asked questions that might come into your mind and their answers to help you understand everything.
How to remove the passcode on an iOS device?
First, open the Settings menu and scroll down to the Touch ID & Passcode option. Here, you will need to enter your current passcode to disable it.
Once done, toggle the switch next to the Passcode option to the Off position. You can then enter your passcode once more to confirm that you wish to disable it.
After doing this, your iOS device will no longer require a passcode to be accessed.
Can local Apple support help me to unlock my Apple iPhone 6s Plus?
The answer is yes!
Here’s how.
Take your Apple iPhone 6s Plus to the nearest Apple Store or Apple Authorized Service Provider. Please contact them, and bring your proof of purchase and other relevant documentation.
First, they will confirm that you are the actual owner of the Apple iPhone 6s Plus; after that, they will help you to unlock your Apple iPhone 6s Plus lock screen.
Why was my Apple iPhone 6s Plus locked?
There are some causes why your Apple iPhone 6s Plus X or XR may be locked. One is that you entered the wrong passcode too many times. If in the situation, you’ll need to wait a certain amount of time before you can try again.
Another possibility is that someone tried to break into your phone using an illegal passcode-guessing tool. If this happens, your phone will be locked for a more extended period.
Finally, if you have an Apple iPhone 6s Plus with Face ID, it’s possible that your phone was locked because it didn’t recognize your face. You ought to enter your passcode to unlock your phone if this is the case.
The Bottom Line
So, these are some most effective methods to follow and unlock the Apple iPhone 6s Plus XR lock screen without a passcode. All the methods discussed are excellent and working, but the most convenient way is using the Wondershare Dr.Fone-Screen Unlock. It is a perfect tool that can be used to unlock different iPhone lock screens. Moreover, it is very safe and easy to use. So, we recommend you use this tool to unlock your Apple iPhone 6s Plus lock screen without a passcode.
Learn How To Lock Stolen Your Apple iPhone 6s Plus Properly
When it comes to security in smartphones, Apple stands at the forefront. The Activation Lock is a robust barrier to preventing unauthorized access and device theft. Losing your Apple iPhone 6s Plus can be a disturbing event, as accidents are inevitable. Taking prompt action to stop unauthorized data access becomes important. This guide offers a step-by-step approach to how to lock a stolen iPhone.

Part 1. Major Threats To Consider When iPhone Is Stolen
A lost iPhone can become susceptible to a myriad of threats. It could compromise your privacy, security, and personal data. Here are the reasons why learning how to lock your Apple iPhone 6s Plus when lost is essential:
- Unauthorized Access to Personal Data: Thieves can exploit an unsecured Apple iPhone 6s Plus to gain unauthorized access to personal information. These include contacts, messages, emails, and photos.
- **Financial Exploitation:**With access to your Apple iPhone 6s Plus, thieves may attempt to get stored payment methods.
- Identity Theft: Stolen iPhones often contain a wealth of sensitive information. This makes them a prime target for identity theft.
- Compromised Social Media Accounts: Using social media applications on your smartphone carries potential risks in the event of device loss. Unauthorized access to your social media accounts can lead to many problems, including misinformation and compromised privacy.
Part 2. Use Find My To Locate Stolen iPhone
On learning about how do I lock my stolen iPhone, Apple’s robust Find My feature emerges as a beacon of hope. It uses a combination of GPS, Wi-Fi, and Bluetooth signals to locate your Apple iPhone 6s Plus accurately.

Key Scenarios Where Find My Works
Find My can be a source to track stolen iPhones, but certain scenarios are associated with its operations. To know more about these scenarios, this section continues the discussion further below:
- iPhone Turned On:Find My can provide real-time location tracking when your stolen iPhone is still powered on and connected to the internet.
- **iPhone Turned Off or In Airplane Mode:**The last known location before the Apple iPhone 6s Plus device was powered down or put in Airplane Mode is accessible, offering a starting point for recovery efforts.
- **Offline Finding with Bluetooth:**The Find My service leverages Bluetooth technology to create a vast network of Apple devices. With these, it can securely help locate your Apple iPhone 6s Plus, even offline.
- **Activation Lock Integration:**This service is also integrated with Activation Lock, adding an extra layer of security. The Activation Lock remains active if a thief attempts to erase your device.
How To Use Find My To Locate Your Stolen iPhone
- Step 1. Access the Find My app on a trusted device and open it. If you can’t access one, use the iCloud website to access Find My service.

- Step 2. After logging in, select the lost device, and you can see its last recorded location on the map.

Part 3. Using Lost Mode To Lock Stolen iPhone
Lost Mode locks the Apple iPhone 6s Plus device and allows users to showcase a personalized message on the screen. This can help greatly in the safe return of the smartphone. The following are the simple steps you need to follow to learn how to block stolen iPhone with Lost Mode:
Activating Lost Mode Using Your Smartphone
- Step 1. Within the Find My app, tap “Devices” from the bottom toolbar and select your lost device. Now, scroll down to “Mark As Lost” and tap “Activate.”

- Step 2. You will now be given a summary of the Lost Mode; tap “Continue” to proceed. On the following screen, add a phone number, tap “Next,” and add a message that will be displayed on the lost device.

- Step 3. After adding a message, tap “Next” on the following screen and press “Activate” from the top right corner.

Activating Lost Mode Using iCloud Website
- Step 1. Access the iCloud website via your computer’s web browser. Sign in using your Apple ID, continue to click the “Grid” icon in the top right corner, and select “Find My.”

- Step 2. In Find My, add your Apple ID password again to access “All Devices.” Now, choose the lost device from the list of all devices in the top left corner. Then, click “Mark As Lost,” and the following pop-up Lost Mode prompt, tap “Next.”

- Step 3. Now go on to add your phone number and tap “Next.” Follow it by providing the message you want to display and click “Activate” to enable Lost Mode.


Part 4. Can’t Find Stolen Phone? Erase iPhone Completely
When efforts to locate a stolen iPhone fail, the need to protect sensitive data intensifies. As a result, the option to erase the Apple iPhone 6s Plus device becomes a crucial step instead of how to lock the Apple iPhone 6s Plus when lost. Here’s how to protect against the potential misuse of your information by erasing your device via Find My:
- Step 1. After accessing Find My service, choose the lost device from the list and click “Erase This Device.”


- Step 2. Select “Continue” on the erased iPhone screen for the Find My app. Once you’ve added the number, press “Erase” in the top right corner and follow the on-screen instructions to finish the procedure.

- Step 3. If using the iCloud website, tap “Erase This Device” and click “Next” on the upcoming prompt. You will be asked to enter the Apple ID password, after which you can use the on-screen guidelines to finish the process.

Part 5. Other Things To Do iPhone Is Stolen
There are additional measures you can take to enhance your overall security apart from understanding how do I lock my stolen iPhone. The following are some options you should utilize in case of device loss:
To Do List #1. Report to Police
If your Apple iPhone 6s Plus is stolen, it is crucial to immediately inform your local law enforcement agency. It facilitates the recovery process and assists in combatting criminal activities. Provide essential details about your Apple iPhone 6s Plus, such as the Model, color, and IMEI number. Share information about your efforts to locate the stolen iPhone using Find My.

To Do List #2. Make an Insurance Claim With AppleCare
You can claim insurance if you have AppleCare+ coverage for your Apple iPhone 6s Plus. AppleCare+ with Theft and Loss for iPhone includes protection against theft and loss incidents. It offers up to two incidents of such coverage every 12 months.
To qualify for theft or loss coverage, it is necessary for Find My to be enabled on your device at the time it goes missing. Moreover, it should remain enabled alongside Lost Mode throughout the claims process.

To Do List #3. Remove iPhone From Trusted Devices (2FA)
After your Apple iPhone 6s Plus is stolen, it becomes essential to bolster the security of your online accounts. It is particularly essential for those safeguarded by Two-Factor Authentication (2FA), which needs to be removed:
From iOS Device Settings
- Step 1. Access Settings on an iOS device logged in with the same Apple ID as the lost one. Here, tap on your name on the following screen and scroll down.

- Step 2. Simply select the misplaced device, and in the subsequent interface, press “Remove from Account” to eliminate it from the list of trusted devices.


From the Apple ID Website
- Step 1. If you cannot reach a secure device, visit the http://appleid.apple.com website and sign in with the identical Apple ID.

- Step 2. Once logged in, click “Devices” from the left side and select the lost device. To remove this device as a trusted device, click “Remove from Account.”

Part 6. Precautions To Take for Avoiding Losing iPhone
Users can proactively adopt specific measures to reduce the likelihood of such an occurrence. The following essential precautions are recommended while learning how to block your Apple iPhone 6s Plus when stolen:
Precaution #1. Enable Find My on Device
Activating Find My increases the likelihood of recovering your device. Take the following steps to enable the Find My feature on your Apple iPhone 6s Plus:
- Step 1. On your iOS device, navigate to “Settings” and tap the Apple ID on the top. Now, scroll down and press “Find My” on the following screen.

- Step 2. Next, tap “Find My iPhone,” on the ensuing window, toggle “Find My iPhone.” This will enable the Find My service on your device.

Precaution #2. Enable Separation Alerts on iPhone
Enabling “Separation Alerts” assists in preventing the loss of your Apple iPhone 6s Plus by alerting you when you distance yourself from it. Follow these steps to enable Separation Alerts on your Apple iPhone 6s Plus:
- Step 1. Navigate to and launch the Find My app on your Apple iPhone 6s Plus. Select the Apple iPhone 6s Plus device from the “Devices” tab for which you want to enable separation alerts.

- Step 2. From the available options, tap “Notify When Left Behind,” and on the following screen, toggle “Notify When Left Behind.” You can also add locations on this screen by tapping “New Location,” for which you don’t want to receive a left-behind notice.

Precaution #3. Enable 2FA on iPhone
Activating Two-Factor Authentication (2FA) enhances the security of your Apple iPhone 6s Plus. The mandatory secondary verification step makes 2FA crucial in securing your accounts. Follow these steps to enable 2FA on your Apple iPhone 6s Plus:
- Step 1. Access the Settings app on your iOS device and tap your name/Apple ID. Find and tap “Sign-In & Security” to proceed further.

- Step 2. On the following screen, tap “Turn On Two-Factor Authentication.” Follow it by tapping “Continue” afterward, and use the on-screen instructions to complete the process.

Bonus Tip. Find Stolen iPhone Back but Locked? Unlock With Wondershare Dr.Fone
Recovering your stolen iPhone successfully can be a joyous event. Yet, the frustration of discovering your device locked due to a forgotten password can be disheartening. Wondershare Dr.Fone - Screen Unlock (iOS) offers a solution to regain access to your device. This robust tool is crafted to help users unlock various iOS screen lock scenarios.
It provides a hassle-free solution for those locked out of their devices. This powerful tool effortlessly removes various lock screens on iPhones and iPads. It can bypass the iCloud activation lock without the need for a password.
Key Features of Wondershare Dr.Fone
- If you are using iTunes for backup but have forgotten the iTunes backup encryption passcode, Dr.Fone can remove it without data loss.
- This tool can remove Apple ID from your Apple iPhone 6s Plus or iPad if you have forgotten its password.
- You can free up your device by removing MDM and carrier locks using Dr.Fone.
Steps To Unlock Your Locked iOS Device Using Wondershare Dr.Fone
Wondershare Dr.Fone is a comprehensive toolkit that addresses many iOS-related issues. It offers a user-friendly solution to unlock your Apple iPhone 6s Plus with the help of the following steps:
- Step 1. Launching Wondershare Dr.Fone and Accessing Toolbox
Once you have installed and launched Wondershare Dr.Fone, access the “Toolbox” tab. Click “Screen Unlock,” and on the following screen, choose “iOS.” Click “Unlock iOS Screen” on the following screen and link your iOS device to the computer.

- Step 2. Entering Recovery Mode and Choosing System Version
The next step requires you to put your device in Recovery Mode, for which you can follow the instructions given on-screen. After your device is in Recovery Mode, Dr.Fone will display its “Model.” Now choose the appropriate “System Version” and click “Start.” Here, Dr.Fone will start downloading the required firmware. Once it is downloaded and verified, tap “Unlock Now.”
- Step 3. Acknowledging Data Loss Warning and Initiating Unlock Process
To show your acknowledgment of the warning, enter the asked code, which is “000000.” Afterward, click “Unlock” to initiate the screen unlocking process. Once the process is complete, tap “Done” to conclude the procedure.
Conclusion
Knowing how to lock stolen iPhones is essential for safeguarding personal and sensitive data. Apple’s Find My empowers users to remotely locate, lock, and erase their lost devices. If you have recovered your stolen device but it is locked, Wondershare Dr.Fone emerges as the top choice to unlock it within minutes.
Tips: Are you searching for a powerful Screen Unlock tool? No worries as Dr.Fone is here to help you. Download it and start a seamless unlock experience!
- Title: In 2024, Guide on How To Change Your Apple ID Email Address On iPhone 6s Plus
- Author: Sophia
- Created at : 2024-07-15 00:10:21
- Updated at : 2024-07-16 00:10:21
- Link: https://ios-unlock.techidaily.com/in-2024-guide-on-how-to-change-your-apple-id-email-address-on-iphone-6s-plus-by-drfone-ios/
- License: This work is licensed under CC BY-NC-SA 4.0.