
In 2024, How To Bypass the Required Apple Store Verification For iPhone X
How To Bypass the Required Apple Store Verification For Apple iPhone X
The Apple App Store is a familiar place for anyone with an iPhone or iPad. It’s where you find all sorts of useful and fun apps. However, one thing that can be a hassle is the store’s strict verification process. Every time you make a purchase, you need to go through this step.
It’s there for a good reason – to stop fraud – but it can get annoying, especially if you forget your Apple ID or have other issues. This article will explore the ways to stop the Apple Store “Verification Required” prompt, making your app downloading experience smoother.

Part 1: Why Does Apple Require Verification in the Apple Store?
When browsing the App Store on your Apple iPhone X or iPad and looking to download the latest game or productivity tool, you might have noticed that Apple often asks for some form of verification before you can proceed with your purchase. This is not just a random step; there’s a solid reason behind it.
The primary reason Apple requires verification for App Store purchases is to ensure that you are the person authorizing the purchase. This security measure prevents unauthorized transactions and protects your account from fraud.
What does this verification usually involve? It could be entering your Apple ID password or using Face ID or Touch ID if your device supports these features. These methods are designed to confirm your identity quickly and securely.

Reasons Why the Verification Required Message Might Appear
There are several reasons why you might see an Apple Store’ Verification Required’ message when trying to download an app or make a purchase:
- New Apple ID. If you’ve just created a new Apple ID and need to download or pay for apps, Apple must verify your payment information. Thus, you’ll have to prove everything, especially on a new phone.
- **Payment method needs to be corrected.**Suppose there’s an issue with your Apple ID’s payment method, such as outdated or incorrect details. In that case, verification is required to ensure the account is secure and ready for transactions.
- Invalid credit card. Unsupported or invalid credit cards can trigger the verification notice, as Apple can’t process payments with these cards.
- Unpaid balance. If there’s an outstanding balance on your Apple ID, you can download or pay for new apps once this balance is cleared.
- Family Sharing restrictions. For those using Family Sharing, if the family organizer has placed restrictions on your account, this could result in a verification prompt.
Understanding these reasons is the first step in addressing the ‘Verification Required’ message. It’s not just a random or annoying hurdle; it’s there for your security and to ensure a smooth, safe experience when using the App Store.
Part 2: How To Fix Verification Required Prompt Using Apple ID
Having to deal with the ‘Verification Required’ prompt in the App Store can be a bit of a hassle, especially when you’re eager to get your hands on a new app or game. Fortunately, there are several methods you can use to resolve this issue, most of which are pretty straightforward and can be done right from your device. Here’s how to tackle it:
Update Payment Method
One of the most common reasons for the verification prompt is a problem with your payment method. To fix this, go to your Apple ID settings on your Apple iPhone X or iPad. Tap your name at the top of the Settings app, then go to Payment & Shipping. You can update your payment information or add a new payment method here. Make sure the details are correct and up to date.
Check Unpaid Subscriptions
Sometimes, unpaid subscriptions can trigger the verification prompt. Tap the App Store > your profile icon, and select Subscriptions. Here, you can view all your subscriptions, active or expired. Check if there are any unpaid ones and clear any outstanding payments.

Don’t Require Password for Purchases
For less frequent purchases, you should change the settings so you don’t always have to enter your password. Go to Settings, then to Screen Time. Under Content & Privacy Restrictions, select iTunes & App Store Purchases. Here, you can change the settings to Don’t Require for purchases. However, be cautious with this method as it reduces security.

Sign Out of Apple ID and Re-Sign In
Sometimes, simply signing out of your Apple ID and then signing back in can resolve the issue. Go to the Settings app, tap your name at the top, and scroll down to Sign Out. After signing out, restart your device and then sign back in. This can help refresh your account settings and clear up any minor glitches.
Remember, these methods are about bypassing the verification process and ensuring your account is up-to-date and secure. Regularly checking your Apple ID settings and payment information can prevent many common issues with the App Store, including the frustrating ‘Verification Required’ prompt.
Part 3: How To Bypass Verification Required Prompt Without Apple ID
If you need to learn how to bypass the ‘Verification Required’ prompt in the App Store but don’t have access to the Apple ID or password, there’s an alternative approach using third-party software. One such tool that can assist in this situation is Wondershare Dr.Fone - Screen Unlock (iOS), which offers a feature specifically designed for this purpose.
Introducing Dr. Fone’s Screen Unlock (iOS) Feature
Dr.Fone - Screen Unlock (iOS) function includes an Apple ID remover tool. This feature is handy when you cannot remember your Apple ID or password but need to download apps from the App Store. Here’s a step-by-step guide on how to use this feature.
Step-by-Step Guide To Bypass Verification Without Apple ID With Dr.Fone
Here’s a complete guide on bypassing the verification required on the App Store.
Step 1: Install and open Wondershare Dr.Fone on your computer.
Step 2: Navigate to Toolbox and select Screen Unlock followed by iOS.

- Step 3: In the next window, choose Remove Apple ID to proceed.

- Step 4: A connectivity status will appear on the screen with your iOS device connected to the computer. Click Unlock Now to start the process.

- Step 5: Confirm if your iOS device has a screen lock and two-factor authentication enabled. This is crucial for the process to continue smoothly.

- Step 6: Follow the on-screen instructions to put your iOS device in Recovery Mode. If necessary, you can also opt for DFU Mode by following the provided instructions. Once in Recovery Mode, the tool will recognize your device model. You’ll need to select the correct system version to proceed.

- Step 7: The tool will download the appropriate iOS firmware for your device. After the download, it will verify the firmware.

- Step 8: After firmware verification, click Unlock Now. You’ll be prompted to enter a code for confirmation. Once entered, the unlocking process will begin.

- Step 9: You’ll receive a notification once the process is complete. You may try again if the process fails to succeed the first time.

Note: After Apple ID removal, you must re-enter a new Apple ID to access the App Store. Take note of the password now if you forgot your previous one.
Conclusion
In this article, you’ve learned how to remove ‘Verification Required’ in the App Store. The primary takeaway is to try solving the issue using your Apple ID, as this approach typically prevents data loss. However, if you’re in a tight spot without access to your Apple ID, Dr.Fone - Screen Unlock (iOS) offers a reliable alternative to bypass this hurdle.
While it’s an effective solution, always consider it a secondary option to safeguard your data. Additionally, Dr.Fone can be a handy tool for various other phone-related challenges, making it a useful resource for tackling different tech problems.
Tips: Are you searching for a powerful Screen Unlock tool? No worries as Dr.Fone is here to help you. Download it and start a seamless unlock experience!
Forgot Locked Apple iPhone X Password? Learn the Best Methods To Unlock
The note-taking apps are pivotal in organizing thoughts, reminders, and sensitive data. Notably, Apple’s Notes app stands out for smooth blending into the Apple ecosystem while boasting a user-friendly interface. It is recognized for its effortless integration and robust security.
This app offers a reliable and secure platform for storing personal and confidential information. Users can safeguard their notes by setting up separate passwords. Yet, it’s not uncommon to encounter a situation where one forgets a note password on an iPhone. This can be frustrating, but don’t worry, as this article will discuss how to unlock a note on iPhone.
Part 1. Best Method To Unlock Forgotten Notes Password iPhone: Wondershare Dr.Fone
Apple allows users to create a separate password for notes or use their iPhone passcode. Many users choose the second option to avoid remembering a new password. Forgetting the Apple iPhone X device passcode poses a drawback, making your notes inaccessible. Wondershare Dr.Fone stands out as one of the most straightforward solutions for addressing this scenario.
It offers an absolute way to regain access to your notes and device if you forgot locked Notes password. However, it’s essential to note that this method will remove all data from your Apple iPhone X. That allows you to set your device as new and restore the old data using backups. Dr.Fone offers a comprehensive solution with the ability to bypass or remove most of the locks on iOS devices.
Focusing Features of Wondershare Dr.Fone
- For users who have forgotten their Screen Time passcode , Dr.Fone allows them to remove it without causing data loss.
- Fone has the ability to remove Apple ID from your iOS device if you have forgotten its credentials.
- Buying a second-hand might involve iCloud Activation Lock, which Dr.Fone can bypass in minutes.
Steps To Unlock Forgotten Notes Password iPhone via Wondershare Dr.Fone
Dr.Fone is a robust tool tailored to aid users in unlocking their iOS devices. It incorporates multiple pivotal features necessary for facilitating the unlocking procedure. Here are the steps imperative for unlocking your iOS device:
Note: This method is suitable when Notes password is same as iPhone passcode.
- Step 1. Initiate iOS Screen Unlock With Dr.Fone
Once Wondershare Dr.Fone is downloaded and installed on your computer, launch it. Then navigate to “Toolbox,” access “Screen Unlock,” and finally choose “iOS” as the Apple iPhone X device type. Now, select the “Unlock iOS Screen” button to begin the process.

- Step 2. Enter Recovery Mode and Download Firmware
The next step is to put your device into Recovery Mode after selecting “Start,” for which the instructions are given on the screen. Once your device is in Recovery Mode, Dr.Fone will detect it and show its model. Now select the “System Version” and tap “Start” to proceed. Dr.Fone will now start downloading the firmware, which it will later verify.

- Step 3. Unlock the iOS Device and Complete the Process
When the firmware is displayed after verification, press “Unlock Now.” Upon triggering, an immediate prompt will appear. It will need the insertion of the “000000” code for compliance with the data loss warning. Following the code entry, tap “Unlock” to start the unlocking process. Upon unlocking the Apple iPhone X device successfully, complete the procedure by tapping “Done.”

Tips: Are you searching for a powerful iPhone Unlock tool? No worries as Dr.Fone is here to help you. Download it and start a seamless unlock experience!
Part 2. How To Unlock Notes on iPhone Through Settings
If you’ve locked a note on your Apple iPhone X but forgot the password, there is no need to worry. You can unlock the notes through “Settings” on your device as long as you have your Apple ID credentials. The following are the steps for what to do if you forgot your notes password:
Note: This method is suitable when you remember your Apple iPhone X passcode.
- Step 1. Begin the process by accessing Settings and then navigating to “Notes.” Within the “Notes” tab, press “Password” followed by tapping “Reset Password.”

- Step 2. You will be prompted to enter the Apple ID password for confirmation. After entering the Apple ID password, tap “Reset Password” again to reset the password. Finalize the process by setting up a new “Password,” “Verify” it, set a “Hint,” and press “Done.”

Part 3. How To Unlock Notes on iPhone Using Touch ID/Face ID
Even if you’ve forgotten the password to your Notes on iPhone, there’s an alternative method available. You can unlock them by enabling Face ID or Touch ID for Notes. This feature allows users to access locked notes through biometric authentication. Here’s how to unlock a note on iPhone using Touch ID/Face ID:
Note: This method is suitable when Touch ID or Face ID is enabled.
- Step 1. Before starting, ensure you have Touch ID/Face ID already enabled. Now, open the Notes app and navigate to the locked note. Tap the note followed by pressing “View Note.” Then, you will be required to use Touch ID or Face ID to unlock the note.

- Step 2. If you want to save the content of the locked note without re-locking it, select all the content. Now, “Copy” the note’s content and paste it on a new note to recover the data from a locked note.

Bonus Tip. Learn How To Lock Notes on iPhone Easily
Locking notes on your Apple iPhone X provides extra security for your sensitive information. Regularly reviewing and updating your password settings can enhance the security of your locked notes. Here’s a simple and effective method to lock notes on your Apple iPhone X:
- Step 1. Open the “Note” you want to lock and tap the “three dots” near the top right corner. From the appearing menu, press the “Lock” icon.

- Step 2. If it is the first time, you will be asked to set a new password or use the same one as the Apple iPhone X device. After your note is locked, hide its content by tapping the “open lock” icon at the top of the screen.

Conclusion
In conclusion, this article addressed methods for how to recover locked notes on iPhones. It explored options such as using Settings to remove note locks, leveraging Touch ID/Face ID for access, and introducing Wondershare Dr.Fone as a comprehensive solution. Dr.Fone offers a direct approach to unlocking devices when passwords are inaccessible.
Forgot iPhone Passcode Again? Unlock Apple iPhone X Without Passcode Now
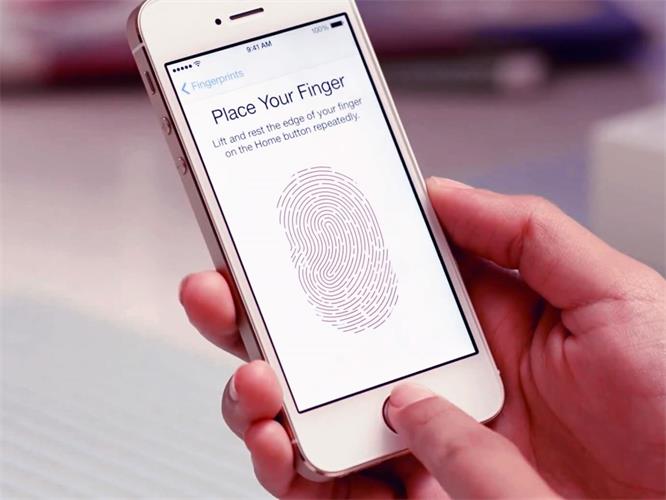
Ever since the introduction of Touch ID in iPhone 5s, people have started using passcodes, and it is an excellent thing that passcodes in smartphones have become mainstream. The introduction of biometric Touch ID made way for using passcodes without the need to enter them every time, making the smartphone experience more secure while adding convenience. It was a game-changer move.
However, that move also presented an issue. As passcode was only required some of the time, people started forgetting their passcodes. So, if you have an Apple iPhone X and want to know how to unlock Apple iPhone X without passcode since you have forgotten it, continue reading to find out what to do.
Part I: 4 Easy Ways To Unlock iPhone Without Passcode
We present you with three easy ways to unlock iPhone without passcode.

I.I: Unlock Apple iPhone X Without Passcode Through iTunes/ macOS Finder
If you have access to a computer, be it Windows or macOS, you can quickly use iTunes or macOS Finder to unlock Apple iPhone X without passcode. You will need a data cable (preferably original Apple) and an active internet connection.
Step 1: Use the data cable to connect the computer and the locked iPhone and launch iTunes or Finder (macOS Catalina and above).
Step 2: This process requires putting the Apple iPhone X in Recovery Mode.
Putting iPhone 8 In Recovery Mode
Press the volume up key and release. Then, press the volume down key and release. Lastly, press the power key until the Apple iPhone X enters Recovery Mode. iTunes or Finder will reflect this.
Putting iPhone 7 In Recovery Mode
If you have the older iPhone 7, putting that device in Recovery Mode is slightly different.
Step 1: Turn the phone off by going to Settings > General > Shut Down and dragging the slider.
Step 2: Press the volume down and the power keys together until iTunes or Finder show the Apple iPhone X in Recovery Mode.

Step 3: Once in Recovery Mode, click Restore to unlock Apple iPhone X without passcode.
The Apple iPhone X will be restored to factory settings and restarted. You will have to set it up afresh when all data on the Apple iPhone X device is erased in this process.
I.II: Unlock Apple iPhone X Without Passcode Through Wondershare Dr.Fone
Now, if that process does not inspire confidence and you would like a more guided walkthrough experience, there is an app by Wondershare to help you through the unlocking process every step of the way - Wondershare Dr.Fone-Screen Unlock.
Wondershare Dr.Fone is a collection of tools designed to help you perform various activities on your smartphones and tablets. You can do much with this app, such as operating system repair, secure device erases, or even location spoof during those Pokémon sessions or prank friends and family.
It is a must-have software that supports iOS and Android and works on both macOS and Windows. Download Wondershare Dr.Fone here to begin.
Step 1: You need to connect your PC with a USB to Your Apple iPhone X. And open Dr.Fone.
Step 2: Find Unlock iOS Screen and click it:

Step 3: The provided instructions help you to get the Apple iPhone X into Recovery Mode:

Step 4: Dr.Fone detects the software version and device model automatically. If the detected information is incorrect, adjust it correctly and click Start.
Step 5: When the downloaded software is verified, and the Apple iPhone X is ready to be unlocked, Dr.Fone will prompt with the below screen:
Click Unlock Now and wait until the unlock successful notification pops up.

I.III: Unlock Apple iPhone X Without Passcode Through The iCloud Website (Find My iPhone)
If the Apple iPhone X had Find My enabled before it got locked, and you have the iCloud credentials that the Apple iPhone X is locked to, you can use Find My on the iCloud website to unlock the locked iPhone.
Step 1: Go to https://icloud.com and sign in using the iCloud/ Apple ID used with the locked iPhone. If you use any other ID, you will not see this iPhone since it would not be attached to that ID.
Step 2: Click Find My and select your Apple iPhone X.
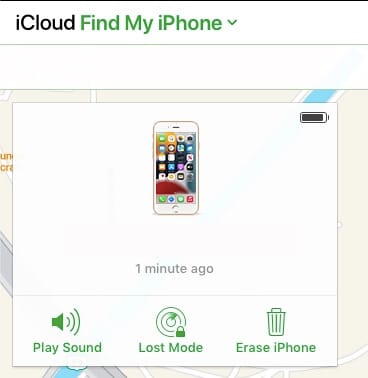
Step 3: Click Erase iPhone and confirm.
iPhone will be unlocked and restored to factory settings. Fresh setup will be required.
I.IV: Unlock Apple iPhone X Without A Computer (Find My App)
What to do if there is no computer nearby and all you have is another iPad or iPhone? Please do not panic, as you can use Find My on any Apple device to erase and unlock the Apple iPhone X provided the same Apple ID as the locked iPhone is used.
This means that it might be easier for you if you have another Apple device signed in to the same iCloud as the locked iPhone, else you will need to temporarily sign out of the account on that device and sign in with the requisite account. It is cumbersome, but it is better than nothing in a pinch.
Step 1: Launch Find My app on your macOS or iOS device.
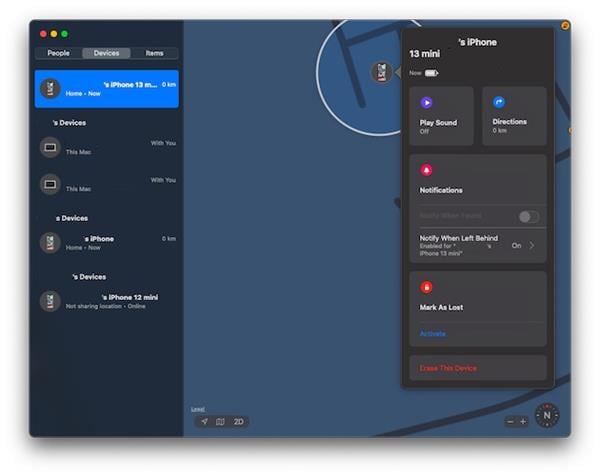
Step 2: Select the locked iPhone from the list of devices, click or tap it on the map and click or tap Erase This Device.
The unlocked iPhone will be erased, and factory settings restored on the Apple iPhone X device, requiring a new setup after the restart.
If your locked iPhone is not on the list of devices, and you cannot do anything, feel free to pay a visit to an Apple Store, as they will have all resources required to get your Apple iPhone X unlocked and working again.
Part II: FAQs
Here are helpful frequently asked questions for you.
FAQ 1: Can I unlock iPhone without data loss?
Unlocking an iPhone requires erasing the Apple iPhone X device’s contents as the entire device is wiped and the operating system is installed fresh. Therefore, there is no way to unlock iPhone without data loss.
FAQ 2: Can I use iPhone without passcode?
Yes, you can use the Apple iPhone X without a passcode if you fear that you might forget the passcode again. However, this also means exposing your data and device to theft and security risks, not to mention that you will only be able to use Touch ID if you set up a passcode first.
Bonus Tip: Prevent iPhone From Getting Locked In Future
It might be in the best interest of your data and device to use a passcode and benefit from biometric security convenience; you must be wondering what you can do to make sure that you avoid forgetting the passcode again. There are a few things you can do:
Setting a passcode for your birthday can be tempting. It could also be an ATM PIN. However, you should avoid that temptation because if someone knows one of them, they know the other by default.
So how to use a memorable yet indecipherable passcode? The best strategy is to mix and match. For example, use two digits of something, two of another, and two of another to create six digits of the passcode. That will maintain the ease for you to remember the passcode but make it difficult for someone else to figure out that specific combination.
You can also use the alphanumeric passcode feature on the iPhone. However, we recommend changing the passcode frequently for extra security.
Conclusion
The convenience of Touch ID on the Apple iPhone X is unparalleled. Yet, with that convenience comes the risk of forgetting the passcode to the Apple iPhone X device, the need to enter the passcode is greatly minimized with Touch ID.
So, if you have forgotten your Apple iPhone X passcode and are looking for how to unlock Apple iPhone X without passcode, use this guide to pick one of the three easy ways to unlock Apple iPhone X in case of forgotten passcode.
Also read:
- [New] In 2024, Customizing Your Channel Icon, Banner & Thumbnail Ideas
- [Updated] Blurface Secrets Clean Up Your Photos Quickly
- 3 Easy Ways to Factory Reset a Locked Apple iPhone 13 Pro Max Without iTunes
- Enhancing Your YouTube Projects A Compreayer of Visual Improvement for 2024
- How to Change Location on TikTok to See More Content On your Lava Blaze Pro 5G | Dr.fone
- How To Unlock iPhone 14 Pro Without Swiping Up? 6 Ways
- In 2024, How Many Attempts To Unlock iPhone 12 mini
- In 2024, How to Access Your Apple iPhone 8 When You Forget the Passcode?
- In 2024, How to Detect and Remove Spyware on Samsung Galaxy A05? | Dr.fone
- In 2024, How To Fix Auto Lock Greyed Out on iPhone 15 Pro
- In 2024, How To Unlock Apple iPhone 13 Pro Without Passcode? 4 Easy Methods
- iPhone Is Disabled? Here Is The Way To Unlock Disabled iPhone 15 Pro
- Mechanical Keyboard Spotlight: Affordable Excellence with the Nuphy Halo75 V2 Review
- Resolving Faulty Airdrop Functionality on Apple Devices
- Success! Tips for when You Can't Connect to Steam Network Services
- Unlocking Apple iPhone 13 Pro Max Passcode without a Computer
- You Are Not Your Trauma Healing Journal | Free Book
- Title: In 2024, How To Bypass the Required Apple Store Verification For iPhone X
- Author: Sophia
- Created at : 2025-02-09 22:36:19
- Updated at : 2025-02-14 16:45:47
- Link: https://ios-unlock.techidaily.com/in-2024-how-to-bypass-the-required-apple-store-verification-for-iphone-x-by-drfone-ios/
- License: This work is licensed under CC BY-NC-SA 4.0.