
In 2024, How To Remove Flashlight From iPhone XS Max Lock Screen
How To Remove Flashlight From Apple iPhone XS Max Lock Screen
Ever wonder why the flashlight shows up on your Apple iPhone XS Max lock screen? Especially when it happens in your pocket or while you’re holding it. If you, like many, accidentally turn it on and drain your battery, no need to worry.
While you can’t remove it, figuring out how to remove flashlight from iPhone lock screens is a common question. This guide shares several ways to prevent accidental activations and save your device’s battery. Keep reading for easy solutions to take charge of your Apple iPhone XS Max’s lock screen and make it work better for you.

Part 1: How To Remove Flashlight From iPhone Lock Screens?
You can’t remove the shortcuts like the flashlight icon from an iPhone lock screen. These are built-in features, and Apple doesn’t currently offer an option to disable them. However, there are some workarounds to make the flashlights less accessible and avoid turning them on accidentally. You can turn off Tap to Wake, Raise to Wake, remove the flashlight icon from the control center, and turn off the Back Tap shortcut.
Find out the steps below.
Quick Fix No. 1: Turn Off Tap To Wake
Tap to Wake lets you light up your Apple iPhone XS Max screen with a simple tap. It’s handy, but there’s a catch – tapping near the bottom right corner might accidentally turn on the flashlight icon. The Tap to Wake feature can be troublesome, especially in the dark, when you don’t want any unexpected brightness.
Turning off the Tap to Wake feature is not directly related to the issue of iPhone users wanting to remove the flashlight from lock screens. However, adjusting settings like Tap to Wake can be part of customizing the overall user experience on an iPhone. When turned off, the screen won’t light up with a tap, reducing the likelihood of accidentally triggering the flashlight.
Here is how to turn off the Tap to Wake feature:
- Step 1: Go to Settings or General > Accessibility on your Apple iPhone XS Max device.
- Step 2: Toggle off Tap to Wake.

Quick Fix No. 2: Turn Off Raise To Wake
With “Raise to Wake” enabled, simply picking up your phone can activate the lock screen. Consequently, the flashlight icon becomes more susceptible to accidental touches. To address this, turning off this feature stops the screen from waking when you lift your Apple iPhone XS Max. By doing so, it becomes less likely that you’ll accidentally turn on the flashlight when you pick up your iOS device.
Here is how to remove flashlights from iPhone lock screens when not needed:
- Step 1: Head to Settings > Display & Brightness on your iOS device.
- Step 2: Toggle off the Raise to Wake option.

Quick Fix No. 3: Remove the Flashlight From the Control Center
The Control Center on iPhones is a quick-access panel. You can access it by swiping down from the top right corner of your screen. There, you can control various settings, like the flashlight. If you remove it, the flashlight becomes less accessible from the lock screen. Follow these steps to remove the flashlight from the control center:
- Step 1: Open the Settings app and navigate to Control Center.
- Step 2: Tap on Customize Controls, then find the Flashlight icon.
- Step 3: Tap the red minus (-) sign next to the Flashlight icon.
- Step 4: Tap Remove to confirm deleting the Flashlight icon from the Control Center.

Quick Fix No. 4: Turn Off Back Tap Shortcut
Back Tap on the Apple iPhone XS Max lets you set actions for double or triple taps on the back. One of these actions is turning on the flashlight. If you often tap your phone’s back, you might accidentally activate the flashlight. Turning off the Back Tap for the flashlight prevents these accidental activations.
Although the flashlight icon remains on the lock screen, you won’t accidentally turn it on by hitting the back of your phone. Here’s how to disable the Back Tap for the flashlight shortcut:
- Step 1: Go to Settings > Accessibility > Touch > Back Tap.
- Step 2: Select the Double Tap or Triple Tap option you’re using for the flashlight shortcut.
- Step 3: Choose None instead of the currently assigned action, which might be Flashlight.

Part 2: How To Turn Off the Flashlight on iPhone?
Now, let’s address turning off the flashlight on your Apple iPhone XS Max. Even if you’ve applied Part 1’s solutions, knowing how to switch off the flashlight is crucial. In this section, you’ll learn how to turn the light off on iPhone devices.
Method No. 1: Turn Off the Flashlight in the Control Center
You can’t remove the flashlight icon from the lock screen, but you can still turn it off easily. Just swipe down from the upper-right corner or swipe up from the bottom (for iPhones with a Home button). Then, follow these steps to discover how to turn off the flashlight on your Apple iPhone XS Max: Here’s how to do it.
- Step 1: Find the flashlight icon in the Control Center. It’s usually located in the bottom left corner.
- Step 2: Tap on the flashlight icon once to turn it off. The icon will turn gray, indicating the flashlight is deactivated.

This method is fast and convenient, especially if you’ve kept the flashlight icon in the Control Center. Plus, it works regardless of how the flashlight was activated, even if it was an accidental tap on the lock screen.
Method No. 2: Use Siri To Turn Off Flashlight
To go hands-free and avoid accidental taps, you can use Siri to turn off the flashlight. For those who favor a hands-free approach, it offers an alternative method, particularly if you haven’t customized the Control Center. Here’s how to turn off the flashlight with Siri on your Apple iPhone XS Max:
- Step 1: Say “Hey Siri” or press and hold the power button (or Home button on older iPhones) to activate Siri.
- Step 2: Give the commands saying, “Turn off the flashlight.”
- Step 3: Siri will confirm your request and turn off the flashlight. You’ll hear a voice cue and see the flashlight icon on your screen dim.

Remember, even with Siri, ensure your Apple iPhone XS Max’s microphone isn’t covered or blocked for successful voice recognition.
Bonus Part: Easily Unlock Your Apple iPhone XS Max Without a Password
Removing the flashlight shortcut avoids accidentally activating the Apple iPhone XS Max flashlight. But what if you forget your lock screen passcode and need to access your Apple iPhone XS Max? That’s where Wondershare Dr.Fone Screen Unlock (iOS) comes in, offering a powerful toolkit for regaining access to your locked iOS device.
This software effortlessly bypasses any lock screen, so you can access your data in a few steps. Dr.Fone works seamlessly with the latest iOS versions and devices, providing a dependable safety net for iPhone users.
Key Features:
- If you’ve forgotten your phone’s password or bought a second-hand device, here’s how Dr.Fone can help you:
- Bypasses various lock screen types like pattern, 4 or 6-digit passcode, Touch ID, and Face ID without the original passcode.
- Removes iCloud Activation Lock on a used or lost iPhone/iPad, allowing it to be set up with a new Apple ID.
- Offers a simple, intuitive interface with clear instructions.
Forgotten passcodes and iCloud Activation Lock can leave you feeling shut out. To address this issue, here’s a step-by-step guide using Dr.Fone Screen Unlock (iOS):
- Step 1: Download and install Dr. Fone’s desktop app on your computer. Make sure you get the latest version for optimal compatibility. Launch the app and select the Screen Unlock option from the Toolbox homepage.

- Step 2: Select iOS as the Apple iPhone XS Max device type. Then, within the Screen Unlock window, select Unlock iOS Screen to begin the process.

- Step 3: Click Start to remove the iOS screen lock.

- Step 4: Get your Apple iPhone XS Max and a USB cable. Connect the phone to your computer and wait for Dr.Fone to recognize it. Next, put your Apple iPhone XS Max into Recovery Mode using specific button combinations for your model.

- Step 5: Check your Device Model, select the System Version you need from the dropdown list, then click Start.

- Step 6: Dr.Fone will download and install the latest iOS firmware on your device. Then, click Unlock Now once the firmware is ready. Follow the on-screen instructions to continue unlocking your device.

- Step 7: Once the process is complete, Dr.Fone will notify you. Your Apple iPhone XS Max should be unlocked and ready for you to set it up again with your preferred settings and Apple ID.

Conclusion
Resolving the issue of how to remove flashlight from iPhone lock screens is attainable with these workarounds. Turning off Tap to Wake and Raise to Wake reduces accidental activations. Customizing the Control Center and Back Tap allows precise accessibility adjustments.
Additionally, learn how to turn off the flashlight using straightforward methods: either through the Control Center or by instructing Siri to do so. These solutions ensure a personalized lock screen experience, minimizing unwanted light disruptions.
And if ever locked out with the flashlight on, consider Dr.Fone Screen Unlock. This powerful tool bypasses various screen locks, including passcodes, Face IDs, and Touch IDs. Dr.Fone remains a valuable safety net for unexpected moments while fixing your iOS device. Customize your Apple iPhone XS Max lock screen settings with these tips for a seamless experience.
Tips: Are you searching for a powerful Screen Unlock tool? No worries as Dr.Fone is here to help you. Download it and start a seamless unlock experience!
How To Bypass the Required Apple Store Verification For Apple iPhone XS Max
The Apple App Store is a familiar place for anyone with an iPhone or iPad. It’s where you find all sorts of useful and fun apps. However, one thing that can be a hassle is the store’s strict verification process. Every time you make a purchase, you need to go through this step.
It’s there for a good reason – to stop fraud – but it can get annoying, especially if you forget your Apple ID or have other issues. This article will explore the ways to stop the Apple Store “Verification Required” prompt, making your app downloading experience smoother.

Part 1: Why Does Apple Require Verification in the Apple Store?
When browsing the App Store on your Apple iPhone XS Max or iPad and looking to download the latest game or productivity tool, you might have noticed that Apple often asks for some form of verification before you can proceed with your purchase. This is not just a random step; there’s a solid reason behind it.
The primary reason Apple requires verification for App Store purchases is to ensure that you are the person authorizing the purchase. This security measure prevents unauthorized transactions and protects your account from fraud.
What does this verification usually involve? It could be entering your Apple ID password or using Face ID or Touch ID if your device supports these features. These methods are designed to confirm your identity quickly and securely.

Reasons Why the Verification Required Message Might Appear
There are several reasons why you might see an Apple Store’ Verification Required’ message when trying to download an app or make a purchase:
- New Apple ID. If you’ve just created a new Apple ID and need to download or pay for apps, Apple must verify your payment information. Thus, you’ll have to prove everything, especially on a new phone.
- **Payment method needs to be corrected.**Suppose there’s an issue with your Apple ID’s payment method, such as outdated or incorrect details. In that case, verification is required to ensure the account is secure and ready for transactions.
- Invalid credit card. Unsupported or invalid credit cards can trigger the verification notice, as Apple can’t process payments with these cards.
- Unpaid balance. If there’s an outstanding balance on your Apple ID, you can download or pay for new apps once this balance is cleared.
- Family Sharing restrictions. For those using Family Sharing, if the family organizer has placed restrictions on your account, this could result in a verification prompt.
Understanding these reasons is the first step in addressing the ‘Verification Required’ message. It’s not just a random or annoying hurdle; it’s there for your security and to ensure a smooth, safe experience when using the App Store.
Part 2: How To Fix Verification Required Prompt Using Apple ID
Having to deal with the ‘Verification Required’ prompt in the App Store can be a bit of a hassle, especially when you’re eager to get your hands on a new app or game. Fortunately, there are several methods you can use to resolve this issue, most of which are pretty straightforward and can be done right from your device. Here’s how to tackle it:
Update Payment Method
One of the most common reasons for the verification prompt is a problem with your payment method. To fix this, go to your Apple ID settings on your Apple iPhone XS Max or iPad. Tap your name at the top of the Settings app, then go to Payment & Shipping. You can update your payment information or add a new payment method here. Make sure the details are correct and up to date.
Check Unpaid Subscriptions
Sometimes, unpaid subscriptions can trigger the verification prompt. Tap the App Store > your profile icon, and select Subscriptions. Here, you can view all your subscriptions, active or expired. Check if there are any unpaid ones and clear any outstanding payments.

Don’t Require Password for Purchases
For less frequent purchases, you should change the settings so you don’t always have to enter your password. Go to Settings, then to Screen Time. Under Content & Privacy Restrictions, select iTunes & App Store Purchases. Here, you can change the settings to Don’t Require for purchases. However, be cautious with this method as it reduces security.

Sign Out of Apple ID and Re-Sign In
Sometimes, simply signing out of your Apple ID and then signing back in can resolve the issue. Go to the Settings app, tap your name at the top, and scroll down to Sign Out. After signing out, restart your device and then sign back in. This can help refresh your account settings and clear up any minor glitches.
Remember, these methods are about bypassing the verification process and ensuring your account is up-to-date and secure. Regularly checking your Apple ID settings and payment information can prevent many common issues with the App Store, including the frustrating ‘Verification Required’ prompt.
Part 3: How To Bypass Verification Required Prompt Without Apple ID
If you need to learn how to bypass the ‘Verification Required’ prompt in the App Store but don’t have access to the Apple ID or password, there’s an alternative approach using third-party software. One such tool that can assist in this situation is Wondershare Dr.Fone - Screen Unlock (iOS), which offers a feature specifically designed for this purpose.
Introducing Dr. Fone’s Screen Unlock (iOS) Feature
Dr.Fone - Screen Unlock (iOS) function includes an Apple ID remover tool. This feature is handy when you cannot remember your Apple ID or password but need to download apps from the App Store. Here’s a step-by-step guide on how to use this feature.
Step-by-Step Guide To Bypass Verification Without Apple ID With Dr.Fone
Here’s a complete guide on bypassing the verification required on the App Store.
Step 1: Install and open Wondershare Dr.Fone on your computer.
Step 2: Navigate to Toolbox and select Screen Unlock followed by iOS.
- Step 3: In the next window, choose Remove Apple ID to proceed.

- Step 4: A connectivity status will appear on the screen with your iOS device connected to the computer. Click Unlock Now to start the process.

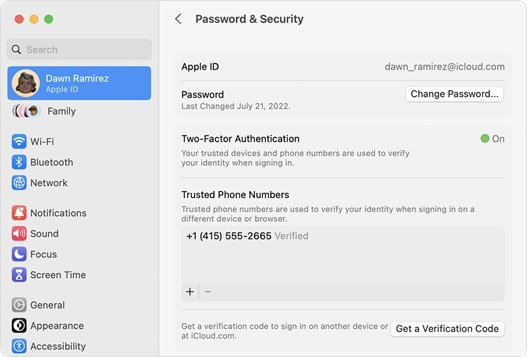
- Step 5: Confirm if your iOS device has a screen lock and two-factor authentication enabled. This is crucial for the process to continue smoothly.

- Step 6: Follow the on-screen instructions to put your iOS device in Recovery Mode. If necessary, you can also opt for DFU Mode by following the provided instructions. Once in Recovery Mode, the tool will recognize your device model. You’ll need to select the correct system version to proceed.

- Step 7: The tool will download the appropriate iOS firmware for your device. After the download, it will verify the firmware.
- Step 8: After firmware verification, click Unlock Now. You’ll be prompted to enter a code for confirmation. Once entered, the unlocking process will begin.

- Step 9: You’ll receive a notification once the process is complete. You may try again if the process fails to succeed the first time.

Note: After Apple ID removal, you must re-enter a new Apple ID to access the App Store. Take note of the password now if you forgot your previous one.
Conclusion
In this article, you’ve learned how to remove ‘Verification Required’ in the App Store. The primary takeaway is to try solving the issue using your Apple ID, as this approach typically prevents data loss. However, if you’re in a tight spot without access to your Apple ID, Dr.Fone - Screen Unlock (iOS) offers a reliable alternative to bypass this hurdle.
While it’s an effective solution, always consider it a secondary option to safeguard your data. Additionally, Dr.Fone can be a handy tool for various other phone-related challenges, making it a useful resource for tackling different tech problems.
Tips: Are you searching for a powerful Screen Unlock tool? No worries as Dr.Fone is here to help you. Download it and start a seamless unlock experience!
Reset iTunes Backup Password Of Apple iPhone XS Max: Prevention & Solution
When you back up the data from your Apple iPhone XS Max, iPad, or iPod touch, you will have a copy of the information stored on those devices. It’s free to use iTunes, iCloud, or both to back up your device.
If you have forgotten the password to your backup, you may reset your Apple iPhone XS Max backup password by following these instructions. The process to reset the iTunes backup password is simple within only a few minutes.
To get started, please follow the instructions that are listed below.
Part 1: iPhone Backup Encryption Specifications
A safety precaution that may be taken to prevent unwanted access to your Apple iPhone XS Max backups is using a password for the backups themselves.
If you forget your password, you will be required to reset it before being able to access your backups again.
iCloud and iTunes Backup Password
Resetting your password may be done in different methods, depending on whether or not you have an iCloud account. You may reset your iCloud password by visiting the iCloud website and following the steps. This requires that you already have an iCloud account.
Connecting your device to a computer and using the iTunes program will allow you to reset your password even if you do not have an iCloud account. After successfully changing your password, you can access your backups the same way as before.
To improve the safety of your Apple iPhone XS Max backup, you should first change the password for your iTunes backup. This will guarantee that no one else can see your backup file and that only you can access it. No one else will have chance to get it.
Basic Ways for Password Security
To reset your password, go to the Preferences menu in iTunes, and click on the Reset Password button. You will be prompted to enter your old password and a new one. Please choose a strong password that cannot be easily guessed.
Another way to enhance the security of your Apple iPhone XS Max backup is to use iCloud instead of iTunes. iCloud offers an extra layer of security, as your backup file will be encrypted when transmitted to iCloud.
In addition, iCloud requires you to enter your Apple ID and password to access your backup file. This means that only you can access your backup and that it will be more difficult for someone else to gain access to it.
Forgot your Apple iPhone XS Max backup password? Don’t worry, and we can help!
Our step-by-step guide will show you how to reset iPhone backup password in minutes. Follow these simple steps, and you’ll be able to access your backed-up data in no time. We guarantee it!
Follow on to learn how to reset your Apple iPhone XS Max backup password now!
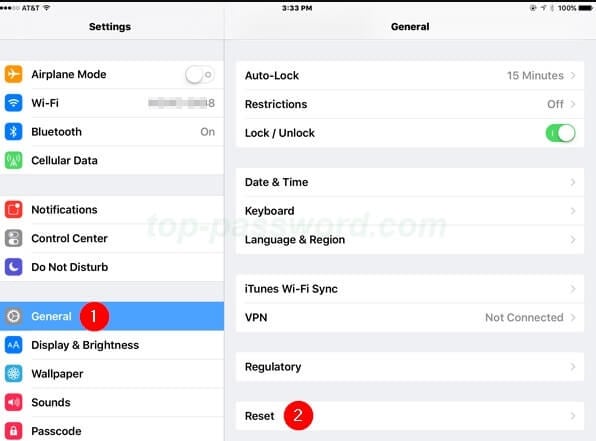
1. “Reset All Settings” in “Settings.”
Get into Settings on your iOS device, then choose General, and Reset.
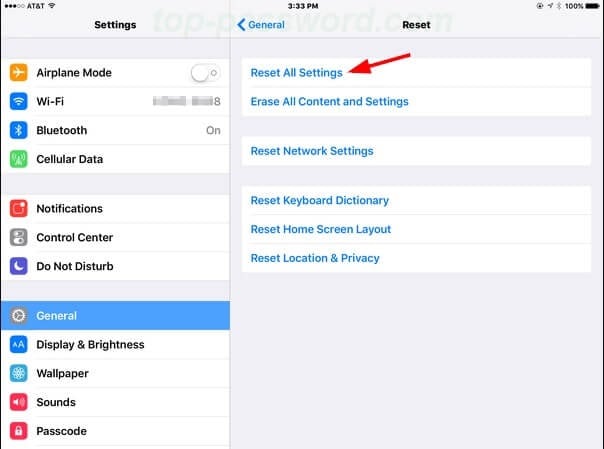
Now, go to Reset All Settings and confirm by entering the security passcode. Your phone will reset to the default setting. Get rid of the password for the last backup without deleting any other apps or data.
2. “Back Up Now” in “iCloud.”
If you already have a backup stored in iCloud, you may use iCloud to reset the encryption password iPhone.
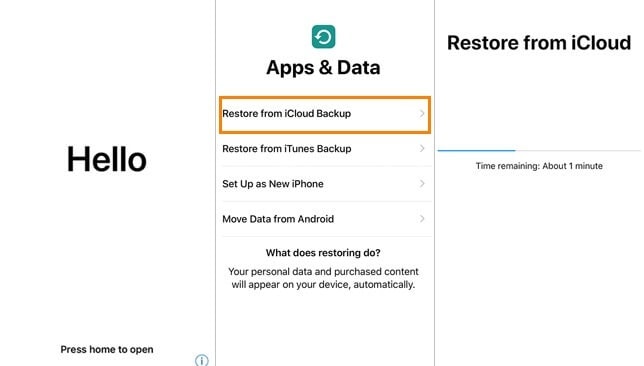
Turn on the mobile and look for the “Hello” screen. If you have previously set up your Apple iPhone XS Max, you must delete or remove all of the material before continuing.
Navigate to the Apps & Data menu, and choose the Restore from iCloud Backup option.
After successfully signing in with your Apple ID, choose Backup.
3. Find it back in the macOS keychain
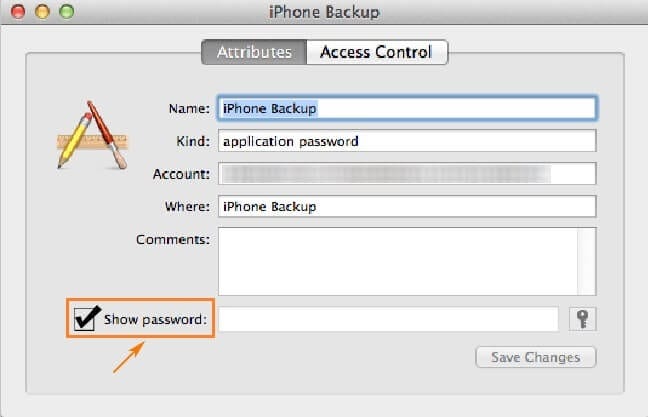
Launch Keychain Access by going to Application, then Utilities, and choose Keychain Access once your Mac has booted up.
Check for a backup by entering it into the search box and looking for it there.
Double-click Show Password, and choose it from the drop-down menu. The password for your Apple iPhone XS Max backup will be shown, and you can reset iTunes backup password now!
Bonus Tips: Best App to Remove iTunes Backup Password
Do you have a loved one’s locked iPhone and don’t know the passcode?
Dr.Fone - Screen Unlock is the world’s first and only tool to remove any lock screen on an iPhone, iPad, or iPod without knowing the password. It also unlocks iCloud locks, removes MDM profiles, and bypasses MDM locks without data loss.
So, whether your loved one has forgotten their screen lock code, had their phone stolen, or is stuck on the activation lock screen, Dr.Fone Screen Unlock can help.
The process is simple -download the software, connect your Apple iPhone XS Max to your computer, click a few buttons, and voila! Your device is unlocked with no data loss. And there’s no need to jailbreak your device or enter any passwords - it’s all done with just a few clicks.
With Dr.Fone - Screen Unlock, you can easily follow the steps to remove iTunes backup password.
Step 1: Install Dr.Fone, launch it and select the red button “Screen Unlock.”
Step 2: Go to the Screen Unlock interface, tap on “Remove iTunes BackUp Encryption” on the bottom right to reset the encryption password iPhone.

Step 3: Connect your iOS device to the PC via a USB cable. You will see the image if Dr.Fone can detect this connection.
Click “Remove Now”
- Make sure “Find My iPhone” is off.
- Do not open “iTunes” in the process.
- Your device will reboot in the process of removing

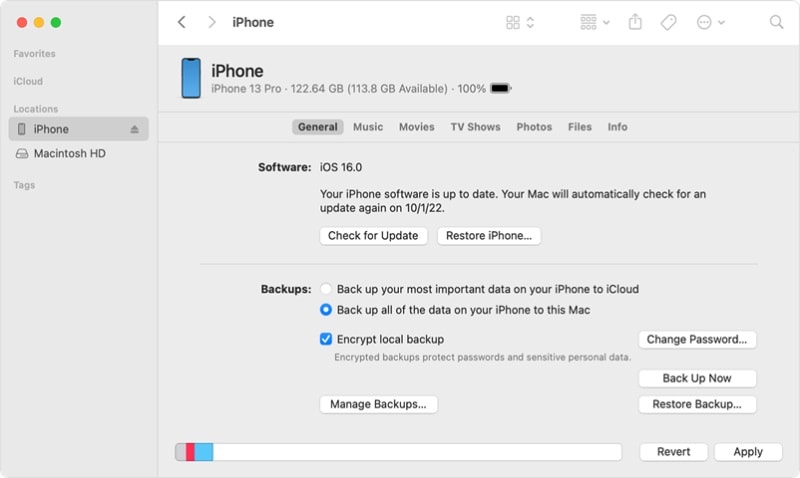
Step 4: Dr.Fone will verify and remove your iTunes backup password when the progress bar reaches 100%

Step 5: iTunes backup encryption is removed successfully! You can now reset iTunes backup password without any trouble.

Part 4: Tips to Keep Your Apple iPhone XS Max Backup Password
1. Use birthday as password
It is essential to use a password that is both robust and one of a kind if you want to have the safety of the backup password for your Apple iPhone XS Max.
Using your birthdate as the password is one approach that has shown to be useful. This strategy helps guarantee that your password is not readily guessed or cracked while at the same time ensuring that it is simple for you to remember.
2. Use a third-party app to keep it
There is a wide selection of third-party software on the market that may assist you in maintaining the privacy and integrity of the data stored on your Apple iPhone XS Max.
These applications cannot only safeguard your data but also add additional levels of protection, making it impossible for anybody else, even if they know the password, to access the data.
KeepSafe and Norton Zone are just examples of the many different programs available. Not only will your Apple iPhone XS Max backup password be safe and secure with these programs, but other crucial information stored on your phone will also be protected.
3. Write it down on a note
If you need to change your Apple iPhone XS Max’s backup password but have forgotten it, you’ll know how aggravating it is. Passwords can be difficult to keep straight in your head even after you’ve exhausted the most obvious possibilities.
Fortunately, you can save your password as a note on your Apple iPhone XS Max and access it whenever necessary. If you store the note somewhere secure (like a password-protected notes app or a master password manager), you shouldn’t have any problems.
Launch Notes and make a new note to do this. After that, you may protect the message with a password and save it.
You may now easily access your backup password by referring to the note. Though it’s not ideal, it’s better than losing track of your password and starting over from scratch.
The Bottom Line
The process to reset iPhone’s backup password is not as complicated as you think and can be completed in a matter of minutes. You may quickly and reset your password and go back to using your phone by following the steps outlined above.
Dr.Fone - Screen Unlock is the easiest method to delete the password from your iTunes backup. This program makes regaining access to your phone and its contents as simple as tapping a screen. If you want to avoid going through this procedure again, be sure to implement the suggestions provided in Section 3.
Also read:
- [Updated] 2024 Approved Quick Fixes Addressing Top YouTube Short Challenges
- 11 Systems
- 4 Ways to Unlock iPhone SE to Use USB Accessories Without Passcode
- Comprehensive Solutions for STOP 0X0000001D (NO_SPIN_LOCK_AVAILABLE) Issue on Windows Systems
- How to Unlock Apple iPhone 15 Pro?
- How to Unlock Apple iPhone SE, Apples New iPhone
- In 2024, PopToons Ultimate Insight '24 Annual
- In 2024, Things You Should Know When Unlocking Total Wireless Of Apple iPhone 6
- The Audience's Eye View Selecting Best Webcams for Podcasts
- Top 9 Invisible Media Extractors for 2024
- Top-Rated Desktop Speaker Emerges as a Non-Logitech, Non-Pioneer Contender Reviewed on ZDNet
- Title: In 2024, How To Remove Flashlight From iPhone XS Max Lock Screen
- Author: Sophia
- Created at : 2025-01-17 16:19:59
- Updated at : 2025-01-24 16:38:40
- Link: https://ios-unlock.techidaily.com/in-2024-how-to-remove-flashlight-from-iphone-xs-max-lock-screen-by-drfone-ios/
- License: This work is licensed under CC BY-NC-SA 4.0.