
In 2024, How to Unlock Your Apple iPhone 8 Plus Passcode 4 Easy Methods (With or Without iTunes)
How to Unlock Your Apple iPhone 8 Plus Passcode: 4 Easy Methods (With or Without iTunes)
“How to unlock iPhone passcode without iTunes? I have been locked out of my iPhone and can’t remember its passcode. Is there an easy solution to learn how to unlock iPhone 6 passcode?”
If you are having a similar experience with your Apple iPhone 8 Plus, then you have certainly come to the right place. There are times when iPhone users don’t remember the passcode of their device and are locked out of it. Even though you can learn how to unlock iPhone 5 passcode in different ways, you might have to suffer from some unwanted data loss. In this guide, we will make you familiar with different solutions to do the same. Read on and learn how to unlock iPhone 6 without password using different techniques.
Part 1: How to unlock iPhone passcode with iTunes?
If you have already synced your Apple iPhone 8 Plus with iTunes, then you can follow this technique and learn how to unlock iPhone passcode effortlessly. Since it will restore your device, you can later use a backup file to get your data back.
1. Launch iTunes on your system and make sure that it is an updated version which is compatible with your Apple iPhone 8 Plus.
2. Now, connect your Apple iPhone 8 Plus to your system and wait for it to detect it.
3. Go to the Apple iPhone 8 Plus devices section to select your Apple iPhone 8 Plus and visit its Summary page.
4. From here, click on the “Restore iPhone” button on the right.

Part 2: How to unlock iPhone passcode with Dr.Fone - Screen Unlock (iOS)?
Too many times, users don’t get the desired results with iTunes. Therefore, we recommend using Dr.Fone - Screen Unlock (iOS) tool to learn how to unlock iPhone 6 without a passcode . The tool is compatible with all the leading iOS versions and devices. It provides a seamless solution to fix all the major issues related to an iOS device and that too within minutes. You can learn how to unlock iPhone 5 passcode by following these instructions. Though, the same steps would work with other iOS versions as well.
Tips: Backup all your data before unlocking the phone with Dr.Fone - Screen Unlock.
Dr.Fone - Screen Unlock (iOS)
Unlock iPhone/iPad Lock Screen Without Hassle.
- Remove Apple ID on iOS devices without Password.
- Support removing 4-digit/6-digit passcode, Touch ID & Face ID.
- Easy to use it, with no technology background required.
- Compatible with the latest iPhone XS, X, iPhone 8 (Plus) and iOS 12.


3981454 people have downloaded it
1. Install Dr.Fone - Screen Unlock (iOS) from its website right here and launch it on your system. Select the “Screen Unlock” option from its homepage.

2. You can attach your Apple iPhone 8 Plus to a computer and the “Start” button at the interface at the same moment.
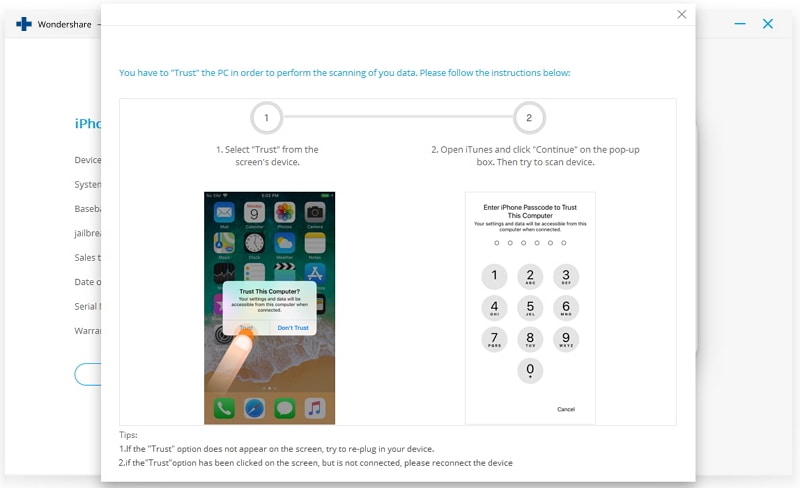
3. When the system detects your Apple iPhone 8 Plus, it displays a prompt to trust the computer. Don’t accept it, and instead close it.
4. Now you have to provide a few important information about your Apple iPhone 8 Plus on the next window.
5. To update your firmware, click on the “Download” button. Wait for a while to finish the download.

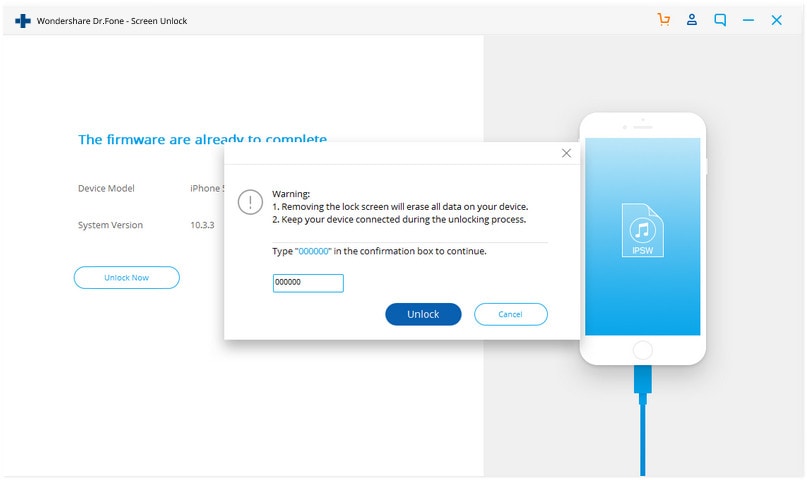
6. You will get the following interface once the firmware update is downloaded. Click “Unlock Now” to determine the option “Contain Native Data.”

7. In addition, by typing the on-screen code you need to verify your choice.
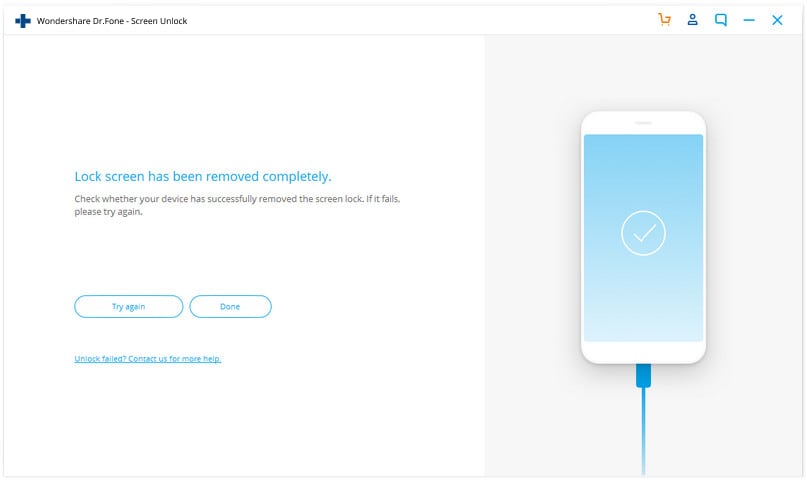
8. After agreeing with the confirmation message, the application will start fixing your Apple iPhone 8 Plus. You might need to wait for a few minutes.
9. You will be notified by showing the following window once the process is effectively finished.
Now when you know how to unlock iPhone 6 without password, you can disconnect your Apple iPhone 8 Plus and use it as per your needs.
Part 3: How to unlock iPhone passcode without iTunes using iCloud?
If your Apple iPhone 8 Plus is already in sync with iCloud and you have enabled the Find My iPhone feature, then you can easily learn how to unlock iPhone passcode remotely. The service was originally introduced to locate a lost iPhone. Though, it can also erase an iPhone entirely without much trouble. To learn how to unlock iPhone 6 passcode using iCloud, follow these steps:
1. Visit the official website of iCloud and sign-in using your account credentials. This should be the same account that is in sync with your Apple iPhone 8 Plus.
2. On the home page, you will find various options. Click on “Find iPhone” to learn how to unlock iPhone 5 passcode.

3. If you have linked several devices with your iCloud account, then simply click on the “All Devices” option and select your Apple iPhone 8 Plus.

4. This will provide various options related to your Apple iPhone 8 Plus. Simply click on the “Erase iPhone” button and confirm your choice.

This will restart your Apple iPhone 8 Plus while wiping it entirely. You need to set up your Apple iPhone 8 Plus as a new device without any lock screen.
Part 4: How to unlock iPhone passcode by tricking Siri?
As you can see, in all the above-stated solutions, your Apple iPhone 8 Plus data would be lost. Therefore, we recommend trying this technique beforehand. For iOS 8.0 to iOS 10.1 versions, it has been observed that Siri has a loophole which can be exploited to unlock the iOS device. It might be a little tricky and doesn’t provide guaranteed results. Nevertheless, you can give it a try and learn how to unlock iPhone 6 without a password by following these steps:
1. Unlock your Apple iPhone 8 Plus and press the Home button to activate Siri.
2. Provide a command like “What time is it” to get the current time with the display of the clock icon.

3. Tap on the clock icon to open the world clock interface.
4. Here, you need to add another clock. Tap on the “+” icon to do it.

5. To add another city, simply provide any text and tap on it. Choose the “Select all” option.

6. As the entire text would be selected, you will get various options. Choose the “Share” option to proceed.

7. This will provide different ways to share the selected text. Go with the message option.

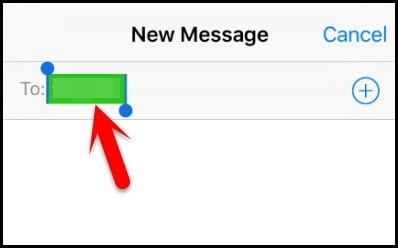
8. A new interface will be opened to draft a message. Type something in the “To” field.
9. After typing, tap on the Return button.

10. This will turn the text in green colour. Now, you need to tap on the add icon beside it.
11. As it will launch a new interface, you can just select the “Create new contact” option.

12. This will again provide a new interface to add new content. Tap on the “Add Photo” option and select to choose an existing photo instead.
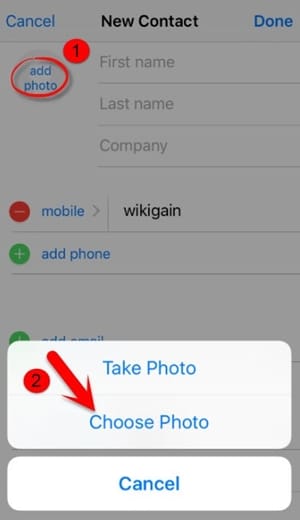
13. The photo library on your phone will be launched. You can simply tap on any album you wish to open.

14. After waiting for a while, slightly press the home button. If you are lucky, you will land on the home screen on your Apple iPhone 8 Plus and can access it without any trouble.

As you can see, there are plenty of ways to learn how to unlock iPhone passcode without much trouble. Ideally, you should go with Dr.Fone - Screen Unlock (iOS) to resolve any kind of issue related to your Apple iPhone 8 Plus. Easy to use, the application provides highly reliable results and will certainly come handy to you on numerous occasions. Now when you know how to unlock iPhone 6 passcode, you can share this guide with your friends and family as well and help them resolve this issue.
How To Remove Flashlight From Apple iPhone 8 Plus Lock Screen
Ever wonder why the flashlight shows up on your Apple iPhone 8 Plus lock screen? Especially when it happens in your pocket or while you’re holding it. If you, like many, accidentally turn it on and drain your battery, no need to worry.
While you can’t remove it, figuring out how to remove flashlight from iPhone lock screens is a common question. This guide shares several ways to prevent accidental activations and save your device’s battery. Keep reading for easy solutions to take charge of your Apple iPhone 8 Plus’s lock screen and make it work better for you.

Part 1: How To Remove Flashlight From iPhone Lock Screens?
You can’t remove the shortcuts like the flashlight icon from an iPhone lock screen. These are built-in features, and Apple doesn’t currently offer an option to disable them. However, there are some workarounds to make the flashlights less accessible and avoid turning them on accidentally. You can turn off Tap to Wake, Raise to Wake, remove the flashlight icon from the control center, and turn off the Back Tap shortcut.
Find out the steps below.
Quick Fix No. 1: Turn Off Tap To Wake
Tap to Wake lets you light up your Apple iPhone 8 Plus screen with a simple tap. It’s handy, but there’s a catch – tapping near the bottom right corner might accidentally turn on the flashlight icon. The Tap to Wake feature can be troublesome, especially in the dark, when you don’t want any unexpected brightness.
Turning off the Tap to Wake feature is not directly related to the issue of iPhone users wanting to remove the flashlight from lock screens. However, adjusting settings like Tap to Wake can be part of customizing the overall user experience on an iPhone. When turned off, the screen won’t light up with a tap, reducing the likelihood of accidentally triggering the flashlight.
Here is how to turn off the Tap to Wake feature:
- Step 1: Go to Settings or General > Accessibility on your Apple iPhone 8 Plus device.
- Step 2: Toggle off Tap to Wake.

Quick Fix No. 2: Turn Off Raise To Wake
With “Raise to Wake” enabled, simply picking up your phone can activate the lock screen. Consequently, the flashlight icon becomes more susceptible to accidental touches. To address this, turning off this feature stops the screen from waking when you lift your Apple iPhone 8 Plus. By doing so, it becomes less likely that you’ll accidentally turn on the flashlight when you pick up your iOS device.
Here is how to remove flashlights from iPhone lock screens when not needed:
- Step 1: Head to Settings > Display & Brightness on your iOS device.
- Step 2: Toggle off the Raise to Wake option.

Quick Fix No. 3: Remove the Flashlight From the Control Center
The Control Center on iPhones is a quick-access panel. You can access it by swiping down from the top right corner of your screen. There, you can control various settings, like the flashlight. If you remove it, the flashlight becomes less accessible from the lock screen. Follow these steps to remove the flashlight from the control center:
- Step 1: Open the Settings app and navigate to Control Center.
- Step 2: Tap on Customize Controls, then find the Flashlight icon.
- Step 3: Tap the red minus (-) sign next to the Flashlight icon.
- Step 4: Tap Remove to confirm deleting the Flashlight icon from the Control Center.

Quick Fix No. 4: Turn Off Back Tap Shortcut
Back Tap on the Apple iPhone 8 Plus lets you set actions for double or triple taps on the back. One of these actions is turning on the flashlight. If you often tap your phone’s back, you might accidentally activate the flashlight. Turning off the Back Tap for the flashlight prevents these accidental activations.
Although the flashlight icon remains on the lock screen, you won’t accidentally turn it on by hitting the back of your phone. Here’s how to disable the Back Tap for the flashlight shortcut:
- Step 1: Go to Settings > Accessibility > Touch > Back Tap.
- Step 2: Select the Double Tap or Triple Tap option you’re using for the flashlight shortcut.
- Step 3: Choose None instead of the currently assigned action, which might be Flashlight.

Part 2: How To Turn Off the Flashlight on iPhone?
Now, let’s address turning off the flashlight on your Apple iPhone 8 Plus. Even if you’ve applied Part 1’s solutions, knowing how to switch off the flashlight is crucial. In this section, you’ll learn how to turn the light off on iPhone devices.
Method No. 1: Turn Off the Flashlight in the Control Center
You can’t remove the flashlight icon from the lock screen, but you can still turn it off easily. Just swipe down from the upper-right corner or swipe up from the bottom (for iPhones with a Home button). Then, follow these steps to discover how to turn off the flashlight on your Apple iPhone 8 Plus: Here’s how to do it.
- Step 1: Find the flashlight icon in the Control Center. It’s usually located in the bottom left corner.
- Step 2: Tap on the flashlight icon once to turn it off. The icon will turn gray, indicating the flashlight is deactivated.

This method is fast and convenient, especially if you’ve kept the flashlight icon in the Control Center. Plus, it works regardless of how the flashlight was activated, even if it was an accidental tap on the lock screen.
Method No. 2: Use Siri To Turn Off Flashlight
To go hands-free and avoid accidental taps, you can use Siri to turn off the flashlight. For those who favor a hands-free approach, it offers an alternative method, particularly if you haven’t customized the Control Center. Here’s how to turn off the flashlight with Siri on your Apple iPhone 8 Plus:
- Step 1: Say “Hey Siri” or press and hold the power button (or Home button on older iPhones) to activate Siri.
- Step 2: Give the commands saying, “Turn off the flashlight.”
- Step 3: Siri will confirm your request and turn off the flashlight. You’ll hear a voice cue and see the flashlight icon on your screen dim.

Remember, even with Siri, ensure your Apple iPhone 8 Plus’s microphone isn’t covered or blocked for successful voice recognition.
Bonus Part: Easily Unlock Your Apple iPhone 8 Plus Without a Password
Removing the flashlight shortcut avoids accidentally activating the Apple iPhone 8 Plus flashlight. But what if you forget your lock screen passcode and need to access your Apple iPhone 8 Plus? That’s where Wondershare Dr.Fone Screen Unlock (iOS) comes in, offering a powerful toolkit for regaining access to your locked iOS device.
This software effortlessly bypasses any lock screen, so you can access your data in a few steps. Dr.Fone works seamlessly with the latest iOS versions and devices, providing a dependable safety net for iPhone users.
Key Features:
- If you’ve forgotten your phone’s password or bought a second-hand device, here’s how Dr.Fone can help you:
- Bypasses various lock screen types like pattern, 4 or 6-digit passcode, Touch ID, and Face ID without the original passcode.
- Removes iCloud Activation Lock on a used or lost iPhone/iPad, allowing it to be set up with a new Apple ID.
- Offers a simple, intuitive interface with clear instructions.
Forgotten passcodes and iCloud Activation Lock can leave you feeling shut out. To address this issue, here’s a step-by-step guide using Dr.Fone Screen Unlock (iOS):
- Step 1: Download and install Dr. Fone’s desktop app on your computer. Make sure you get the latest version for optimal compatibility. Launch the app and select the Screen Unlock option from the Toolbox homepage.
- Step 2: Select iOS as the Apple iPhone 8 Plus device type. Then, within the Screen Unlock window, select Unlock iOS Screen to begin the process.

- Step 3: Click Start to remove the iOS screen lock.

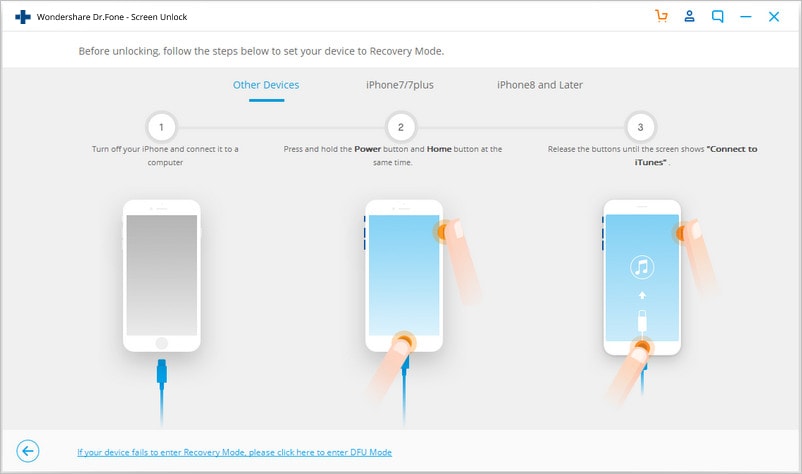
- Step 4: Get your Apple iPhone 8 Plus and a USB cable. Connect the phone to your computer and wait for Dr.Fone to recognize it. Next, put your Apple iPhone 8 Plus into Recovery Mode using specific button combinations for your model.

- Step 5: Check your Device Model, select the System Version you need from the dropdown list, then click Start.
- Step 6: Dr.Fone will download and install the latest iOS firmware on your device. Then, click Unlock Now once the firmware is ready. Follow the on-screen instructions to continue unlocking your device.

- Step 7: Once the process is complete, Dr.Fone will notify you. Your Apple iPhone 8 Plus should be unlocked and ready for you to set it up again with your preferred settings and Apple ID.

Conclusion
Resolving the issue of how to remove flashlight from iPhone lock screens is attainable with these workarounds. Turning off Tap to Wake and Raise to Wake reduces accidental activations. Customizing the Control Center and Back Tap allows precise accessibility adjustments.
Additionally, learn how to turn off the flashlight using straightforward methods: either through the Control Center or by instructing Siri to do so. These solutions ensure a personalized lock screen experience, minimizing unwanted light disruptions.
And if ever locked out with the flashlight on, consider Dr.Fone Screen Unlock. This powerful tool bypasses various screen locks, including passcodes, Face IDs, and Touch IDs. Dr.Fone remains a valuable safety net for unexpected moments while fixing your iOS device. Customize your Apple iPhone 8 Plus lock screen settings with these tips for a seamless experience.
Tips: Are you searching for a powerful Screen Unlock tool? No worries as Dr.Fone is here to help you. Download it and start a seamless unlock experience!
How to Bypass Apple iPhone 8 Plus Passcode Easily [Video Inside]
If you have forgotten the passcode of your Apple iPhone 8 Plus, then don’t worry! You are not the only one. It happens with plenty of iOS users every now and then. Lately, we have received lots of feedback from our readers asking for a solution to bypass Apple iPhone 8 Plus. Therefore, we thought of compiling an informative post to help you bypass the Apple iPhone 8 Plus passcode without much trouble. Go ahead and follow these hassle-free methods to perform an Apple iPhone 8 Plus bypass.
Part 1: How to bypass Apple iPhone 8 Plus passcode with Dr.Fone - Screen Unlock? (iOS 15.4)
Dr.Fone - Screen Unlock is an extremely secure and easy-to-use application that can help you bypass locked screens within minutes. Afterward, you can simply use your phone by resetting its lock. It provides a reliable way to update your phone’s firmware without causing any complications. The application can also be used to resolve plenty of other Apple iPhone 8 Plus-related issues. The only disadvantage you should notice is that your data will be wiped out after using this tool. So, you’d better backup it before.
 safe & secure
Compatible with every leading iOS device, it runs on all major iOS versions. Since Dr.Fone has an easy-to-use interface, it can simply resolve your issues without much trouble. You can restore your phone and perform an Apple iPhone 8 Plus bypass with Dr.Fone - Screen Unlock by following these steps.
Dr.Fone - Screen Unlock (iOS)
Bypass Apple iPhone 8 Plus Passcode at Ease
- Remove the 4-digit/6-digit passcode, Touch ID, and Face ID.
- A few clicks and the iOS lock screen are gone.
- The best alternative to factory rest mode.
- Fully compatible with all iDevice models and iOS versions.
4,395,218 people have downloaded it
Step 1. Download Dr.Fone - Screen Unlock on your Mac or Windows system from its official website. After installing it, launch it whenever you need to bypass the Apple iPhone 8 Plus lock. Click on the option of “Screen Unlock“ from the welcome screen.
Step 2. Connect your Apple iPhone 8 Plus to the system and let the application detect it automatically. Click on the “Unlock iOS Screen” button whenever you need to initiate the operation.

Step 3. After your phone is detected, you need to activate the DFU mode as instructed by the on-screen steps.
Step 4. In the next window, you have to provide basic information regarding your iOS device. Here, supply relevant information related to your phone (like device model, firmware, and more). Click on the “Download” button to get the firmware update for your phone.
Step 5. Wait for a while as the application will download the firmware update for your phone. Once it is done, click on the “Unlock Now” button.
Step 6. Simply provide the on-screen confirmation code to initiate the process.
Step 7. As soon as it is completed, you will be notified by the interface. You can also repeat the process by clicking on the “Try Again” button.
safe & secure
Part 2: How to bypass the Apple iPhone 8 Plus passcode with Siri? (iOS 8.0 – iOS 10.1)
If you are an avid user of Apple products, then the chances are that you must have already heard of this Apple iPhone 8 Plus hack. If you are running a device on iOS 8.0 to iOS 10.1, then you can take the assistance of Siri to bypass the Apple iPhone 8 Plus lock. Even though this is not a secure way to surpass your phone’s lock screen, it doesn’t restore or erase your data in the process. You can follow these steps to bypass the Apple iPhone 8 Plus passcode with Siri.
Step 1. Firstly, hold the Home button on our phone to activate Siri. Speak a command like “Siri, what time is it?” to ask the present time. Now, tap on the clock icon.

Step 2. It will open an interface for the world clock feature. From here, add another clock.

Step 3. Simply provide a textual input while searching for the city and tap on the “Select all” button.

Step 4. From all the provided features, select the option of “Share” to continue.

Step 5. Tap on the message icon to draft a new message.

Step 6. A new interface for message draft would be opened. In the “To” field, type something and tap the return button on the keyboard.

Step 7. As your text will turn green, tap on the add icon again.

Step 8. From the next interface, select the option of “Create New Contact”.

Step 9. While adding a new contact, tap on the contact photo icon and choose “Add Photo”.

Step 10. From the photo library, browse your albums.

Step 11. Wait for 3-5 seconds before pressing the home button again. This will lead you to the home screen of your device.

Part 3: How to bypass the Apple iPhone 8 Plus passcode with iTunes?
Another popular way to restore your Apple iPhone 8 Plus is by taking the assistance of iTunes. Needless to say, even though you would be able to bypass the Apple iPhone 8 Plus passcode, the technique will wipe the data on your device. Though, if you have already taken a backup of your data, then you can choose to restore it after performing an Apple iPhone 8 Plus bypass. Do it by following these instructions.
Step 1. Launch iTunes on your system and connect it with a USB/lightning cable.
Step 2. Hold the Home button on your Apple iPhone 8 Plus and while pressing it, connect it to your system. This will display a connect-to-iTunes symbol.

Step 3. After connecting your phone to the system, iTunes will automatically recognize it and display the following message. Simply click on the “Restore” button.

Step 4. Furthermore, you can choose to restore content from a previous backup as well. Go to iTunes Summary section and click on the “Restore Backup” button.

Step 5. Agree with the pop-up message and erase all the previous content on your phone.

Part 4: How to bypass Apple iPhone 8 Plus passcode with Elcomsoft iOS Forensic Toolkit?
This might be new to you, but there are a few forensic toolkits in the market that can help you perform Apple iPhone 8 Plus bypass without much trouble. One of the most reliable options is the Elcomsoft iOS Forensic Toolkit. Though, in order to use it, you need to download its licensed version from its website right.
Later, you can simply connect your phone to the system and run the forensic tool. From the welcome screen, select the option of “Get Passcode”. This will run an encrypted command and provide a passcode to your phone that can be used to unlock it.

Wrap it up
After following these solutions, you would be able to bypass the Apple iPhone 8 Plus lock without any trouble. You can simply choose your preferred option and perform an Apple iPhone 8 Plus bypass. If you are not able to unlock your phone with Siri, then use Dr.Fone - Screen Unlock. It is an extremely safe option to help you bypass the Apple iPhone 8 Plus passcode and overcome various iOS-related problems.
safe & secure
Also read:
- [New] In 2024, Authentic Audience Growth Tricks for Sustainable Views
- [Updated] In 2024, Busting the Top 10 Vloggers' Fears Strategies for Success
- [Updated] In 2024, Pro Tips for Time-Lapping Your Samsung Camera
- 3 Easy Solutions to Hard Reset Nokia G22 | Dr.fone
- Disabled iPhone 13 mini How to Unlock a Disabled iPhone 13 mini?
- How to Bypass Apple iPhone 12 Pro Max Passcode Easily Video Inside
- How to Migrate Android Data From Xiaomi Redmi 13C to New Android Phone? | Dr.fone
- In 2024, A Comprehensive Guide to Apple iPhone SE (2020) Blacklist Removal Tips and Tools
- In 2024, Can You Unlock Apple iPhone 7 After Forgetting the Passcode?
- In 2024, Different Methods To Unlock Your iPhone 8 Plus
- In 2024, How To Change Country on App Store for Apple iPhone 12 Pro With 7 Methods
- In 2024, How To Remove Flashlight From Apple iPhone 11 Pro Lock Screen
- In 2024, Is Your Apple iPhone 14 in Security Lockout? Proper Ways To Unlock
- Insightful Guide to the Samsung Galaxy Note20 Ultra's Cutting-Edge 5G Experience
- Restore Siri Functionality - Top 7 Fixes for Your Apple Device Woes
- Step-by-Step Guide: Modifying Excel Gridline Colors Easily
- The Ultimate List for Windows Multi-Monitor Brightness Tuning
- Title: In 2024, How to Unlock Your Apple iPhone 8 Plus Passcode 4 Easy Methods (With or Without iTunes)
- Author: Sophia
- Created at : 2025-02-10 02:14:23
- Updated at : 2025-02-15 03:31:36
- Link: https://ios-unlock.techidaily.com/in-2024-how-to-unlock-your-apple-iphone-8-plus-passcode-4-easy-methods-with-or-without-itunes-by-drfone-ios/
- License: This work is licensed under CC BY-NC-SA 4.0.