
In 2024, How to Unlock Your iPhone 7 Plus Passcode 4 Easy Methods (With or Without iTunes)
How to Unlock Your Apple iPhone 7 Plus Passcode: 4 Easy Methods (With or Without iTunes)
“How to unlock iPhone passcode without iTunes? I have been locked out of my iPhone and can’t remember its passcode. Is there an easy solution to learn how to unlock iPhone 6 passcode?”
If you are having a similar experience with your Apple iPhone 7 Plus, then you have certainly come to the right place. There are times when iPhone users don’t remember the passcode of their device and are locked out of it. Even though you can learn how to unlock iPhone 5 passcode in different ways, you might have to suffer from some unwanted data loss. In this guide, we will make you familiar with different solutions to do the same. Read on and learn how to unlock iPhone 6 without password using different techniques.
Part 1: How to unlock iPhone passcode with iTunes?
If you have already synced your Apple iPhone 7 Plus with iTunes, then you can follow this technique and learn how to unlock iPhone passcode effortlessly. Since it will restore your device, you can later use a backup file to get your data back.
1. Launch iTunes on your system and make sure that it is an updated version which is compatible with your Apple iPhone 7 Plus.
2. Now, connect your Apple iPhone 7 Plus to your system and wait for it to detect it.
3. Go to the Apple iPhone 7 Plus devices section to select your Apple iPhone 7 Plus and visit its Summary page.
4. From here, click on the “Restore iPhone” button on the right.

Part 2: How to unlock iPhone passcode with Dr.Fone - Screen Unlock (iOS)?
Too many times, users don’t get the desired results with iTunes. Therefore, we recommend using Dr.Fone - Screen Unlock (iOS) tool to learn how to unlock iPhone 6 without a passcode . The tool is compatible with all the leading iOS versions and devices. It provides a seamless solution to fix all the major issues related to an iOS device and that too within minutes. You can learn how to unlock iPhone 5 passcode by following these instructions. Though, the same steps would work with other iOS versions as well.
Tips: Backup all your data before unlocking the phone with Dr.Fone - Screen Unlock.
Dr.Fone - Screen Unlock (iOS)
Unlock iPhone/iPad Lock Screen Without Hassle.
- Remove Apple ID on iOS devices without Password.
- Support removing 4-digit/6-digit passcode, Touch ID & Face ID.
- Easy to use it, with no technology background required.
- Compatible with the latest iPhone XS, X, iPhone 8 (Plus) and iOS 12.


3981454 people have downloaded it
1. Install Dr.Fone - Screen Unlock (iOS) from its website right here and launch it on your system. Select the “Screen Unlock” option from its homepage.

2. You can attach your Apple iPhone 7 Plus to a computer and the “Start” button at the interface at the same moment.
3. When the system detects your Apple iPhone 7 Plus, it displays a prompt to trust the computer. Don’t accept it, and instead close it.
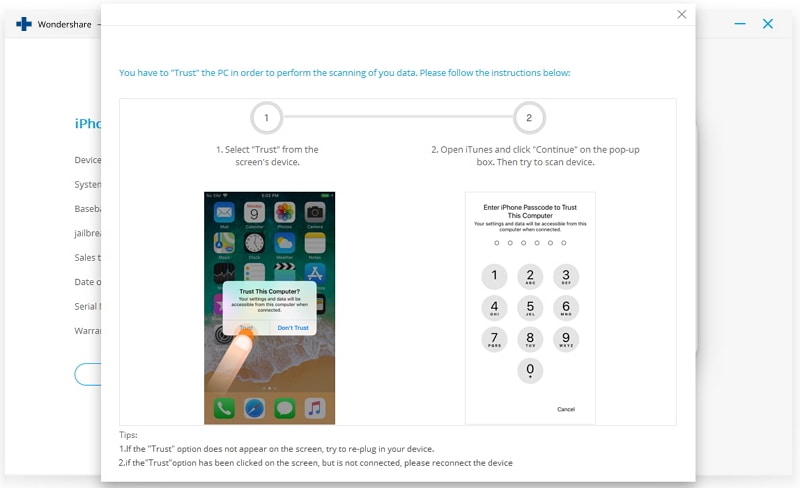
4. Now you have to provide a few important information about your Apple iPhone 7 Plus on the next window.
5. To update your firmware, click on the “Download” button. Wait for a while to finish the download.

6. You will get the following interface once the firmware update is downloaded. Click “Unlock Now” to determine the option “Contain Native Data.”

7. In addition, by typing the on-screen code you need to verify your choice.
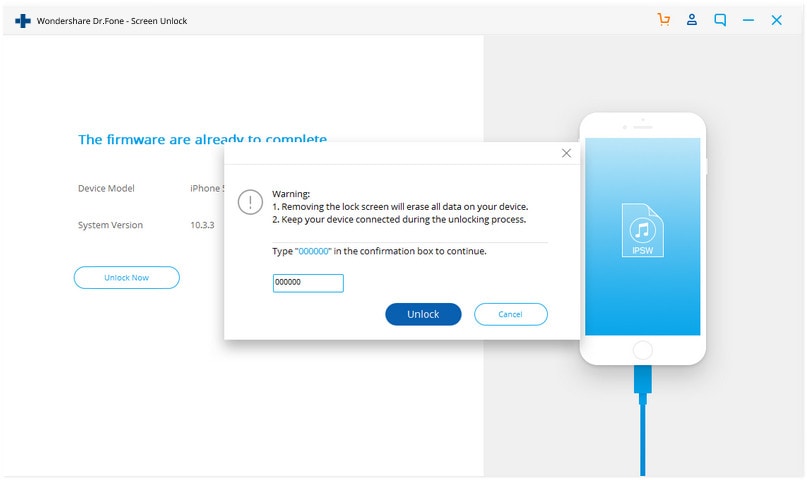
8. After agreeing with the confirmation message, the application will start fixing your Apple iPhone 7 Plus. You might need to wait for a few minutes.
9. You will be notified by showing the following window once the process is effectively finished.
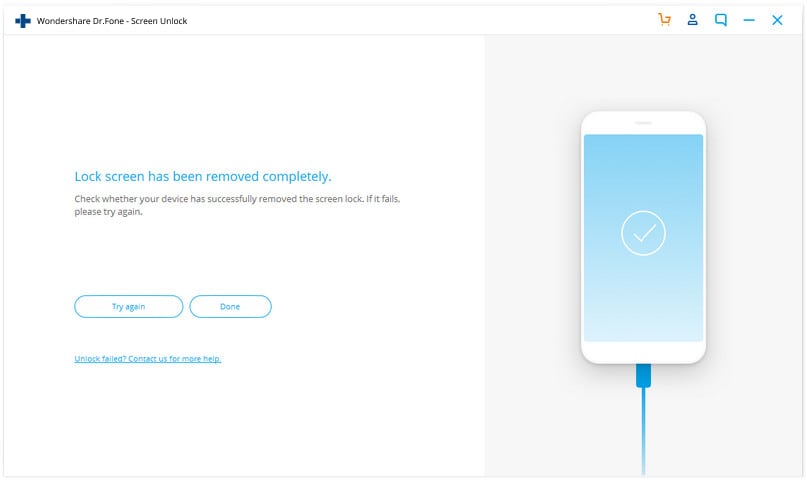
Now when you know how to unlock iPhone 6 without password, you can disconnect your Apple iPhone 7 Plus and use it as per your needs.
Part 3: How to unlock iPhone passcode without iTunes using iCloud?
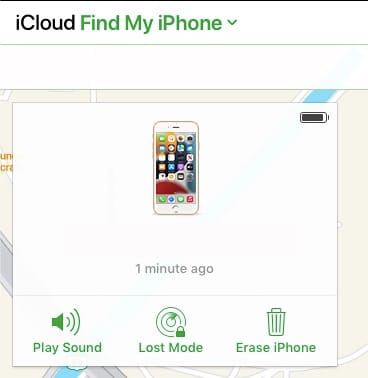
If your Apple iPhone 7 Plus is already in sync with iCloud and you have enabled the Find My iPhone feature, then you can easily learn how to unlock iPhone passcode remotely. The service was originally introduced to locate a lost iPhone. Though, it can also erase an iPhone entirely without much trouble. To learn how to unlock iPhone 6 passcode using iCloud, follow these steps:
1. Visit the official website of iCloud and sign-in using your account credentials. This should be the same account that is in sync with your Apple iPhone 7 Plus.
2. On the home page, you will find various options. Click on “Find iPhone” to learn how to unlock iPhone 5 passcode.

3. If you have linked several devices with your iCloud account, then simply click on the “All Devices” option and select your Apple iPhone 7 Plus.

4. This will provide various options related to your Apple iPhone 7 Plus. Simply click on the “Erase iPhone” button and confirm your choice.

This will restart your Apple iPhone 7 Plus while wiping it entirely. You need to set up your Apple iPhone 7 Plus as a new device without any lock screen.
Part 4: How to unlock iPhone passcode by tricking Siri?
As you can see, in all the above-stated solutions, your Apple iPhone 7 Plus data would be lost. Therefore, we recommend trying this technique beforehand. For iOS 8.0 to iOS 10.1 versions, it has been observed that Siri has a loophole which can be exploited to unlock the iOS device. It might be a little tricky and doesn’t provide guaranteed results. Nevertheless, you can give it a try and learn how to unlock iPhone 6 without a password by following these steps:
1. Unlock your Apple iPhone 7 Plus and press the Home button to activate Siri.
2. Provide a command like “What time is it” to get the current time with the display of the clock icon.

3. Tap on the clock icon to open the world clock interface.
4. Here, you need to add another clock. Tap on the “+” icon to do it.

5. To add another city, simply provide any text and tap on it. Choose the “Select all” option.

6. As the entire text would be selected, you will get various options. Choose the “Share” option to proceed.

7. This will provide different ways to share the selected text. Go with the message option.

8. A new interface will be opened to draft a message. Type something in the “To” field.
9. After typing, tap on the Return button.

10. This will turn the text in green colour. Now, you need to tap on the add icon beside it.

11. As it will launch a new interface, you can just select the “Create new contact” option.

12. This will again provide a new interface to add new content. Tap on the “Add Photo” option and select to choose an existing photo instead.
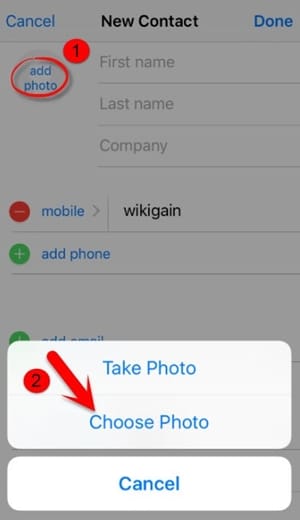
13. The photo library on your phone will be launched. You can simply tap on any album you wish to open.

14. After waiting for a while, slightly press the home button. If you are lucky, you will land on the home screen on your Apple iPhone 7 Plus and can access it without any trouble.

As you can see, there are plenty of ways to learn how to unlock iPhone passcode without much trouble. Ideally, you should go with Dr.Fone - Screen Unlock (iOS) to resolve any kind of issue related to your Apple iPhone 7 Plus. Easy to use, the application provides highly reliable results and will certainly come handy to you on numerous occasions. Now when you know how to unlock iPhone 6 passcode, you can share this guide with your friends and family as well and help them resolve this issue.
Disabled Apple iPhone 7 Plus: How to Unlock a Disabled Apple iPhone 7 Plus?

Apple iPhone 7 Plus Disabled?
Because of using face masks, Face ID on iPhone does not always work correctly, and we are entering our passcodes more than before. If we enter it incorrectly a few times in succession, the phone will disable itself to prevent unauthorized access. It can seem like the end of the world because in so many ways smartphones have become our world. Here are ways you can unlock your Apple iPhone 7 Plus disabled due to too many incorrect passcode attempts.
Part 1: Unlock Disabled Apple iPhone 7 Plus Without iTunes/ iCloud Using Dr.Fone - Screen Unlock (iOS)
We know and understand that the word troubleshooting can remind you of long telephone calls with support or making appointments and driving down to specialists and spending obscene amounts of money to get solutions. You do not want that. How about a way you could unlock your Apple iPhone 7 Plus in a simple, 1-click way instead?
Dr.Fone - Screen Unlock is a unique tool designed to help you avoid all hassles and get back on track quickly. It comprises modules designed to help you with all the issues that you might encounter during smartphone use. Naturally, there is something to help you when your Apple iPhone 7 Plus is disabled. You don’t need to use anything else, no other software or special cable or support. All you need is this one software you can download on your computer (both macOS and Windows supported) and you’re good to go.
Dr.Fone - Screen Unlock (iOS)
Unlock Disabled Apple iPhone 7 Plus Without iTunes/ iCloud.
- Intuitive instructions to unlock iPhone without the passcode.
- Removes the iPhone’s lock screen whenever it is disabled.
- Easy to use with detailed guides.
- Compatible with the latest iOS/iPadOS version.
3981454 people have downloaded it
Do note that all methods that unlock your Apple iPhone 7 Plus will necessarily wipe your Apple iPhone 7 Plus and remove all data from the Apple iPhone 7 Plus device, essentially booting it up as new.
Step 1: Launch Dr.Fone and click the module titled “Screen Unlock”.
Step 2: Choose the “iOS” option, then select “Unlock iOS Screen” on the subsequent screen to continue unlocking your Apple iPhone 7 Plus.

Step 3: Follow the provided instructions to start the disabled Apple iPhone 7 Plus in Recovery Mode to unlock it. If for any reason the phone does not boot in Recovery Mode, there are instructions provided at the bottom to enter what is called DFU mode.

Step 4: Dr.Fone will read and display your phone model and the software installed on it. If the model displayed is incorrect, use the dropdown to pick the correct detail. Click “Start” to download the specific firmware file for your particular Apple iPhone 7 Plus model.
Step 5: After the download completes, please click Unlock Now to start unlocking the disabled Apple iPhone 7 Plus.
Your Apple iPhone 7 Plus will be unlocked in a short span of time. Please note that all data would have been wiped out from the Apple iPhone 7 Plus device. When you set the Apple iPhone 7 Plus device up again, if you set it to use iCloud, data such as Contacts, iCloud Photos, iCloud Drive data, etc. will be downloaded onto your device again. The apps you had on your Apple iPhone 7 Plus prior to it getting disabled can be downloaded again from the App Store. If you did not use iCloud but backed up the data manually, you will have to manually restore that data onto the Apple iPhone 7 Plus device again.
 safe & secure
Part 2: Unlock Disabled Apple iPhone 7 Plus Using iTunes or macOS Finder
Of course, there is an official way that Apple provides for users to restore device firmware using iTunes or macOS Finder. For this, iPhone is put under Recovery Mode manually and Finder or iTunes is used to reinstall software on it directly from Apple. This process is fine for people who are conversant in tech, since this process can throw up a lot of errors that are just numbers, and people can get confused as to what they mean, resulting in frustration.
Step 1: Connect your Apple iPhone 7 Plus to a Windows/ macOS device and launch iTunes. If you are on a Mac that runs macOS Catalina or higher, open Finder since you would not have access to iTunes anymore.
Step 2: Pick your Apple iPhone 7 Plus and do the following:
(2.1) Press the volume up button and let it go.
(2.2) Press the volume down button and let it go.
(2.3) Press the Side Button (power button, on the right side of your Apple iPhone 7 Plus) and keep it pressed till Finder or iTunes detects the phone in Recovery Mode.
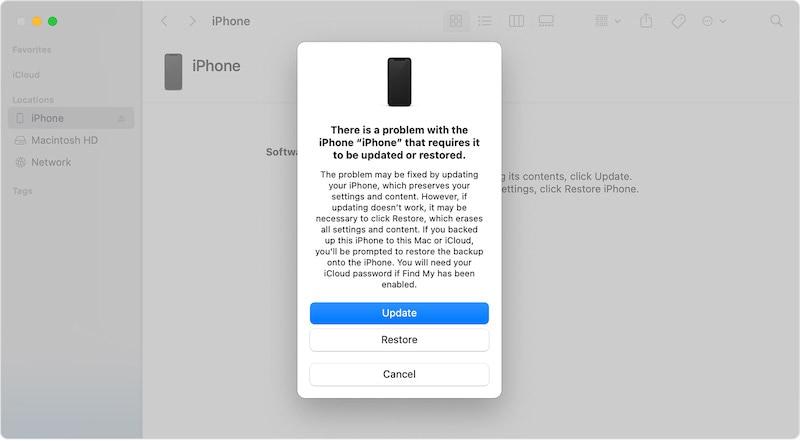
Step 3: Choose Restore to download and reinstall the latest iOS on your Apple iPhone 7 Plus and unlock your Apple iPhone 7 Plus.
When the Apple iPhone 7 Plus reboots, it will be reset to factory settings, and you can set it up again as you did when brand new.
Part 3: Unlock Disabled Apple iPhone 7 Plus Using iCloud Website (Find iPhone method)
Another method you may go with to unlock your disabled Apple iPhone 7 Plus is using the iCloud website to gain access back. This is a fairly easy way and doesn’t require going through complex hoops.
Find My is available both online via the iCloud website and on iOS devices and on Macs. In case the only Apple product you own is the currently disabled Apple iPhone 7 Plus, you can use Find My on the iCloud website from any other computer you may have to unlock your disabled Apple iPhone 7 Plus.
Step 1: Visit https://icloud.com and log in into the same iCloud account/ Apple ID as the disabled Apple iPhone 7 Plus.
Step 2: Go to Find My, select your Apple iPhone 7 Plus.
Step 3: Click Erase iPhone and confirm.
This will start the wipe process on your Apple iPhone 7 Plus remotely and your Apple iPhone 7 Plus will be reset to factory settings. You can now proceed to setup your Apple iPhone 7 Plus once again.
Part 4: Unlock Disabled Apple iPhone 7 Plus Using Find My iPhone App
There are times you have another iOS device in the family or just lying around, you can use that device to unlock your disabled Apple iPhone 7 Plus. This method is particularly useful if you’re traveling with family or alone, and only have family members with their own iOS devices or, say, your iPad with you. As always, note that all these methods will wipe your data from your Apple iPhone 7 Plus.
Step 1: Open the Find My app on your other iOS device or Mac
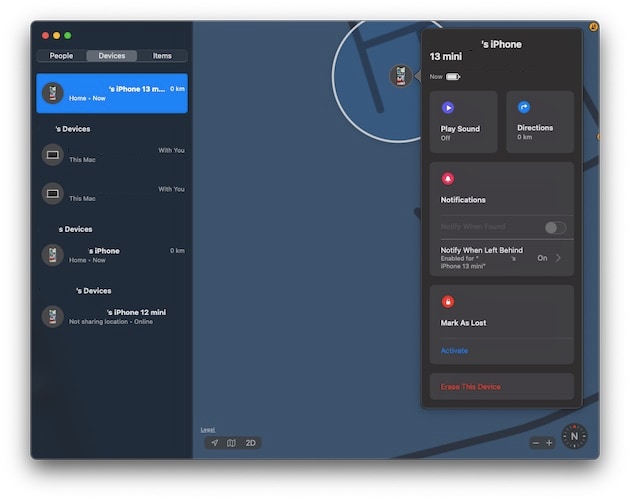
Step 2: Select your disabled Apple iPhone 7 Plus from the Apple iPhone 7 Plus devices from the left pane, click/ tap your disabled Apple iPhone 7 Plus and click/ tap Erase This Device
The disabled iPhone will be wiped and reset to factory settings. You can then set it up again.
Part 5: Unlock Disabled Apple iPhone 7 Plus Without A Computer
There are millions in the world who do not use the traditional computer so to speak. They have entered the post-PC era as they say, and their needs are met without a regular desktop or a laptop. They live wirelessly. They travel the world. Are you one of them? How would you unlock disabled Apple iPhone 7 Plus with no desktop/ laptop computer around? You have a few options.
You can use your other iOS device with Find My iPhone app to unlock your disabled Apple iPhone 7 Plus or you can use the iCloud website from your other device and Find iPhone app to unlock your disabled Apple iPhone 7 Plus.
The second option is to get a loaner device from someone you know. A loaner device is a device you borrow from someone to use for a purpose and return it when you are done with it. In this case, you can ask for a computer from someone you know and use it to unlock your disabled Apple iPhone 7 Plus and return the Apple iPhone 7 Plus device back. That way, you can use iTunes or macOS Finder if you’re more favorable to using that method.
When using a computer, the simplest, easiest, most flexible, and robust method to unlock disabled Apple iPhone 7 Plus is using third-party tools such as Dr.Fone – Screen Unlock (iOS). However, Dr.Fone is not just for troubleshooting and unlocking your disabled devices. Dr.Fone is like that multi-utility knife that can do a variety of things.
Using Dr.Fone you can not only unlock your Apple iPhone 7 Plus with ease, you can also use it periodically as a backup and restore tool that gives power in your hands. How does it do that? When you launched Dr.Fone, you had several modules to choose from and you chose Screen Unlock to unlock your disabled device. Instead of that, you can choose the Phone Backup module to backup and restore data from and to your device. Why would you use a third-party tool to backup and restore?
As you may be aware, using iTunes or macOS Finder allows you to backup and restore data onto your Apple iPhone 7 Plus easily, but, the one glaring omission here is that it does not allow you to choose what you want to backup and what you want to restore. This is a much-coveted feature that is glaringly absent from the Apple world so far, and with Dr.Fone’s iOS Phone Backup feature you can have that choice in your hands, just like you do with Android. Dr.Fone allows you to choose what you want to backup, so, you can back up just your photos, just your text messages, just your files, or any combination thereof, for the matter. And, when it comes to restore, you can restore selectively as well. So, suppose you backed up your entire data using Dr.Fone, now you can restore just the text messages if you so want.
safe & secure
Part 6: Prevent iPhone From Getting Disabled Again
After all this to get access back, you might think let’s go passcode-less and prevent the hassle. Don’t do that - that’s worse and unsafe. Instead, here are tips you can use to make sure you don’t accidentally disable your Apple iPhone 7 Plus again.
Tip 1: About Passcodes
- 1.1 Set a passcode that is easier to remember for you but difficult to think of for thieves and others.
- 1.2 Never use birthdates, years, vehicle numbers or any such numbers that may be easily tried by others.
- 1.3 Never use repeating numbers.
- 1.4 Do not use your ATM PIN as your phone passcode either. Think of some digits or combination that makes sense to you and only you. And then use it.
Tip 2: Use Face ID
Along with Passcode comes the option of Face ID on your Apple iPhone 7 Plus, so use that. That will minimize instances for you to enter your passcode, and may make you forget it again, though. So, make sure that the passcode you set does make sense to you and you can remember it always without effort.
Conclusion
Not all of us have the memory of elephants. With Touch ID and Face ID on our iPhones minimizing the use of passcodes, we may forget them. Another factor in forgetting passcodes is being too smart for our own good and trying to set up such a secure passcode that even we are not able to remember it. If we enter incorrect passcode too many times, the Apple iPhone 7 Plus disables itself and we need to restore it to factory settings to unlock it again. There are several ways to do that, depending on the time you are willing to spend on the job and your proficiency level, along with the resources that you have with you right now. For example, if a method requires use of another iOS device and you do not have it, that method is not useful to you right now, pick another. Lastly, when the Apple iPhone 7 Plus device is reset, instead of going passcode-less to make sure that you do not forget the passcode again, it is best to set up a passcode that you can somehow remember.
safe & secure
Remove Device Supervision From your Apple iPhone 7 Plus
Supervising devices is a proven technique for companies to monitor their employees. With this, they keep track of their performance on all associated devices. If you’ve decided to leave an organization, ensure that you retain the Apple iPhone 7 Plus device’s ownership by removing supervision access. If you’re looking for a guide on how to remove device supervision from your Apple iPhone 7 Plus, you can find some effective methods here.

Part 1. Answering Top Queries About Removing Device Supervision From iPhone
Many questions often pop up in users’ minds when considering removing device supervision. This section unveils some top queries with authoritative answers before heading to the main guide:
|
You May Want to Ask
|
Authoritative Answer
|
| — | — |
|
1. Does removing device supervision impact the iPhone’s functionality?
|
Removing device supervision does not compromise the fundamental functionality of your Apple iPhone 7 Plus. It is important to note that any administrative restrictions or configurations will be lifted. However, it might result in losing access to specific apps related to that organization.
|
|
2. Can device supervision be reinstated after removal?
|
Device supervision can be re-applied by the designated supervisor or IT administrator. However, this process usually involves resetting the Apple iPhone 7 Plus device to its factory settings if needed.
|
|
3. What information can be accessed through device supervision on iOS?
|
Once user’s devices are supervised, organizations can conveniently check settings, apps, and accounts being managed. They can also apply extra restrictions such as disabling Apple Music or putting the Apple iPhone 7 Plus device into Single App Mode.
|
Part 2. Remove Device Supervision With Perfection Using Wondershare Dr.Fone - Screen Unlock
Undoubtedly, device supervision is the most reliable method for organizations to monitor connected devices and analyze reports. If you have left a company where the administrator supervises your iOS device, your device needs to be unsupervised. For this process, you can bypass the MDM lock on your iOS device through a reliable tool.
Here, Wondershare Dr.Fone stands tall to help out your ventures and provide executable techniques explaining how to remove supervision from iPhone. This tool allows you to bypass the MDM lock without data loss on your Apple iPhone 7 Plus using easy steps. Consequently, you can also use other advanced functions, such as removing lock screens and unlocking Apple ID in different instances.
Features of Wondershare Dr.Fone To Consider
- Wondershare Dr.Fone lets you bypass iCloud Activation Lock completely and set a new Apple ID on the Apple iPhone 7 Plus device.
- This tool is compatible with all iOS devices, even iOS 17, and helps users experience creative features.
- Users can remove iTunes backup encryption by changing the encryption setting without losing data.
Step-by-Step Guide to Remove MDM Lock Using Wondershare Dr.Fone
Wondershare Dr.Fone provides the simplest method to remove the MDM lock and bypass device supervision access. Here is a comprehensive step-by-step guide to help users remove supervision from iPhones.
- Step 1. Initiate and Proceed With the Screen Unlock Feature
First, launch Wondershare Dr.Fone on the computer and connect it to your Apple iPhone 7 Plus. Move into the “Toolbox” tab and select the “Screen Unlock” function.
- Step 2: Select iOS and Head To Unlock MDM
After that, choose “iOS” as the Apple iPhone 7 Plus device type to open the related tool. Once the tool starts working, select the “Unlock MDM iPhone” option from the list.

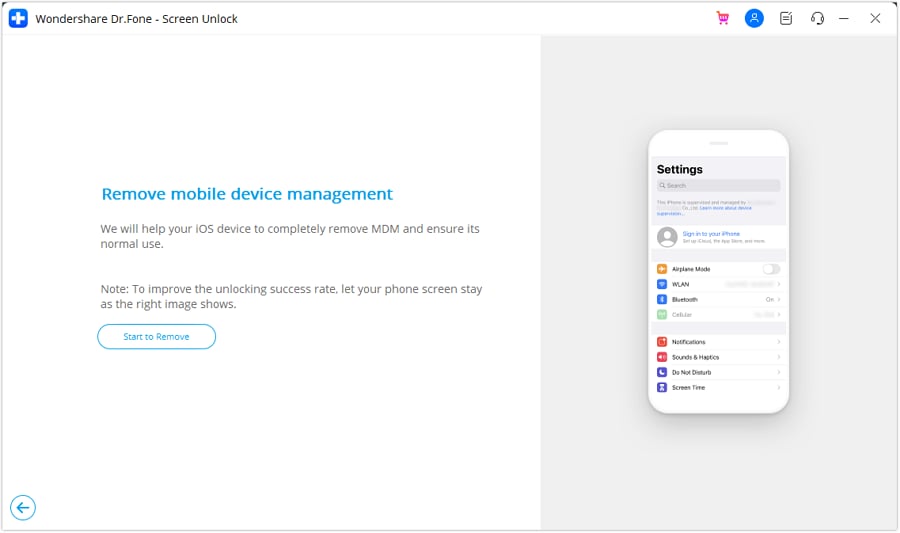
- Step 3. Select Remove MDM Function To Start the Process
On the next screen, you will see two options, “Bypass MDM” and “Remove MDM.” Select “Remove MDM” and hit the “Get Start” button. After that, you will be taken to another screen where you need to tap on “Start to Remove” to execute the process.
- Step 4. Disable Find My Feature and Complete the Process
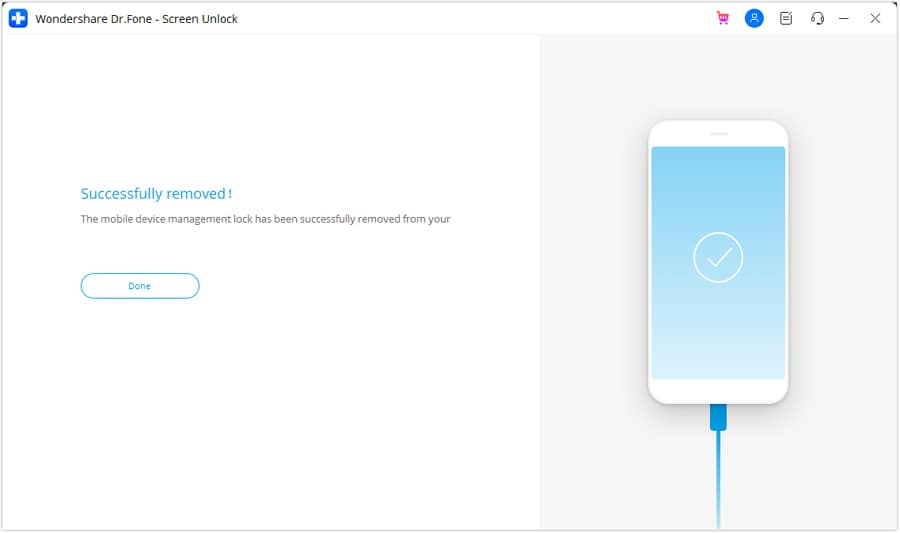
A prompt will pop up stating that you need to turn off the Find My feature on your iOS device. For this, open your device “Settings” and choose the “iCloud” option. Lastly, disable the “Find My iPhone” feature and hit the “OK” button. Wait a few seconds to complete the process and click “Done” to conclude the MDM removal process.
Part 3. Easy Removal of Device Supervision From Settings
Looking for other conventional methods about how to remove supervision from iPad or iPhone? If you wish to perform such actions, you can access some options in your Apple iPhone 7 Plus settings. However, to utilize this method, you should know the login information and password of the Apple iPhone 7 Plus device. If you have them with you, follow the given steps to remove device supervision from iPhone settings:
- Step 1. Initially, open the “Settings” and move into the “General” section. After that, select the “VPN & Device Management” option to see which MDM profiles supervise your iOS device.

- Step 2. Select the MDM profile you want to remove and tap on “Remove Management” to delete that profile from your iDevice. Then, you will be prompted to enter your login info or password and type your information to bypass supervision access.

Part 4. Using Apple Configurator 2 for Removing iPhone Supervision System
Apple Configurator is a free tool for Mac users that provides a simple technique for removing iPhone supervision. To use this method, you must have a password for the Apple iPhone 7 Plus device; otherwise, you will need to contact the organization to get the necessary permissions. Below are easy steps about how to remove device supervision from iPad and iPhone through your Mac:
Instructions. First, download and launch the Apple Configurator tool on your Mac. Connect the iDevice to the Mac using a compatible USB-C cable. Click on “Actions” from the top bar of the tool. In the drop-down list, choose the “Advanced” option and select “Erase All Content and Settings” to remove iPhone device supervision. Enter your device password to start using your Apple iPhone 7 Plus normally.

Part 5. Directly Contact Administration for Removing Device Supervision
If you’ve forgotten the username and password of your management profiles, you cannot remove MDM profiles from iPhone settings. In that situation, you can only seek help from the company admin, as this iPhone is supervised and managed by them.
You can contact the administrator and share a valid reason why you want to remove supervision access. They can remove your device directly from their system or provide you with the correct password to proceed with the login process.
Conclusion
Removing device supervision is simple, but getting familiar with the safest method is necessary. Considering this, we have covered some techniques to bypass MDM locks on your iOS device. These can easily resolve your issue of how to remove device supervision from iPhone queries. Conclusively, Wondershare Dr.Fone is the recommended tool to bypass the MDM lock without data loss.
Tips: Are you searching for a powerful Screen Unlock tool? No worries as Dr.Fone is here to help you. Download it and start a seamless unlock experience!
Also read:
- [New] Comparative Analysis The Leading Edge with Active for 2024
- [Updated] Sportscasting Your Pathway to Highlight Videos
- 2024 Approved Unzipping for SRT Methods and Tips
- 3 Ways to Unlock iPhone 14 Pro Max without Passcode or Face ID
- Behind the Scenes: The New Features of VisionOS 2 Unveiled at WWDC - A Closer Look at Expectations and Curiosities
- Effortless Video Editing with YouTube Clip - Your Quick Guide to Trimming Down Videos
- How To Unlock A Found iPhone 15?
- How To Unlock Stolen iPhone 14 Pro Max In Different Conditionsin
- In 2024, Can You Unlock Apple iPhone 14 After Forgetting the Passcode?
- In 2024, How to Fix iPhone 6 Passcode not Working?
- In 2024, Stand Alone, Hold Tight Camera Stability Techniques
- Streamlining Video Production Merging YouTube Editing & iMovie's Best Practices
- Title: In 2024, How to Unlock Your iPhone 7 Plus Passcode 4 Easy Methods (With or Without iTunes)
- Author: Sophia
- Created at : 2025-02-28 21:20:11
- Updated at : 2025-03-03 18:09:42
- Link: https://ios-unlock.techidaily.com/in-2024-how-to-unlock-your-iphone-7-plus-passcode-4-easy-methods-with-or-without-itunes-by-drfone-ios/
- License: This work is licensed under CC BY-NC-SA 4.0.