
In 2024, iPhone 11 Asking for Passcode after iOS 17/14 Update, What to Do?
Apple iPhone 11 Asking for Passcode after iOS 17/14 Update, What to Do?
If you’ve recently updated your iOS iPhone and iPad to the iOS 17/14 operating system, you may notice a bit of a bug where the Apple iPhone 11 displays the passcode lock, even if you haven’t got a security code in place.
This obviously means you won’t be able to access your phone, and in many cases, you’re going to want to get back into your phone as quickly as possible. However, this may be easier said than done. Fortunately, today we’re going to go through multiple solutions to help you get your device working as it should!
Part 1. Don’t try passcodes blindly
One of the worst things you can do when faced with this situation is to enter passcodes blindly. Perhaps you’re trying random numbers and letters, or you’re trying passwords you’ve used in the past. If you get it wrong, you’re going to be locked out of your device for a long time.
The more times you get your code wrong, the longer you’ll be locked out, so avoid doing this at all costs, so make sure you move straight onto these approaches to get your phone working as quickly as possible.
Part 2. 5 ways to unlock iPhone after iOS 17/14 Update
2.1 Try a default passcode in your family
While we said, you shouldn’t type in random numbers to try and guess the password, of course, if you have a standard family passcode that you use across all iOS devices, perhaps an admin password or just something you use for everything, it can be well worth a try.

In reality, you get three attempts to put a passcode in before it locks you out, so try two passcodes that your family uses to see whether this will easily unlock your device. If you brought your device preowned and still have contact with the owner, they may have a passcode you can try.
2.2 Unlock iPhone with an unlock tool
The second approach you can take if you don’t know the passcode and can’t get it unlocked is to use a powerful software solution known as Dr.Fone - Screen Unlock (iOS) . This Wondershare software application completely unlocks your phone, even if you don’t know the passcode.
This software is easy to use and incredibly simple, yet it gets the job done. If you’re looking for a quick way to get your iOS device back up and running with full access after an iOS 17/14 update, it doesn’t get much better than this. Here’s how it works;
Step 1. Download and install the Dr.Fone - Screen Unlock (iOS) software to either your Mac or Windows PC and open it, so you’re on the homepage. Connect your iOS device to your computer using the USB cable and wait for the software to recognize your device.
When it does, close iTunes if it automatically opens and clicks the Screen Unlock option from the main menu.

Step 2. Click the Unlock iOS Screen option.

Step 3. You will now need to put your device in DFU mode, also known as Recovery Mode. Fortunately, this is easy thanks to the on-screen instructions where you will hold down the volume down and power button for a few seconds.

Step 4. Once Dr.Fone - Screen Unlock (iOS) has detected your device in DFU Mode. You’ll be able to select which device you’re using and what firmware you want to be repaired; in this case, iOS 17/14.

Step 5. Once everything has been confirmed and you’re happy to continue, press the Unlock option. The program will do its thing, and when it’s done, the software will say you’re able to disconnect your Apple iPhone 11 and use it without a lock screen!
That’s how easy Dr.Fone - Screen Unlock (iOS) makes the entire unlock process!

2.3 Restore an old backup from iTunes
Another key way that some users have found to unlock their device after an update is to restore their device to an older version, aiming to put your device back into a position where it didn’t have a lock screen.
It’s only possible to do this if you’ve backed up your iOS device in the past (which is why you’re encouraged to back up regularly), and it can all be done through the iTunes software on either your Mac or Windows computer. Here’s how it works;
Step 1. Ensure you’re running the latest version of iTunes and then connect your iOS device to your Mac or Windows computer using the official USB cable. This should automatically open the iTunes window.
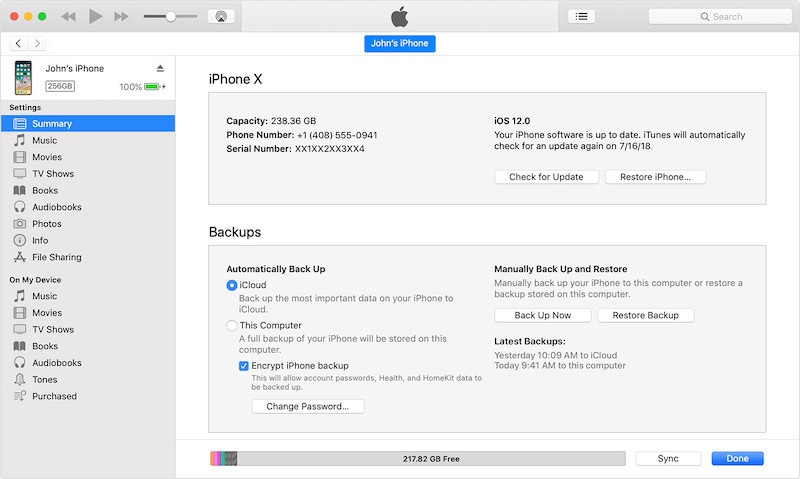
Step 2. In iTunes, click the symbol representing your device and then click Summary. On this screen, you’ll be able to choose the Restore iPhone option at the top to begin the restoring process.
Step 3. Follow the onscreen instructions where you’ll choose which backup file you want to use before iTunes, then restores your device. When the software has completed the process, you’ll be able to disconnect your Apple iPhone 11 and use it without a lock screen!
2.4 Restore in recovery mode
In some cases, restoring your device using just iTunes will not be good enough, and it won’t have the effect you’re looking for; in this case, restoring your device with no lock screen after an iOS 17/14 update.
If the above method of restoring your device via iTunes doesn’t work, or you haven’t got a backup file to load, you’ll need to restore your device using a move known as Recovery Mode, or DFU mode. This will hard reset your device and get it working to its full potential.
Here’s how to do it. (Note, the process will differ slightly depending on which model of iPhone you’re using).
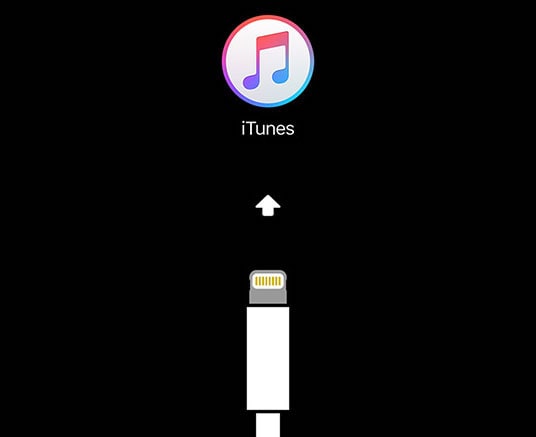
Step 1. Press and hold the volume up button for about one second, and then switch and press the Volume Down button for the same amount of time. You can then hold the side button (on devices without a home button), and the following screen should appear after a few seconds.
Step 2. Now connect your Apple iPhone 11 to your computer with iTunes and wait for iTunes to open. Make sure you’re running the latest version of iTunes before connecting up your device. Also, make sure you’re using the official USB cable for the most stability.
Step 3. iTunes should automatically detect that your device is in Recovery Mode and automatically restore your device to a default state without a lock screen. Wait until this process is completed before disconnecting your device and using it as normal.
2.5 Use Find My iPhone feature in iCloud
The fifth and final approach you can take to removing a lock screen from your recently updated iPhone or iPad when faced with the iOS 17/14 glitch is taking advantage of the integrated Apple technology and features are known as Find My iPhone.
While this feature originally allows you to literally find your Apple iPhone 11 in the situation where it’s lost and offers many other security features to help ensure your device and data don’t fall into the wrong hands, you can also use it to remove your device unwanted lock screen.
Of course, this will only work if the Find My iPhone features have been enabled in the past, so make sure you’re using it to get it to work. Here’s how to use the feature to get your phone access back.
Step 1. From your computer, iPad, tablet, or mobile web browser, head over to iCloud.com and log into your iCloud account using the login in button at the top of the screen.

Step 2. Once signed in, scroll down the menu of features and select the Find iPhone feature. Click on the All Devices option at the top.
Step 3. From the list of devices connected to your account, click the Apple iPhone 11 device name with the locked screen and then click the Erase option. This will clear everything from your device, much like the process we’ve spoken about in the methods above.
Leave the Apple iPhone 11 device to erase, and once completed, you’ll be able to pick up and use your phone as normal without a lock screen. You should also now be able to update to iOS 17/14 without any problems!
Summary
And there you go, the five key ways you need to know when it comes to removing an unwanted lock screen from your iOS device after an iOS 17/14 update. We highly recommend the Dr.Fone - Screen Unlock (iOS) since the software makes the whole process incredibly easy, especially when managing any problems you may have on your iOS device!
3 Ways to Erase Apple iPhone 11 When It’s Locked Within Seconds
Over the last few years, Apple has made remarkable progress with its flagship iPhone series. There are plenty of ways for users to back up, erase, and restore their data. It doesn’t matter if you are moving from one device to another or would like to reset your phone. You should know how to erase iPhone when locked. Too many times, after getting locked out of their device, users find it hard to wipe locked iPhone. If you are also going through the same dilemma, then don’t worry. Read on and learn how to wipe a locked iPhone in this extensive guide.
Part 1: Erase locked iPhone with Dr.Fone - Screen Unlock (iOS)
One of the best ways to wipe locked iPhone is by using Dr.Fone - Screen Unlock (iOS) tool. It is an extremely secure and reliable application. It is already compatible with every leading version of iOS and runs on almost all major iOS devices. Available for both Windows and Mac, the tool can be used to remove activation lock and Apple ID. The tool also provides an easy-to-use interface that can help you reset the activation lock on your device.
Dr.Fone - Screen Unlock (iOS)
Erase the data of an iPhone even if it is locked
- Erase iPhone data together with the lock screen.
- Remove the 4-digit/6-digit passcode, Touch ID, and Face ID , and activation lock.
- A few clicks and the iOS lock screen are gone.
- Fully compatible with all iDevice models and iOS versions.
4,395,216 people have downloaded it
To learn how to erase iPhone when locked, follow these steps:
Step 1. Download and install Dr.Fone.
Start by downloading Dr.Fone - Screen Unlock (iOS) from its official website. Install it on your Windows or Mac and connect your Apple iPhone 11 to the system whenever you wish to resolve an issue with it. After launching the application, click on the “Screen Unlock” option from the welcome screen.
Step 2. Click Start button.
Wait for a while as the application will automatically recognize your phone. Click on the “Start” button to commence the process.

Step 3. Put the phone into DFU mode.
Follow the on-screen instructions to put your phone into the DFU (Device Firmware Update) mode. It can be done by pressing the Home and Power button simultaneously for 10 seconds. Afterward, it would help if you released the Power button while pressing the Home button for another 5 seconds.

Step 4. Download firmware package.
After putting your device into the DFU mode, the application will automatically move to the next window. Here, you would be required to provide essential information related to your phone like device model, firmware update, and more. After filling in the correct information, click on the “Download” button.
Sit back and relax as the application will download the essential firmware update for your phone.

Step 5. Start to unlock.
Once it is done, the application will automatically start resolving the issue on your phone. Make sure that you don’t disconnect your phone while Dr.Fone - Screen Unlock (iOS) will resolve the issue on your device.

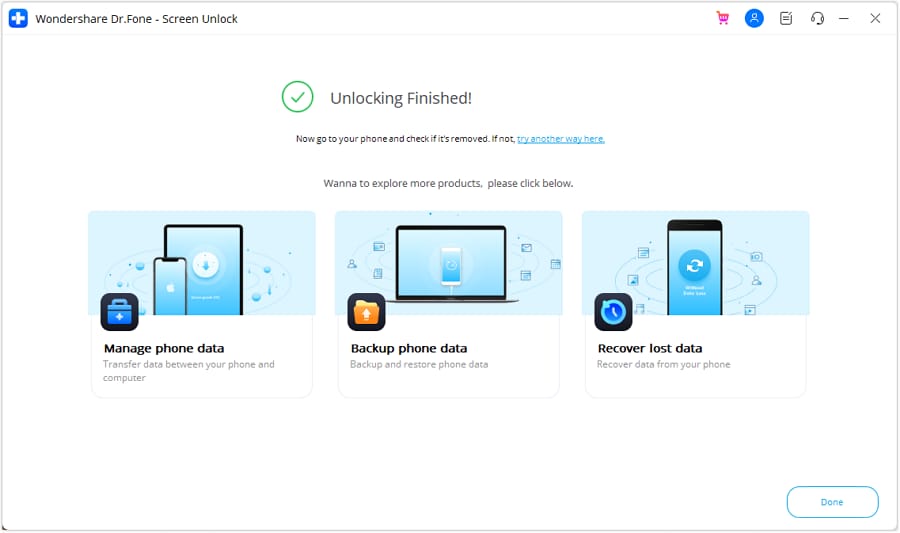
Step 7. Unlock completed.
After completing the operation successfully, the interface will provide the following message.

You can check if you can unlock your phone or not. If you still have an issue, then click on the “Try Again” button. Else, you can safely remove your phone and use it without any constraint. By following this method, you would learn how to wipe a locked iPhone with Dr.Fone - Screen Unlock (iOS).
One of the best things about this technique is that you would wipe locked iPhone without causing any damage. Since it is a secure and reliable method with a high success rate, it is sure to provide a hassle-free experience.
Part 2: Erase locked iPhone by restoring it with iTunes
If you are looking for an alternative way to learn how to erase iPhone when locked, you can also take the assistance of iTunes. It provides a free and simple method to restore your device. Since it would wipe your data, you might end up losing your essential files in the process. We recommend following this technique only when you have taken a backup of your data via iTunes beforehand. To learn how to wipe a locked iPhone with iTunes, follow these steps:
1. Firstly, put your Apple iPhone 11 into recovery mode. To do this, launch an updated version of iTunes on your system and connect it to a lightning cable. Now, long-press the Home button on your device and connect it to the other end of the lightning cable. Release the Home button once the iTunes logo would appear.

2. As soon as your phone would be connected, iTunes will recognize an issue with it. From here, you can choose to restore it.

3. If you don’t get the above pop-up on your screen, launch iTunes and visit its “Summary” section. From here, choose “Restore backup” under the Backup section.

4. agree to the pop-up message by clicking on the “Restore” button.

Part 3: Erase locked iPhone by Find My iPhone
If you haven’t already taken a backup of your phone, then you might find it hard to recover it with iTunes. Another popular way to wipe locked iPhone is by using the Find My iPhone tool. This is mostly implemented in case of a stolen or lost device. One of the best features of Find My iPhone is that it can be used to reset your device remotely. With this, you can protect your personal data without much trouble. Implement these steps to learn how to erase iPhone when locked using Find My iPhone.
1. To start with, log in to your iCloud account and visit the “Find My iPhone” section.
2. Under the “All Devices” section, you can choose the Apple iPhone 11 you wish to reset.

3. After selecting your device, you will be presented with various options. Select the “Erase iPhone” feature to reset your device.

Confirm your choice and wipe locked iPhone remotely using the Find My iPhone feature on iCloud.
After following this informative guide, you would learn how to wipe a locked iPhone without any trouble. Go ahead and pick your preferred option to wipe locked iPhone. We recommend using Dr.Fone - Screen Unlock (iOS) to resolve this issue securely. Though, if you wish to do it remotely, then you can also give Find My iPhone a try as well. If you are familiar with any other reliable method, please let us know how to erase iPhone when locked in the comments below.
Disabling Apple iPhone 11 Parental Restrictions With/Without Password
Among smartphones, the Apple iPhone 11 is well known for its quality and reliability. It is celebrated for its elegant design, robust capabilities, and exceptional security attributes. This device holds innovation within the smartphone industry. Among its array of security features lies the parental controls. These are a specialized set of features and settings crafted to aid parents.
It allows them to manage their children’s access to certain content and functionalities. This article aims to go through the details of how to disable parental controls on iPhones. It will offer a range of methods catering to both scenarios: disabling parental controls with and without a password. Moreover, it will feature an in-depth exploration of the most effective method to disable parental control.

Part 1. Defining Parental Controls on iPhone and Why People Want To Disable/Remove It?
Parental controls on an iPhone refer to features designed to allow parents to track various aspects of the Apple iPhone 11 device’s usage. These controls aim to provide younger users with a safer, more regulated digital experience. They include a range of functions, such as screen time limits and app restrictions. Moreover, content filtering and purchase controls also fall under parental control.
Primarily, parental controls serve as a protective measure. They enable parents to safeguard their children from potential online dangers. These include inappropriate content and excessive screen time. It turns out valuable for managing a child’s interaction with digital devices.
Why Do People Want To Disable/Remove Parental Control?
Parental controls can be a great way to manage children’s digital lives. However, there are equally good reasons why users seek how to remove restrictions on iPhone without passcode:
1. Age Appropriateness
As children grow older, they may desire increased independence and responsibility. Parental controls might become restrictive or unnecessary. This leads to the desire for removal to grant them more freedom.
2. Technical Glitches or Restrictions
Sometimes, parental control settings might malfunction or impose unintended restrictions. This can hamper the Apple iPhone 11 device’s regular functionality. Users seek removal to rectify these technical issues.
3. Privacy Concerns
Older users may find parental controls intrusive or overly restrictive. These can affect their privacy and autonomy. Disabling these controls allows for a personalized and private user experience.
4. Change in Circumstances
Situations change, and what was once appropriate may no longer apply. Families might undergo changes in dynamics or rules. This can prompt the need to adjust or remove parental controls accordingly.
Part 2. [With Password] How To Disable Parental Controls on iPhone?
Do you have the password to access parental control settings on your Apple iPhone 11? The process of disabling these controls becomes straightforward. Here, we present 2 distinct methods for how to remove parental controls on iPhone:
Way 1. By Turning Off Screen Time Settings
Accessing Screen Time settings allows you to manage and disable parental controls. This method is recommended if you have the passcode. Follow these steps to know how to turn off restrictions on your Apple iPhone 11 with the password:
- Step 1. To disable Screen Time settings, navigate to “Settings” and select “Screen Time.” On the following screen, choose “Content & Privacy Restrictions” under the “Restrictions” section.

- Step 2. Now, switch the slider next to “Content & Privacy Restrictions” to turn it off. It will disable all parental control on the targeted device. However, before it disables, the Apple iPhone 11 will prompt for the Screen Time passcode, which needs to be added.

Way 2. By Resetting the Entire iPhone
Resetting the entire settings of your Apple iPhone 11 is a drastic but effective method. It can disable parental controls by removing all settings, including restrictions and passcodes. Note that this process will erase personalized settings on your device. However, it does not delete data like photos, videos, or apps. Below are the steps on how to remove parental controls iPhone by resetting:
- Step 1. You will need to access the “General” tab within Settings of your Apple iPhone 11. Here, scroll down and tap “Transfer or Reset iPhone.” On the following screen, tap the “Reset” option.

- Step 2. From the available options, after tapping “Reset,” choose “Reset All Settings.” You will be asked to provide the passcode to successfully reset your Apple iPhone 11 and disable parental control settings.

Part 3. [Without Password] How Do You Disable Parental Controls on iPhone?
Disabling parental controls on an iPhone is still possible, even without the password. Below, we explore two methods that can be used to bypass parental controls without requiring a password.
Way 1. Wondershare Dr.Fone - Screen Unlock (iOS)
Removing a Screen Time passcode without the associated passcode can be challenging. Utilizing Wondershare Dr.Fone presents a potential solution. It is a robust tool that tackles a range of iOS-related problems. You will discover it as a convenient method to surpass the limitations imposed by Screen Time.
Among its functions, Wondershare Dr.Fone - Screen Unlock (iOS) caters to resolving passcode-related concerns. This also includes the removal of Screen Time passcodes. The best thing about using Dr.Fone to remove the Screen Time passcode is that it bypasses the lock without data loss. Along with Screen Time passcodes, Dr.Fone is also an expert in unlocking various screen locks.
Notable Features of Wondershare Dr.Fone
- It lets users bypass MDM on their iOS devices without losing their data.
- If your iOS device is stuck at the iCloud Activation Lock, Dr.Fone bypasses this lock without requiring a passcode.
- For those facing issues with forgotten Apple ID passwords, Dr.Fone facilitates the removal of Apple ID from devices.
Steps To Disable Parental Controls on iPhone via Wondershare Dr.Fone
Forgetting passwords, be it Screen Time lock or device screen lock, can be a stress-inducing experience. Following are the steps for how to turn off parental controls without a password:
- Step 1. Access Unlock Screen Time Passcode
To initiate the procedure, open Wondershare Dr.Fone on your computer. Navigate to “Toolbox,” tap “Screen Unlock,” and choose “iOS” as the Apple iPhone 11 device type. On the following screen, choose “Unlock Screen Time Passcode.” Establish a USB connection between your iOS device and the computer before commencing.

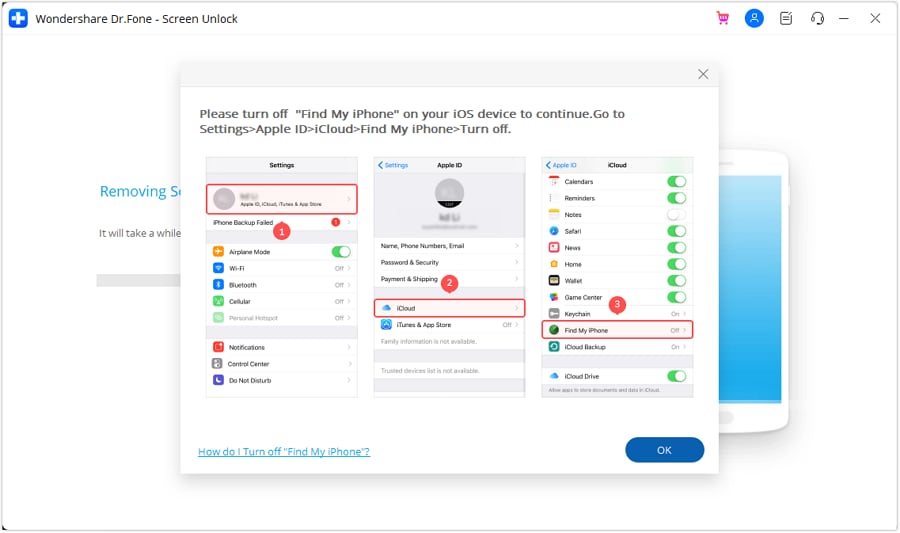
- Step 2. Start Unlocking by Disabling Find My Feature
Upon connecting the Apple iPhone 11 device, the platform will detect the iDevice and showcase its status on the screen. Afterward, you are required to proceed by clicking on the “Unlock Now” button. However, it is necessary to deactivate the Find My service as indicated in the prompt. Navigate to your Apple iPhone 11’s Settings and select the Apple ID at the top of the settings menu. Access the “Find My” settings and toggle off the “Find My iPhone” feature.
- Step 3: Complete Screen Time Passcode Removal Process
Upon completion, confirm by clicking “OK” on the computer screen. The progress bar on the screen indicates the progress of unlocking the screen time passcode process. When the Apple iPhone 11 device is unlocked, the platform will present a confirmation message. To conclude the entire process, click on the “Done” button.
Way 2. Restore iPhone From iTunes
Restoring an iPhone using iTunes is an alternative method for removing parental controls. iTunes is a multimedia management software that is developed by Apple. It provides various functions, including media playback and data synchronization. The most important function is the Apple iPhone 11 device backup and restoration. Restoring your Apple iPhone 11 via iTunes results in the complete erasure of all data and settings. Here is how to disable restrictions on iPhones without password:
- Step 1. Ensure that iTunes has been updated to the most recent version before opening the application. Connect your Apple iPhone 11 to the computer and grant iTunes permission to recognize the Apple iPhone 11 device. After detecting the Apple iPhone 11 device, access the “Summary” tab by tapping the Apple iPhone 11 device icon in iTunes. You can access the “Backups” section to create any backup before restoring.

- Step 2. Afterward, initiate the Apple iPhone 11 restoration by selecting “Restore iPhone.” A menu box will appear, asking you to create a “Back Up” or not. Choose the preferred option, and another dialog box will appear, alerting you about the deletion of all content and settings on your Apple iPhone 11. You should proceed by clicking “Restore” to confirm. Then, follow the on-screen instructions to finalize the process.

Conclusion
In summary, this article explored how to disable restrictions on iPhones without a password and with a password. Accessing settings with a passcode simplifies the process. Wondershare Dr.Fone stands out as the optimal solution for those seeking how to delete parental controls without password. When passcode access is limited, Dr.Fone – Screen Unlock (iOS) offers the most efficient solution.
Tips: Are you searching for a powerful iPhone Unlock tool? No worries as Dr.Fone is here to help you. Download it and start a seamless unlock experience!
Also read:
- [New] 2024 Approved Why Watch HD? - Switch to AV1 Codec on YouTube
- [New] In 2024, Essential Guide to Recording Films on Windows/Mac & Phones
- [Updated] In 2024, Explore the World in High Definition on YouTube
- 2024 Approved Elevate Your Artistry Unveiling Timelapse Magic with GoPro
- 2024 Approved Master List 17 Pro-Rated Software for Image Perfection
- Fixing Persistent VSCode Crashes on Windows 11
- How To Change Your Apple ID on Apple iPhone X With or Without Password
- How To Change Your Apple ID on iPhone 14 Pro With or Without Password
- In 2024, 3 Easy Ways to Factory Reset a Locked iPhone SE (2020) Without iTunes
- In 2024, Complete Guide For iPhone 8 Plus Lock Screen
- In 2024, Detailed Review of doctorSIM Unlock Service For Apple iPhone 7 Plus
- In 2024, How to Fix iPhone 11 Pro Passcode not Working?
- iPhone 15 Pro Max Backup Password Never Set But Still Asking? Heres the Fix
- Motorola Moto G Stylus 5G (2023) support - Turn Off Screen Lock.
- Reprogramming Windows: Delete File's Read Lock
- Speedy Fixes for Slow-Mo Videos in a Flash
- What Does Jailbreaking iPhone 14 i Do? Get Answers here
- Title: In 2024, iPhone 11 Asking for Passcode after iOS 17/14 Update, What to Do?
- Author: Sophia
- Created at : 2025-01-10 16:11:26
- Updated at : 2025-01-12 17:12:30
- Link: https://ios-unlock.techidaily.com/in-2024-iphone-11-asking-for-passcode-after-ios-1714-update-what-to-do-by-drfone-ios/
- License: This work is licensed under CC BY-NC-SA 4.0.