
In 2024, iPhone X Asking for Passcode after iOS 17/14 Update, What to Do?
Apple iPhone X Asking for Passcode after iOS 17/14 Update, What to Do?
If you’ve recently updated your iOS iPhone and iPad to the iOS 17/14 operating system, you may notice a bit of a bug where the Apple iPhone X displays the passcode lock, even if you haven’t got a security code in place.
This obviously means you won’t be able to access your phone, and in many cases, you’re going to want to get back into your phone as quickly as possible. However, this may be easier said than done. Fortunately, today we’re going to go through multiple solutions to help you get your device working as it should!
Part 1. Don’t try passcodes blindly
One of the worst things you can do when faced with this situation is to enter passcodes blindly. Perhaps you’re trying random numbers and letters, or you’re trying passwords you’ve used in the past. If you get it wrong, you’re going to be locked out of your device for a long time.
The more times you get your code wrong, the longer you’ll be locked out, so avoid doing this at all costs, so make sure you move straight onto these approaches to get your phone working as quickly as possible.
Part 2. 5 ways to unlock iPhone after iOS 17/14 Update
2.1 Try a default passcode in your family
While we said, you shouldn’t type in random numbers to try and guess the password, of course, if you have a standard family passcode that you use across all iOS devices, perhaps an admin password or just something you use for everything, it can be well worth a try.

In reality, you get three attempts to put a passcode in before it locks you out, so try two passcodes that your family uses to see whether this will easily unlock your device. If you brought your device preowned and still have contact with the owner, they may have a passcode you can try.
2.2 Unlock iPhone with an unlock tool
The second approach you can take if you don’t know the passcode and can’t get it unlocked is to use a powerful software solution known as Dr.Fone - Screen Unlock (iOS) . This Wondershare software application completely unlocks your phone, even if you don’t know the passcode.
This software is easy to use and incredibly simple, yet it gets the job done. If you’re looking for a quick way to get your iOS device back up and running with full access after an iOS 17/14 update, it doesn’t get much better than this. Here’s how it works;
Step 1. Download and install the Dr.Fone - Screen Unlock (iOS) software to either your Mac or Windows PC and open it, so you’re on the homepage. Connect your iOS device to your computer using the USB cable and wait for the software to recognize your device.
When it does, close iTunes if it automatically opens and clicks the Screen Unlock option from the main menu.

Step 2. Click the Unlock iOS Screen option.

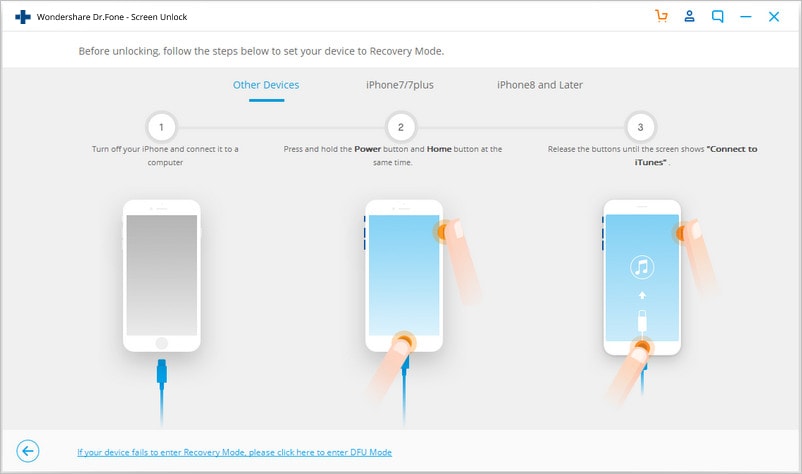
Step 3. You will now need to put your device in DFU mode, also known as Recovery Mode. Fortunately, this is easy thanks to the on-screen instructions where you will hold down the volume down and power button for a few seconds.

Step 4. Once Dr.Fone - Screen Unlock (iOS) has detected your device in DFU Mode. You’ll be able to select which device you’re using and what firmware you want to be repaired; in this case, iOS 17/14.

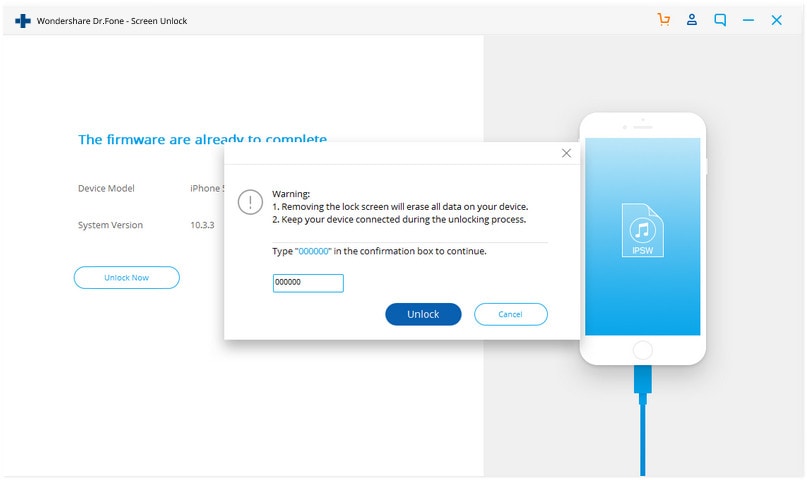
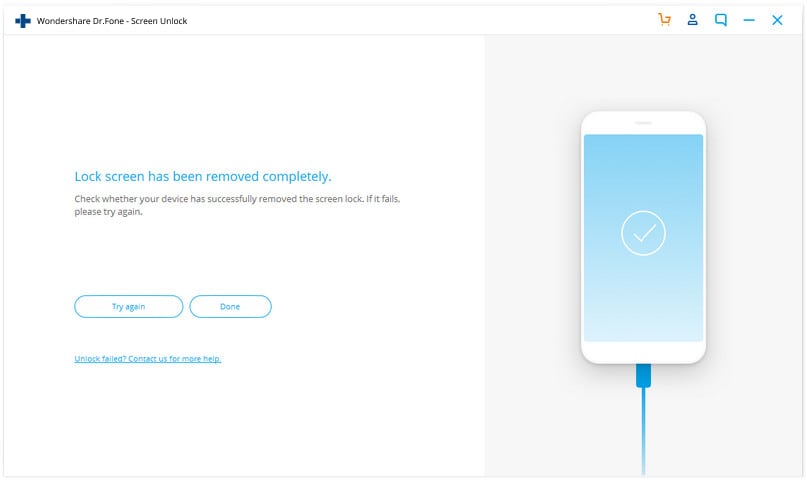
Step 5. Once everything has been confirmed and you’re happy to continue, press the Unlock option. The program will do its thing, and when it’s done, the software will say you’re able to disconnect your Apple iPhone X and use it without a lock screen!
That’s how easy Dr.Fone - Screen Unlock (iOS) makes the entire unlock process!

2.3 Restore an old backup from iTunes
Another key way that some users have found to unlock their device after an update is to restore their device to an older version, aiming to put your device back into a position where it didn’t have a lock screen.
It’s only possible to do this if you’ve backed up your iOS device in the past (which is why you’re encouraged to back up regularly), and it can all be done through the iTunes software on either your Mac or Windows computer. Here’s how it works;
Step 1. Ensure you’re running the latest version of iTunes and then connect your iOS device to your Mac or Windows computer using the official USB cable. This should automatically open the iTunes window.
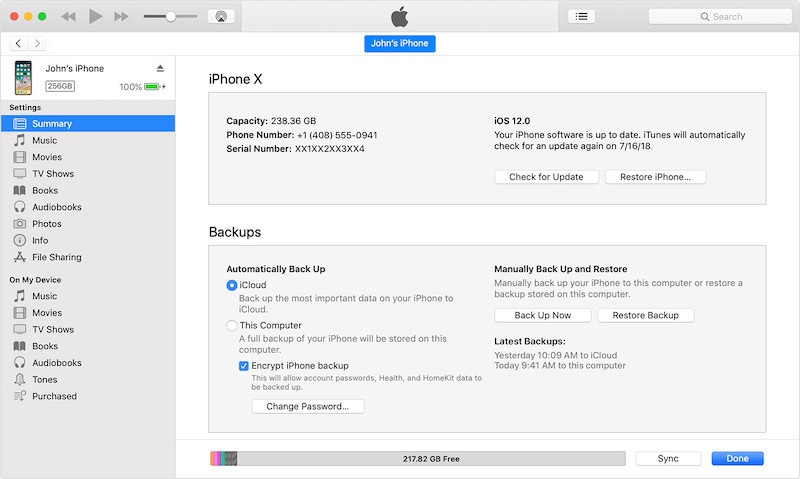
Step 2. In iTunes, click the symbol representing your device and then click Summary. On this screen, you’ll be able to choose the Restore iPhone option at the top to begin the restoring process.
Step 3. Follow the onscreen instructions where you’ll choose which backup file you want to use before iTunes, then restores your device. When the software has completed the process, you’ll be able to disconnect your Apple iPhone X and use it without a lock screen!
2.4 Restore in recovery mode
In some cases, restoring your device using just iTunes will not be good enough, and it won’t have the effect you’re looking for; in this case, restoring your device with no lock screen after an iOS 17/14 update.
If the above method of restoring your device via iTunes doesn’t work, or you haven’t got a backup file to load, you’ll need to restore your device using a move known as Recovery Mode, or DFU mode. This will hard reset your device and get it working to its full potential.
Here’s how to do it. (Note, the process will differ slightly depending on which model of iPhone you’re using).
Step 1. Press and hold the volume up button for about one second, and then switch and press the Volume Down button for the same amount of time. You can then hold the side button (on devices without a home button), and the following screen should appear after a few seconds.
Step 2. Now connect your Apple iPhone X to your computer with iTunes and wait for iTunes to open. Make sure you’re running the latest version of iTunes before connecting up your device. Also, make sure you’re using the official USB cable for the most stability.
Step 3. iTunes should automatically detect that your device is in Recovery Mode and automatically restore your device to a default state without a lock screen. Wait until this process is completed before disconnecting your device and using it as normal.
2.5 Use Find My iPhone feature in iCloud
The fifth and final approach you can take to removing a lock screen from your recently updated iPhone or iPad when faced with the iOS 17/14 glitch is taking advantage of the integrated Apple technology and features are known as Find My iPhone.
While this feature originally allows you to literally find your Apple iPhone X in the situation where it’s lost and offers many other security features to help ensure your device and data don’t fall into the wrong hands, you can also use it to remove your device unwanted lock screen.
Of course, this will only work if the Find My iPhone features have been enabled in the past, so make sure you’re using it to get it to work. Here’s how to use the feature to get your phone access back.
Step 1. From your computer, iPad, tablet, or mobile web browser, head over to iCloud.com and log into your iCloud account using the login in button at the top of the screen.

Step 2. Once signed in, scroll down the menu of features and select the Find iPhone feature. Click on the All Devices option at the top.
Step 3. From the list of devices connected to your account, click the Apple iPhone X device name with the locked screen and then click the Erase option. This will clear everything from your device, much like the process we’ve spoken about in the methods above.
Leave the Apple iPhone X device to erase, and once completed, you’ll be able to pick up and use your phone as normal without a lock screen. You should also now be able to update to iOS 17/14 without any problems!
Summary
And there you go, the five key ways you need to know when it comes to removing an unwanted lock screen from your iOS device after an iOS 17/14 update. We highly recommend the Dr.Fone - Screen Unlock (iOS) since the software makes the whole process incredibly easy, especially when managing any problems you may have on your iOS device!
How to Bypass Apple iPhone X Passcode Easily [Video Inside]
If you have forgotten the passcode of your Apple iPhone X, then don’t worry! You are not the only one. It happens with plenty of iOS users every now and then. Lately, we have received lots of feedback from our readers asking for a solution to bypass Apple iPhone X. Therefore, we thought of compiling an informative post to help you bypass the Apple iPhone X passcode without much trouble. Go ahead and follow these hassle-free methods to perform an Apple iPhone X bypass.
Part 1: How to bypass Apple iPhone X passcode with Dr.Fone - Screen Unlock? (iOS 15.4)
Dr.Fone - Screen Unlock is an extremely secure and easy-to-use application that can help you bypass locked screens within minutes. Afterward, you can simply use your phone by resetting its lock. It provides a reliable way to update your phone’s firmware without causing any complications. The application can also be used to resolve plenty of other Apple iPhone X-related issues. The only disadvantage you should notice is that your data will be wiped out after using this tool. So, you’d better backup it before.
 safe & secure
Compatible with every leading iOS device, it runs on all major iOS versions. Since Dr.Fone has an easy-to-use interface, it can simply resolve your issues without much trouble. You can restore your phone and perform an Apple iPhone X bypass with Dr.Fone - Screen Unlock by following these steps.
Dr.Fone - Screen Unlock (iOS)
Bypass Apple iPhone X Passcode at Ease
- Remove the 4-digit/6-digit passcode, Touch ID, and Face ID.
- A few clicks and the iOS lock screen are gone.
- The best alternative to factory rest mode.
- Fully compatible with all iDevice models and iOS versions.
4,395,218 people have downloaded it
Step 1. Download Dr.Fone - Screen Unlock on your Mac or Windows system from its official website. After installing it, launch it whenever you need to bypass the Apple iPhone X lock. Click on the option of “Screen Unlock“ from the welcome screen.
Step 2. Connect your Apple iPhone X to the system and let the application detect it automatically. Click on the “Unlock iOS Screen” button whenever you need to initiate the operation.
Step 3. After your phone is detected, you need to activate the DFU mode as instructed by the on-screen steps.
Step 4. In the next window, you have to provide basic information regarding your iOS device. Here, supply relevant information related to your phone (like device model, firmware, and more). Click on the “Download” button to get the firmware update for your phone.
Step 5. Wait for a while as the application will download the firmware update for your phone. Once it is done, click on the “Unlock Now” button.

Step 6. Simply provide the on-screen confirmation code to initiate the process.
Step 7. As soon as it is completed, you will be notified by the interface. You can also repeat the process by clicking on the “Try Again” button.
safe & secure
Part 2: How to bypass the Apple iPhone X passcode with Siri? (iOS 8.0 – iOS 10.1)
If you are an avid user of Apple products, then the chances are that you must have already heard of this Apple iPhone X hack. If you are running a device on iOS 8.0 to iOS 10.1, then you can take the assistance of Siri to bypass the Apple iPhone X lock. Even though this is not a secure way to surpass your phone’s lock screen, it doesn’t restore or erase your data in the process. You can follow these steps to bypass the Apple iPhone X passcode with Siri.
Step 1. Firstly, hold the Home button on our phone to activate Siri. Speak a command like “Siri, what time is it?” to ask the present time. Now, tap on the clock icon.

Step 2. It will open an interface for the world clock feature. From here, add another clock.

Step 3. Simply provide a textual input while searching for the city and tap on the “Select all” button.

Step 4. From all the provided features, select the option of “Share” to continue.

Step 5. Tap on the message icon to draft a new message.

Step 6. A new interface for message draft would be opened. In the “To” field, type something and tap the return button on the keyboard.

Step 7. As your text will turn green, tap on the add icon again.

Step 8. From the next interface, select the option of “Create New Contact”.

Step 9. While adding a new contact, tap on the contact photo icon and choose “Add Photo”.

Step 10. From the photo library, browse your albums.

Step 11. Wait for 3-5 seconds before pressing the home button again. This will lead you to the home screen of your device.

Part 3: How to bypass the Apple iPhone X passcode with iTunes?
Another popular way to restore your Apple iPhone X is by taking the assistance of iTunes. Needless to say, even though you would be able to bypass the Apple iPhone X passcode, the technique will wipe the data on your device. Though, if you have already taken a backup of your data, then you can choose to restore it after performing an Apple iPhone X bypass. Do it by following these instructions.
Step 1. Launch iTunes on your system and connect it with a USB/lightning cable.
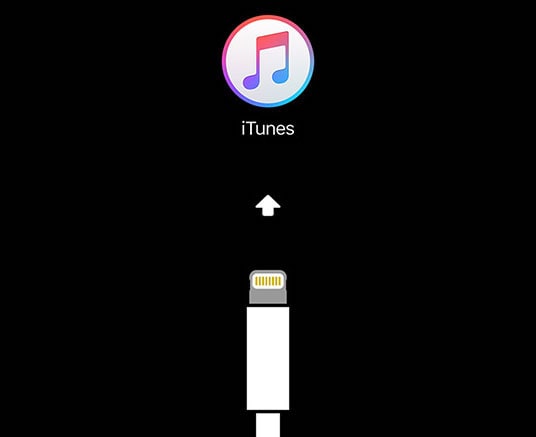
Step 2. Hold the Home button on your Apple iPhone X and while pressing it, connect it to your system. This will display a connect-to-iTunes symbol.

Step 3. After connecting your phone to the system, iTunes will automatically recognize it and display the following message. Simply click on the “Restore” button.

Step 4. Furthermore, you can choose to restore content from a previous backup as well. Go to iTunes Summary section and click on the “Restore Backup” button.

Step 5. Agree with the pop-up message and erase all the previous content on your phone.

Part 4: How to bypass Apple iPhone X passcode with Elcomsoft iOS Forensic Toolkit?
This might be new to you, but there are a few forensic toolkits in the market that can help you perform Apple iPhone X bypass without much trouble. One of the most reliable options is the Elcomsoft iOS Forensic Toolkit. Though, in order to use it, you need to download its licensed version from its website right.
Later, you can simply connect your phone to the system and run the forensic tool. From the welcome screen, select the option of “Get Passcode”. This will run an encrypted command and provide a passcode to your phone that can be used to unlock it.

Wrap it up
After following these solutions, you would be able to bypass the Apple iPhone X lock without any trouble. You can simply choose your preferred option and perform an Apple iPhone X bypass. If you are not able to unlock your phone with Siri, then use Dr.Fone - Screen Unlock. It is an extremely safe option to help you bypass the Apple iPhone X passcode and overcome various iOS-related problems.
safe & secure
How to Unlock Apple iPhone X without Passcode or Face ID
You can’t access your Apple iPhone X because the Face ID isn’t working, and you forgot your passcode? So you are considering how to unlock iPhone without face ID or passcode. If so, this article will walk you through how to do that.
Firstly, one ought to realize that it is impossible to hack an iPhone passcode. Therefore, the primary way that attempts to unlock your device without a PIN or Face ID is to erase it. After reading this guide, you will figure out how to unlock iPhone without passcode or face ID. Keep reading to find out more and learn about the best tools in the business.
Part 1: Best Ways to Unlock iPhone without a Passcode or Face ID
1. Unlock it via Find My
- Go to the iCloud official site, and sign in to your iCloud account. The site will give you two or three choices when you log in. Click on “Find iPhone” to proceed.
- You will be taken to another interface. Click “All devices” and select the Apple iPhone X on which you need to erase the passcode.
- Click on “Erase iPhone”, and afterwards affirm the decision. That’s the simplest solution for how to unlock iPhone without passcode or face ID.

2. Via iTunes
Step 1. Go to Recovery Mode
Entering the recovery mode requires various steps, given your Apple iPhone X model or settings. Assuming you’re uncertain which one you have, check the rear of your phone or the client manual you got in the first box.
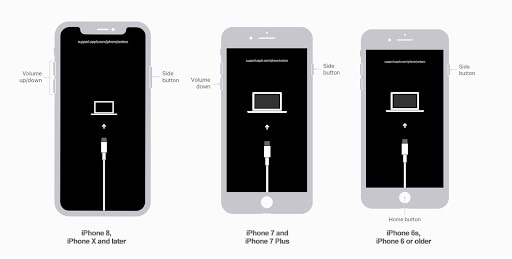
iPhone 8 and Above:
- Hold the Side button used to lock your screen and both Volume buttons. The power-off slider will show up on the screen.
- Drag the slider to one side to switch off your Apple iPhone X.
- Use a lightning connector to plug your Apple iPhone X into a Macintosh or PC while holding the Side button.
- Keep holding the button until the recovery screen shows up.
iPhone 7/7 Plus:
- Hold the Side button used to lock your screen until the power-off slider shows up.
- Switch off your Apple iPhone X.
- Connect your Apple iPhone X to a Macintosh or PC through a connector while holding the Volume (-) button.
- Continue to press the button until you get to recovery mode.
iPhone 6 or Below:
- Hold the Side or Top button and trust that the power-off slider will appear.
- Switch off your Apple iPhone X.
- Connect your Apple iPhone X to a system through a connector while holding the Home button.
- Keep the Home button held until you see the recovery screen.
Step 2. Select your Device on your System
After entering recovery mode, you’ll have to continue on your Macintosh or PC. Then, contingent upon your OS, follow the aide underneath to begin unlocking your Apple iPhone X.
macOS Catalina
- Go to the Finder window.
- Your Apple iPhone X will appear on the left half of the Finder window under Locations. You can tap on it to choose it.

macOS Mojave or a Windows with iTunes
If your gadget isn’t running macOS Catalina or later, you’ll need to involve iTunes to connect your Apple iPhone X. In the first place, download iTunes on your PC. Then, take the appropriate steps depending on which iTunes version you’re running:
- On iTunes 12 and newer, click on the Apple iPhone X symbol in the upper-left corner of the iTunes window.
- On iTunes 11, click on the Apple iPhone X tab on the right half of the iTunes window.
- On iTunes 10, the Apple iPhone X will be in the sidebar on the left.
Step 3. Pick the Choice to Restore
When you’ve effectively connected and chosen your Apple iPhone X on a Mac or a PC, tap on the Restore button. And that’s how to unlock iPhone without passcode or face ID.
3. DNS Server
The following steps explain how to unlock iPhone without face ID or passcode using a DNS server:
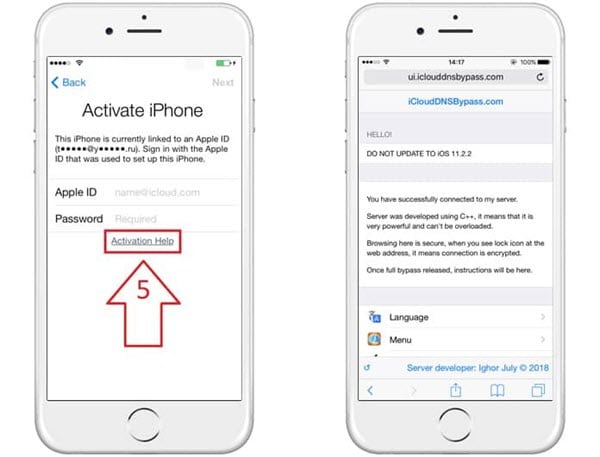
Step 1. Pick your LANGUAGE and COUNTRY from the lock screen menu after switching on a locked device.
Step 2. Click “Continue” to enter the WiFi settings page. Whenever requested to connect to WiFi, search for the “I” next to the WiFi tab.
Step 3. Disconnect your current network, go to “Network/connection Settings”, and click Forget.
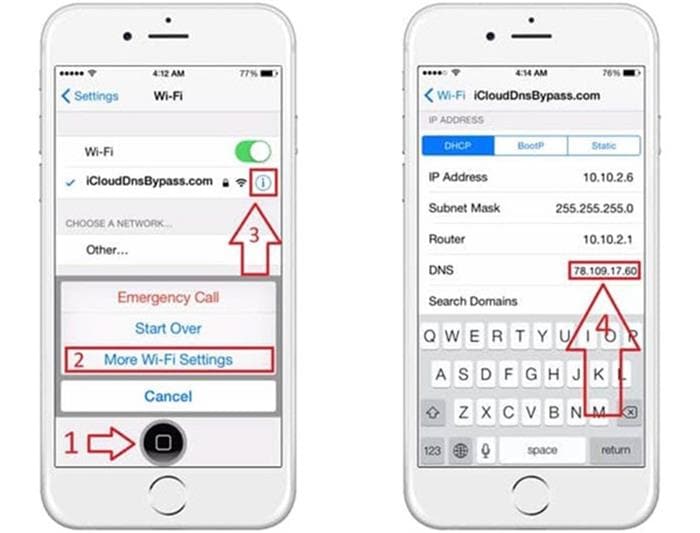
Step 4. Click the “I” and enter a DNS server IP address to bypass the lock. IP addresses of different regions are given below:
- USA: 104.154.51.7
- South America: 35.199.88.219
- Europe: 104.155.28.90
- Asia: 104.155.220.58
- Australia and Oceania: 35.189.47.23
- Others: 78.100.17.60
Step 5. Then, click the “Back” choice at the left half of your screen, turn the WiFi on and select your network. Enter your WiFi passcode.
Step 6. Click Next Page > Back to enter the lock bypass screen. These are all the required steps for how to unlock iPhone without passcode or face ID 2022.
4. Dr.Fone-Screen Unlock
This section will introduce you to our most important solution. Yes, you heard it right. If you need a hassle-free method to unlock your iDevice without a passcode or face ID, use Wondershare Dr.Fone Screen Unlock.
Dr.Fone will not only remove the screen lock but also make sure to keep your identity safe. In addition, it is the easiest method and requires no prior knowledge. So if you are someone new to this technology, we suggest you follow the steps below:
Step 1. Launch the Software on your PC
After successfully installing Dr.Fone on your PC, open it and select the “Screen Unlock” tool from the main interface.
Next, connect your locked phone to the system through a wired connection. Then go for the iOS screen unlock feature.
Step 2. Recovery or DFU Mode Boot
It is necessary to first boot your locked device in recovery or DFU mode. Follow the guidelines on your screen to do so. The Recovery mode is the suggested way for iOS screen locks. If you can’t actuate this mode, go for the DFU mode boot.
Step 3. Select your Apple iPhone X Model
After the phone is in recovery/DFU mode, the program will show the locked device’s information. Here you can see the model and iOS variant of the Apple iPhone X device. If it isn’t correct, you could choose the right one from the dropdown menu next to it. After that, click the Download button to get the required firmware for your locked phone.
Step 4. Remove the Screen Lock
After downloading the firmware effectively, click the “Unlock Now” button to let Dr.Fone unlock your Apple iPhone X.
Simply in no time, Dr.Fone will successfully unlock your device.
Note: This unlocking process will erase everything off your Apple iPhone X and bring it to the factory default state. Indeed, no other method that doesn’t allow data erasure at the moment.
Part 2: How to Turn Off Passcode or Face ID on My Device?
Face ID can be a helpful method for unlocking your Apple iPhone X - by simply looking at your phone. However, a few clients might worry that it’s not as secure as utilizing a PIN to open your phone. If that is the best case for you, you can follow this manual to disable Face ID and depend on a passcode.
Here’s the step-by-step guide to the most effective method to switch off Face ID on the iPhone:
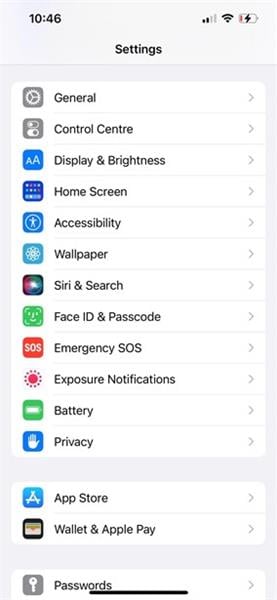
1. Open the Settings application
First, tap on your Settings app to open it. That is the one on the home screen with a symbol like the mechanical gear.
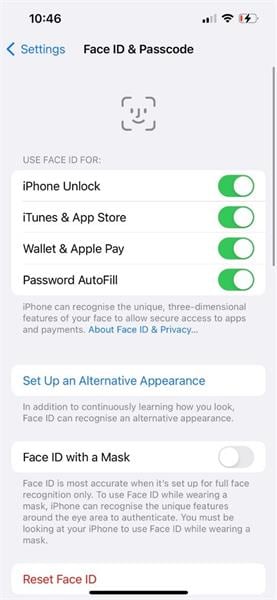
2. Tap on Face ID and Passcode
On the Settings menu, tap on the Face ID and Passcode menu.
3. Enter your passcode
At this stage, you’ll be approached to enter your passcode, so do this to get to the Face ID and Passcode menu.
4. Switch off Face ID
You’ll have the option to turn off the switch for Face ID across different activities, including the phone unlock.
Part 3: Can I bypass my iPhone Face ID with a picture?
As indicated by Apple, the short and obvious answer is no.
FaceID isn’t simply a camera snapping a picture. It utilizes an exceptional chip to filter the face with many spots. It makes a 3D contour of the look that works in low, glorious light around evening time, and your eyes must be opened. The opportunity to randomly unlock an iPhone with FaceID is 1/1 million, compared to 1/50000 with Touch ID.
It doesn’t work by snapping a picture of your face, but by taking a contour of your face if you utilize a camera that can see infrared. However, a photograph is a level and cannot give a dab matrix required for Face ID to work. You may be holding a clear piece of paper before the phone.
The Bottom Line
That’s all about our take on how to unlock iPhone without passcode or face ID 2022. We have worked hard to make sure you get the right solutions in hand. However, we strongly suggest Dr.Fone if you still face issues with our solutions. Even if the above methods fail, Dr.Fone will ensure you unlock your phone.
Also read:
- [New] 2024 Approved Breaking Down the Process for YouTube Comment Highlights
- [New] 2024 Approved Evaluating Adobe's Anti-Shake Functionality for Creatives
- [New] Basics of Engaging Narratives
- [New] Creating Intriguing Movie Summaries for 2024
- [Updated] 2024 Approved The Ultimate Guide to Choosing a Win10 Video Grabber Tool
- 2024 Approved Instagram Collage Hacks Unveiled
- Bid Farewell to the iPhone 13 and 15 Pro: Top Recommendations for Consumers | Guides by ZDNet
- Different Methods To Unlock Your iPhone 13 Pro
- Forgot Apple iPhone SE (2020) Backup Password? Heres What to Do
- How to Unlock iPhone 8 Plus without Passcode or Face ID
- In 2024, How To Unlock Apple iPhone 13 mini Without Swiping Up? 6 Ways
- In 2024, Trouble with iPhone 15 Plus Swipe-Up? Try These 11 Solutions
- In 2024, Unlocking Apple iPhone SE (2022) Lock Screen 3 Foolproof Methods that Actually Work
- Latest NVIDIA GeForce 210 Driver Upgrade Compatible with Windows 10
- Locked Out of Apple iPhone 15 Pro? 5 Ways to get into a Locked Apple iPhone 15 Pro
- Title: In 2024, iPhone X Asking for Passcode after iOS 17/14 Update, What to Do?
- Author: Sophia
- Created at : 2025-02-10 20:55:55
- Updated at : 2025-02-15 02:35:03
- Link: https://ios-unlock.techidaily.com/in-2024-iphone-x-asking-for-passcode-after-ios-1714-update-what-to-do-by-drfone-ios/
- License: This work is licensed under CC BY-NC-SA 4.0.