In 2024, Things You Should Know When Unlocking Total Wireless Of iPhone 13
Things You Should Know When Unlocking Total Wireless Of Apple iPhone 13
Total Wireless is a prominent name when it comes to affordable network carriers. It offers users a wide range of call and data packages. The company also offers smartphones; however, they are carrier-locked. This can become a problem for users who want to switch networks. Users need to learn unlocking methods that seek greater flexibility and control over their phones.
In this article, we go through the essence of unlocking a Total Wireless phone. Our focus is to present a comprehensive overview of the methods and essential details required to unlock your device. It will enable users to make informed decisions and achieve the best possible results.

Part 1. Defining The Total Wireless Phone Terminology
A Total Wireless phone refers to a mobile device that operates on the Total Wireless network. It is a prepaid mobile virtual network operator (MVNO) that uses Verizon’s network infrastructure. These phones are often sold with Total Wireless plans. Moreover, they are optimized to function within its network coverage area. Unlocking a Total Wireless phone can pose challenges due to the Apple iPhone 13 device’s association with a specific carrier.
The difficulty level largely depends on factors such as the phone model, contract status, and carrier policies. Unlock Total Wireless iPhone is indeed feasible under specific conditions. Even so, the procedure might not follow a direct path and is subject to variation on various factors. Like its counterparts, Total Wireless presents distinct guidelines and eligibility criteria for phone unlocking.

Part 2. Looking out the Reasons for Unlocking a Total Wireless Phone
Understanding the details of unlocking a Total Wireless phone opens up many compelling reasons to pursue this task. It enables users to bypass limitations and enjoy the benefits of a more liberated mobile experience. Given below are some of the many reasons why you should go for unlocking a Total Wireless phone:
- Switching Carriers: Total Wireless phones are often locked to their network, which limits users to their services. Unlocking allows users to switch to other carriers for better plans, coverage, or services that suit their needs.
- International Travel: On Total Wireless, international roaming options might be limited or expensive. Unlocking the phone enables the use of local SIM cards abroad. This offers more cost-effective communication options during travel.
- Network Compatibility: Total Wireless phones don’t work with other carriers due to specific network configurations. Unlocking enables these devices to work with a broader range of networks, enhancing usability.
Advantages of Unlocking a Total Wireless Device
Unlocking a Total Wireless phone opens up a lot of advantages. Here are a few of the benefits associated with unlocking Total Wireless iPhone:
- Flexibility: The freedom to select among different carriers, plans, and services is offered by unlocked phones. It grants users increased flexibility in handling their communication requirements.
- Cost Savings: Switching to more affordable or better-suited plans from different carriers can result in cost savings. This is especially true for users with specific usage patterns or travel requirements.
- Improved Resale Value: Unlocked phones generally have higher demand in the resale market. It appeals to a wider range of buyers and potentially fetching better prices.

Part 3. How To Check if Your Apple iPhone 13 Is Already Unlocked?
No need to worry if you’re unsure whether your Total Wireless device is unlocked. You can easily verify its status through a simple SIM test. Here’s a straightforward set of steps to check if your iPhone Total Wireless unlock is already unlocked:
- Step 1. Turn off your device and remove the SIM tray to start. Swap the current SIM card for one from a different carrier and position it in the tray. Reinsert the tray into your device and power it on again.

- Step 2. First, check to see if the SIM card is getting network service. Attempting a call or sending an SMS are alternative methods to test whether your phone is unlocked. If it fails, it suggests that your phone might still be locked to Total Wireless.
Part 4. A Small Checklist to Ensure Before Unlocking Your Total Wireless Phone
Prior to Total Wireless unlock, it’s essential to verify that it meets the specified criteria. Ensure your phone aligns with the requirements by following the provided checklist:
- Check Contract Status: Ensure your device is not bound by an ongoing contract with Total Wireless. If under contract, complete the contractual obligations, which include payment of fees or early termination charges.
- Verify Eligibility: Confirm your device’s eligibility for unlocking. Total Wireless requires your device to be at least completed 12 months of service period. Moreover, you need to ensure the Apple iPhone 13 device isn’t reported lost or stolen.
- Clear Outstanding Payments: Make sure no outstanding payments or dues are associated with your Total Wireless account. These cover any installment plans or unpaid bills involving the Apple iPhone 13 device.
- IMEI Compatibility: Check if your device’s IMEI is compatible with unlocking services. Moreover, you need to ensure that it is not blacklisted.
- Backup Your Data: Before initiating the unlocking process, back up all your important data . This includes contacts, photos, and files to prevent any potential loss during the process.
- Understand Terms and Conditions: Familiarize yourself with the unlocking policies and terms Total Wireless provides. Ensure compliance with their guidelines to avoid complications during the unlocking process.
Part 5. How To Unlock Total Wireless Phone: The Best Methods
You are now armed with an inherent understanding of Total Wireless phones. We discussed the reasons for unlocking a Total Wireless phone free and its prerequisites. Below, the most common methods to unlock a Total Wireless phone are summarized. These will equip you completely to explore the most effective ways to unlock your device.
Way 1. Accessing All Important Carriers
Unlocking a phone to access various carriers involves understanding the unique policies of each carrier. Below are the differing policies of prominent carriers:
AT&T
Instructions. Using a browser, open the att.com/deviceunlock website. Here, choose the “Start an unlock request” option and follow the on-screen prompts to complete the process. AT&T will let you know about the unlock status via the provided email.

T-Mobile
Instructions. Access the T-Mobile website and navigate to the “Contact US” page. Here, choose a way to contact customer service and request device unlocking. If you meet the basic criteria set by T-Mobile, your device will be unlocked.

Verizon
Instructions. Verizon has established a minimum period of 60 days, after which your device will be unlocked. However, it is necessary that you don’t have any outstanding payments. Moreover, your device is not blacklisted is also an essential requirement.

Way 2. Contact the Total Wireless Customer Service
As explained before, Total Wireless requires you to use your device for at least 365 days before you can request device unlocking. Moreover, the Apple iPhone 13 device should be white-listed and should not be reported missing or stolen. These are the simple instructions to unlock Total Wireless phone free:
- Step 1. After ensuring you meet all the criteria, you can contact them by dialing 1-888-442-5102. This number is available throughout the week between 8 A.M and 11:45 P.M EST. Once you reach out, the department will request your IMEI number.
- Step 2. Following that, they will advise you to wait a few days as they need this time to verify your request. They will contact you to unlock your device if you meet their requirements. It is an unlock code for Android devices, while iPhones can be unlocked remotely.

Way 3. Make the Urgency Fee Payment
While the official Total Wireless device unlocking policy requires you to use the Apple iPhone 13 device for at least a year, there are times when it might not be feasible. In such scenarios, you can pay an urgent fee to unlock the Apple iPhone 13 device. Remember that even when paying an urgency fee, you need to have used the Apple iPhone 13 device for at least 60 days.
Way 4. Unlock Your Total Wireless Phone Using SafeUnlocks
SafeUnlocks stands as the premier choice for unlocking your phone. It is committed to delivering unparalleled services, including speed, safety, and affordability. The aim of the superior quality is a guaranteed phone unlocking experience. It boasts a 99.9% success rate and can unlock any phone’s brand without a hassle. Additionally, we specialize in unlocking devices from numerous carriers worldwide. Here’s how to unlock Total Wireless phone using SafeUnlocks:
- Step 1. Begin by accessing the official SafeUnlocks website. Click “Services” from the top toolbar and choose the “Carrier Unlock” option. Provide your name, email, device model, and IMEI number on the following screen.

- Step 2. After ensuring you’ve marked the “I accept the $1 fee for signing up and unlocking my device” box, proceed by tapping “Proceed.” Next, on the following screen, select a payment method and then follow the prompts displayed on the screen.

Bonus Tip. What To Do if Your Apple iPhone 13 Is Locked? Use Wondershare Dr.Fone
Should your Apple iPhone 13 become locked because of forgotten passcodes or any other issues, there’s no need to panic. Wondershare Dr.Fone , a dependable software tool, seeks to rescue the situation. It is a reputable software known for its utility. You can find options to resolve various iOS device-related problems, including unlocking iPhone screens.
Dr.Fone effectively unlocks your iOS devices across various iOS versions, from iOS 7 to iOS 17. It covers various lock types, including touch lock screens, 4-digit/6-digit passcodes, numeric codes, and alphanumeric passcodes. Moreover, it can bypass Face ID, Touch ID, and Screen Time Passcode, among others. With Dr.Fone, you can unlock your iDevices within minutes.
Key Characteristics of Wondershare Dr.Fone
- This tool can effortlessly bypass the iCloud activation lock without needing the Apple ID.
- You can find a dedicated option for Data Recovery in Dr.Fone’s service, allowing you to easily recover all types of lost data.
- It can remove encryption locks from iTunes backups without causing any data loss.
Steps To Unlock Your Locked iPhone Using Wondershare Dr.Fone
This tool ensures a straightforward process without any learning curve. Experience the simplicity of unlocking your Apple iPhone 13 in just a few easy steps:
- Step 1. Initialization and Setup of Screen Unlocking
After installing Wondershare Dr.Fone on your computer, begin by launching the program. Access the “Toolbox” section and find “Screen Unlock”. Choose “iOS” as your device type and proceed by selecting “Unlock iOS Screen .” Initiate the unlocking process by clicking “Start.”

Tips: Are you searching for a powerful iPhone Unlock tool? No worries as Dr.Fone is here to help you. Download it and start a seamless unlock experience!
- Step 2. Preparing Devices and Firmware
Follow the prompts on the screen to put your iDevice into Recovery Mode. The platform will automatically detect and showcase the “Device Model.” If necessary, modify the model or System Version accordingly and click “Start.” Monitor the progress of the iOS firmware download on the following screen.

- Step 3. Validation and Completion
Ensure that the downloaded iOS firmware is validated before proceeding. To start the unlocking process, click “Unlock Now”. Enter the required code and tap “Unlock” to continue. Upon successfully unlocking the Apple iPhone 13 device, finalize the process by clicking the “Done” button.

Conclusion
In this comprehensive guide, we navigated through how to unlock Total Wireless phone. It covered its definition, reasons for unlocking, and a checklist before initiating the process. We explored multiple unlocking methods, including carrier-specific policies and third-party services. Additionally, we discussed Wondershare Dr.Fone as the ultimate choice when users encounter device unlocking.
How Many Attempts To Unlock Apple iPhone 13
Unlocking your Apple iPhone 13 involves a delicate balance to avoid pitfalls. Knowing how many attempts to unlock an iPhone is vital due to Apple’s security measures. Exceeding the limit triggers consequences, such as temporary disablement or even data erasure.
These restrictions highlight the need to learn how many attempts for iPhone passcodes are allowed before facing potential data loss. When dealing with failed passcode attempts, exploring methods for successful access is essential. Let’s delve into the intricacies of iPhone passcode security and unveil strategies for a seamless unlocking process. Read on to learn more.

Part 1. How Many Times Until the Apple iPhone 13 Is Permanently Disabled?
Unlocking an iPhone involves a series of attempts, each with distinct consequences. Here’s a breakdown of how many failed passcode attempts on an iPhone you can do before it locks you out:
First 5 Attempts
- No significant consequences.
- Users have the flexibility to enter their passcode without any penalties.
6th Attempt
- iPhone is disabled for 1 minute.
- An iPhone is Disabled message appears on the screen.

7th Attempt
- Disabled for 5 minutes.
- The same on-screen message persists, but the Apple iPhone 13 enforces a longer wait time.
8th Attempt
- Disabled for 15 minutes.
- Users must wait before attempting again. The escalating time delay discourages brute-force attacks.
9th Attempt
- Disabled for 60 minutes.
- A considerable waiting period is imposed. It increases the frustration for unauthorized users attempting to gain access.

10th Attempt
- iPhone is disabled.

Two things can happen on the tenth failed attempt to unlock your Apple iPhone 13. If you have Erase Data enabled, your phone’s data gets wiped. If it’s disabled, the Apple iPhone 13 is permanently locked, requiring a connection to iTunes for restoration. It’s crucial to back up your data on iCloud or locally to avoid permanent loss.
Part 2. What Are the Consequences After Consecutive Failed Attempts?
When you exceed ten unsuccessful passcode entries, the Apple iPhone 13 device takes stringent actions to protect sensitive data. It can initiate a data wipe or lock the iPhone, needing a connection to iTunes for restoration. After a series of failed attempts, the Apple iPhone 13 can activate a security measure often referred to as a “self-destruct” mode.
To turn this mode on or off, follow these steps:
How To Enable Erase Data Mode
Safeguard your personal information with these simple steps to remotely wipe your device in case of loss or theft.
- Step 1: Go to Settings > Face ID & Passcode or Touch ID & Passcode, depending on your device. Enter your current passcode.

- Step 2: Scroll down and find the Erase Data option. Toggle the button to activate the feature.
How To Disable Erase Data Mode
Here are the steps to disable Erase Data Mode on your Apple iPhone 13, ensuring controlled access to your device.
- Step 1: Follow the same steps to access the Erase Data toggle. Next, disable the toggle to turn off this feature.
- Step 2: Confirm your choice, ensuring the “self-destruct” mode is deactivated to prevent accidental data loss.
Part 3. Top 5 Methods To Unlock an iPhone After Too Many Attempts
When wondering how many tries to unlock an iPhone, consider the following methods to restore functionality. The section below explores the most effective ways to regain access to your device. Let’s start with the use of a dedicated screen unlock tool.
Method 1: Using a Dedicated Screen Unlock Tool
When facing a disabled iPhone, Wondershare Dr.Fone - Screen Unlock (iOS) stands out as a reliable solution. It’s a comprehensive platform that unlocks iOS devices without a passcode. Here are some of the tool’s key features to help you get started:

- Removes all types of lock screens. Fone Screen Unlock tackles various lock screen types, like pattern lock, etc. It offers a comprehensive solution for different scenarios.
- Unlock Apple ID without a password. The tool provides a secure method to unlock Apple ID without needing a password.
- No data loss. Users can regain access without losing data, a crucial aspect of dealing with a disabled iPhone.
- High success rate.Fone Screen Unlock boasts a high success rate, instilling confidence in users seeking a swift and effective solution.
How To Unlock iPhone With Dr.Fone
After many failed passcode attempts on your Apple iPhone 13,Dr.Fone can help you access it again in no time. Follow the steps:
- Step 1: Download and install Dr.Fone on your computer. Next, click Toolbox > Screen Unlock > iOS to start. In the next window, choose Unlock iOS Screen.

- Step 2: Follow the on-screen instructions. Dr.Fone will automatically detect your Apple iPhone 13 model. If necessary, choose the System Version according to your preference. Next, click Start to start the iOS firmware download.
- Step 3: Wait for the iOS firmware to download successfully. Click on Unlock Now to initiate the unlocking process. Follow the on-screen instructions again and wait for Dr.Fone to unlock your device. If unsuccessful, click on the Try again option.

Method 2: Using iTunes To Unlock a Locked or Disabled iPhone
An alternative method to unlock your Apple iPhone 13 when locked or disabled involves using iTunes. Note that if your iTunes is not synchronized with the iPhone, you risk losing your existing data. Here’s how:
- Step 1: Launch iTunes on your computer. Connect your locked iPhone using a cable and let iTunes identify the Apple iPhone 13 device. Next, navigate to the Summary section and select the Restore iPhone option.

- Step 2: Allow iTunes to identify your device. Start the restoration of previous data by selecting Restore Backup. Your Apple iPhone 13 will be unlocked with all the associated data if you have backed up your information on iTunes. Otherwise, you will need to set it up as a new iPhone.
Method 3: Using Recovery Mode To Unlock a Locked or Disabled iPhone
Activating Recovery mode is another useful method for accessing a locked phone. The approach erases all data on the phone, restoring it to factory settings. Any data not backed up will be lost using this method. Follow the steps:
- Step 1: Download and Launch iTunes on your computer. Connect your Apple iPhone 13 with a USB cable.
- Step 2: For iPhone 8 models or newer, press and release the volume up button, followed by the volume down button. Next, press and hold the power button. If executed, the iTunes connect screen will appear. For earlier iPhone models, you can refer to here.

- Step 3: iTunes will prompt you to either restore or update your Apple iPhone 13. Choose the Restore iPhone option to reset your device to its factory settings. If the restoration process extends beyond 15 minutes and your Apple iPhone 13 exits recovery mode, you’ll need to repeat the steps.
Method 4: Using iCloud To Unlock a Lock or Disabled iPhone
After many failed passcode attempts on your Apple iPhone 13,it got disabled, but iCloud offers a convenient solution. Your phone must have the Find My iPhone option enabled for the method to work. You should be aware of the Apple ID password associated with your iCloud account. Once these prerequisites are fulfilled, access the iCloud account from another device. Here’s how.
- Step 1: Go to iCloud.com using another device, such as a computer, and log in with your Apple ID and password.

- Step 2: Select All Devices, and pick the locked iPhone from the dropdown menu. Once you’ve chosen the Apple iPhone 13 device, click the Erase iPhone icon in the lower-right corner. Although the action deletes the data on the phone, you can retrieve it from your iCloud backup once the Apple iPhone 13 device is operational again.
Method 5: Contact Apple Support or Visit an Apple Store
If all methods fail or you don’t have access to Dr.Fone, consider contacting Apple Support. You can also try visiting an Apple Store. Apple experts will guide you through the appropriate steps based on your unique situation.
Conclusion
If you are wondering how many passcode attempts on iPhone will lock your device and not sure how to fix this issue, here is the way to go. Methods like iTunes, Recovery Mode, iCloud, or seeking Apple Support all offer potential solutions.
Consider using Dr.Fone Screen Unlock (iOS) for a secure and data-preserving unlock. It safeguards your data even if you forget your passcode. Remember that surpassing the allowed attempts could result in data loss or permanent device disablement. Safeguard your data wisely by exploring these methods.
Tips: Are you searching for a powerful Screen Unlock tool? No worries as Dr.Fone is here to help you. Download it and start a seamless unlock experience!
Remove Device Supervision From your Apple iPhone 13
Supervising devices is a proven technique for companies to monitor their employees. With this, they keep track of their performance on all associated devices. If you’ve decided to leave an organization, ensure that you retain the Apple iPhone 13 device’s ownership by removing supervision access. If you’re looking for a guide on how to remove device supervision from your Apple iPhone 13, you can find some effective methods here.

Part 1. Answering Top Queries About Removing Device Supervision From iPhone
Many questions often pop up in users’ minds when considering removing device supervision. This section unveils some top queries with authoritative answers before heading to the main guide:
|
You May Want to Ask
|
Authoritative Answer
|
| — | — |
|
1. Does removing device supervision impact the iPhone’s functionality?
|
Removing device supervision does not compromise the fundamental functionality of your Apple iPhone 13. It is important to note that any administrative restrictions or configurations will be lifted. However, it might result in losing access to specific apps related to that organization.
|
|
2. Can device supervision be reinstated after removal?
|
Device supervision can be re-applied by the designated supervisor or IT administrator. However, this process usually involves resetting the Apple iPhone 13 device to its factory settings if needed.
|
|
3. What information can be accessed through device supervision on iOS?
|
Once user’s devices are supervised, organizations can conveniently check settings, apps, and accounts being managed. They can also apply extra restrictions such as disabling Apple Music or putting the Apple iPhone 13 device into Single App Mode.
|
Part 2. Remove Device Supervision With Perfection Using Wondershare Dr.Fone - Screen Unlock
Undoubtedly, device supervision is the most reliable method for organizations to monitor connected devices and analyze reports. If you have left a company where the administrator supervises your iOS device, your device needs to be unsupervised. For this process, you can bypass the MDM lock on your iOS device through a reliable tool.
Here, Wondershare Dr.Fone stands tall to help out your ventures and provide executable techniques explaining how to remove supervision from iPhone. This tool allows you to bypass the MDM lock without data loss on your Apple iPhone 13 using easy steps. Consequently, you can also use other advanced functions, such as removing lock screens and unlocking Apple ID in different instances.
Features of Wondershare Dr.Fone To Consider
- Wondershare Dr.Fone lets you bypass iCloud Activation Lock completely and set a new Apple ID on the Apple iPhone 13 device.
- This tool is compatible with all iOS devices, even iOS 17, and helps users experience creative features.
- Users can remove iTunes backup encryption by changing the encryption setting without losing data.
Step-by-Step Guide to Remove MDM Lock Using Wondershare Dr.Fone
Wondershare Dr.Fone provides the simplest method to remove the MDM lock and bypass device supervision access. Here is a comprehensive step-by-step guide to help users remove supervision from iPhones.
- Step 1. Initiate and Proceed With the Screen Unlock Feature
First, launch Wondershare Dr.Fone on the computer and connect it to your Apple iPhone 13. Move into the “Toolbox” tab and select the “Screen Unlock” function.
- Step 2: Select iOS and Head To Unlock MDM
After that, choose “iOS” as the Apple iPhone 13 device type to open the related tool. Once the tool starts working, select the “Unlock MDM iPhone” option from the list.

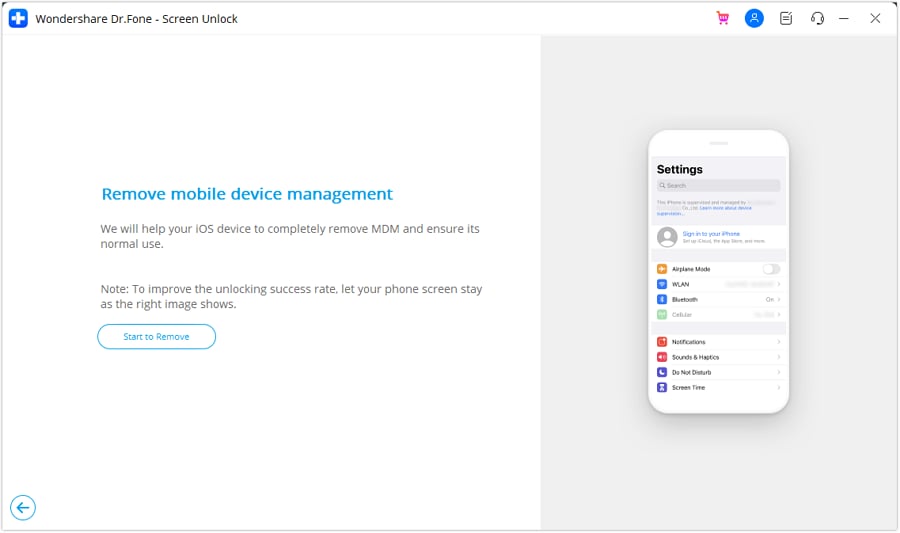
- Step 3. Select Remove MDM Function To Start the Process
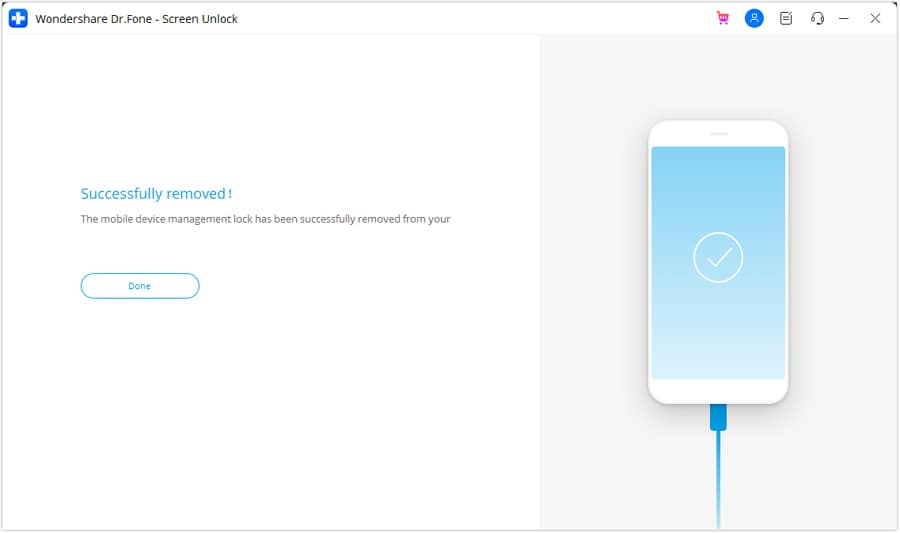
On the next screen, you will see two options, “Bypass MDM” and “Remove MDM.” Select “Remove MDM” and hit the “Get Start” button. After that, you will be taken to another screen where you need to tap on “Start to Remove” to execute the process.
- Step 4. Disable Find My Feature and Complete the Process
A prompt will pop up stating that you need to turn off the Find My feature on your iOS device. For this, open your device “Settings” and choose the “iCloud” option. Lastly, disable the “Find My iPhone” feature and hit the “OK” button. Wait a few seconds to complete the process and click “Done” to conclude the MDM removal process.
Part 3. Easy Removal of Device Supervision From Settings
Looking for other conventional methods about how to remove supervision from iPad or iPhone? If you wish to perform such actions, you can access some options in your Apple iPhone 13 settings. However, to utilize this method, you should know the login information and password of the Apple iPhone 13 device. If you have them with you, follow the given steps to remove device supervision from iPhone settings:
- Step 1. Initially, open the “Settings” and move into the “General” section. After that, select the “VPN & Device Management” option to see which MDM profiles supervise your iOS device.

- Step 2. Select the MDM profile you want to remove and tap on “Remove Management” to delete that profile from your iDevice. Then, you will be prompted to enter your login info or password and type your information to bypass supervision access.

Part 4. Using Apple Configurator 2 for Removing iPhone Supervision System
Apple Configurator is a free tool for Mac users that provides a simple technique for removing iPhone supervision. To use this method, you must have a password for the Apple iPhone 13 device; otherwise, you will need to contact the organization to get the necessary permissions. Below are easy steps about how to remove device supervision from iPad and iPhone through your Mac:
Instructions. First, download and launch the Apple Configurator tool on your Mac. Connect the iDevice to the Mac using a compatible USB-C cable. Click on “Actions” from the top bar of the tool. In the drop-down list, choose the “Advanced” option and select “Erase All Content and Settings” to remove iPhone device supervision. Enter your device password to start using your Apple iPhone 13 normally.

Part 5. Directly Contact Administration for Removing Device Supervision
If you’ve forgotten the username and password of your management profiles, you cannot remove MDM profiles from iPhone settings. In that situation, you can only seek help from the company admin, as this iPhone is supervised and managed by them.
You can contact the administrator and share a valid reason why you want to remove supervision access. They can remove your device directly from their system or provide you with the correct password to proceed with the login process.
Conclusion
Removing device supervision is simple, but getting familiar with the safest method is necessary. Considering this, we have covered some techniques to bypass MDM locks on your iOS device. These can easily resolve your issue of how to remove device supervision from iPhone queries. Conclusively, Wondershare Dr.Fone is the recommended tool to bypass the MDM lock without data loss.
Tips: Are you searching for a powerful Screen Unlock tool? No worries as Dr.Fone is here to help you. Download it and start a seamless unlock experience!
Also read:
- [New] Step Into a World of Eye-Catching Imagery at Pexels for 2024
- 2024 Approved Prodigious Android Collages Editor's Picks Revealed
- 2024 Approved Ultimate List of Accessibility 8 Premium Free MP3 Grabber Apps (Android)
- Championship Playlist: The Ultimate 7 iOS/Android Sports Games
- In 2024, 7 Top Ways To Resolve Apple ID Not Active Issue For iPhone 8
- In 2024, Catch or Beat Sleeping Snorlax on Pokemon Go For Oppo Find X6 Pro | Dr.fone
- In 2024, How Do You Unlock your Apple iPhone 6 Plus? Learn All 4 Methods
- In 2024, How To Remove Flashlight From Apple iPhone X Lock Screen
- In 2024, How to Unlock iPhone 15 Pro?
- In 2024, Network Locked SIM Card Inserted On Your Lava Blaze 2 Phone? Unlock It Now
- In 2024, Resolve Your iPhone SE (2022) Keeps Asking for Outlook Password
- In 2024, Securing Your Gaming Memories Without Game Bar
- In 2024, Unlock iPhone 14 Pro Max With Forgotten Passcode Different Methods You Can Try
- In 2024, What Does Jailbreaking Apple iPhone 13 i Do? Get Answers here
- INCREASED PATENT SAFEGUARDS FOR LINUX SYSTEMS: OIN EXCLUSIVITY INTENSIFIES, SKIRTS AI COVERAGE - ZDNET
- Is Your Apple iPhone 11 in Security Lockout? Proper Ways To Unlock
- Moment by Moment | Free Book
- Simplified Guide to Cloning Disks with Disk Partitions - A 5-Step Process
- Unlocking Apple iPhone 12 Lock Screen 3 Foolproof Methods that Actually Work
- Title: In 2024, Things You Should Know When Unlocking Total Wireless Of iPhone 13
- Author: Sophia
- Created at : 2024-12-03 17:03:14
- Updated at : 2024-12-06 16:29:42
- Link: https://ios-unlock.techidaily.com/in-2024-things-you-should-know-when-unlocking-total-wireless-of-iphone-13-by-drfone-ios/
- License: This work is licensed under CC BY-NC-SA 4.0.