
In 2024, Unlocking Apple iPhone XS Lock Screen 3 Foolproof Methods that Actually Work
Unlocking Apple iPhone XS Lock Screen: 3 Foolproof Methods that Actually Work

The competition in the market between Android and iOS has been increased ever since the features are increasing. People get attracted by anything that is new and unique. The competitive brands are taking things seriously and are coming up with the eye-catching mobile body and mesmerizing features.
Someone who is new in the Apple world must not be aware of the security activation lock and many other different features. No one can use your Apple device without the activation lock. The fact that user can remove all the data from iPhone whenever they want and can even restore it instantly gets user attention.
Looking more into the Apple iPhone XS world, people might be confused between the lock screen and activation lock. Also, they might be facing the problem of how to bypass the lock screen of iPhone Apple iPhone XS . Let us answer your questions and provide you some knowledge.
Part 1. Can Someone Bypass the Apple iPhone XS Activation Lock?
Protecting user’s information is among the core objectives of Apple. For this purpose, an activation lock has been developed for iPhone, iPad, iPod, and Apple Watch users. The lock prevents any other person from using your apple device in case it’s lost or stolen.
The phones that are iOS 7 or above versions do not need to manually enable the lock because it is auto-enabled once the phone is switched on. The strong security concerns behind this lock do not allow your device’s misuse from someone who is using it for the wrong purpose.
Apple’s activation server saves your Apple ID, and in case the phone is turned off, or any erasing activity is observed, then the Apple iPhone XS device will ask to unlock the iCloud activation. Suppose you have purchased a phone from someone, and it asks for an activation lock. That is because the Apple iPhone XS device is still linked with the old owner and hence, will not allow you to access the phone.
For this, if the Apple iPhone XS device is asking for an activation lock, the user cannot bypass the Apple iPhone XS activation lock. The only way to get rid of that is to break the link between the Apple device and the prior owner, but that requires Apple ID.
Part 2. Bypass iPhone Lock Screen Apple iPhone XS without Passcode [No iTunes]
The major difference between the lock screen and activation lock is that the lock screen can be bypassed without the password but, the user can never bypass the activation lock as it marks the security boundary of Apple.
You might be wondering how to escape the lock screen without a password because it is possible that you might forget the password, and now you can’t open your phone. Let’s look at how you can do this;
The commonly faced problem of many iOS users was that they forget the password but later, an amazing solution to this problem as Dr.Fone – Screen Unlock application was known and used by almost all iOS users. Some of its features are;
- The application is easy to use. It does not need any technical skill to use it, and everyone can handle the application.
- It can unlock a disabled iPhone even if the user doesn’t have the passcode.
- It fully supports iPhone 8, iPhone X, and all the latest models of iPhone.
- You don’t have to worry if you got a second-hand phone because Dr.Fone can unlock it.
Let us now show you how to use the application and enjoy life with iPhone;
Step 1: Download Dr.Fone
The user is requested to download Dr.Fone – Screen Unlock on Windows or Mac system from its official website. Once it’s downloaded, you should install it and then, it will be ready to use. Launch it whenever you want to bypass the Apple iPhone XS lock screen.
As you will launch the application, the home page will appear from that, and you have to select ‘Screen Unlock’ that is on the left.

Step 2: Make a Connection
The user is now supposed to make the connection between iPhone and the system and let the application automatically detect it. When you are ready to initiate the action, just click on the button ‘Unlock iOS Screen.’

Step 3: Activate DFU Mode
Once the system has detected the phone, the user is advised to activate the DFU mode by turning off the phone and connecting it to the computer.

Step 4: Information for Confirmation
The next window will ask for some basic information regarding the iOS device and version.

Step 5: Firmware Update
Click on the ‘Download’ button at the bottom to get the firmware update for your phone. This might take some time as the firmware update for your phone is being downloaded. As that’s done, click on the ‘Unlock Now’ button on the screen.
Step 3: Select the Path
Select the saving path where you want to save your screenshots. For this, click on the “Settings” and go to “Screenshots and recording settings.”
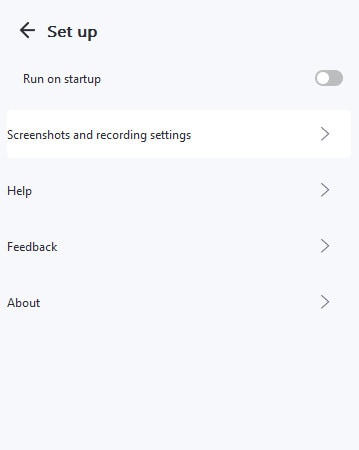
You will see the option “Save to.” Guide the path, and all taken screenshots will be stored at the selected location.

Provide the system with an on-screen confirmation code to continue the process. When that is done, the interface will notify you. By clicking on the ‘Try Again’ button, you can repeat the process.

Part 3. Erase iPhone from iCloud [Apple ID & Password]
People keep on switching between Android and iOS. Not everyone sticks to one thing, and so do passionate mobile users do. But suppose someone is changing their phone and they want to delete the Apple iPhone XS from iCloud, both the Apple ID and its password; what should be done in such a scenario?
The user can easily bypass the lock screen on their iPhone from iCloud only if their Find My iPhone feature is turned on. Let us take you through the steps that will help you to do the task;
User is firstly supposed to log in to iCloud.com on their computer or any other device in use by using the Apple ID and password.

In case the user has enabled the two-factor authentication on iPhone, then they should hit ‘Trust’ and enter the six-digit verification code sent to their iPhones on the iCloud web.
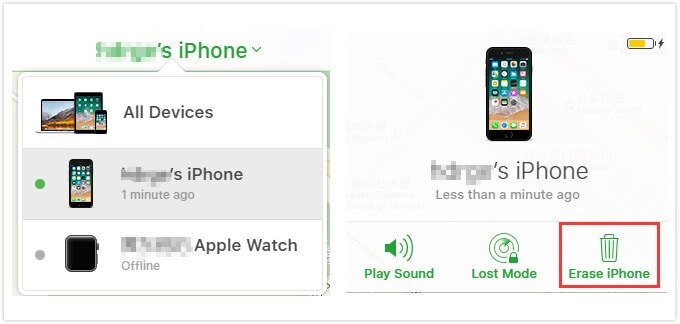
Once that is done, and you have logged in to iCloud, select the option of ‘Find iPhone.’
Now, the user should select and click on ‘All Devices, located at the top of the browser.
The system will now ask for your Apple ID and password; provide that.
After you have done that, a list of all the Apple iPhone XS devices will appear. You are now supposed to select your device and click on the option of ‘Erase iPhone.’
Doing this will wipe all the data, settings and, also the password.
Part 4. Restore Apple iPhone XS Apple iPhone XS to Factory Reset by iTunes
Most iPhone users have synced the Apple device to iTunes. This helps them to recover the data in case it is lost. If the user has created an appropriate backup across iTunes, they can easily carry out the process of bypassing the lock screen. In other words, iPhone users have everything saved without the fear of being lost.
iPhone users can even restore their phones to factory settings without losing anything and by just using iTunes. Let us show you how it is done;
Users should start the process by turning their phone off and connecting it to the computer.
Now, the user should press and hold the ‘Home’ button and ‘Power’ button together. Release them when you see ‘Connect to iTunes’ on the screen.
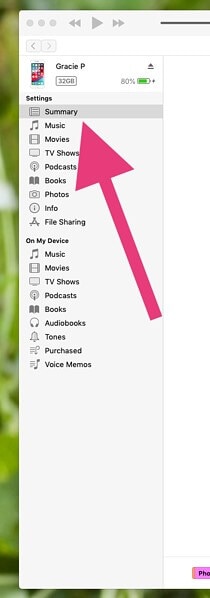
Once that is done, the user is now requested that from the menu on the left side of the screen, select ‘Summary.’
A new window will appear, the Summary window. From this, the user is supposed to select the option of ‘Restore iPhone.’
Selecting the restore option, a confirmation window will appear on the screen, asking the user to confirm the decision of the restore process.
As soon as iTunes has finished the restoring process, the phone is ready and reset.
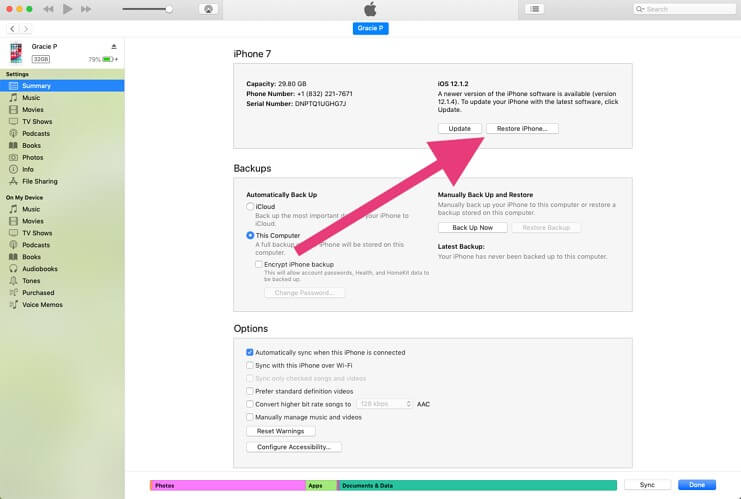
Users can now retrieve all the data that has been backed up on iTunes.
Conclusion
The article has covered a sufficient portion of knowledge for the user regarding how they can bypass iPhone lock screen Apple iPhone XS . The difference between the common confusion of lock screen and activation screen and also a few tips and tricks have been discussed.
Unlock Apple iPhone XS With Forgotten Passcode: Different Methods You Can Try
Have you forgotten the passcode iPhone 6? We know forgetting your Apple iPhone XS passcode can be a frustrating experience, but luckily it is possible to unlock your device. Using different methods, we will show you how to unlock your Apple iPhone XS 6 with a forgotten passcode.
So let’s get started.
Top 3 Ways to Unlock iPhone 6 without Forgotten Passcode
Your iPhone passcode can be reset in a variety of ways, depending on whether you have a backup. Below, we’ll go over the three most common methods for resetting an iPhone passcode.
1. Use Find My iPhone
If you’ve activated Find My iPhone, you can use it to reset your passcode. Resetting your passcode this way is probably the simplest method, as it doesn’t require any technical knowledge or special tools.

Just follow the steps below and get started.
- Step 1: Via a computer or other iOS devices, go to icloud.com/find and sign in with your Apple ID and password.
- Step 2: Select “All Devices” at the top of the screen and find out your Apple iPhone XS from the list of devices.
- Step 3: Click “Erase iPhone” and confirm that you want to erase your device.
Once your Apple iPhone XS has been erased, it can be set up as a new device and you can choose a new passcode.
2. Unlock it via Recovery mode with iTunes
You can use Recovery mode to reset your device if you’ve synced your Apple iPhone XS with iTunes. This method will erase all of the data on your Apple iPhone XS, so confirm you have a backup before proceeding.

Just go with the steps below.
- Step 1: To begin with, you need to connect your Apple iPhone XS to a computer and turn on iTunes.
- Step 2: While your Apple iPhone XS is connected, restart it by pressing and holding the Sleep/Wake and Home buttons simultaneously. Keep holding these buttons until the recovery mode screen shows up.
- Step 3: When the “Restore” or “Update” appears, please choose “Restore”.
iTunes will now begin downloading the software for your device. Once it’s finished, you can set up your device as new and choose a new passcode.
3. Use Siri
If you’re running iOS 8 or later, you may be able to use Siri to bypass the lock screen. This method doesn’t work on all devices, and it can be patched with a software update, so it’s not a guaranteed way to reset your passcode.

Just follow the instructions.
- Step 1: Press and hold the Home button to activate Siri.
- Step 2: Say something like “Siri, what time is it?” or “Siri, who am I?”
- Step 3: Siri will likely respond with an error message saying that she can’t answer these questions while your device is locked. However, she will also give you the option to “Tap to open Clock”.
- Step 4: Tap on “Clock,” and you’ll be taken to the Clock app. From here, you can access other apps like Calendar, Reminders, and more.
While this method doesn’t give you direct access to the home screen, it does allow you to bypass the lock screen and access some of your device’s features.
Bonus Tips: Easy Tool to Unlock iPhone 6 without Passcode
If none of the above-mentioned methods works for you, or you don’t want to use them, there is another method that will surely work for you. Dr.Fone - Screen Unlock is a powerful software that can unlock your Apple iPhone XS without a passcode. The software is extremely easy to use and supports all iOS devices.
Dr.Fone - Screen Unlock (iOS)
Unlock iPhone Without Passcode
- Unlock Face ID, Touch ID, Apple ID without password.
- Bypass the iCloud activation lock without hassle.
- Remove iPhone carrier restrictions for unlimited usage.
- No tech knowledge required, Simple, click-through, process.

3,981,454 people have downloaded it
How To Unlock iPhone Without Passcode Using Dr.Fone?
Step 1: When you have Dr.Fone on your PC, then launch the program and select “Screen Unlock”.

Step 2: To connect your Apple iPhone XS to the computer, you require a USB cable.
Step 3: Follow the instructions below to put your device in DFU or Recovery mode.
Step 4: Once your device enters into DFU mode or Recovery mode, Dr.Fone will ask you to choose the right firmware for your Apple iPhone XS 6.
Step 5: Upon selecting the right firmware, Dr.Fone will start downloading the firmware for your device. Once it’s finished, click “Unlock Now” to remove the passcode.
You need to wait as the process may take several minutes. So be patient and don’t interrupt the process; otherwise, it may permanently damage your Apple iPhone XS. Once the process is completed, your Apple iPhone XS will be unlocked, and you can choose a new passcode.
This is a very easy-to-use way to reset your Apple iPhone XS passcode. So, if you’re looking for a hassle-free solution, this is the one you should obtain.
As we told you earlier, any method you follow will lose your data, as there is no way to unlock your Apple iPhone XS 6 without losing the data. So, how can you back up your Apple iPhone XS to avoid forgetting the passcode? Let’s find out.
How Can I Back Up My Apple iPhone XS to Avoid Forgetting Passcode Again?
Wondershare Dr.Fone is an excellent tool that can help you keep your Apple iPhone XS data to avoid losing it. The software is extremely easy to use and supports all iOS devices.
Step #1: Launch Dr.Fone App on Your Computer
Firstly, you need to download and install Dr.Fone on your computer. Once it’s installed, launch the program and select “Backup Device” from the main interface.

Step #2: Connect your Apple iPhone XS 6
Now you will need to connect your Apple iPhone XS 6 to the computer with a lightning cable and click “Back Up Now” to start backing up your device. Dr.Fone will now start scanning your Apple iPhone XS for data. Once it’s finished, you can move on to the next step.

Step #3: Hit Backup Button
Once it’s finished, you can safely disconnect your Apple iPhone XS and keep the backup file safe. So that is how you can safely back up your Apple iPhone XS without losing any data.
 safe & secure
FAQs
1. I forgot my iPhone passcode, and it’s disabled. How can I fix this?
If your Apple iPhone XS is disabled, restoring your device using above mentioned methods is the only way to fix it. However, this will erase all your data, so ensure you have a backup before proceeding.
2. How can I reset my iPhone if I forget my passcode without losing any data?
As we mentioned before, there is no way to reset your device without losing your data unless you have a backup. So, ensure you have a backup before proceeding with the reset process.
3. Can I unlock my iPhone 6 without a passcode?
You can unlock your Apple iPhone XS 6 without a passcode by following the steps mentioned in this article. However, this will erase all your data, so ensure you have a backup before proceeding.
4. I tried unlocking my iPhone using iTunes, but it’s not working. What should I do?
If you cannot unlock your Apple iPhone XS using iTunes, you can try Dr.Fone-Screen Unlock. This software is extremely easy to use and supports all iOS devices. Plus, it won’t erase your data if you have a backup.
Conclusion
We hope this article helped you reset your Apple iPhone XS if you forgot the passcode iPhone 6. As you can see, there are several ways to do it; however, any method you follow will result in data loss. So, ensure you have a backup before proceeding.
Also, if you’re looking for an easy and effective way to unlock your device, we recommend you try Dr.Fone - Screen Unlock (iOS) software. It’s extremely easy to use and supports all iOS devices. Plus, it won’t erase your data as long as you have a backup.
Remove Device Supervision From your Apple iPhone XS
Supervising devices is a proven technique for companies to monitor their employees. With this, they keep track of their performance on all associated devices. If you’ve decided to leave an organization, ensure that you retain the Apple iPhone XS device’s ownership by removing supervision access. If you’re looking for a guide on how to remove device supervision from your Apple iPhone XS, you can find some effective methods here.

Part 1. Answering Top Queries About Removing Device Supervision From iPhone
Many questions often pop up in users’ minds when considering removing device supervision. This section unveils some top queries with authoritative answers before heading to the main guide:
|
You May Want to Ask
|
Authoritative Answer
|
| — | — |
|
1. Does removing device supervision impact the iPhone’s functionality?
|
Removing device supervision does not compromise the fundamental functionality of your Apple iPhone XS. It is important to note that any administrative restrictions or configurations will be lifted. However, it might result in losing access to specific apps related to that organization.
|
|
2. Can device supervision be reinstated after removal?
|
Device supervision can be re-applied by the designated supervisor or IT administrator. However, this process usually involves resetting the Apple iPhone XS device to its factory settings if needed.
|
|
3. What information can be accessed through device supervision on iOS?
|
Once user’s devices are supervised, organizations can conveniently check settings, apps, and accounts being managed. They can also apply extra restrictions such as disabling Apple Music or putting the Apple iPhone XS device into Single App Mode.
|
Part 2. Remove Device Supervision With Perfection Using Wondershare Dr.Fone - Screen Unlock
Undoubtedly, device supervision is the most reliable method for organizations to monitor connected devices and analyze reports. If you have left a company where the administrator supervises your iOS device, your device needs to be unsupervised. For this process, you can bypass the MDM lock on your iOS device through a reliable tool.
Here, Wondershare Dr.Fone stands tall to help out your ventures and provide executable techniques explaining how to remove supervision from iPhone. This tool allows you to bypass the MDM lock without data loss on your Apple iPhone XS using easy steps. Consequently, you can also use other advanced functions, such as removing lock screens and unlocking Apple ID in different instances.
Features of Wondershare Dr.Fone To Consider
- Wondershare Dr.Fone lets you bypass iCloud Activation Lock completely and set a new Apple ID on the Apple iPhone XS device.
- This tool is compatible with all iOS devices, even iOS 17, and helps users experience creative features.
- Users can remove iTunes backup encryption by changing the encryption setting without losing data.
Step-by-Step Guide to Remove MDM Lock Using Wondershare Dr.Fone
Wondershare Dr.Fone provides the simplest method to remove the MDM lock and bypass device supervision access. Here is a comprehensive step-by-step guide to help users remove supervision from iPhones.
- Step 1. Initiate and Proceed With the Screen Unlock Feature
First, launch Wondershare Dr.Fone on the computer and connect it to your Apple iPhone XS. Move into the “Toolbox” tab and select the “Screen Unlock” function.
- Step 2: Select iOS and Head To Unlock MDM
After that, choose “iOS” as the Apple iPhone XS device type to open the related tool. Once the tool starts working, select the “Unlock MDM iPhone” option from the list.

- Step 3. Select Remove MDM Function To Start the Process
On the next screen, you will see two options, “Bypass MDM” and “Remove MDM.” Select “Remove MDM” and hit the “Get Start” button. After that, you will be taken to another screen where you need to tap on “Start to Remove” to execute the process.
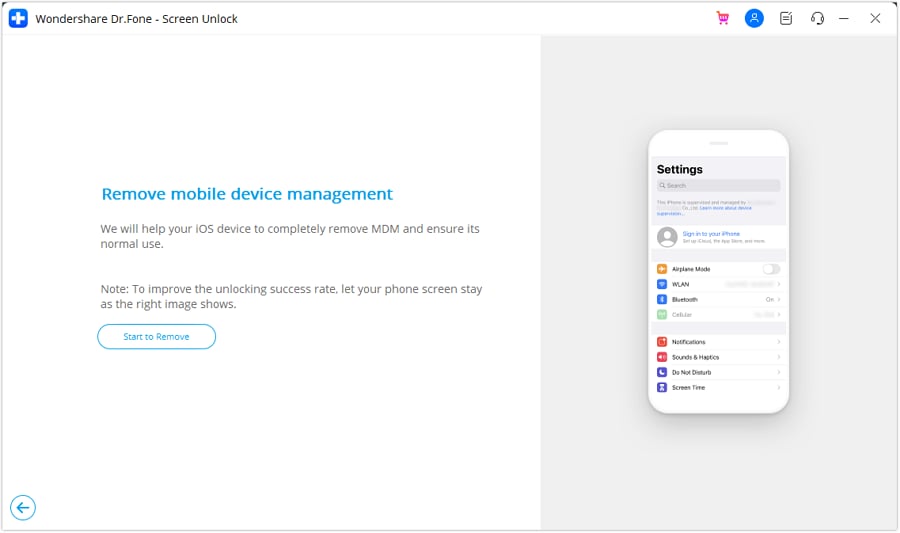
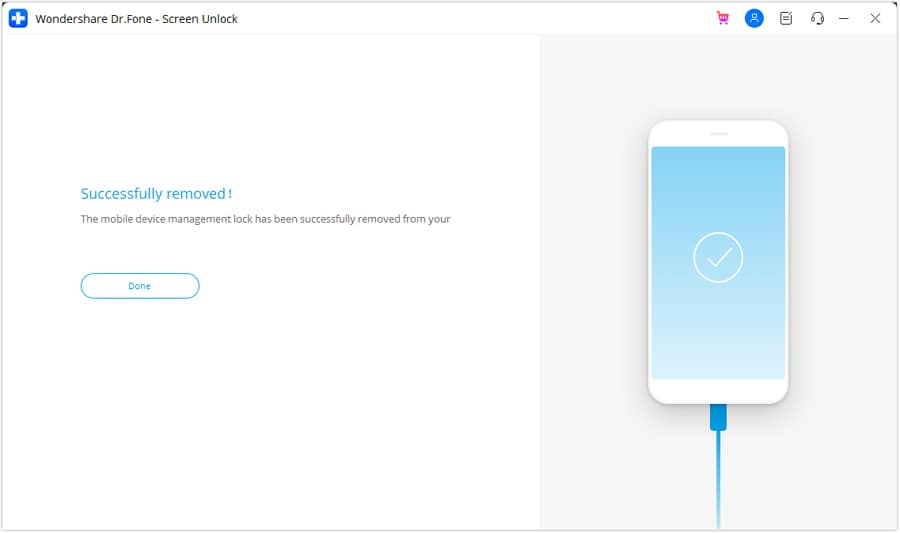
- Step 4. Disable Find My Feature and Complete the Process
A prompt will pop up stating that you need to turn off the Find My feature on your iOS device. For this, open your device “Settings” and choose the “iCloud” option. Lastly, disable the “Find My iPhone” feature and hit the “OK” button. Wait a few seconds to complete the process and click “Done” to conclude the MDM removal process.
Part 3. Easy Removal of Device Supervision From Settings
Looking for other conventional methods about how to remove supervision from iPad or iPhone? If you wish to perform such actions, you can access some options in your Apple iPhone XS settings. However, to utilize this method, you should know the login information and password of the Apple iPhone XS device. If you have them with you, follow the given steps to remove device supervision from iPhone settings:
- Step 1. Initially, open the “Settings” and move into the “General” section. After that, select the “VPN & Device Management” option to see which MDM profiles supervise your iOS device.

- Step 2. Select the MDM profile you want to remove and tap on “Remove Management” to delete that profile from your iDevice. Then, you will be prompted to enter your login info or password and type your information to bypass supervision access.

Part 4. Using Apple Configurator 2 for Removing iPhone Supervision System
Apple Configurator is a free tool for Mac users that provides a simple technique for removing iPhone supervision. To use this method, you must have a password for the Apple iPhone XS device; otherwise, you will need to contact the organization to get the necessary permissions. Below are easy steps about how to remove device supervision from iPad and iPhone through your Mac:
Instructions. First, download and launch the Apple Configurator tool on your Mac. Connect the iDevice to the Mac using a compatible USB-C cable. Click on “Actions” from the top bar of the tool. In the drop-down list, choose the “Advanced” option and select “Erase All Content and Settings” to remove iPhone device supervision. Enter your device password to start using your Apple iPhone XS normally.

Part 5. Directly Contact Administration for Removing Device Supervision
If you’ve forgotten the username and password of your management profiles, you cannot remove MDM profiles from iPhone settings. In that situation, you can only seek help from the company admin, as this iPhone is supervised and managed by them.
You can contact the administrator and share a valid reason why you want to remove supervision access. They can remove your device directly from their system or provide you with the correct password to proceed with the login process.
Conclusion
Removing device supervision is simple, but getting familiar with the safest method is necessary. Considering this, we have covered some techniques to bypass MDM locks on your iOS device. These can easily resolve your issue of how to remove device supervision from iPhone queries. Conclusively, Wondershare Dr.Fone is the recommended tool to bypass the MDM lock without data loss.
Tips: Are you searching for a powerful Screen Unlock tool? No worries as Dr.Fone is here to help you. Download it and start a seamless unlock experience!
Also read:
- [New] Navigating Video Migration YouTube to Dailymotion Process
- [New] Your First Sound Recording Guide in Audacity on a Mac for 2024
- [Updated] In 2024, Premium Picks Recommended Portals for Tapping Snapchat Tunes
- Exploring Virtual Speed Best VR Treadmills Ranked
- How to Bypass Google FRP Lock on Tecno Pova 6 Pro 5G Devices
- How to Rescue Lost Music from Realme GT 5
- How To Unlock Apple iPhone 8 Without Swiping Up? 6 Ways
- In 2024, 5 Solutions For Realme C67 5G Unlock Without Password
- In 2024, How to Bypass iPhone 12 Pro Passcode Easily Video Inside
- In 2024, How to Bypass iPhone 6s Plus Passcode Easily Video Inside
- In 2024, How To Unlock iPhone 12 Without Passcode? 4 Easy Methods
- In 2024, iPhone Is Disabled? Here Is The Way To Unlock Disabled Apple iPhone 6
- In 2024, Remove Device Supervision From your Apple iPhone 15 Pro
- Syncing With Serenity Listening to Podcasts on iPhone for 2024
- Title: In 2024, Unlocking Apple iPhone XS Lock Screen 3 Foolproof Methods that Actually Work
- Author: Sophia
- Created at : 2025-01-29 23:16:50
- Updated at : 2025-02-01 03:43:49
- Link: https://ios-unlock.techidaily.com/in-2024-unlocking-apple-iphone-xs-lock-screen-3-foolproof-methods-that-actually-work-by-drfone-ios/
- License: This work is licensed under CC BY-NC-SA 4.0.