
iPhone 13 Backup Password Never Set But Still Asking? Heres the Fix
Apple iPhone 13 Backup Password Never Set But Still Asking? Here’s the Fix
Part 1: Why Do iTunes Ask Me for iPhone Backup Password?
When you use iTunes to create a backup, the backup will probably have a password that iTunes automatically create. This is for privacy reasons. Hence, it might ask for an iTunes backup password never set by you!
In most cases, this occurs when the Encrypt Backup option is activated. As an official iOS feature, its purpose is to provide iOS users with the iTunes backup encryption for further security.
Unfortunately, this capability may also become problematic if you inadvertently take a backup without being able to provide the password. For example, you may have to enter the password for your Apple iPhone 13 backup unlocking never set by you.
But the good news is you have some possible fixes. So, let’s talk about them.
Part 2: 4 Possible Ways to Fix Asking for iPhone Backup Password
Many iPhone users have problems with iTunes when they back up their devices.
One of the most common issues is that people are asked for their iPhone backup password never set, but they need to know what it is. This can be frustrating because you can only back up your device if you have the password.
There are a few possible ways to fix this problem. Try resetting your password or using a different computer to back up your device. You could also try using a third-party software tool like Dr.Fone - Screen Unlock.
1. Try all passwords you use on iPhone
When iTunes prompts you for an iPhone backup password never set, what should your initial course of action be?
To get out of this predicament in the simplest way possible, try entering every potential password you will likely have used. In most cases, individuals will use the same password for many accounts.
A significant possibility is that you encrypted the iTunes backup with the same password from the iCloud account.
Therefore, before doing anything further, try all passwords to configure your iTunes account. For example, try entering 0000, 123456, name123, or 1111.
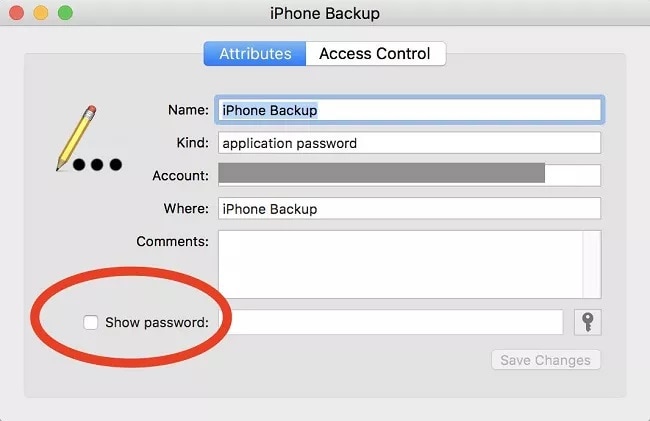
2. Find the password from Keychain on macOS
You may also attempt to find the password for the iTunes backup using the keychain approach if you are working on a Mac.
The likelihood of success with this approach is relatively low. However, it is still worthwhile to try it, particularly if you have also synchronized your iTunes account with your Mac.
- On your macOS, go to Utilities by clicking the Applications menu item. At this point, launch the Keychain Access app and look for your Apple iPhone 13 backup.
- To open a new dialogue box, double-click the most recent backup file, and you will see one appear before you.
- On this page, choose Show Password to get the password for the Apple iPhone 13 backup. However, you will first be prompted to provide the administrator password associated with your iCloud account to recover the password.
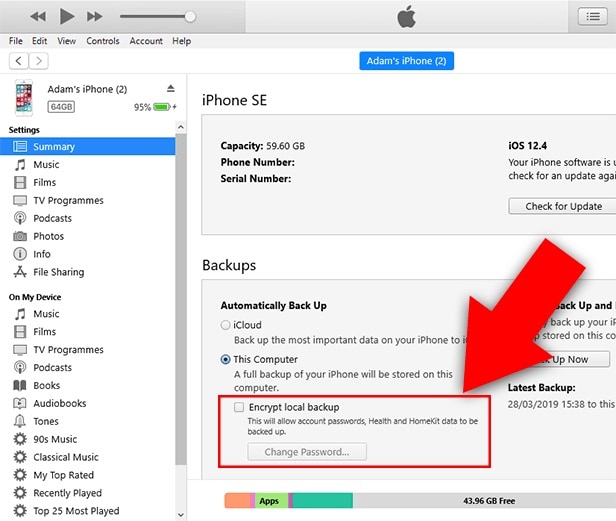
3. “Reset All Settings”
Resetting the password is another option at your disposal if you encounter the Apple iPhone 13 backup password never set problem. How you do this will be different depending on the version of iOS that you have installed.
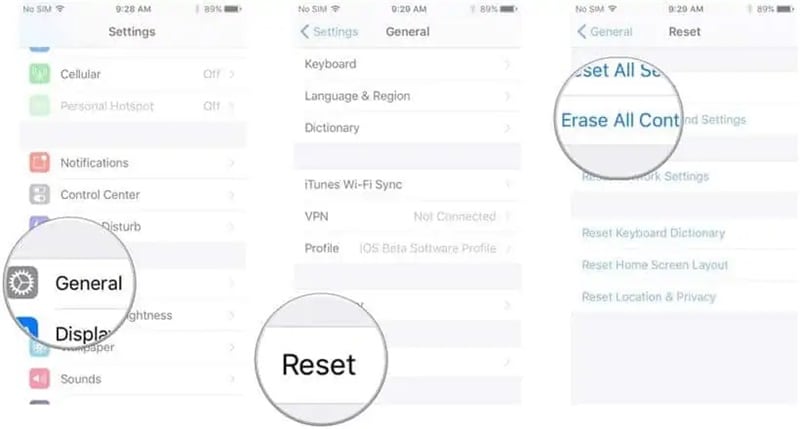
Here are what you can do with your iOS smartphone if it has iOS 11 or a later version:
Step 1: Unlock your Apple iPhone 13, and then open the Settings app on your device.
Step 2: After locating the General menu, go to the Reset menu and then hit the Reset All Settings button. Please confirm your action by providing the password for your Apple iPhone 13.
Step 3: Once the reset has been completed, your previous password will be deleted.
Step 4: The next thing you should do is take a fresh backup of your Apple iPhone 13 using iTunes, and then establish a new password for the backup that iTunes creates.
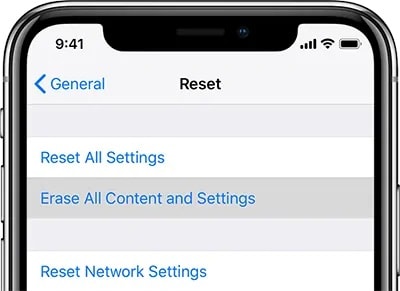
You will need to use an alternative strategy, which includes a factory reset if you use an older version of the iOS firmware than iOS 11.
Step 1: Before continuing, it is highly recommended that you create a backup of the data on your Apple iPhone 13 using iCloud.
Step 2: After you have opened the Settings app, go to the General menu, then to the Reset menu, and finally to the Erase All Content and Settings option.
Step 3: Confirm that you want to reset your Apple iPhone 13 to factory settings, and wait until it is done.
Step 4: Once the factory data reset is finished, you must restore your iCloud backup. To do this, follow the steps for setting up iOS until you reach the Apps & Data option.
Step 5: Create a new backup in iTunes and change the password for the existing backup in iTunes.
You should be aware that resetting the Apple iPhone 13 device to factory settings will not make your encrypted backups accessible again.
On the other hand, it does make it possible for you to generate a fresh backup in iTunes that is not encrypted.
4. Dr.Fone-Screen Unlock
First step: After installing Dr.Fone on your device, please run the program and look for the red button labeled “Screen Unlock.”

Step 2: While in the interface for Screen Unlock, navigate to the bottom right of the screen and tap on the feature labeled “Remove iTunes BackUp Encryption.” This will allow you to proceed.

Step 3: When brought to this screen, please use a USB cord to connect your iOS device to your personal computer. If Dr.Fone can identify this relationship, the following picture will appear for you to see.
Please read the following three notes carefully before clicking the “Remove Now” button:
- Check to ensure that “Find My iPhone” is not turned on.
- During this procedure, you should not launch “iTunes.”
- During the process, your Apple iPhone 13 will restart.

Step 4: If you have an iTunes backup, Dr.Fone may automatically verify it and delete it. This encryption will be removed once the percentage on the progress meter reaches the end. This procedure won’t take a lot of time at all.

Step 5: The encryption of the iTunes backup has been successfully erased! Your backed-up data may be quickly restored, transferred, wiped clean, and backed up again. Hence, you can enter the password to unlock your Apple iPhone 13 backup never set in the first place!

The Bottom Line
There are four ways to fix the problem if iTunes keeps asking for your Apple iPhone 13 backup password. The first method is to try all the passwords you use on your Apple iPhone 13. You can try finding the password from Keychain on macOS if this does not work. Another option is to “Reset All Settings” on your Apple iPhone 13.
Lastly, Dr.Fone-Screen Unlock is a program that can help you bypass the passcode and get into your backups. So, what are you waiting for? It’s time to avoid the problem of iTunes backup password never set.
How to Unlock Disabled Apple iPhone 13/iPad Without Computer
Forgetting the Apple iPhone 13 or iPad passcode could be the worst nightmare for plenty of iOS users. If you are also locked out of your Apple iPhone 13, then don’t worry. There are several ways to learn how to unlock a disabled Apple iPhone 13 without a computer. Surprisingly, you don’t need to take the assistance of a computer to unlock your iOS device. This guide will make you familiar with how to unlock the iPad passcode without a computer. Read on and learn how to unlock the disabled Apple iPhone 13 without a computer right away.
Part 1: How to unlock disabled Apple iPhone 13 without computer using Siri?
Accessing Siri is the first thing that comes to iOS users’ minds whenever they get locked out of their Apple iPhone 13 . It might surprise you, but you can also take the assistance of Siri to unlock your phone. Most users prefer this technique, as it doesn’t require a computer and can unlock an iOS device without erasing its data.
Though, before you proceed, you need to know the limitations of this method. Since it is considered a loophole in iOS, it doesn’t always yield desirable results. It has been observed that the method only works on devices running from iOS 8.0 to iOS 10.1. To learn how to unlock iPad passcode without a computer, follow these stepwise instructions:
Step 1. Activate Siri on your iOS device by holding the Home button. Ask for the present time by giving a command like “Hey Siri, what time is it?” to proceed. Siri will let you know the current time by displaying a clock. Tap on it.

Step 2. Tap on the Add (plus) icon.

Step 3. From here, you can search for a city. Just type anything you want and tap again to get various options. Choose the “Select all” button to get more options.

Step 4. Select the feature of “Share.”

Step 5. Tap on the message icon.

Step 6. It will open another interface to draft a new message. Wait for a while and write something in the “To” field. Once you are done, tap on the return button on the keyboard.

Step 7. This will highlight your text in green. Now, tap on the add icon located nearby.

Step 8. A new interface would be launched to add a new contact. From here, tap on the “Create New Contact” button.

Step 9. Instead of adding information regarding a new contact, tap on the photo icon, and choose the option of “Add Photo.”

Step 10. This will open your device’s gallery. You can browse your photo library from here.

Step 11. After a while, press the Home button. If everything goes right, you will enter the Home screen of your iOS device after unlocking it.

By following this technique, you would also learn how to unlock the disabled Apple iPhone 13 4. Though, you need to ensure that the iOS device you are using would support this feature.
Part 2: How to unlock disabled Apple iPhone 13 using Find My Apple iPhone 13?
The chances are that your iOS device might not work with the above-stated solution, or it’s latest iOS version. Therefore, you would be required to take the assistance of another method to unlock your device. With the help of Apple’s official Find My Apple iPhone 13 service, you can easily restore your device remotely. It is also used to locate an iOS device, play a sound, and lock it remotely.
After implementing this solution, your iOS device will reset, and your data would be erased. Nevertheless, in the end, it will automatically reset its lock as well. Follow these steps:
Step 1. Open iCloud’s website on any other handheld device of your choice. Not just your system, you can open the website on any other smart device as well. Use your Apple ID and password to log in to your iCloud account.
Step 2. Visit the Find My Apple iPhone 13 service. Under the “All Devices” category, you can view all the iOS devices linked to your Apple ID. Select the Apple iPhone 13 device you want to reset.

Step 3. Select the feature of the Erase device and confirm your choice. Wait for a while as your Apple iPhone 13 or iPad would be restored remotely.

By following this method, you can learn how to unlock the iPad passcode without a computer remotely.
Part 3: Unlock disabled Apple iPhone 13/iPad using Dr.Fone - Screen Unlock?
Dr.Fone can help you to remove the screen from the disabled Apple iPhone 13 or iPad. It can also unlock the Apple ID after you forgot the Apple ID email or password.
- Easy operations to unlock the Apple iPhone 13 without the passcode.
- Removes the Apple iPhone 13 lock screen without relying on iTunes.
- Works for all models of Apple iPhone 13, iPad, and iPod touch.
- Fully compatible with the latest iOS 14.


Step 1. Install Dr.Fone on your computer.
Step 2. Open ‘Screen Unlock’. Select ‘Unlock iOS Screen.’
Step 3. Follow the on-screen instruction.
Boot your Apple iPhone 13 into DFU mode.

Select device information on Dr.Fone

Step 4. Start to Unlock. The phone will be unlocked after that.

Part 4: Tips to protect your Apple iPhone 13 from being unlocked by thieves
As you can see, anyone can learn how to unlock the disabled Apple iPhone 13 4 without a computer and other iOS devices as well. Therefore, if you don’t want your Apple iPhone 13 and iPad to be misused by thieves, you should take some added measures. Follow these suggestions to increase security on your iOS device.
1. Disable Siri from the lock screen
If someone can’t access Siri from the lock screen, then they won’t be able to follow the above-mentioned process to unlock an iOS device. Therefore, it is highly recommended to disable Siri from the lock screen. To do this, visit your device’s Settings > Touch ID & Passcode, and under the “Allow access when locked” section, disable the option of “Siri.”

2. Enable Find My Apple iPhone 13 service
There are times when users forget to enable the Find My Apple iPhone 13 feature on their iOS device. To access this feature, make sure that it is turned on. To do this, go to your device’s Settings > iCloud > Find My Apple iPhone 13 and turn on the feature of “Find My Apple iPhone 13.” Additionally, you should turn on the “Send the last location” option as well.

3. Set a strong alphanumeric password
One of the best ways to secure your iOS device is by adding secure passwords. To do this, visit your device’s Settings > Touch ID & Passcode > Change Passcode and select the option of “Custom Alphanumeric Code.” Provide a strong alphanumeric passcode to boost the security of your device.

Conclusion
By implementing the above suggestions, you can easily make your iOS device more secure. Additionally, we have also listed two stepwise solutions that can unlock your iPad or Apple iPhone 13 without taking the assistance of a computer. Now when you know how to unlock a disabled Apple iPhone 13 without a computer, you can easily make the most out of your iOS device.
How To Remove Flashlight From Apple iPhone 13 Lock Screen
Ever wonder why the flashlight shows up on your Apple iPhone 13 lock screen? Especially when it happens in your pocket or while you’re holding it. If you, like many, accidentally turn it on and drain your battery, no need to worry.
While you can’t remove it, figuring out how to remove flashlight from iPhone lock screens is a common question. This guide shares several ways to prevent accidental activations and save your device’s battery. Keep reading for easy solutions to take charge of your Apple iPhone 13’s lock screen and make it work better for you.

Part 1: How To Remove Flashlight From iPhone Lock Screens?
You can’t remove the shortcuts like the flashlight icon from an iPhone lock screen. These are built-in features, and Apple doesn’t currently offer an option to disable them. However, there are some workarounds to make the flashlights less accessible and avoid turning them on accidentally. You can turn off Tap to Wake, Raise to Wake, remove the flashlight icon from the control center, and turn off the Back Tap shortcut.
Find out the steps below.
Quick Fix No. 1: Turn Off Tap To Wake
Tap to Wake lets you light up your Apple iPhone 13 screen with a simple tap. It’s handy, but there’s a catch – tapping near the bottom right corner might accidentally turn on the flashlight icon. The Tap to Wake feature can be troublesome, especially in the dark, when you don’t want any unexpected brightness.
Turning off the Tap to Wake feature is not directly related to the issue of iPhone users wanting to remove the flashlight from lock screens. However, adjusting settings like Tap to Wake can be part of customizing the overall user experience on an iPhone. When turned off, the screen won’t light up with a tap, reducing the likelihood of accidentally triggering the flashlight.
Here is how to turn off the Tap to Wake feature:
- Step 1: Go to Settings or General > Accessibility on your Apple iPhone 13 device.
- Step 2: Toggle off Tap to Wake.

Quick Fix No. 2: Turn Off Raise To Wake
With “Raise to Wake” enabled, simply picking up your phone can activate the lock screen. Consequently, the flashlight icon becomes more susceptible to accidental touches. To address this, turning off this feature stops the screen from waking when you lift your Apple iPhone 13. By doing so, it becomes less likely that you’ll accidentally turn on the flashlight when you pick up your iOS device.
Here is how to remove flashlights from iPhone lock screens when not needed:
- Step 1: Head to Settings > Display & Brightness on your iOS device.
- Step 2: Toggle off the Raise to Wake option.

Quick Fix No. 3: Remove the Flashlight From the Control Center
The Control Center on iPhones is a quick-access panel. You can access it by swiping down from the top right corner of your screen. There, you can control various settings, like the flashlight. If you remove it, the flashlight becomes less accessible from the lock screen. Follow these steps to remove the flashlight from the control center:
- Step 1: Open the Settings app and navigate to Control Center.
- Step 2: Tap on Customize Controls, then find the Flashlight icon.
- Step 3: Tap the red minus (-) sign next to the Flashlight icon.
- Step 4: Tap Remove to confirm deleting the Flashlight icon from the Control Center.

Quick Fix No. 4: Turn Off Back Tap Shortcut
Back Tap on the Apple iPhone 13 lets you set actions for double or triple taps on the back. One of these actions is turning on the flashlight. If you often tap your phone’s back, you might accidentally activate the flashlight. Turning off the Back Tap for the flashlight prevents these accidental activations.
Although the flashlight icon remains on the lock screen, you won’t accidentally turn it on by hitting the back of your phone. Here’s how to disable the Back Tap for the flashlight shortcut:
- Step 1: Go to Settings > Accessibility > Touch > Back Tap.
- Step 2: Select the Double Tap or Triple Tap option you’re using for the flashlight shortcut.
- Step 3: Choose None instead of the currently assigned action, which might be Flashlight.

Part 2: How To Turn Off the Flashlight on iPhone?
Now, let’s address turning off the flashlight on your Apple iPhone 13. Even if you’ve applied Part 1’s solutions, knowing how to switch off the flashlight is crucial. In this section, you’ll learn how to turn the light off on iPhone devices.
Method No. 1: Turn Off the Flashlight in the Control Center
You can’t remove the flashlight icon from the lock screen, but you can still turn it off easily. Just swipe down from the upper-right corner or swipe up from the bottom (for iPhones with a Home button). Then, follow these steps to discover how to turn off the flashlight on your Apple iPhone 13: Here’s how to do it.
- Step 1: Find the flashlight icon in the Control Center. It’s usually located in the bottom left corner.
- Step 2: Tap on the flashlight icon once to turn it off. The icon will turn gray, indicating the flashlight is deactivated.

This method is fast and convenient, especially if you’ve kept the flashlight icon in the Control Center. Plus, it works regardless of how the flashlight was activated, even if it was an accidental tap on the lock screen.
Method No. 2: Use Siri To Turn Off Flashlight
To go hands-free and avoid accidental taps, you can use Siri to turn off the flashlight. For those who favor a hands-free approach, it offers an alternative method, particularly if you haven’t customized the Control Center. Here’s how to turn off the flashlight with Siri on your Apple iPhone 13:
- Step 1: Say “Hey Siri” or press and hold the power button (or Home button on older iPhones) to activate Siri.
- Step 2: Give the commands saying, “Turn off the flashlight.”
- Step 3: Siri will confirm your request and turn off the flashlight. You’ll hear a voice cue and see the flashlight icon on your screen dim.

Remember, even with Siri, ensure your Apple iPhone 13’s microphone isn’t covered or blocked for successful voice recognition.
Bonus Part: Easily Unlock Your Apple iPhone 13 Without a Password
Removing the flashlight shortcut avoids accidentally activating the Apple iPhone 13 flashlight. But what if you forget your lock screen passcode and need to access your Apple iPhone 13? That’s where Wondershare Dr.Fone Screen Unlock (iOS) comes in, offering a powerful toolkit for regaining access to your locked iOS device.
This software effortlessly bypasses any lock screen, so you can access your data in a few steps. Dr.Fone works seamlessly with the latest iOS versions and devices, providing a dependable safety net for iPhone users.
Key Features:
- If you’ve forgotten your phone’s password or bought a second-hand device, here’s how Dr.Fone can help you:
- Bypasses various lock screen types like pattern, 4 or 6-digit passcode, Touch ID, and Face ID without the original passcode.
- Removes iCloud Activation Lock on a used or lost iPhone/iPad, allowing it to be set up with a new Apple ID.
- Offers a simple, intuitive interface with clear instructions.
Forgotten passcodes and iCloud Activation Lock can leave you feeling shut out. To address this issue, here’s a step-by-step guide using Dr.Fone Screen Unlock (iOS):
- Step 1: Download and install Dr. Fone’s desktop app on your computer. Make sure you get the latest version for optimal compatibility. Launch the app and select the Screen Unlock option from the Toolbox homepage.
- Step 2: Select iOS as the Apple iPhone 13 device type. Then, within the Screen Unlock window, select Unlock iOS Screen to begin the process.

- Step 3: Click Start to remove the iOS screen lock.

- Step 4: Get your Apple iPhone 13 and a USB cable. Connect the phone to your computer and wait for Dr.Fone to recognize it. Next, put your Apple iPhone 13 into Recovery Mode using specific button combinations for your model.
- Step 5: Check your Device Model, select the System Version you need from the dropdown list, then click Start.
- Step 6: Dr.Fone will download and install the latest iOS firmware on your device. Then, click Unlock Now once the firmware is ready. Follow the on-screen instructions to continue unlocking your device.

- Step 7: Once the process is complete, Dr.Fone will notify you. Your Apple iPhone 13 should be unlocked and ready for you to set it up again with your preferred settings and Apple ID.
Conclusion
Resolving the issue of how to remove flashlight from iPhone lock screens is attainable with these workarounds. Turning off Tap to Wake and Raise to Wake reduces accidental activations. Customizing the Control Center and Back Tap allows precise accessibility adjustments.
Additionally, learn how to turn off the flashlight using straightforward methods: either through the Control Center or by instructing Siri to do so. These solutions ensure a personalized lock screen experience, minimizing unwanted light disruptions.
And if ever locked out with the flashlight on, consider Dr.Fone Screen Unlock. This powerful tool bypasses various screen locks, including passcodes, Face IDs, and Touch IDs. Dr.Fone remains a valuable safety net for unexpected moments while fixing your iOS device. Customize your Apple iPhone 13 lock screen settings with these tips for a seamless experience.
Tips: Are you searching for a powerful Screen Unlock tool? No worries as Dr.Fone is here to help you. Download it and start a seamless unlock experience!
Also read:
- [New] 2024 Approved Satirical Shots Reimagined The Best Online/iOS/Android Tools
- [New] Crafting Engaging Instagram Reels Step-by-Step
- [New] High-End Audio Gear The Top 9 Mic Recorders Online in '23 for 2024
- [Updated] In-Depth Review VR's Winning Features & Faults
- [Updated] Ultimate Guide Hitting the Slopes with Excellent Cams for 2024
- 10 - Uncover the Hidden Details
- 3 Easy Ways to Factory Reset a Locked Apple iPhone 12 Pro Max Without iTunes
- 4 Ways to Unlock iPhone 7 Plus to Use USB Accessories Without Passcode
- Capture Screens in Windows 8 4 Methods
- How To Fix Apple iPhone 7 Unavailable Issue With Ease
- How to Fix iPhone 14 Plus Passcode not Working?
- How To Open Your iPhone 13 mini Without a Home Button
- In 2024, Detailed Review of doctorSIM Unlock Service For Apple iPhone SE (2020)
- In 2024, Grid Artistry at Its Peak The Definitive 10 for Insta Posts
- Reset iTunes Backup Password Of iPhone SE (2022) Prevention & Solution
- Simple Fix for 'USB Device Not Recognized': Get Back to Business!
- Trouble with Apple iPhone XR Swipe-Up? Try These 11 Solutions
- Title: iPhone 13 Backup Password Never Set But Still Asking? Heres the Fix
- Author: Sophia
- Created at : 2024-12-06 17:00:52
- Updated at : 2024-12-12 17:09:24
- Link: https://ios-unlock.techidaily.com/iphone-13-backup-password-never-set-but-still-asking-heres-the-fix-by-drfone-ios/
- License: This work is licensed under CC BY-NC-SA 4.0.