
Trouble with iPhone 8 Plus Swipe-Up? Try These 11 Solutions
Trouble with Apple iPhone 8 Plus Swipe-Up? Try These 11 Solutions
Part 1: Why Is My iPhone Screen Not Swiping?
The iPhone’s swipe-up gesture serves as a fundamental navigation tool. It allows users to access various functions and features swiftly. Yet, when this functionality encounters issues, it can be perplexing and disruptive. That’s why learning the reasons behind I can’t swipe up on my iPhone is essential. Summarized below are some of the common reasons behind frozen swipe-up issues:
1. Software Glitches
Updates or software bugs can occasionally interfere with the swipe-up gesture. It leads to unresponsiveness or delays.
2. Touch Screen Calibration
Sometimes, the touch screen may need recalibration. This can cause the swipe-up feature to become unresponsive.
3. Physical Damage
Physical damage, like heavy falls, can impact the phone’s touch sensitivity. Moreover, it affects swipe gestures as a result.
4. Full Memory or Background Apps
Insufficient memory or many background apps running simultaneously can overload the Apple iPhone 8 Plus device. This leads to performance issues, including unresponsive gestures.
5. Water Exposure
Sudden exposure to moisture or water damage can also cause the screen to malfunction. This can cause the screen to become unresponsive, leading to swipe-up issues.
Part 2: 11 Ways To Fix iPhone Swipe up Not Working
Encountering an unresponsive swipe-up gesture on your Apple iPhone 8 Plus can be exasperating. However, you no longer need to worry. There are numerous troubleshooting techniques available to address this problem. Explained below are the 11 effective ways to address the problem:
Fix 1. Fix iOS System Error Without Data Loss: Dr.Fone – System Repair (iOS)
Wondershare Dr.Fone - System Repair (iOS) is a reliable solution designed to resolve iOS system issues. It also includes unresponsive gestures like the swipe-up problem on iPhones. This tool specializes in repairing iOS system errors without causing data loss. It offers a comprehensive solution for resolving iOS system issues conveniently from home. With this tool, you can address over 150 iOS system problems.
![]()
Dr.Fone - System Repair (iOS)
Repair iOS System Errors Without data loss.
- Only fix your iOS to normal, no data loss at all.
- Fix various iOS system issues stuck in recovery mode , white Apple logo , black screen , looping on start, etc.
- Downgrade iOS without iTunes at all.
- Works for all models of iPhone, iPad, and iPod touch.
- Fully compatible with the latest iOS version.


3981454 people have downloaded it
These include the Apple logo, boot loop, and the 1110 error, among others. It enables you to downgrade or update iOS versions without needing to jailbreak your device. Additionally, it allows you to enter or exit DFU and Recovery Mode at no cost.
Key Features of Wondershare Dr.Fone
- This user-friendly iOS system repair solution doesn’t typically lead to data loss.
- It doesn’t require users to have advanced technical skills to operate it.
- Wondershare Dr.Fone is compatible with all iPhone, iPad, and iPod Touch models, regardless of the iOS version.
Steps to Fix iPhone Swipe up Not Working via Wondershare Dr.Fone
Here’s how to use Wondershare Dr.Fone to address the swipe-up not working on iPhone problem:
Step 1: Initiate System Repair with Dr.Fone
After successfully downloading Dr.Fone on your device, navigate towards the left side panel and click “Toolbox.” From the many options appearing on the main window, select “System Repair.” Then, establish a connection between your iOS and your current device.

Step 2: Opt for iOS Restoration and Enable Recovery Mode
Select the Apple iPhone 8 Plus device type from the available options and select “iPhone.” From the new window, select “iOS Repair,” and following that, select “Standard Repair.” Now, follow the instructions available and enable recovery mode for your iOS.

Step 3: Select iOS Firmware to Initiate the Repair Process
After that, you’ll reach a window showing different iOS firmware alternatives. Pick any as per your preferences and click “Download.” Once the download is complete, click “Repair Now” and “Done” to end the repair process.

Fix 2. Force Restart iPhone
Performing a force restart, also known as a hard reset, can troubleshoot minor software glitches. These can cause unresponsive swipe-up issues on your Apple iPhone 8 Plus. Here’s a guide on how to perform a force restart on various iDevice models to fix the iPhone won’t swipe up:
For iPhone 8 and Later Devices
Instructions: Begin by moving your finger towards the left side of your Apple iPhone 8 Plus and tap on the “Volume Up.” Then, release the button after some points. Proceed similarly with the “Volume Down” button. Then, navigate towards the right side and press the “Side” button there. Keep on forcing the “Side” button up until the screen shows the Apple logo. This will indicate that a force restart is initiated.
For iPhone 7 Series
Instructions: Begin by reaching both sides of your Apple iPhone 8 Plus at once. Press the “Volume Down” button situated on the left side using your left hand while simultaneously using your right hand to press the “Sleep/Wake” button on the right side. Stay firm with the grip on both buttons and release them when you see the signature Apple logo glowing on the screen. This will indicate that the force restart operation has been successful.
For iPhone 6 and Older Devices
Instructions: To restart your Apple iPhone 8 Plus 6, press the “Wake/Sleep” button on the top edge of the phone. Hold the other “Home” button at the bottom center screen of the phone. Continue holding the buttons until the Apple logo becomes visible on the display. Then, press the “Wake/Sleep” button and the “Home” button.

Fix 3. Remove the Cover or Case
Sometimes, an unresponsive swipe-up gesture on your Apple iPhone 8 Plus could be due to interference caused by a protective cover or case. The cover might be too thick, improperly aligned, or interfering with the touch sensitivity of the screen. Gently remove the protective cover or case from your Apple iPhone 8 Plus. Inspect the screen for any dust, debris, or smudges while the cover is removed. Utilize a clean, soft cloth to wipe the screen.
Fix 4. Clean iPhone Screen or Remove Screen Protector
An unresponsive swipe-up gesture on your Apple iPhone 8 Plus might be due to dirt, smudges, or interference caused by a screen protector. Power off your Apple iPhone 8 Plus to prevent accidental taps during the cleaning process. Carefully clean the screen by softly rubbing it with a fresh and dry microfiber cloth. In addition, ensure the cloth is soft and free from any debris that might scratch the screen.
Fix 5. Activate Control Center Access on the Lock Screen
If your Apple iPhone 8 Plus swipe-up gesture isn’t working specifically on the lock screen to access the Control Center, it might be due to settings restricting its accessibility. Enabling Control Center access on the lock screen allows you to swipe up from the bottom edge. Follow these steps to ensure Control Center access is enabled on the lock screen and fix the iPhone swipe up not working:
Step 1. On your iOS device, access the “Settings” app and launch it. Now scroll down to find and tap “Face ID & Passcode.”

Step 2. Head to the “Allow Access When Locked” section, toggle on the “Control Center” switch, then return to the lock screen to verify if the problem has been resolved.

Fix 6. Enable Control Center Within Apps
Are you experiencing issues with accessing the Control Center via the swipe-up gesture while using certain apps? If yes, ensuring that Control Center access is enabled within apps is essential. It ensures that the swipe-up gesture from the bottom edge of the screen functions. Here’s how to enable Control Center access within apps:
Instructions: Navigate to Settings on your Apple iPhone 8 Plus and access “Control Center.” On the following screen, activate the toggle next to “Access Within Apps.” It will allow you to access the Control Center when using apps.

Fix 7. Update to the Latest iOS Version
Running an outdated iOS version can sometimes lead to various software issues. These include unresponsive gestures like the swipe-up function on your Apple iPhone 8 Plus. Updating your device to the latest iOS version can often resolve such problems. Here’s how to check for and update your Apple iPhone 8 Plus to the latest iOS version:
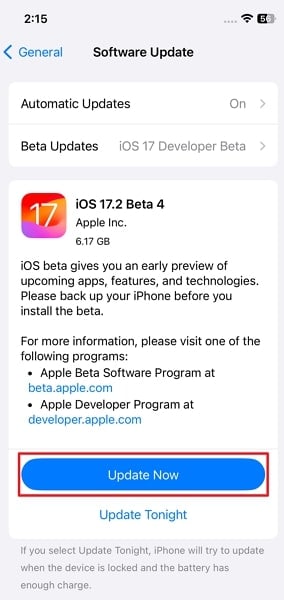
Step 1. Unlock your Apple iPhone 8 Plus and open the “Settings” app to access “General” settings. Simply touch the “Software Update” option to verify if an update is accessible.

Step 2. If an update is available, press the “Update Now” button to commence the updating process. During the process, make sure to follow the prompts carefully to avoid issues.
Fix 8. Turn Off VoiceOver
VoiceOver is an accessibility feature on iPhones. It assists users with visual impairments by providing spoken feedback for actions on the Apple iPhone 8 Plus device. Sometimes, VoiceOver settings can interfere with normal touchscreen gestures like the swipe-up function. Here’s how to turn off VoiceOver to resolve iPhone 13 won’t swipe up to unlock:
Step 1. You will need to open the Settings app and scroll down to select the “Accessibility” menu. There, tap “VoiceOver” to get access to the “VoiceOver” settings.

Step 2. On the following screen, toggle off the “VoiceOver” switch if it is enabled. Afterward, check if the swipe-up gesture issue is resolved.

Fix 9. Customize Touch Accommodations
Touch Accommodations is an accessibility feature on iPhones. It is designed to modify touch sensitivity and enhance touchscreen interactions for users. Customizing these settings might resolve issues with unresponsive gestures like the swipe-up function. Here’s how to customize Touch Accommodations to fix the Apple iPhone 8 Plus 12 won’t swipe up to unlock:
Step 1. Move to the “Accessibility” settings of your Apple iPhone 8 Plus and select “Touch.” On the following screen, scroll down and tap “Touch Accommodations.”

Step 2. Now, first, enable the “Touch Accommodation” option from the top of the next screen. Then, scroll down and set the “Tap Assistance” option to “Use Initial Touch Location.”

Fix 10. Turn Off Reduce Motion
Reduce Motion is an accessibility setting on iPhones designed to reduce animations and visual effects. It is particularly for users sensitive to motion effects. However, enabling this feature might affect certain gestures or animations on the Apple iPhone 8 Plus device. Thus potentially causing issues with the swipe-up function. Here’s how to turn off Reduce Motion to fix the iPhone 11 won’t swipe up to unlock:
Step 1. Go through your iOS device Settings to open the “Accessibility” tab. Here, find and tap the “Motion” option to proceed.

Step 2. Now, on the following screen, turn off the toggle next to the “Reduce Motion” option. Then, go and check if the swipe-up gesture issue is fixed or not.

Fix 11. Reset iPhone All Settings
Resetting all settings on your Apple iPhone 8 Plus can help resolve software-related issues. It can help remove conflicts that might be affecting the swipe-up gesture. Note that this action will reset all settings on your device, but it won’t delete your data. Here’s how to reset all settings to fix iPhone swipe not working:
Step 1. Go to your device’s “General” settings and scroll down to tap the second last option, “Transfer or Reset iPhone.” On the following screen, press “Reset” from the available two options.

Step 2. Now, choose “Reset All Settings” from the pop-up options and confirm it by providing the passcode. Then, wait for a few moments as your Apple iPhone 8 Plus is restored to its original settings.

Part 3: Unlock iPhone Without Swiping Up
Encountering swipe not working on iPhone can sometimes lead to difficulties. This is especially the case in unlocking the Apple iPhone 8 Plus device or accessing essential functions. In such scenarios, using Wondershare Dr.Fone - Screen Unlock (iOS) provides a reliable solution. It bypasses the swipe-up need and regains access to your Apple iPhone 8 Plus without relying on the problematic gesture. This tool offers a solution to unlock iPhone/iPad devices without the passcode.
Dr.Fone - Screen Unlock (iOS)
Unlock iPhone/iPad Lock Screen Without Swiping Up.
- Simple, click-through, process.
- Unlock screen passwords from all iPhones and iPads.
- No tech knowledge is required, everybody can handle it.
- Supports iPhone 15 / iPhone 14 / iPhone 13 / 12, iPhone 11, … and the latest iOS version fully!
4,395,216 people have downloaded it
It allows the removal of various lock screens present on iPhone, iPad, and iPod touch. Additionally, it provides the capability to bypass the iCloud activation lock. Users can also bypass MDM and screen time restrictions without experiencing any data loss.
Key Features of Wondershare Dr.Fone
- This software is compatible with the latest iOS 17 and iPadOS 17, including iPhone 15 models.
- The unlocking process involves a simple 3-step procedure.
- With it, you can remove Apple ID from your device without the password.
Steps To Unlock iPhone Without Swiping Up via Wondershare Dr.Fone
You can use the simple steps explained below to unlock your Apple iPhone 8 Plus and fix the Apple iPhone 8 Plus 11 swipe-up not working:
Step 1: Connect Your Device and Choose Unlock iOS Screen
Upon downloading and installing Wondershare Dr.Fone onto your computer, access the “Toolbox” menu. Here, proceed to select “Screen Unlock” followed by “iOS.” Within this window, choose the “Unlock iOS Screen” option to proceed with unlocking your iOS device’s screen. Subsequently, connect your Apple iPhone 8 Plus and click Start to initiate the unlocking process.
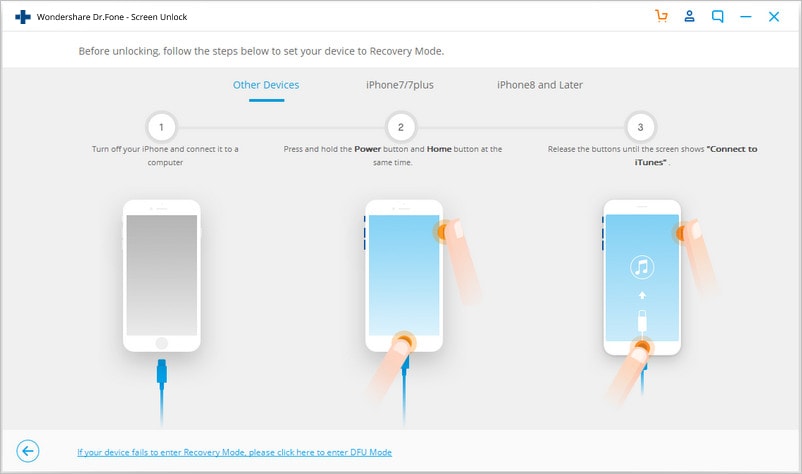
Step 2: Ensure Your Device is in Recovery Mode
Now, adhere to the on-screen prompts provided to enter Recovery Mode based on the specific model of your iDevice. Then, the platform automatically recognizes and exhibits the Apple iPhone 8 Plus device Model. If necessary, change the model and choose the system version as per your preferences. Upon completion, click on “Start” to continue the process.

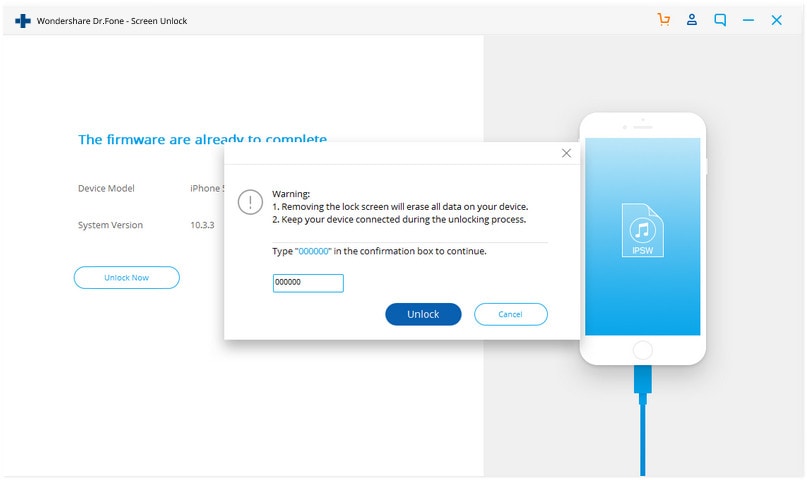
Step 3: Unlock Your iOS Device Successfully
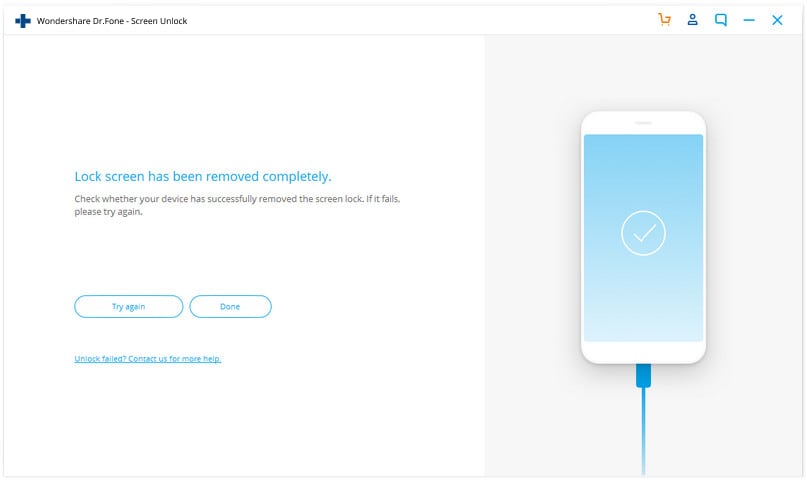
Once the iOS firmware has been successfully downloaded, it undergoes verification. Proceed by selecting the “Unlock Now” button to initiate the unlocking process. A prompt window will emerge on the screen, requesting confirmation of the process. Enter the code and tap “Unlock” to proceed to the final step. Upon successfully unlocking the iDevice, click the “Done” button to finish the process.

Conclusion
Having trouble with swipe up not working on an iPhone can be annoying. It stops you from using important stuff and moving around your phone quickly. This guide has lots of ways to fix it. We’ve covered simple things like restarting your Apple iPhone 8 Plus and cleaning the screen, as well as more complex stuff like changing settings and using unique options for accessibility. These fixes can help make the swipe-up gesture work again.
We’ve also talked about a helpful tool called Wondershare Dr.Fone. It’s made to fix problems with the lock screen, including issues with swiping on your Apple iPhone 8 Plus. Moreover, Dr.Fone - Screen Unlock lets you get into your Apple iPhone 8 Plus even when gestures aren’t working properly.
Locked Out of Apple iPhone 8 Plus? 5 Ways to get into a Locked Apple iPhone 8 Plus
Is your Apple iPhone 8 Plus locked, and can’t seem to remember its passcode? If your response is “yes,” then you’re in. It might surprise you, but there are a lot of ways to get into a locked Apple iPhone 8 Plus. To help our readers, we have come up with this extensive post, covering different techniques for taking the lock off Apple iPhone 8 Plus. Follow these expert suggestions and unlock your iOS device when you are locked out of your Apple iPhone 8 Plus.
Part 1: How to get into a locked Apple iPhone 8 Plus with Dr.Fone?
If you are locked out of Apple iPhone 8 Plus, you should only use a reliable and secure way to unlock it. The chances are that the above-mentioned technique might not work on your device. Hence, you can use Dr.Fone - Screen Unlock for help to unlock your phone. Compatible with almost all iOS devices, its desktop application runs on Mac and Windows. One can learn how to get into a locked Apple iPhone 8 Plus by following these instructions.
Attention: All your data all be erased after you get into your locked Apple iPhone 8 Plus.Please make sure if you have backed up all your data.
Dr.Fone - Screen Unlock
Get Into Locked Apple iPhone 8 Plus In 5 Minutes!
- No special skills are required to get into a locked Apple iPhone 8 Plus.
- Unlock the iDevice effectively whether it is disabled or nobody knows its passcode.
- Works properly whether if you’re using Apple iPhone 8 Plus, iPad, and iPod touch.
- Fully compatible with the latest iOS.
4,395,216 people have downloaded it
You can watch the video below about how to unlock your Apple iPhone 8 Plus without Password, and you can explore more from Wondershare Video Community .
Step 1. Download Dr.Fone - Screen Unlock, install it on the computer, and launch it whenever you need to unlock your phone. Choose the option of “Screen Unlock” from the main screen.
Step 2. Connect your device with a computer. Afterward, choose the “Unlock iOS Screen” to get started.

Step 3. Then on the next screen, this tool will prompt you to enter the DFU mode to continue.
Step 4. Provide the essential details about your phone in the next window and Download the firmware update.

Step 5. Wait a moment until the download process is done, and then click on the “Unlock Now” button to activate the process.
Step 6. There will be a warning message showing up. Just confirm it by entering the on-screen code.
Step 7. Let the application resolve the issue on your phone. Once it is done, you will be notified that your lock screen is removed.
Part 2: How to get into a locked Apple iPhone 8 Plus with iTunes?
This is another popular way to resolve the locked out of the Apple iPhone 8 Plus problem. It can get a little complicated to start with, but in the end, your data would be erased. On Mac with macOS Catalina, you need to open Finder. On Windows PC and Mac with other macOS, you can use iTunes. Implement the following steps to restore your Apple iPhone 8 Plus.
Step 1. Connect your Apple iPhone 8 Plus to the computer.
Step 2. Enter the Recovery Mode.
- For Apple iPhone 8 Plus 8 and 8 Plus and later: Press and quickly release the ‘Volume Up’ button. Press and quickly release the ‘Volume Down’ button. Keep the Side (Top) button until the Recovery-mode screen appears.
- For Apple iPhone 8 Plus 7 and 7 Plus, iPod Touch (7th generation): Press and hold the ‘Top’ (‘Side’) and ‘Volume Down’ buttons simultaneously. Keep holding until it enters the Recovery mode.
- For iPad with Hom buttons and Apple iPhone 8 Plus 6s and former Apple iPhone 8 Plus: Press and hold the ‘Home’ and ‘Side’ (‘Top’) buttons at the same time. Keep holding both buttons until the iTunes symbol would appear on the screen.

Step 3. Click on the “Restore” button. This would reset your device.

Part 3: How to get into a locked Apple iPhone 8 Plus via Find My Apple iPhone 8 Plus?
Apple’s official Find My Apple iPhone 8 Plus is a smart and hassle-free way to locate your lost Apple iPhone 8 Plus or reset it remotely. All you need to remmber is your Apple ID and password. To use this method, preconditions are: Find My Apple iPhone 8 Plus is enabled and internet network is available. Follow these instructions to reset your Apple iPhone 8 Plus:
Step 1. Log in to iCloud’s website using your Apple ID and password. Visit the Find My Apple iPhone 8 Plus page and click on the “All Devices” option to view all the iOS devices linked to your Apple ID. Now, select the iOS device that is locked.

Step 2. This will provide various tasks that you can perform on the iOS device. Click on the “Erase Apple iPhone 8 Plus” button to reset the Apple iPhone 8 Plus device.

Part 4: How to get into a locked Apple iPhone 8 Plus with Siri?
If you don’t want to erase your device’s data while resolving this issue, you can use Siri. You should know that this is not an official fix and only works for limited iOS devices (iOS 8.0 to iOS 13). Ideally, it is considered a loophole in iOS, which can be exploited to fix a disabled phone. You can learn how to get in a locked Apple iPhone 8 Plus by implementing the following steps:
Step 1. To activate Siri, please long press your home button on the phone. Ask for the present time (by saying “Hey Siri, what time is it?”) and wait for its response. Now, tap on the clock icon.

Step 2. On the world clock interface, add another clock.

Step 3. The interface will ask you to search for a location of your choice. Type anything on the search tab and select it to get various options. Tap on the “Select all” text.

Step 4. A few added options will be displayed. Tap on “Share” to proceed.

Step 5. Out of all the options to share this text, select the Message app.

Step 6. A new interface will be opened from where you can draft a new message. Type anything in the “To” field and tap “return” from a keyboard.

Step 7. Then the text will be highlighted. Tap on the add icon.

Step 8. This will open another interface to add a new contact. From here, tap on the “Create new contact” option.

Step 9. Instead of adding a contact, tap on the photo icon and select the “Choose Photo” option.

Step 10. This will open the photo library on your phone. Visit an album or wait for a while.

Step 11. Now, press the home button. If nothing goes wrong, then you will enter the Home screen on your phone.

Conclusion
We hope that after learning how to get in a locked Apple iPhone 8 Plus in different ways, you would be able to resolve the issue on your iOS device. Choose the way you prefer and fix the locked out of the Apple iPhone 8 Plus problem. We recommend using Dr.Fone - Screen Unlock to get an easy fix to your issue without much trouble.
Complete Guide For Apple iPhone 8 Plus Lock Screen
Like most iPhone users, you rely on your lock screen to keep your data safe and protected. But with the release of iOS 17, there are a few new features and changes that you need to know about. This complete guide will clarify everything you need to know about the iOS 17 lock screen.
We’ll explain to you how to use the new features, protect your data, and more. So don’t waste any time - read on for all the details!
How to Have a Customized iOS 17 Lock Screen?
Before we get started, you should know that there are three ways to have a customized lock screen in iOS 17. Let’s get to know more about them.
1. How to select your favorite wallpaper
The first way is to use a pre-made wallpaper from the Apple Wallpaper Gallery.
To do this, go to Settings > Wallpapers & Brightness > Choose a New Wallpaper. Then, select the Apple Wallpaper Gallery and choose the image you want to use.
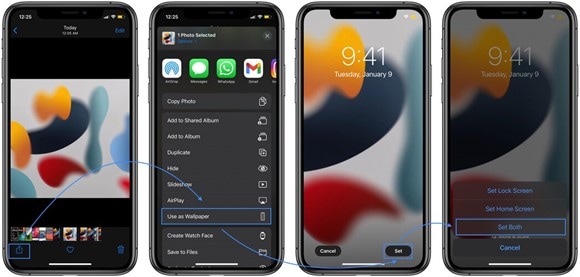
The second way to have a customized lock screen is to use a Live Photo. To do this, go to Settings > Wallpapers & Brightness > Choose a New Wallpaper. Then, select the Live Photo option and choose the image you want to use.
Note: You can only use Live Photos for your lock screen if your Apple iPhone 8 Plus is unlocked.
2. How to manage notifications
If you want to manage notifications on the iOS 17 lock screen, there are two ways to do it.
At first, you can go to Settings > Notifications. Here, you can choose how many notifications you want to see on your lock screen and which apps can send you notifications.
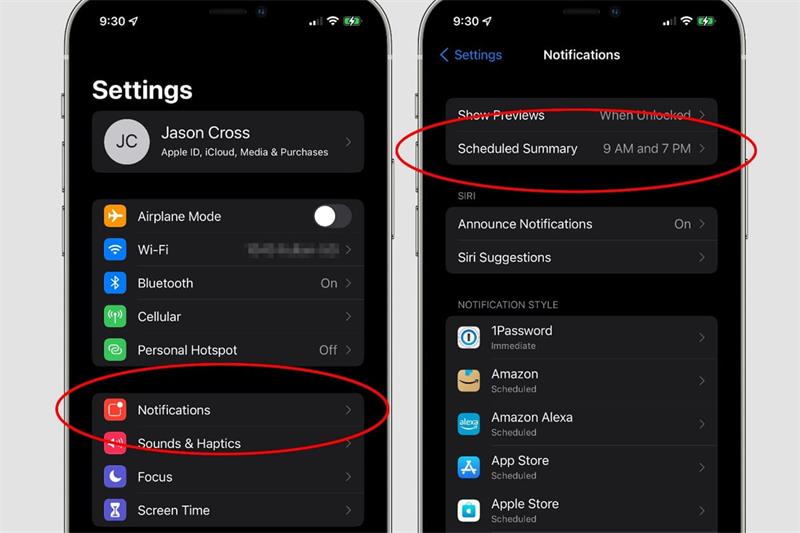
The Do Not Disturb feature is the second way to manage notifications. To do this, go to Settings > Do Not Disturb and enable the feature. You can also schedule when Do Not should turn on and off. This feature work like a charm if you want to silence all notifications at night.
3. How to set Auto-Lock time
If you want to set the Auto-Lock time, go to Settings > Display & Brightness > Auto-Lock. Here, you can choose how long it should take for your Apple iPhone 8 Plus to lock automatically.
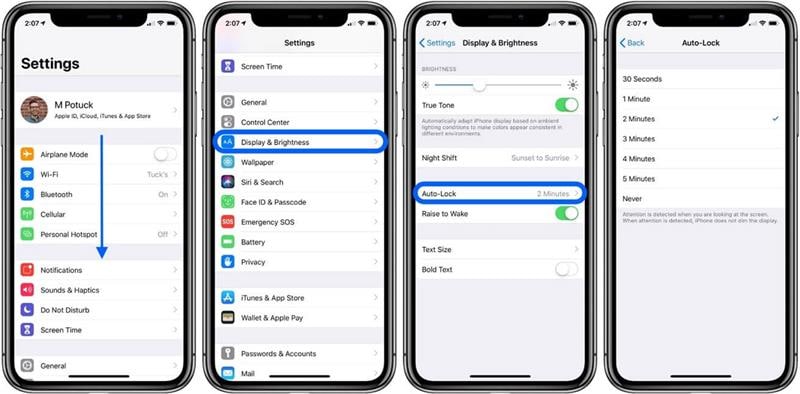
By default, the Auto-Lock time is set to 30 seconds. But you can choose to lock it immediately, after 1 minute, 5 minutes, or never.
How to Turn Off/On Lock Screen in iOS 17?
If you want to turn off the lock screen, go to Settings > Touch ID & Passcode (or Face ID & Passcode). Then, scroll down and disable the Unlock with Passcode (or Unlock with Face ID) option.
Enable the Unlock with Passcode (or Unlock with Face ID) to turn ON the lock screen.

But if you have forgotten your passcode, don’t worry. The next section will show you how to bypass the lock screen.
How to Bypass the iOS 17 Lock Screen Passcode?
Different methods can help you bypass the iOS 17 lock screen passcode. Let’s discuss them in detail.
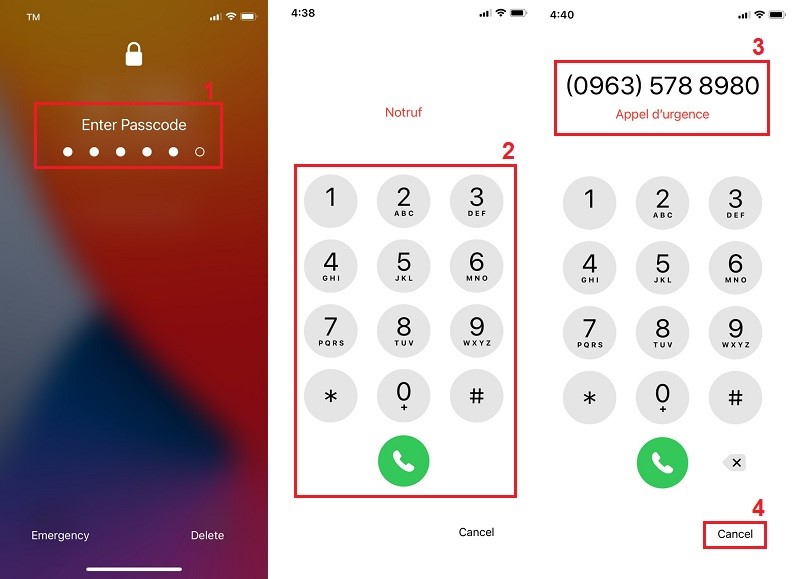
1. Use Emergency call
The first method to bypass the passcode is to use the emergency call feature.
To do this, access your device with five wrong passcodes attempts. This will trigger the emergency call feature. All you need to do is, dial an emergency number and then tap on the cancel button, and you’ll be taken to the home screen.
That’s how you bypass the lock screen without losing any data.
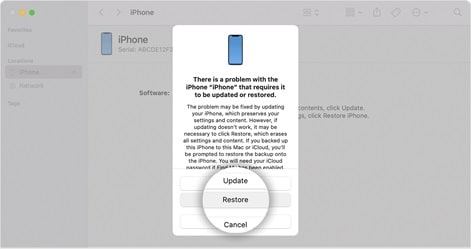
2. Bypass passcode with iTunes restore
If your Apple iPhone 8 Plus needs to be backed up with iTunes sync feature, you can use this method to bypass the passcode.
To do this, connect your Apple iPhone 8 Plus to a computer and open iTunes. Then, click the Restore button and follow the on-screen instructions to restore your Apple iPhone 8 Plus.
It will take some time, but you can use your Apple iPhone 8 Plus without a passcode once it’s done.
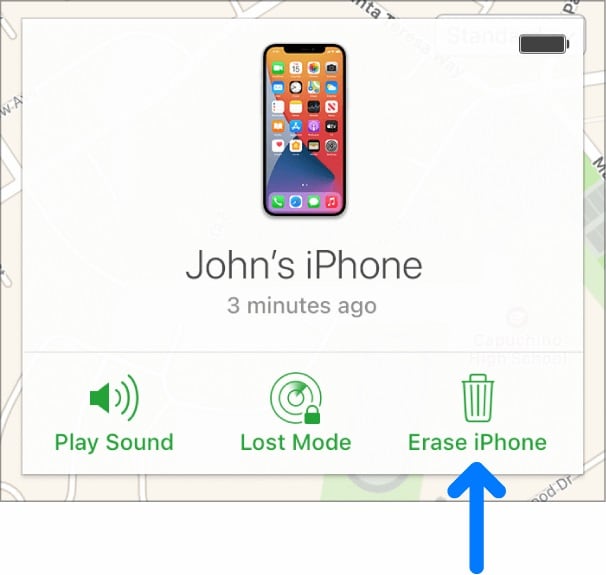
3. Use Find My in iCloud
If you have synced your Apple iPhone 8 Plus with iCloud, you can try the Find My feature to bypass the lock screen.
To do this, go to icloud.com/#find and sign in with your Apple ID. Then, select your device from the list of devices and click on the Erase button.
To do this, go to icloud.com/#find and sign in with your Apple ID. Then, select your device from the list of devices and click on the Erase button.
All the data will disappear on your Apple iPhone 8 Plus, and you’ll be able to access it without a passcode.
This process can also take some time, so be patient.
4. Dr.Fone-Screen Unlock
If all mentioned methods don’t work for you, the ultimate solution is to use Wondershare Dr.Fone-Screen Unlock and bypass the passcode. To finish it, you can follow the steps given below carefully.
Step #1: Download/Install Dr.Fone on your Computer or MacBook
A third-party tool named Dr.Fone-Screen Unlock can help you in this regard. The wonderful part is that you don’t have to learn any technical knowledge.
First, download/install Dr.Fone-Screen Unlock on your computer or MacBook. You can get it from here:
After downloading the tool, install launch it on your PC.
Step #2: Launch the Application and Go for Screen Unlock
Once you have installed the tool, launch it and go to its main window. Here, you will see different features. Select the Screen Unlock feature from the list.
Step #3: Connect your Apple iPhone 8 Plus and Activate DFU Mode
Now, you need to connect your Apple iPhone 8 Plus to the computer using an Apple original cable. Once done, you need to put your Apple iPhone 8 Plus into DFU mode.
To do this, you need to press and hold the Home button and Sleep/Wake button simultaneously for 10 seconds.
After that, release the Sleep/Wake button but keep holding the Home button until Dr.Fone detects your device in DFU mode.
Step #4: Download the Appropriate Firmware
Once Dr.Fone detects your Apple iPhone 8 Plus, it will ask you to continue. So, proceed to the next, and here you will be asked to download the correct firmware package for your device.
So, choose the firmware carefully and hit the download button.
Depending on your internet connection, you may have to wait for a longer time. But once the firmware is downloaded successfully, you can proceed to the next step.
Step #5: Unlock your Apple iPhone 8 Plus
After the firmware is downloaded, you need to press the Unlock Now button, and Dr.Fone will start to unlock your Apple iPhone 8 Plus without a passcode. Once it is done, you can get into your device without any restriction.
FAQs
Why iOS 17 Lock Screen is not working?
There could be many reasons for the malfunction of the Lock Screen in iOS 17. The most common reason is the installation of incompatible jailbreak tweaks. Therefore, it is recommended to remove all the jailbreak tweaks and check whether the problem persists.
You can try resetting your device to factory settings if the problem still exists. But make sure to back up your data before doing so, as it will erase all your data.
How do I fix my iOS 17 lock screen bugs?
There are various ways to fix the lock screen bugs in iOS 17. You can try resetting your device to factory settings, or you can also try restoring your device from a previous backup.
If none of these methods work, you can try using a third-party tool like Dr.Fone-Screen Unlock to bypass the lock screen.
How do you unlock a locked iPhone iOS 17?
There are various ways to unlock a locked iPhone running on iOS 17. You can try the feature of Find My iPhone, or you can also use a third-party tool like Dr.Fone-Screen Unlock.
How do you fix an unresponsive lock screen on iPhone running on iOS 17?
If your lock screen is unresponsive on iPhone running on iOS 17, you can try force restarting your device. To do this, you need to press and hold the Home button and Sleep/Wake button simultaneously for 10 seconds.
After that, release the Sleep/Wake button but keep holding the Home button until you see the Apple logo. Once your device is restarted, check if the problem persists or not.
If the problem still bothers you, you can try using a third-party tool like Dr.Fone-Screen Unlock to reset the phone, eventually fixing the issue.
The Bottom Line
So this is what we want to talk about the iOS 17 Lock Screen with you. We have tried to cover everything in this article, including the new features, lock screen bugs, and how to fix them.
All the fixes mentioned above are tested and proven to be working. So you can try them without any hesitation.
But if you are still facing problems with your lock screen, then the greatest thing you can do is to use a third-party tool like Dr.Fone-Screen Unlock. This tool is very easy to use and will unlock your device within minutes.
So, if you are looking for a hassle-free solution to fix your lock screen issues, then this is the best one you should never miss.
Also read:
- [New] Capture and Save FB Videos on Windows, Mac
- [New] In 2024, Expert Reviews Best Screen Recorder Software for Google Meet
- [New] Level Up Your Playtime Examining KineMaster on Android
- [Updated] 2024 Approved Pinterest Vid Extractor Guide Top 5 FREE Tools Summary
- [Updated] YouTube Ad Elimination Techniques for Chrome & Safari Users
- 3 Easy Ways to Factory Reset a Locked iPhone XR Without iTunes
- Android Screen Stuck General Google Pixel 7a Partly Screen Unresponsive | Dr.fone
- Convert Your Discs Effortlessly with Digiarty's Custom Software Solution
- Halo Infinite Sound Troubles? Here's How You Can Get Quality Audio Back
- How Many Attempts To Unlock iPhone 13 Pro Max
- How to Unlock Apple iPhone 15 Plus without Passcode or Face ID
- How To Unlock Apple iPhone SE (2022) Without Passcode? 4 Easy Methods
- How to Unlock iPhone SE (2020) Passcode without iTunes without Knowing Passcode?
- In 2024, How to Unlock iPhone 6 Plus Passcode without Computer?
- In 2024, Resolve Your Apple iPhone XR Keeps Asking for Outlook Password
- Top 5 Methods to Fix the Black Screen of Death on Windows 7, 8 & 10
- Unlock Your Disabled Apple iPhone 6s Plus Without iTunes in 5 Ways
- Title: Trouble with iPhone 8 Plus Swipe-Up? Try These 11 Solutions
- Author: Sophia
- Created at : 2025-02-09 18:41:00
- Updated at : 2025-02-14 18:39:36
- Link: https://ios-unlock.techidaily.com/trouble-with-iphone-8-plus-swipe-up-try-these-11-solutions-by-drfone-ios/
- License: This work is licensed under CC BY-NC-SA 4.0.